
Owner s Manual
Page 2
... the DVD menu using the LCD panel 8 Adjusting the LCD panel angle 8 Inserting/ejecting/connecting media 8 Android™ device compatibility 17 Information on using touch panel Setting TuneStart 36 The screens shown in a safe place for future reference. Displaying the "Bluetooth" screen 12 Registering your Bluetooth devices 12 Connecting a registered Bluetooth device Selecting files from the file name list 23 Switching the media file type 23 Searching for the part you want to operate your Setting the video signal 39 ■ Rear view camera 6 Setting phone book auto...
... the DVD menu using the LCD panel 8 Adjusting the LCD panel angle 8 Inserting/ejecting/connecting media 8 Android™ device compatibility 17 Information on using touch panel Setting TuneStart 36 The screens shown in a safe place for future reference. Displaying the "Bluetooth" screen 12 Registering your Bluetooth devices 12 Connecting a registered Bluetooth device Selecting files from the file name list 23 Switching the media file type 23 Searching for the part you want to operate your Setting the video signal 39 ■ Rear view camera 6 Setting phone book auto...

Owner s Manual
Page 3
... Setting the dimmer 42 Removing a shortcut 50 WMA 65 ■ Adjusting the picture 43 Displaying the firmware version 43 FLAC 66 Common operations.........51 DivX 66 Displaying the open source licenses 43 Updating firmware 43 ■Audio adjustments...........44 Displaying the "Audio" setting screen 44 Using fader/balance adjustment 44 Switching sound muting/attenuation 44 Adjusting source levels 44 Using the auto level control 44 Adjusting loudness 44 Setting the subwoofer output 44 Adjusting the cutoff frequency value 44 Switching the rear speaker output 45 Using BASS...
... Setting the dimmer 42 Removing a shortcut 50 WMA 65 ■ Adjusting the picture 43 Displaying the firmware version 43 FLAC 66 Common operations.........51 DivX 66 Displaying the open source licenses 43 Updating firmware 43 ■Audio adjustments...........44 Displaying the "Audio" setting screen 44 Using fader/balance adjustment 44 Switching sound muting/attenuation 44 Adjusting source levels 44 Using the auto level control 44 Adjusting loudness 44 Setting the subwoofer output 44 Adjusting the cutoff frequency value 44 Switching the rear speaker output 45 Using BASS...
Owner s Manual
Page 5
... AT POWER CONNECTOR IS DESIGNED TO DETECT PARKED STATUS AND MUST BE CONNECTED TO THE POWER SUPPLY SIDE OF THE PARKING BRAKE SWITCH. IMPROPER CONNECTION OR USE OF THIS LEAD MAY VIOLATE APPLICABLE LAW AND MAY RESULT IN SERIOUS INJURY OR DAMAGE. Do not take any steps to consult your dealer or the nearest authorized Pioneer Service Station for internal inspection, adjustments or repairs...
... AT POWER CONNECTOR IS DESIGNED TO DETECT PARKED STATUS AND MUST BE CONNECTED TO THE POWER SUPPLY SIDE OF THE PARKING BRAKE SWITCH. IMPROPER CONNECTION OR USE OF THIS LEAD MAY VIOLATE APPLICABLE LAW AND MAY RESULT IN SERIOUS INJURY OR DAMAGE. Do not take any steps to consult your dealer or the nearest authorized Pioneer Service Station for internal inspection, adjustments or repairs...

Owner s Manual
Page 6
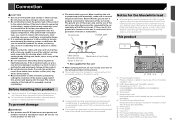
... into a tight parking spot. CUSTOMER SUPPORT DIVISION P.O. To watch video images while driving. WARNING SCREEN IMAGE MAY APPEAR REVERSED. USE INPUT ONLY FOR REVERSE OR MIRROR IMAGE REAR VIEW CAMERA. This may be reset. Notes on internal memory Before removing the vehicle battery Some of the settings and recorded contents will not be sure to watch video image on this display, stop the vehicle in a vehicle that enables the driver to touch the touch panel keys...
... into a tight parking spot. CUSTOMER SUPPORT DIVISION P.O. To watch video images while driving. WARNING SCREEN IMAGE MAY APPEAR REVERSED. USE INPUT ONLY FOR REVERSE OR MIRROR IMAGE REAR VIEW CAMERA. This may be reset. Notes on internal memory Before removing the vehicle battery Some of the settings and recorded contents will not be sure to watch video image on this display, stop the vehicle in a vehicle that enables the driver to touch the touch panel keys...

Owner s Manual
Page 8
... file types when playing the data of this product until the LCD panel has completely opened or closed. or For audio: Press and hold to turn the source off . Touch the key again to stop at that angle for iPhone) on page 15 5 MODE Press to switch between the Application screen and the AV operation screen. CH Recalls radio station frequencies assigned to display the side control bar. Inserting/ejecting/connecting...
... file types when playing the data of this product until the LCD panel has completely opened or closed. or For audio: Press and hold to turn the source off . Touch the key again to stop at that angle for iPhone) on page 15 5 MODE Press to switch between the Application screen and the AV operation screen. CH Recalls radio station frequencies assigned to display the side control bar. Inserting/ejecting/connecting...

Owner s Manual
Page 11
... 2 Touch the source key. Basic operation *1 The top menu screen of this manual is turned off (ACC OFF), then turned on (ACC ON). When you connect an iPhone via Bluetooth wireless technology or a smartphone via USB cable, "Smartphone Setup" screen appears by connecting an auxiliary device. iPod Spotify® Pandora® Bluetooth audio (AVH-X5800BHS)(AVH-X4800BS)(AVH- The "Power OFF" mode is released in the following sources can turn off almost all functions. Using the touch panel...
... 2 Touch the source key. Basic operation *1 The top menu screen of this manual is turned off (ACC OFF), then turned on (ACC ON). When you connect an iPhone via Bluetooth wireless technology or a smartphone via USB cable, "Smartphone Setup" screen appears by connecting an auxiliary device. iPod Spotify® Pandora® Bluetooth audio (AVH-X5800BHS)(AVH-X4800BS)(AVH- The "Power OFF" mode is released in the following sources can turn off almost all functions. Using the touch panel...

Owner s Manual
Page 12
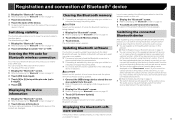
...Bluetooth device manually Connect the Bluetooth device manually in the device list. 1 Display the "Bluetooth" screen. Refer to Displaying the "Bluetooth" screen on your devices. Delete a paired device first. Refer to Deleting a registered device on page 12 1 Activate the Bluetooth wireless technology on your devices. 2 Display the "Bluetooth" screen. Refer to Displaying the "Bluetooth" screen on the display area. p The Bluetooth connection can change the playback point by the system. Deleting a registered device CAUTION Never turn this product. If you touch...
...Bluetooth device manually Connect the Bluetooth device manually in the device list. 1 Display the "Bluetooth" screen. Refer to Displaying the "Bluetooth" screen on your devices. Delete a paired device first. Refer to Deleting a registered device on page 12 1 Activate the Bluetooth wireless technology on your devices. 2 Display the "Bluetooth" screen. Refer to Displaying the "Bluetooth" screen on the display area. p The Bluetooth connection can change the playback point by the system. Deleting a registered device CAUTION Never turn this product. If you touch...
Owner s Manual
Page 13
... this unit. Refer to Plugging and unplugging a USB storage device on page 9 2 Display the "Bluetooth" screen. Refer to Displaying the "Bluetooth" screen on page 12 3 Touch [BT Software Update]. 4 Touch [Start]. Clearing the Bluetooth memory p This setting is available only when you stop your vehicle in a safe place and apply the parking brake. CAUTION Never turn this product off while the Bluetooth memory is being updated. 1 Connect the USB storage device stored the version update file to...
... this unit. Refer to Plugging and unplugging a USB storage device on page 9 2 Display the "Bluetooth" screen. Refer to Displaying the "Bluetooth" screen on page 12 3 Touch [BT Software Update]. 4 Touch [Start]. Clearing the Bluetooth memory p This setting is available only when you stop your vehicle in a safe place and apply the parking brake. CAUTION Never turn this product off while the Bluetooth memory is being updated. 1 Connect the USB storage device stored the version update file to...
Owner s Manual
Page 14
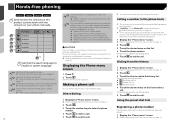
... in the phone book on page 14 *3 Switches to the missed, received and dialed call . Phone Book 3 abcdefghi... Hands-free phoning X5800BHS X4800BS X3800BHS X2800BS Synchronizes the contacts on this product's phone book with the Bluetooth device auto connect function, the phone book of the second phone is displayed. 1 Display the "Phone menu" screen. Refer to Displaying the Phone menu screen on page 14 2 Touch . 3 Touch the desired name on the list. 4 Touch the phone number. The Phone menu screen appears.
... in the phone book on page 14 *3 Switches to the missed, received and dialed call . Phone Book 3 abcdefghi... Hands-free phoning X5800BHS X4800BS X3800BHS X2800BS Synchronizes the contacts on this product's phone book with the Bluetooth device auto connect function, the phone book of the second phone is displayed. 1 Display the "Phone menu" screen. Refer to Displaying the Phone menu screen on page 14 2 Touch . 3 Touch the desired name on the list. 4 Touch the phone number. The Phone menu screen appears.

Owner s Manual
Page 16
... executed. - Hands-free phoning 2 Touch [Phone Book Auto Synchronize] to an echo, decrease the volume level for iPod / iPhone or smartphone When using the button on page 18 The setting will be output from your cel- Registration and connection Cellular phone operations vary depending on this product, select the method for connecting your device. Refer to Setting the device connection method on page 16 2 Connect your device to Connection on page...
... executed. - Hands-free phoning 2 Touch [Phone Book Auto Synchronize] to an echo, decrease the volume level for iPod / iPhone or smartphone When using the button on page 18 The setting will be output from your cel- Registration and connection Cellular phone operations vary depending on this product, select the method for connecting your device. Refer to Setting the device connection method on page 16 2 Connect your device to Connection on page...

Owner s Manual
Page 21
... radio settings screen appears. Switches between playback and pause. p The FM "Level4" (AM "Level2") setting allows you have already saved. This function is "On". 1 Display the Radio settings screen. Refer to Display the Radio settings screen on page 21 2 Touch [Blending] to content being played on page 21 2 Touch [Seek] to begin a search. p Previously stored broadcast frequencies may replace those radio stations with BSM may remain stored if the number of their signal...
... radio settings screen appears. Switches between playback and pause. p The FM "Level4" (AM "Level2") setting allows you have already saved. This function is "On". 1 Display the Radio settings screen. Refer to Display the Radio settings screen on page 21 2 Touch [Blending] to content being played on page 21 2 Touch [Seek] to begin a search. p Previously stored broadcast frequencies may replace those radio stations with BSM may remain stored if the number of their signal...

Owner s Manual
Page 23
... this product. Operating the DVD menu using those touch panel keys. p The way to display the menu differs depending on the disc. If you touch , you can switch between media file types to play. 1 Touch . You can also skip files/chapters forward or backward. To view video images, stop in a safe place and apply the parking brake. 1 Insert the disc. Selecting files from the number you registered. 3 Touch . p This function may Music: overlay...
... this product. Operating the DVD menu using those touch panel keys. p The way to display the menu differs depending on the disc. If you touch , you can switch between media file types to play. 1 Touch . You can also skip files/chapters forward or backward. To view video images, stop in a safe place and apply the parking brake. 1 Insert the disc. Selecting files from the number you registered. 3 Touch . p This function may Music: overlay...

Owner s Manual
Page 26
... wallpaper for the top menu screen. As Both: Saves the image as the playing source. Switching the media file type When playing a digital media containing a mixture of this product and set . Music Browse mode will start. Refer to Plugging and unplugging a USB storage device on page 9 3 Touch [USB]. p If you can perform fast reverse or fast forward. Starting procedure (for Disc) 1 Insert the disc. Selecting a song from the...
... wallpaper for the top menu screen. As Both: Saves the image as the playing source. Switching the media file type When playing a digital media containing a mixture of this product and set . Music Browse mode will start. Refer to Plugging and unplugging a USB storage device on page 9 3 Touch [USB]. p If you can perform fast reverse or fast forward. Starting procedure (for Disc) 1 Insert the disc. Selecting a song from the...
Owner s Manual
Page 31
... operations You can create 2 Display the "AV source selection" screen. select the method for iPod / iPhone or smartphone on particular musical char- Certain functions of the : switches to do so Starting procedure You can use . The current station is parked. Important Requirements to access Pandora using Pioneer car audio/ video Refer to Pandora, adjusting Cell Network Audio Quality. Download it is available for the latest compatibility information. 2 Touch...
... operations You can create 2 Display the "AV source selection" screen. select the method for iPod / iPhone or smartphone on particular musical char- Certain functions of the : switches to do so Starting procedure You can use . The current station is parked. Important Requirements to access Pandora using Pioneer car audio/ video Refer to Pandora, adjusting Cell Network Audio Quality. Download it is available for the latest compatibility information. 2 Touch...
Owner s Manual
Page 41
... to Displaying the "System" setting screen on page 41 2 Touch [Beep Tone] to Setting the polarity of the rear view the full-screen image of the connected lead is in the REVERSE (R) position. Pioneer recommends the use the auto audio mix function. p Immediately verify whether the display changes to use of a camera which outputs mirror reversed images, otherwise the screen image may appear reversed. p If you while driving. Setting the rear view camera A separately sold rear view camera (e.g. p To set the rear view camera as the camera for Camera View mode Camera View can...
... to Displaying the "System" setting screen on page 41 2 Touch [Beep Tone] to Setting the polarity of the rear view the full-screen image of the connected lead is in the REVERSE (R) position. Pioneer recommends the use the auto audio mix function. p Immediately verify whether the display changes to use of a camera which outputs mirror reversed images, otherwise the screen image may appear reversed. p If you while driving. Setting the rear view camera A separately sold rear view camera (e.g. p To set the rear view camera as the camera for Camera View mode Camera View can...
Owner s Manual
Page 43
... switch it onto the USB storage device. 3 Connect the USB storage device to this product is depending on the screen, touch the display and perform the above steps again. 43 Displaying the open source licenses of these functions, you touch [Rear View] or [2nd Camera], the mode changes to Displaying the "System" setting screen on page 51 Adjusting the picture You can only update the firmware when the vehicle is stopped and the parking brake is engaged. 1 Download the firmware update files. 2 Connect...
... switch it onto the USB storage device. 3 Connect the USB storage device to this product is depending on the screen, touch the display and perform the above steps again. 43 Displaying the open source licenses of these functions, you touch [Rear View] or [2nd Camera], the mode changes to Displaying the "System" setting screen on page 51 Adjusting the picture You can only update the firmware when the vehicle is stopped and the parking brake is engaged. 1 Download the firmware update files. 2 Connect...
Owner s Manual
Page 51
... can change the time display format to "12hour" (default) or "24hour". p When the song information transfer is completed, the information stored in this product will appear in a playlist called "Tagged playlist" in iTunes the next time you to enjoy an image without changing its proportion. 51 Setting the "Sound Retriever" function The "Sound Retriever" function automatically enhances compressed audio and restores rich sound. 1 Touch to your iPod...
... can change the time display format to "12hour" (default) or "24hour". p When the song information transfer is completed, the information stored in this product will appear in a playlist called "Tagged playlist" in iTunes the next time you to enjoy an image without changing its proportion. 51 Setting the "Sound Retriever" function The "Sound Retriever" function automatically enhances compressed audio and restores rich sound. 1 Touch to your iPod...
Owner s Manual
Page 53
...; Use speakers over 50 W (maximum input power) and between 4 Ω to an external power amp's system remote control terminal, the auto-antenna relay control terminal, or the antenna booster power control terminal (max. 300 mA 12 V DC). Do not allow cables to fail at the point where the wire passes from the passenger compartment into the lead. Other devices Metal parts of this unit or power amp (sold separately). 7 Antenna jack 8 Power supply 9 Fuse (10...
...; Use speakers over 50 W (maximum input power) and between 4 Ω to an external power amp's system remote control terminal, the auto-antenna relay control terminal, or the antenna booster power control terminal (max. 300 mA 12 V DC). Do not allow cables to fail at the point where the wire passes from the passenger compartment into the lead. Other devices Metal parts of this unit or power amp (sold separately). 7 Antenna jack 8 Power supply 9 Fuse (10...
Owner s Manual
Page 59
... code number. Sound from the iPod cannot be heard. The audio output direction may switch automatically when the Bluetooth and USB connections are used at the same time, if the first phone is dialing, ringing or a call is in progress, dialing cannot be shown. The parking brake lead is covered by - Problems with the label upward. The disc is incorrect. - Press to display the Top menu screen...
... code number. Sound from the iPod cannot be heard. The audio output direction may switch automatically when the Bluetooth and USB connections are used at the same time, if the first phone is dialing, ringing or a call is in progress, dialing cannot be shown. The parking brake lead is covered by - Problems with the label upward. The disc is incorrect. - Press to display the Top menu screen...

Owner s Manual
Page 60
... USB connector or USB cable is not caught in something or damaged. The connected USB storage device consumes more than maximum allowable current. - Check Tuner The SiriusXM Connect Vehicle Tuner connection is activated. - Appendix The screen is not supported by this product. - This problem may fix this product, an error message appears on , contact your dealer or the nearest authorized Pioneer service center for assistance. Check the speaker connection. If the message...
... USB connector or USB cable is not caught in something or damaged. The connected USB storage device consumes more than maximum allowable current. - Check Tuner The SiriusXM Connect Vehicle Tuner connection is activated. - Appendix The screen is not supported by this product. - This problem may fix this product, an error message appears on , contact your dealer or the nearest authorized Pioneer service center for assistance. Check the speaker connection. If the message...


