
Other Manual
Page 1
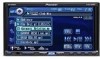
INSTALLATION MANUAL OF OF AVH-P6800DVD This product conforms to an external power amp's system remote control or ... by cutting the insulation of the power supply lead of both products and connect cords that you to authorized Pioneer service personnel. • Secure all installation and servicing of the IP-BUS connector is blue, and the ...volt battery and negative grounding. Connect the connectors of the wiring short-circuiting to the driver. • In some countries or states the viewing of applicable laws, the front DVD or TV (sold separately) feature should not be installed in...
INSTALLATION MANUAL OF OF AVH-P6800DVD This product conforms to an external power amp's system remote control or ... by cutting the insulation of the power supply lead of both products and connect cords that you to authorized Pioneer service personnel. • Secure all installation and servicing of the IP-BUS connector is blue, and the ...volt battery and negative grounding. Connect the connectors of the wiring short-circuiting to the driver. • In some countries or states the viewing of applicable laws, the front DVD or TV (sold separately) feature should not be installed in...

Other Manual
Page 3
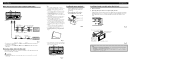
...-nosed pliers. AVG-VDP1) (supplied with Navigation (sold separately) To video output rear view camera Extension lead (supplied) 8m Violet/white Of the two lead wires connected to REVERSE (R) position is moving forwards or backwards. WARNING USE INPUT ONLY FOR REVERSE OR MIRROR IMAGE REAR VIEW CAMERA. Connecting the Units When...
...-nosed pliers. AVG-VDP1) (supplied with Navigation (sold separately) To video output rear view camera Extension lead (supplied) 8m Violet/white Of the two lead wires connected to REVERSE (R) position is moving forwards or backwards. WARNING USE INPUT ONLY FOR REVERSE OR MIRROR IMAGE REAR VIEW CAMERA. Connecting the Units When...
Other Manual
Page 4
..., use the installa- WARNING: • NEVER install the display in the figure below. Note: • Before finally installing the unit, connect the wiring temporarily, making sure it is for instance, near a heater outlet. • If installation angle exceeds 30° from moving. • Thoroughly wipe... not give its screw holes are aligned (are fitted), and tighten the screws at 3 or 4 locations on the SETUP menu when connecting to DVD player. Position this unit to fill the gap . • To some types of automobiles, descrepancy may (i) obstruct the driver's vision, (ii...
..., use the installa- WARNING: • NEVER install the display in the figure below. Note: • Before finally installing the unit, connect the wiring temporarily, making sure it is for instance, near a heater outlet. • If installation angle exceeds 30° from moving. • Thoroughly wipe... not give its screw holes are aligned (are fitted), and tighten the screws at 3 or 4 locations on the SETUP menu when connecting to DVD player. Position this unit to fill the gap . • To some types of automobiles, descrepancy may (i) obstruct the driver's vision, (ii...


