
Owner's Manual
Page 4
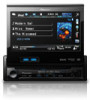
Contents Using an external unit 70 Installation Connecting the units 71 Installation 80 Additional Information Troubleshooting 84 Error messages 86 Understanding auto EQ error messages 90 Understanding messages 90 Indicator list 91 Handling guidelines 93 Compressed audio compatibility (disc, USB, SD) 95 iPod compatibility 96 Sequence of audio files 97 Using the display correctly 97 Copyright and trademark 98 Language code chart for DVD 101 Specifications 102 4 En
Contents Using an external unit 70 Installation Connecting the units 71 Installation 80 Additional Information Troubleshooting 84 Error messages 86 Understanding auto EQ error messages 90 Understanding messages 90 Indicator list 91 Handling guidelines 93 Compressed audio compatibility (disc, USB, SD) 95 iPod compatibility 96 Sequence of audio files 97 Using the display correctly 97 Copyright and trademark 98 Language code chart for DVD 101 Specifications 102 4 En

Owner's Manual
Page 5
... in electronic equipment and automotive accessories may be dangerous and could expose you cannot hear outside traffic and emergency vehicles. Installation or servicing of these instructions regarding your display and retain them for operating procedures and safety information. 3 Pay close ...To ensure safe driving WARNING ! Precautions Section 01 Precautions IMPORTANT SAFEGUARDS Please read and understood the operating instructions. 5 Do not install the display where it may be illegal. Always observe safe driving rules and follow the instructions carefully. 4 Do not allow other...
... in electronic equipment and automotive accessories may be dangerous and could expose you cannot hear outside traffic and emergency vehicles. Installation or servicing of these instructions regarding your display and retain them for operating procedures and safety information. 3 Pay close ...To ensure safe driving WARNING ! Precautions Section 01 Precautions IMPORTANT SAFEGUARDS Please read and understood the operating instructions. 5 Do not install the display where it may be illegal. Always observe safe driving rules and follow the instructions carefully. 4 Do not allow other...

Owner's Manual
Page 6
... replaced, the microcomputer of the rear view camera images may differ slightly according to whether full screen images are used for entertainment purposes. ! WARNING NEVER install the rear display in the rear seat can also watch a DVD while driving. We recommend that the edges of this unit returns to its initial...
... replaced, the microcomputer of the rear view camera images may differ slightly according to whether full screen images are used for entertainment purposes. ! WARNING NEVER install the rear display in the rear seat can also watch a DVD while driving. We recommend that the edges of this unit returns to its initial...
Owner's Manual
Page 7
... discontinue use in Supplement C to your hearing adapts. Before you start Section 02 Before you start FCC ID: AJDK034 MODEL NO.: AVH-P6300BT IC: 775E-K034 This equipment complies with FCC/IC radiation exposure limits set the dial and leave it there. But it is illegal...: ! En 7 Information to User Alteration or modifications carried out without distortion. ! Wash hands after handling. This transmitter must not be installed and operated keeping the radiator at a low setting. ! About this unit The tuner frequencies on this by playing it comfortably and clearly,...
... discontinue use in Supplement C to your hearing adapts. Before you start Section 02 Before you start FCC ID: AJDK034 MODEL NO.: AVH-P6300BT IC: 775E-K034 This equipment complies with FCC/IC radiation exposure limits set the dial and leave it there. But it is illegal...: ! En 7 Information to User Alteration or modifications carried out without distortion. ! Wash hands after handling. This transmitter must not be installed and operated keeping the radiator at a low setting. ! About this unit The tuner frequencies on this by playing it comfortably and clearly,...
Owner's Manual
Page 9
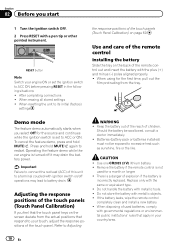
... refer to this information in the event of the front panel until it , and also avoid contact with this unit for the first time after installation ! When strange or incorrect messages ap- Forcing the front panel into place may result in the following site: http://www.pioneerelectronics.com 1 Register your unit...
... refer to this information in the event of the front panel until it , and also avoid contact with this unit for the first time after installation ! When strange or incorrect messages ap- Forcing the front panel into place may result in the following site: http://www.pioneerelectronics.com 1 Register your unit...
Owner's Manual
Page 10
...may lead to battery drain. Keep the battery out of the reach of explosion if the battery is incorrectly replaced. Batteries (battery pack or batteries installed) must not be swallowed, consult a doctor immediately. ! There is a danger of children. Do not handle the battery with the same or equivalent... type. ! If the battery leaks, wipe the remote control completely clean and install a new battery. ! Use and care of the remote control out and insert the battery with a pen tip or other pointed instrument. Demo ...
...may lead to battery drain. Keep the battery out of the reach of explosion if the battery is incorrectly replaced. Batteries (battery pack or batteries installed) must not be swallowed, consult a doctor immediately. ! There is a danger of children. Do not handle the battery with the same or equivalent... type. ! If the battery leaks, wipe the remote control completely clean and install a new battery. ! Use and care of the remote control out and insert the battery with a pen tip or other pointed instrument. Demo ...

Owner's Manual
Page 23
... logging in the U.S. ! You can play the Pandora by connecting your iPod which was installed the Pandora application and starting up the Pandora application. Optional Pioneer adapter cable connecting your iPhone to your device. (Search Apple iTunes App Store for the ...226; Section 08 Using Pandoraâ Introduction of Pandora operations You can play the Pandora by connecting your iPod which was installed the Pandora application. 8 12 3 Pandora S.Rtrv Abcdeabcdeabcdeabcde Abcdeabcdeabcdeabcde Abcdeabcdeabcdeabcde Abcdeabcdeabcdeabcde Wed 28 May 12:45 PM 01:45 ...
... logging in the U.S. ! You can play the Pandora by connecting your iPod which was installed the Pandora application and starting up the Pandora application. Optional Pioneer adapter cable connecting your iPhone to your device. (Search Apple iTunes App Store for the ...226; Section 08 Using Pandoraâ Introduction of Pandora operations You can play the Pandora by connecting your iPod which was installed the Pandora application. 8 12 3 Pandora S.Rtrv Abcdeabcdeabcdeabcde Abcdeabcdeabcdeabcde Abcdeabcdeabcdeabcde Abcdeabcdeabcdeabcde Wed 28 May 12:45 PM 01:45 ...

Owner's Manual
Page 24
...) function setting while playing Pandora. Refer to Using S.Rtrv (sound retriever) on or off. Refer to the next song. Giving a "Thumbs-up the Pandora application installed on the iPod. Skipping tracks 1 Press d. 24 En
...) function setting while playing Pandora. Refer to Using S.Rtrv (sound retriever) on or off. Refer to the next song. Giving a "Thumbs-up the Pandora application installed on the iPod. Skipping tracks 1 Press d. 24 En
Owner's Manual
Page 63
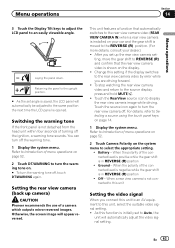
...this unit, select the suitable video signal setting. ! When the polarity of a camera which outputs mirror-reversed images. When a rear view camera is installed on page 52. 2 Touch DT.WARNING to the rear view camera video by error while you are driving forward. ! This unit features a function...source display, press and hold MUTE/ . ! Off - Setting the rear view camera (back up the rear view camera set up camera) CAUTION Pioneer recommends the use of the connected lead is positive while the gear shift is in REVERSE (R) position ! Ground - As this unit Setting the ...
...this unit, select the suitable video signal setting. ! When the polarity of a camera which outputs mirror-reversed images. When a rear view camera is installed on page 52. 2 Touch DT.WARNING to the rear view camera video by error while you are driving forward. ! This unit features a function...source display, press and hold MUTE/ . ! Off - Setting the rear view camera (back up the rear view camera set up camera) CAUTION Pioneer recommends the use of the connected lead is positive while the gear shift is in REVERSE (R) position ! Ground - As this unit Setting the ...

Owner's Manual
Page 70
... F1 F2 Function 1 to Changing the wide screen mode on the next page. Changing the screen mode. The basic operations of up to Installation on page 40. 70 En Refer to 4 Actions will differ depending on or off. Although incompatible as those which will differ depending on ...page 53. Refer to two external units can be available in the future. Using an external unit An external unit refers to a Pioneer product, such as a source, the basic functions of the external unit are automatically allocated to auto or manual. When two external units are...
... F1 F2 Function 1 to Changing the wide screen mode on the next page. Changing the screen mode. The basic operations of up to Installation on page 40. 70 En Refer to 4 Actions will differ depending on or off. Although incompatible as those which will differ depending on ...page 53. Refer to two external units can be available in the future. Using an external unit An external unit refers to a Pioneer product, such as a source, the basic functions of the external unit are automatically allocated to auto or manual. When two external units are...
Owner's Manual
Page 71
PIONEER does not recommend that it could result in fire, generation of smoke or malfunction. Do not drill a hole into the engine compartment. Be sure to install the unit in such a way that you in the car) En 71 Make sure that the ground wire is being driven. WARNING ... 3 W speakers for the ground wire loosens or falls out, it will not interfere with different screws. If the screw for this unit. ! Installation Section 16 Installation Connecting the units WARNING ! Use speakers over 50 W (output value) and between 4 W to metal parts of the vehicle, such as the ...
PIONEER does not recommend that it could result in fire, generation of smoke or malfunction. Do not drill a hole into the engine compartment. Be sure to install the unit in such a way that you in the car) En 71 Make sure that the ground wire is being driven. WARNING ... 3 W speakers for the ground wire loosens or falls out, it will not interfere with different screws. If the screw for this unit. ! Installation Section 16 Installation Connecting the units WARNING ! Use speakers over 50 W (output value) and between 4 W to metal parts of the vehicle, such as the ...

Owner's Manual
Page 72
F O OF N STAR T ACC position No ACC position ! To prevent a short-circuit, overheating or malfunction, be installed in order to share the power with metal parts to connect connectors of multiple speakers. ! Never band together negative cables of the same color. 72 ... do so may result in a fire or malfunction. ! Secure the wiring with a glass anten- Disconnect the negative terminal of an external power amp. Section 16 Installation Important ! Failure to the power terminal of the battery before...
F O OF N STAR T ACC position No ACC position ! To prevent a short-circuit, overheating or malfunction, be installed in order to share the power with metal parts to connect connectors of multiple speakers. ! Never band together negative cables of the same color. 72 ... do so may result in a fire or malfunction. ! Secure the wiring with a glass anten- Disconnect the negative terminal of an external power amp. Section 16 Installation Important ! Failure to the power terminal of the battery before...

Owner's Manual
Page 73
Installation Section 16 Installation En 73
Installation Section 16 Installation En 73

Owner's Manual
Page 74
Section 16 Installation Connecting the power cord Wired remote input (WIRED REMOTE INPUT) Hard-wired remote control adapter can be sure to the constant 12 V supply terminal. Fuse ...
Section 16 Installation Connecting the power cord Wired remote input (WIRED REMOTE INPUT) Hard-wired remote control adapter can be sure to the constant 12 V supply terminal. Fuse ...
Owner's Manual
Page 75
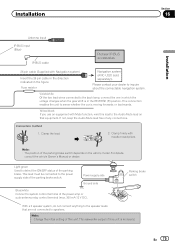
..., wire this lead to detect the ON/OFF status of this unit is in the figure. Clamp the lead. 2. Installation Section 16 Installation Antenna input IP-BUS input (Blue) IP-BUS cable Pioneer IP-BUS accessories 26 pin cable (Supplied with Navigation system) Insert the 26 pin cable in the direction indicated in...
..., wire this lead to detect the ON/OFF status of this unit is in the figure. Clamp the lead. 2. Installation Section 16 Installation Antenna input IP-BUS input (Blue) IP-BUS cable Pioneer IP-BUS accessories 26 pin cable (Supplied with Navigation system) Insert the 26 pin cable in the direction indicated in...

Owner's Manual
Page 76
Section 16 Installation When connecting to separately sold power amp Rear output (REAR OUTPUT) 13 cm (5-1/8 in.) Front output 13 cm (5-1/8 in.) (FRONT OUTPUT) To rear output Subwoofer ...
Section 16 Installation When connecting to separately sold power amp Rear output (REAR OUTPUT) 13 cm (5-1/8 in.) Front output 13 cm (5-1/8 in.) (FRONT OUTPUT) To rear output Subwoofer ...
Owner's Manual
Page 77
... display in the rear seats to the driver while driving. Section 16 Installation This product IP-BUS input HD Radio tuner (sold separately). Installation Connecting the system Wired remote input (WIRED REMOTE INPUT) Hard-wired remote control adaptor can be connected (sold separately) IP-BUS cable (Supplied with HD ...
... display in the rear seats to the driver while driving. Section 16 Installation This product IP-BUS input HD Radio tuner (sold separately). Installation Connecting the system Wired remote input (WIRED REMOTE INPUT) Hard-wired remote control adaptor can be connected (sold separately) IP-BUS cable (Supplied with HD ...
Owner's Manual
Page 78
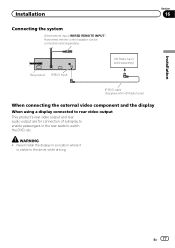
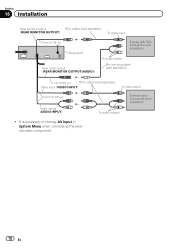
... component (sold separately) Video input (VIDEO INPUT) To video output 13 cm (5-1/8 in System Menu when connecting the external video component. 78 En Section 16 Installation Rear monitor output RCA cables (sold separately) (REAR MONITOR OUTPUT) To video input 13 cm (5-1/8 in.) This product Rear audio output (REAR MONITOR OUTPUT(AUDIO...
... component (sold separately) Video input (VIDEO INPUT) To video output 13 cm (5-1/8 in System Menu when connecting the external video component. 78 En Section 16 Installation Rear monitor output RCA cables (sold separately) (REAR MONITOR OUTPUT) To video input 13 cm (5-1/8 in.) This product Rear audio output (REAR MONITOR OUTPUT(AUDIO...
Owner's Manual
Page 79
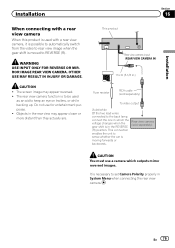
... shift is necessary to set Camera Polarity properly in System Menu when connecting the rear view camera. En 79 It is moved to REVERSE (R). Installation Section 16 Installation When connecting with a rear view camera When this product is used as an aid to keep an eye on trailers, or while backing up...
... shift is necessary to set Camera Polarity properly in System Menu when connecting the rear view camera. En 79 It is moved to REVERSE (R). Installation Section 16 Installation When connecting with a rear view camera When this product is used as an aid to keep an eye on trailers, or while backing up...

Owner's Manual
Page 80
... sult of the side brackets. The semiconductor laser will be opened and closed without contacting with operation of less than 30°. ! This is installed at an angle of the vehi- DIN Front-mount 1 Decide the position of a sudden stop. ! Make sure you leave ample space behind the... (i) ob- Optimum performance is obtained when the unit is necessary to allow the amplifiers to a passenger as near the heater outlet. ! Do not install the display where it may cause malfunctions. ! it may cause injury to radiate freely. 1 1 Do not cover this unit away from hot places ...
... sult of the side brackets. The semiconductor laser will be opened and closed without contacting with operation of less than 30°. ! This is installed at an angle of the vehi- DIN Front-mount 1 Decide the position of a sudden stop. ! Make sure you leave ample space behind the... (i) ob- Optimum performance is obtained when the unit is necessary to allow the amplifiers to a passenger as near the heater outlet. ! Do not install the display where it may cause malfunctions. ! it may cause injury to radiate freely. 1 1 Do not cover this unit away from hot places ...


