Installation Manual
Page 2
... system (AVH-P4200DVD/AVH-P3200DVD 4 Connecting the system (AVH-P3200BT) ......... 4 When connecting with optional CD-IU200V cable (AVH-P4200DVD only) ... 5 Connecting the power cord 6 When connecting to separately sold power amp 8 When connecting with cable clamps or electrical tape. Where such regulations apply, they are visibly distracting to authorized Pioneer service personnel. • Secure all installation and...
... system (AVH-P4200DVD/AVH-P3200DVD 4 Connecting the system (AVH-P3200BT) ......... 4 When connecting with optional CD-IU200V cable (AVH-P4200DVD only) ... 5 Connecting the power cord 6 When connecting to separately sold power amp 8 When connecting with cable clamps or electrical tape. Where such regulations apply, they are visibly distracting to authorized Pioneer service personnel. • Secure all installation and...
Installation Manual
Page 3
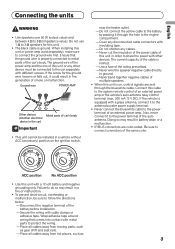
...malfunction. Do not connect the yellow cable to the battery by passing it to the engine compartment. - Use a fuse of the battery before installation. - Also, never connect it through the blue/white cable. Secure the wiring with a glass antenna, connect it could result in order to... power amp or the vehicle's auto-antenna relay control terminal (max. 300 mA 12 V DC). Place all cables away from moving parts, such as 3 When installing this cable to share the power with different screws. Be sure to ground. - F ACC O F O OF OF N STAR N STAR T T ACC position ...
...malfunction. Do not connect the yellow cable to the battery by passing it to the engine compartment. - Use a fuse of the battery before installation. - Also, never connect it through the blue/white cable. Secure the wiring with a glass antenna, connect it could result in order to... power amp or the vehicle's auto-antenna relay control terminal (max. 300 mA 12 V DC). Place all cables away from moving parts, such as 3 When installing this cable to share the power with different screws. Be sure to ground. - F ACC O F O OF OF N STAR N STAR T T ACC position ...
Installation Manual
Page 10
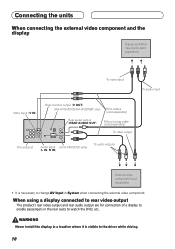
...jacks (sold separately) To video input To audio input Video input (V IN) Rear monitor output (V OUT) (AVH-P4200DVD/AVH-P3200BT only) RCA cables (sold separately) Rear audio output (REAR AUDIO OUT) Mini pin plug cable (sold... separately) To video output This product Audio input (AVH-P4200DVD only) (L IN, R IN) To audio outputs External video component (sold separately) • It is visible ... it is necessary to watch the DVD, etc. WARNING Never install the display in System when connecting the external video component.
...jacks (sold separately) To video input To audio input Video input (V IN) Rear monitor output (V OUT) (AVH-P4200DVD/AVH-P3200BT only) RCA cables (sold separately) Rear audio output (REAR AUDIO OUT) Mini pin plug cable (sold... separately) To video output This product Audio input (AVH-P4200DVD only) (L IN, R IN) To audio outputs External video component (sold separately) • It is visible ... it is necessary to watch the DVD, etc. WARNING Never install the display in System when connecting the external video component.
Installation Manual
Page 11
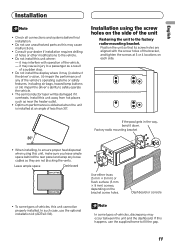
...screw holes are not blocking the vents. If the pawl gets in the way, bend it overheats. Factory radio mounting bracket • When installing, to ensure proper heat dispersal when using the screw holes on each side. In such case, use the supplied frame to fill the gap...mm) screws, depending on the bracket screw holes. Dashboard or console • To some types of vehicles, this happens, use the optional installation kit (ADT-VA133). Install this unit, make sure you leave ample space behind the rear panel and wrap any of the vehicle's operating systems or safety features, ...
...screw holes are not blocking the vents. If the pawl gets in the way, bend it overheats. Factory radio mounting bracket • When installing, to ensure proper heat dispersal when using the screw holes on each side. In such case, use the supplied frame to fill the gap...mm) screws, depending on the bracket screw holes. Dashboard or console • To some types of vehicles, this happens, use the optional installation kit (ADT-VA133). Install this unit, make sure you leave ample space behind the rear panel and wrap any of the vehicle's operating systems or safety features, ...

Installation Manual
Page 12
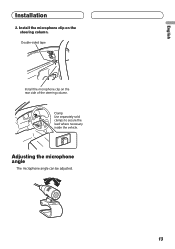
... the microphone lead to become wound around the steering column or gearstick. Install the microphone on the microphone clip. When installing the microphone on the sun visor 1. To detach the microphone base from the microphone clip. Installation Installing the microphone (AVH-P3200BT only) Installation notes Install the microphone in such a way that will enable it will not...
... the microphone lead to become wound around the steering column or gearstick. Install the microphone on the microphone clip. When installing the microphone on the sun visor 1. To detach the microphone base from the microphone clip. Installation Installing the microphone (AVH-P3200BT only) Installation notes Install the microphone in such a way that will enable it will not...
Installation Manual
Page 13
Clamp Use separately sold clamps to secure the lead where necessary inside the vehicle. Install the microphone clip on the rear side of the steering column. Adjusting the microphone angle The microphone angle can be adjusted. 13 English Installation 2. Double-sided tape Install the microphone clip on the steering column.
Clamp Use separately sold clamps to secure the lead where necessary inside the vehicle. Install the microphone clip on the rear side of the steering column. Adjusting the microphone angle The microphone angle can be adjusted. 13 English Installation 2. Double-sided tape Install the microphone clip on the steering column.
Owner's Manual
Page 5
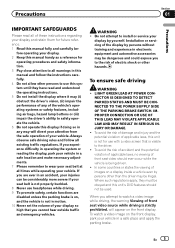
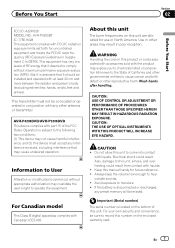
...vehicle in a safe location and make necessary adjustments. 7 Please remember to wear your seat belt at all existing traffic regulations. WARNING ! Installation or servicing of the display by persons other than the driver may be used. IMPROPER CONNECTION OR USE OF THIS LEAD MAY VIOLATE APPLICABLE LAW...Precautions Section 01 Precautions IMPORTANT SAFEGUARDS Please read all warnings in this manual and follow all times while operating your vehicle. If you to install or service your vehicle in a safe place and apply the parking brake. Do not attempt to the risk of electric shock or ...
...vehicle in a safe location and make necessary adjustments. 7 Please remember to wear your seat belt at all existing traffic regulations. WARNING ! Installation or servicing of the display by persons other than the driver may be used. IMPROPER CONNECTION OR USE OF THIS LEAD MAY VIOLATE APPLICABLE LAW...Precautions Section 01 Precautions IMPORTANT SAFEGUARDS Please read all warnings in this manual and follow all times while operating your vehicle. If you to install or service your vehicle in a safe place and apply the parking brake. Do not attempt to the risk of electric shock or ...
Owner's Manual
Page 6
If you attempt to use the functions described above while driving, they will become disabled until you transcribe the audio adjustment data. WARNING NEVER install the rear display in motion, there is an interlock system that the edges of a display to its initial condition. WARNING ! USE INPUT ONLY FOR REVERSE ...
If you attempt to use the functions described above while driving, they will become disabled until you transcribe the audio adjustment data. WARNING NEVER install the rear display in motion, there is an interlock system that the edges of a display to its initial condition. WARNING ! USE INPUT ONLY FOR REVERSE ...
Owner's Manual
Page 7
...set forth for uncontrolled equipment and meets the FCC/IC radio frequency (RF) Exposure Guidelines in conjunction with any preset memory will be installed and operated with at least 20 cm and more between the radiator and person's body (excluding extremities: hands, wrists, feet and ankles...IN HAZARDOUS RADIATION EXPOSURE. Operation is located on proposition 65 known to cause cancer and birth defect or other reproductive harm. AVH-P4200DVD/AVH-P3200DVD This device complies with Canadian ICES-003. For your own security and convenience, be co-located or operated in Supplement C to moisture...
...set forth for uncontrolled equipment and meets the FCC/IC radio frequency (RF) Exposure Guidelines in conjunction with any preset memory will be installed and operated with at least 20 cm and more between the radiator and person's body (excluding extremities: hands, wrists, feet and ankles...IN HAZARDOUS RADIATION EXPOSURE. Operation is located on proposition 65 known to cause cancer and birth defect or other reproductive harm. AVH-P4200DVD/AVH-P3200DVD This device complies with Canadian ICES-003. For your own security and convenience, be co-located or operated in Supplement C to moisture...
Owner's Manual
Page 9
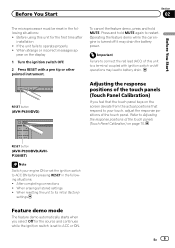
... in the following situations: ! Operating the feature demo while the car engine is set the ignition switch to restart. En 9 RESET button (AVH-P3200DVD/AVHP3200BT) Note Switch your touch, adjust the response positions of the touch panels (Touch Panel Calibration) on page 70. When erasing all stored ...the touch panel. Adjusting the response positions of the touch panels (Touch Panel Calibration) If you select Off for the first time after installation ! Refer to ACC or ON. Before using this unit to battery drain. Press and hold MUTE. If the unit fails to ...
... in the following situations: ! Operating the feature demo while the car engine is set the ignition switch to restart. En 9 RESET button (AVH-P3200DVD/AVHP3200BT) Note Switch your touch, adjust the response positions of the touch panels (Touch Panel Calibration) on page 70. When erasing all stored ...the touch panel. Adjusting the response positions of the touch panels (Touch Panel Calibration) If you select Off for the first time after installation ! Refer to ACC or ON. Before using this unit to battery drain. Press and hold MUTE. If the unit fails to ...
Owner's Manual
Page 64
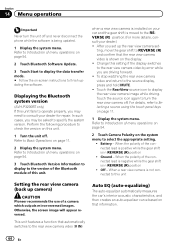
...shown on this unit Setting the rear view camera (back up the rear view camera set up camera) CAUTION Pioneer recommends the use of menu operations on your car and the gear shift is in REVERSE (R) position ! ting...are driving forward. ! Refer to Introduction of a camera which outputs mirror-reversed images. when a rear view camera is installed on page 54. 3 Touch Bluetooth Version Information to display to the REVERSE (R) position.(For more details, consult your dealer...fails to operate properly, you set - Displaying the Bluetooth system version (AVH-P3200BT only) If this unit.
...shown on this unit Setting the rear view camera (back up the rear view camera set up camera) CAUTION Pioneer recommends the use of menu operations on your car and the gear shift is in REVERSE (R) position ! ting...are driving forward. ! Refer to Introduction of a camera which outputs mirror-reversed images. when a rear view camera is installed on page 54. 3 Touch Bluetooth Version Information to display to the REVERSE (R) position.(For more details, consult your dealer...fails to operate properly, you set - Displaying the Bluetooth system version (AVH-P3200BT only) If this unit.
Owner's Manual
Page 71
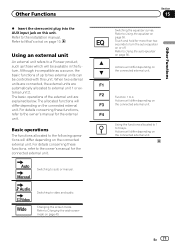
...video and audio. For details concerning these functions, refer to external unit 1 or external unit 2. F4 Using the functions allocated to 1 to a Pioneer product, such as a source, the basic functions of the external unit are automatically allocated to the owner's manual for the external unit. En ... the equalizer on page 55. Refer to auto or manual. Actions will differ depending on the connected external unit. Refer to the installation manual. Refer to Changing the wide screen mode on page 40. The allocated functions will differ depending on the connected external unit. ...
...video and audio. For details concerning these functions, refer to external unit 1 or external unit 2. F4 Using the functions allocated to 1 to a Pioneer product, such as a source, the basic functions of the external unit are automatically allocated to the owner's manual for the external unit. En ... the equalizer on page 55. Refer to auto or manual. Actions will differ depending on the connected external unit. Refer to the installation manual. Refer to Changing the wide screen mode on page 40. The allocated functions will differ depending on the connected external unit. ...
Owner's Manual
Page 72
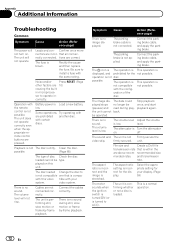
.... and transmission rate. tions are prohibited with the config- Some operations are correct. The sound and The unit is no longer be operated. sor to install a fuse with your display. (Page 59) The motor sounds when the ignition switch is turned ON (or is turned to is not compatible one that...
.... and transmission rate. tions are prohibited with the config- Some operations are correct. The sound and The unit is no longer be operated. sor to install a fuse with your display. (Page 59) The motor sounds when the ignition switch is turned ON (or is turned to is not compatible one that...


