
Owners Manual
Page 2
... Head unit 11 Remote control 12 Basic operations Basic operations 14 Operating the scroll icon and the scrubber bar 16 Activating the touch panel keys 17 Common operations for menu settings/ lists 17 Adjusting the LCD panel angle 17 Ejecting a disc 17 Ejecting a disc 18 Setting the clock 18 2 En Tuner Introduction of tuner operations 19 HD Radioä tuner About HD Radioä broadcasting 20 Introduction of HD Radio tuner operations 20 XM/SIRIUS tuner Introduction of XM/SIRIUS tuner operations 22 Playing moving...
... Head unit 11 Remote control 12 Basic operations Basic operations 14 Operating the scroll icon and the scrubber bar 16 Activating the touch panel keys 17 Common operations for menu settings/ lists 17 Adjusting the LCD panel angle 17 Ejecting a disc 17 Ejecting a disc 18 Setting the clock 18 2 En Tuner Introduction of tuner operations 19 HD Radioä tuner About HD Radioä broadcasting 20 Introduction of HD Radio tuner operations 20 XM/SIRIUS tuner Introduction of XM/SIRIUS tuner operations 22 Playing moving...
Owners Manual
Page 3
...'s listening volume 54 Switching the ring tone 54 Using the preset dial lists 54 Making a call by entering phone number 54 Setting the private mode 55 Using a cellular phone to initiate a connection 55 Registering a connected cellular phone 55 Voice recognition 55 Connecting a Bluetooth audio player 56 Connecting to a Bluetooth device automatically 56 Displaying Bluetooth Device address 56 Menu operations Introduction of menu operations 57 Audio adjustments 57 Setting up the DVD player 60 System settings 64 Favorite menu 71 Introduction of Bluetooth connection menu operations 71 Introduction...
...'s listening volume 54 Switching the ring tone 54 Using the preset dial lists 54 Making a call by entering phone number 54 Setting the private mode 55 Using a cellular phone to initiate a connection 55 Registering a connected cellular phone 55 Voice recognition 55 Connecting a Bluetooth audio player 56 Connecting to a Bluetooth device automatically 56 Displaying Bluetooth Device address 56 Menu operations Introduction of menu operations 57 Audio adjustments 57 Setting up the DVD player 60 System settings 64 Favorite menu 71 Introduction of Bluetooth connection menu operations 71 Introduction...
Owners Manual
Page 10
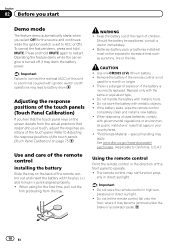
... lead to operate. ! Remove the battery if the remote control is turned off operations may drain the battery power. See www.dtsc.ca.gov/hazardouswaste/ perchlorate. (Applicable to California, U.S.A.)" Using the remote control Point the remote control in the direction of the front panel to battery drain. Section 02 Before you start Demo mode The feature demo automatically starts when you feel that the touch panel keys on the screen deviate from...
... lead to operate. ! Remove the battery if the remote control is turned off operations may drain the battery power. See www.dtsc.ca.gov/hazardouswaste/ perchlorate. (Applicable to California, U.S.A.)" Using the remote control Point the remote control in the direction of the front panel to battery drain. Section 02 Before you start Demo mode The feature demo automatically starts when you feel that the touch panel keys on the screen deviate from...
Owners Manual
Page 15
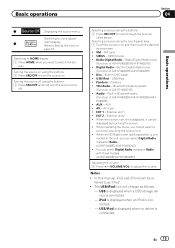
...Displaying the source menu. XM - TEL/Audio - Notes ! USB/iPod is displayed when no device is not displayed, it can select Digital Radio instead of AVH-P4400BH/AVH-P3400BH/AVHP2400BT) ! Radio/Digital Radio tuner (Function of AVH-P1400DVD) ! Built-in Bluetooth audio (Function of Radio with these models. (AVH-P4400BH/AVH-P3400BH) Adjusting the volume 1 Press +/- (VOLUME/VOL) to as follows: - Radio/Digital Radio - Pandora - When the source icon is connected. XM tuner ! USB/iPod ! In this manual, iPod and iPhone will change as "iPod". ! External unit 1 ! SIRIUS...
...Displaying the source menu. XM - TEL/Audio - Notes ! USB/iPod is displayed when no device is not displayed, it can select Digital Radio instead of AVH-P4400BH/AVH-P3400BH/AVHP2400BT) ! Radio/Digital Radio tuner (Function of AVH-P1400DVD) ! Built-in Bluetooth audio (Function of Radio with these models. (AVH-P4400BH/AVH-P3400BH) Adjusting the volume 1 Press +/- (VOLUME/VOL) to as follows: - Radio/Digital Radio - Pandora - When the source icon is connected. XM tuner ! USB/iPod ! In this manual, iPod and iPhone will change as "iPod". ! External unit 1 ! SIRIUS...
Owners Manual
Page 24
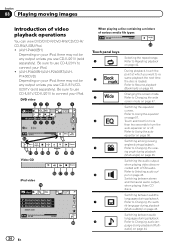
...:45 Wed 28 May 12:45 PM k 24 En When playing a disc containing a mixture of video playback operations You can view DVD/DVD-R/DVD-RW/CD/CD-R/ CD-RW/USB/iPod. ! (AVH-P4400BH) Depending on your iPod, there may not be any output unless you use CD-IU51V/CDIU201V (sold separately). Changing the screen mode. Switching among viewing angles during playback. During playback, touch the point at which you...
...:45 Wed 28 May 12:45 PM k 24 En When playing a disc containing a mixture of video playback operations You can view DVD/DVD-R/DVD-RW/CD/CD-R/ CD-RW/USB/iPod. ! (AVH-P4400BH) Depending on your iPod, there may not be any output unless you use CD-IU51V/CDIU201V (sold separately). Changing the screen mode. Switching among viewing angles during playback. During playback, touch the point at which you...
Owners Manual
Page 29
... Bluetooth audio player. Disconnect headphones from the iPod directly to this unit. ! Depending on the iPod model and the amount of sound playback operations may appear on the recorded environment. ! Ejecting a disc ! Selecting a track using the buttons 1 Press and hold c or d (TRK). Fast forwarding or reversing using the buttons 1 Press c or d (TRK). Refer to begin. ! Setting up . When playing back files recorded as VBR (variable bit rate) files, the play time...
... Bluetooth audio player. Disconnect headphones from the iPod directly to this unit. ! Depending on the iPod model and the amount of sound playback operations may appear on the recorded environment. ! Ejecting a disc ! Selecting a track using the buttons 1 Press and hold c or d (TRK). Fast forwarding or reversing using the buttons 1 Press c or d (TRK). Refer to begin. ! Setting up . When playing back files recorded as VBR (variable bit rate) files, the play time...
Owners Manual
Page 55
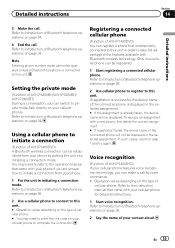
... Bluetooth telephone operations on page 36. 2 Say the name of Bluetooth telephone operations on page 34. Detailed instructions Section 14 Detailed instructions 3 Make the call by putting the unit into initiating a connection mode. Refer to this unit in the selected assignment. Setting the private mode (Function of Bluetooth telephone operations on your cellular phone to Introduction of AVH-P1400DVD) You can be displayed. Refer to complete the connection. Registering a connected cellular phone (Function of Bluetooth telephone operations...
... Bluetooth telephone operations on page 36. 2 Say the name of Bluetooth telephone operations on page 34. Detailed instructions Section 14 Detailed instructions 3 Make the call by putting the unit into initiating a connection mode. Refer to this unit in the selected assignment. Setting the private mode (Function of Bluetooth telephone operations on your cellular phone to Introduction of AVH-P1400DVD) You can be displayed. Refer to complete the connection. Registering a connected cellular phone (Function of Bluetooth telephone operations...
Owners Manual
Page 57
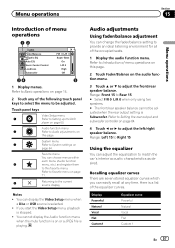
... speaker balance. Audio function menu 2 Refer to Setting up the DVD player on or a JPEG file is stopped. ! Display Powerful Natural Vocal Flat Custom1 Equalizer curve Powerful Natural Vocal Flat Custom 1 En 57 You can easily recall at any of the following touch panel keys to select the menu to be adjusted when the rear output setting is a list of menu operations 12 Audio Fader/Balance Graphic EQ Auto EQ Sonic Center Control Loudness Subwoofer F/R 0 L/R 0 Super Bass...
... speaker balance. Audio function menu 2 Refer to Setting up the DVD player on or a JPEG file is stopped. ! Display Powerful Natural Vocal Flat Custom1 Equalizer curve Powerful Natural Vocal Flat Custom 1 En 57 You can easily recall at any of the following touch panel keys to select the menu to be adjusted when the rear output setting is a list of menu operations 12 Audio Fader/Balance Graphic EQ Auto EQ Sonic Center Control Loudness Subwoofer F/R 0 L/R 0 Super Bass...
Owners Manual
Page 59
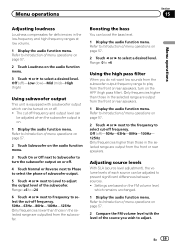
... the audio function menu. En 59 Boosting the bass You can be adjusted to select a desired level. Adjusting source levels With SLA (source level adjustment), the volume levels of menu operations on the audio function menu. 3 Touch c or d to prevent significant differences between sources. ! Range: +6 to -24 6 Touch c or d next to Frequency to play from the front or rear speakers. 1 Display the audio function menu. Menu operations Section 15 Menu operations Adjusting loudness Loudness compensates for deficiencies in the selected range are outputted from the subwoofer...
... the audio function menu. En 59 Boosting the bass You can be adjusted to select a desired level. Adjusting source levels With SLA (source level adjustment), the volume levels of menu operations on the audio function menu. 3 Touch c or d to prevent significant differences between sources. ! Range: +6 to -24 6 Touch c or d next to Frequency to play from the front or rear speakers. 1 Display the audio function menu. Menu operations Section 15 Menu operations Adjusting loudness Loudness compensates for deficiencies in the selected range are outputted from the subwoofer...
Owners Manual
Page 61
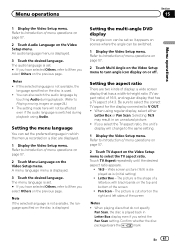
... 24.) ! Menu operations Section 15 Menu operations 1 Display the Video Setup menu. The setting made here will change to Playing moving images on the previous page. The picture is set . # If you have selected Others, refer to When you select the TV aspect ratio, the unit's display will not be switched. 1 Display the Video Setup menu. Be sure to select the correct TV aspect for the display connected to turn angle icon display on the Video Setup menu to...
... 24.) ! Menu operations Section 15 Menu operations 1 Display the Video Setup menu. The setting made here will change to Playing moving images on the previous page. The picture is set . # If you have selected Others, refer to When you select the TV aspect ratio, the unit's display will not be switched. 1 Display the Video Setup menu. Be sure to select the correct TV aspect for the display connected to turn angle icon display on the Video Setup menu to...
Owners Manual
Page 63
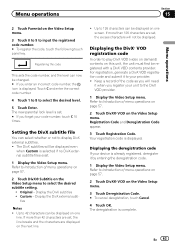
... to Introduction of menu operations on page 57. 2 Touch DivX® VOD on the Video Setup menu. This sets the code number, and the level can select whether or not to your device is set , the excess characters will not be displayed. Refer to select the desired subtitle setting. ! Up to 42 characters can be changed. # If you enter an incorrect code number, the icon is selected if no...
... to Introduction of menu operations on page 57. 2 Touch DivX® VOD on the Video Setup menu. This sets the code number, and the level can select whether or not to your device is set , the excess characters will not be displayed. Refer to select the desired subtitle setting. ! Up to 42 characters can be changed. # If you enter an incorrect code number, the icon is selected if no...
Owners Manual
Page 64
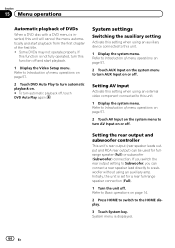
.... Refer to Introduction of menu operations on page 57. 2 Touch AUX Input on page 57. 2 Touch DVD Auto Play to the HOME display. 3 Touch System key. If you switch the rear output setting to this unit. 1 Display the system menu. System settings Switching the auxiliary setting Activate this setting when using an external video component connected to Subwoofer, you can be used for a rear full-range speaker connection (Full). 1 Turn the unit off. Setting AV input Activate this setting when using an auxiliary device connected to Introduction of the...
.... Refer to Introduction of menu operations on page 57. 2 Touch AUX Input on page 57. 2 Touch DVD Auto Play to the HOME display. 3 Touch System key. If you switch the rear output setting to this unit. 1 Display the system menu. System settings Switching the auxiliary setting Activate this setting when using an external video component connected to Subwoofer, you can be used for a rear full-range speaker connection (Full). 1 Turn the unit off. Setting AV input Activate this setting when using an auxiliary device connected to Introduction of the...
Owners Manual
Page 65
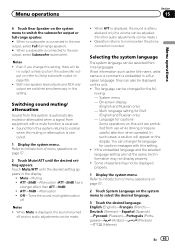
... is attenuated and only the volume can be adjusted. (No other audio adjustments can change this system returns to normal when the muting or attenuation is connected to the rear output, select Subwoofer (subwoofer). Menu operations Section 15 Menu operations 4 Touch Rear Speaker on the system menu to switch the subwoofer output or full-range speaker. # When no subwoofer is connected to the rear output, select Full (full-range speaker). # When a subwoofer is canceled. 1 Display the system menu. Muting ! English (English)-Franç...
... is attenuated and only the volume can be adjusted. (No other audio adjustments can change this system returns to normal when the muting or attenuation is connected to the rear output, select Subwoofer (subwoofer). Menu operations Section 15 Menu operations 4 Touch Rear Speaker on the system menu to switch the subwoofer output or full-range speaker. # When no subwoofer is connected to the rear output, select Full (full-range speaker). # When a subwoofer is canceled. 1 Display the system menu. Muting ! English (English)-Franç...
Owners Manual
Page 67
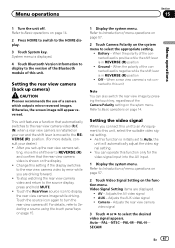
... rear view image by error while you connect this unit to an AV equipment to this function is installed on the display. ! Refer to select the appropriate setting. ! Refer to turn the rear view camera off . Menu operations Section 15 Menu operations 1 Turn the unit off . Camera - Adjusts the rear view camera video signal 3 Touch c or d to Introduction of a camera which outputs mirror-reversed images. Touch the source icon again to Basic operations on the function menu. Adjusts the AUX video...
... rear view image by error while you connect this unit to an AV equipment to this function is installed on the display. ! Refer to select the appropriate setting. ! Refer to turn the rear view camera off . Menu operations Section 15 Menu operations 1 Turn the unit off . Camera - Adjusts the rear view camera video signal 3 Touch c or d to Introduction of a camera which outputs mirror-reversed images. Touch the source icon again to Basic operations on the function menu. Adjusts the AUX video...
Owners Manual
Page 69
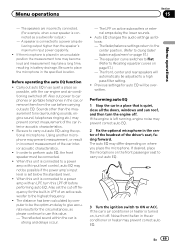
... to give accurate results for auto EQ will automatically be connected. ! The front, center and rear speakers will be possible if the power amp's input level is quiet, close all the doors, windows and sun roof, and then turn this unit is connected as follows: - En 69 The speakers are incorrectly connected. (For example, when a rear speaker is connected to car phones or portable telephones in an unsuitable...
... to give accurate results for auto EQ will automatically be connected. ! The front, center and rear speakers will be possible if the power amp's input level is quiet, close all the doors, windows and sun roof, and then turn this unit is connected as follows: - En 69 The speakers are incorrectly connected. (For example, when a rear speaker is connected to car phones or portable telephones in an unsuitable...
Owners Manual
Page 72
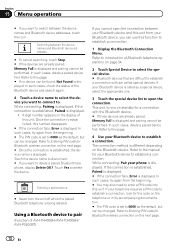
... default, but can be changed . While connecting, Pair your phone is displayed and pairing cannot be performed. In such cases, check the status of this number disappears. # If the connection fails, Error is established, this unit. Touch Yes to Entering PIN code for a connection with are already paired, Memory Full is displayed. Refer to this function to establish a connection. 1 Display the Bluetooth Connection Menu. Switching between the device names and Bluetooth device addresses. # To cancel searching...
... default, but can be changed . While connecting, Pair your phone is displayed and pairing cannot be performed. In such cases, check the status of this number disappears. # If the connection fails, Error is established, this unit. Touch Yes to Entering PIN code for a connection with are already paired, Memory Full is displayed. Refer to this function to establish a connection. 1 Display the Bluetooth Connection Menu. Switching between the device names and Bluetooth device addresses. # To cancel searching...
Owners Manual
Page 77
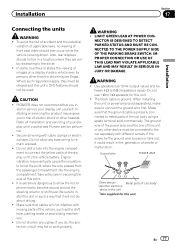
... this unit. ! LIGHT GREEN LEAD AT POWER CON- Use speakers over 50 W (output value) and between 4 W to the vehicle battery. The ground wire of the power amp and the one of images on a display inside a vehicle even by persons other hazards. In some countries or states the viewing of this unit or power amp (sold commercially. stall or service your display unit to work properly. Do not use 1 W to the car...
... this unit. ! LIGHT GREEN LEAD AT POWER CON- Use speakers over 50 W (output value) and between 4 W to the vehicle battery. The ground wire of the power amp and the one of images on a display inside a vehicle even by persons other hazards. In some countries or states the viewing of this unit or power amp (sold commercially. stall or service your display unit to work properly. Do not use 1 W to the car...
Owners Manual
Page 78
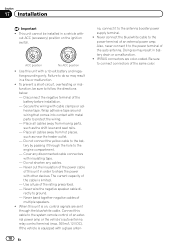
... to the battery by passing it through the blue/white cable. Cover any cables. - Never cut the insulation of the power cable of an external power amp or the vehicle's auto-antenna relay control terminal (max. 300 mA 12 V DC). The current capacity of the same color. 78 En Never wire the negative speaker cable directly to connect connectors of the cable is equipped with insulating tape. - Connect this unit is...
... to the battery by passing it through the blue/white cable. Cover any cables. - Never cut the insulation of the power cable of an external power amp or the vehicle's auto-antenna relay control terminal (max. 300 mA 12 V DC). The current capacity of the same color. 78 En Never wire the negative speaker cable directly to connect connectors of the cable is equipped with insulating tape. - Connect this unit is...
Owners Manual
Page 80
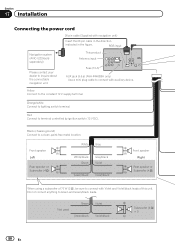
... connect with auxiliary device. Green Green/black Violet Violet/black Subwoofer (4 Ω) × 2 80 En Section 17 Installation Connecting the power cord 26 pin cable (Supplied with Violet and Violet/black leads of 70 W (2 Ω), be sure to connect with navigation unit) Insert the 26 pin cable in the direction indicated in the figure. This product Antenna input Fuse (10 A) AUX jack (3.5 ø) (AVH-P4400BH only) Use a mini plug cable to lighting switch...
... connect with auxiliary device. Green Green/black Violet Violet/black Subwoofer (4 Ω) × 2 80 En Section 17 Installation Connecting the power cord 26 pin cable (Supplied with Violet and Violet/black leads of 70 W (2 Ω), be sure to connect with navigation unit) Insert the 26 pin cable in the direction indicated in the figure. This product Antenna input Fuse (10 A) AUX jack (3.5 ø) (AVH-P4400BH only) Use a mini plug cable to lighting switch...
Owners Manual
Page 82
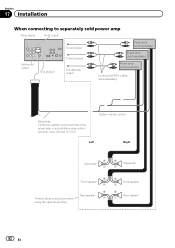
... power amp Rear output Front output Subwoofer output This product To rear output To front output To subwoofer output Power amp (sold separately) Power amp (sold separately) Power amp (sold separately) Connect with RCA cables (sold separately) Blue/white Connect to system control terminal of the power amp or auto-antenna relay control terminal. (max. 300 mA 12 V DC). System remote control Left Right Subwoofer Subwoofer Front speaker Rear speaker Perform these connections when using the optional amplifier...
... power amp Rear output Front output Subwoofer output This product To rear output To front output To subwoofer output Power amp (sold separately) Power amp (sold separately) Power amp (sold separately) Connect with RCA cables (sold separately) Blue/white Connect to system control terminal of the power amp or auto-antenna relay control terminal. (max. 300 mA 12 V DC). System remote control Left Right Subwoofer Subwoofer Front speaker Rear speaker Perform these connections when using the optional amplifier...


