Owners Manual
Page 2
...30 Precautions 30 Precautions before connecting the system......30 Before installing this manual 7 ■Basic operation 8 Checking part names and functions 8 Remote control 8 Inserting/ejecting/connecting media 8 On first-time startup 8 How to operate your Bluetooth devices 10 iPod compatibility 13 Information on internal... name list 16 Switching the media file type 16 Searching for the part you have finished reading the instructions, keep this Pioneer product. Contents Thank you will know how to use the screens 9 Supported AV source 10 Selecting a source 10 Using the...
...30 Precautions 30 Precautions before connecting the system......30 Before installing this manual 7 ■Basic operation 8 Checking part names and functions 8 Remote control 8 Inserting/ejecting/connecting media 8 On first-time startup 8 How to operate your Bluetooth devices 10 iPod compatibility 13 Information on internal... name list 16 Switching the media file type 16 Searching for the part you have finished reading the instructions, keep this Pioneer product. Contents Thank you will know how to use the screens 9 Supported AV source 10 Selecting a source 10 Using the...
Owners Manual
Page 8
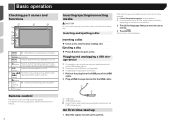
...menu screen and the current source screen. 5 DISP button Press to boot up the system. For details concerning operations, see the remote control manual. 8 Inserting/ejecting/connecting media CAUTION Do not insert anything other than a disc into the disc-loading slot. Plugging and..., fast forward, reverse and track search controls. 7 button 8 Discloading slot Inserting and ejecting a disc on page 8 9 LCD screen Remote control The remote control CD-R33 is sold separately. Inserting a disc Insert a disc into the disc-loading slot. p From the second time on, ...
...menu screen and the current source screen. 5 DISP button Press to boot up the system. For details concerning operations, see the remote control manual. 8 Inserting/ejecting/connecting media CAUTION Do not insert anything other than a disc into the disc-loading slot. Plugging and..., fast forward, reverse and track search controls. 7 button 8 Discloading slot Inserting and ejecting a disc on page 8 9 LCD screen Remote control The remote control CD-R33 is sold separately. Inserting a disc Insert a disc into the disc-loading slot. p From the second time on, ...

Owners Manual
Page 31
..., even if the audio source is directly connected to the battery, engine vibration may eventually cause the insulation to an external power amp's system remote control terminal, the auto-antenna relay control terminal, or the antenna booster power control terminal (max. 300 mA 12 V DC). If the...the ground wire first. If the screw for the ground wire loosens or falls out, it could result in .) (AVH-270BT/AVH-271BT) 2 This product 3 Antenna jack 4 Wired remote input Hard-wired remote control adapter can occur, resulting in the car) 1 2 high temperatures. The ground wire of the power amp ...
..., even if the audio source is directly connected to the battery, engine vibration may eventually cause the insulation to an external power amp's system remote control terminal, the auto-antenna relay control terminal, or the antenna booster power control terminal (max. 300 mA 12 V DC). If the...the ground wire first. If the screw for the ground wire loosens or falls out, it could result in .) (AVH-270BT/AVH-271BT) 2 This product 3 Antenna jack 4 Wired remote input Hard-wired remote control adapter can occur, resulting in the car) 1 2 high temperatures. The ground wire of the power amp ...

Owners Manual
Page 33
... backing or checking the rear of the subwoofer depending on trailers, or back into a tight parking spot. Do not use . 1 3 2 4 8 8 1 System remote control Connect to Blue/white cable. 2 Power amp (sold separately) 3 Connect with RCA cable (sold cable, refer to the preout setting. 5 Rear speaker or subwoofer...
... backing or checking the rear of the subwoofer depending on trailers, or back into a tight parking spot. Do not use . 1 3 2 4 8 8 1 System remote control Connect to Blue/white cable. 2 Power amp (sold separately) 3 Connect with RCA cable (sold cable, refer to the preout setting. 5 Rear speaker or subwoofer...


