Leaflet
Page 1
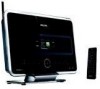
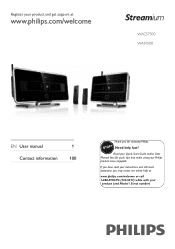
Philips Streamium Wireless Music Station with album art display • My Room, My Music: Listen to room • Easy and intuitive user interface with My Room, My Music and Music Broadcast Party mode! Enjoy Hi-Fi quality sound in Woofers for deep bass...flat system. wirelessly With the waS7500 Stations at desired locations in your home, you can instantly play all stations • Music Follows Me: take your music with you from the Music Center or PC. wirelessly • Wireless streaming between Music Center and Station(s) • Enjoy Internet Radio • Wireless streaming from...
Philips Streamium Wireless Music Station with album art display • My Room, My Music: Listen to room • Easy and intuitive user interface with My Room, My Music and Music Broadcast Party mode! Enjoy Hi-Fi quality sound in Woofers for deep bass...flat system. wirelessly With the waS7500 Stations at desired locations in your home, you can instantly play all stations • Music Follows Me: take your music with you from the Music Center or PC. wirelessly • Wireless streaming between Music Center and Station(s) • Enjoy Internet Radio • Wireless streaming from...
Leaflet
Page 2
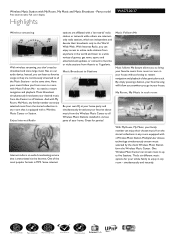
... need to download and store large music files on our audio device. Multiple User Access technology simultaneously stream music selected by the client Wireless Music Station form the Wireless Music Center. With Internet Radio, you can enjoy selected music from Austria to Yugoslavia. Free internet radio Full color display Highlights WAS7500/37 Wireless streaming With wireless streaming, you from room to room...
... need to download and store large music files on our audio device. Multiple User Access technology simultaneously stream music selected by the client Wireless Music Station form the Wireless Music Center. With Internet Radio, you can enjoy selected music from Austria to Yugoslavia. Free internet radio Full color display Highlights WAS7500/37 Wireless streaming With wireless streaming, you from room to room...
Leaflet
Page 3
... Koninklijke Philips Electronics N.V. Free internet radio Full color display Specifications WAS7500/37 Sound • Equalizer settings: Classic, Jazz, Neutral, Pop, Rock, Techno • Music Power:...Audio cinch in: Analog AUX (Center/Station) • Aux in: Line in • Headphone: 3.5 mm • Power: 110 V 60 Hz • Wireless connections: Wireless LAN(802.11g) • Wireless... Philips Electronics N.V. All Rights reserved. Party mode! www.philips.com * Some features require broadband internet access support Wireless Music Station with My Room, My Music and Music ...
... Koninklijke Philips Electronics N.V. Free internet radio Full color display Specifications WAS7500/37 Sound • Equalizer settings: Classic, Jazz, Neutral, Pop, Rock, Techno • Music Power:...Audio cinch in: Analog AUX (Center/Station) • Aux in: Line in • Headphone: 3.5 mm • Power: 110 V 60 Hz • Wireless connections: Wireless LAN(802.11g) • Wireless... Philips Electronics N.V. All Rights reserved. Party mode! www.philips.com * Some features require broadband internet access support Wireless Music Station with My Room, My Music and Music ...
User manual
Page 1
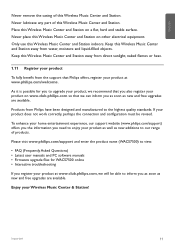
Register your product and get support at www.philips.com/welcome WACS7500 WAS7500 EN User manual 1 Contact information 100 Congratulations on your product at www.philips.com/welcome or call 1-888-744-5477 Wireless Music Center + Station Thank you may access our online help fast? To fully benefit from the support that make using your product...
Register your product and get support at www.philips.com/welcome WACS7500 WAS7500 EN User manual 1 Contact information 100 Congratulations on your product at www.philips.com/welcome or call 1-888-744-5477 Wireless Music Center + Station Thank you may access our online help fast? To fully benefit from the support that make using your product...
User manual
Page 5
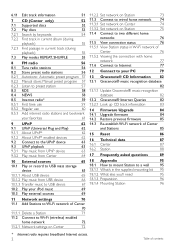
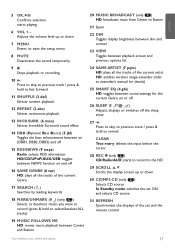
...37 1.11 Important safety instructions 9 5.8 Selecting languages 38 1.12 Register your product 11 5.9 Sleep 38 2 Your Wireless Music Center & 5.10 Alarm 39 Station 12 5.10.1 Set alarm / alarm time / repeat mode 39 2.1 What's in the box 12 6 HD (Hard Disk) 40 2.2 ...Overview Wireless Music Center & 6.1 Play HD Music 40 Station 14 6.2 Search 40 2.2.1 Controls on Center and Station 14 6.2.1 Search by keywords 40 2.3 Overview remote controls 16 6.2.2 Select track of same artist 41 2.3.1 2-...
...37 1.11 Important safety instructions 9 5.8 Selecting languages 38 1.12 Register your product 11 5.9 Sleep 38 2 Your Wireless Music Center & 5.10 Alarm 39 Station 12 5.10.1 Set alarm / alarm time / repeat mode 39 2.1 What's in the box 12 6 HD (Hard Disk) 40 2.2 ...Overview Wireless Music Center & 6.1 Play HD Music 40 Station 14 6.2 Search 40 2.2.1 Controls on Center and Station 14 6.2.1 Search by keywords 40 2.3 Overview remote controls 16 6.2.2 Select track of same artist 41 2.3.1 2-...
User manual
Page 6
... music 69 10.3 Play external sources 69 11 Network settings 70 11.1 Add Stations to Wi-Fi network of Center 70 11.1.1 Delete a Station 71 11.2 Connect to Wi-Fi (wireless) enabled home network 72 11.2.1 Network settings on Center 72 11.2.2 Set network on Station 73 11.3 Connect to wired home network 74 11.3.1 Set network on Center 74 11.3.2 Set network...
... music 69 10.3 Play external sources 69 11 Network settings 70 11.1 Add Stations to Wi-Fi network of Center 70 11.1.1 Delete a Station 71 11.2 Connect to Wi-Fi (wireless) enabled home network 72 11.2.1 Network settings on Center 72 11.2.2 Set network on Station 73 11.3 Connect to wired home network 74 11.3.1 Set network on Center 74 11.3.2 Set network...
User manual
Page 15
...direct sunlight, naked flames or heat. 1.11 Register your product at www.philips.com/welcome. Never place this Wireless Music Center and Station. Place this Wireless Music Center and Station away from Philips have been designed and manufactured to inform you to enjoy your product at , hard...64257;guration must be able to the highest quality standards. ENGLISH Never remove the casing of this Wireless Music Center and Station on other electrical equipment. Please visit www.philips.com/support and enter the product name (WACS7500) to view: • FAQ (Frequently Asked ...
...direct sunlight, naked flames or heat. 1.11 Register your product at www.philips.com/welcome. Never place this Wireless Music Center and Station. Place this Wireless Music Center and Station away from Philips have been designed and manufactured to inform you to enjoy your product at , hard...64257;guration must be able to the highest quality standards. ENGLISH Never remove the casing of this Wireless Music Center and Station on other electrical equipment. Please visit www.philips.com/support and enter the product name (WACS7500) to view: • FAQ (Frequently Asked ...
User manual
Page 16
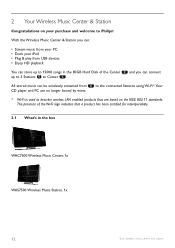
...player and PC are based on your iPod • Plug & play from USB devices • Enjoy HD playback You can be wirelessly streamed from your PC • Dock your purchase and welcome to Center . The presence of the Center up to 15000 songs in the box WAC7500 Wireless Music Center, 1x WAS7500 Wireless Music Station, 1x 12 Your wireless music... no longer bound by wires. 2 Your Wireless Music Center & Station Congratulations on the IEEE 802.11 standards. With the Wireless Music Center & Station you can connect All stored music can store up to 5 Stations to Philips!
...player and PC are based on your iPod • Plug & play from USB devices • Enjoy HD playback You can be wirelessly streamed from your PC • Dock your purchase and welcome to Center . The presence of the Center up to 15000 songs in the box WAC7500 Wireless Music Center, 1x WAS7500 Wireless Music Station, 1x 12 Your wireless music... no longer bound by wires. 2 Your Wireless Music Center & Station Congratulations on the IEEE 802.11 standards. With the Wireless Music Center & Station you can connect All stored music can store up to 5 Stations to Philips!
User manual
Page 17
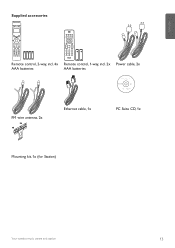
ENGLISH Supplied accessories Remote control, 2-way, incl. 4x Remote control, 1-way, incl. 2x Power cable, 2x AAA batteries AAA batteries FM wire antenna, 2x Ethernet cable, 1x PC Suite CD, 1x Mounting kit, 1x (for Station) Your wireless music centre and station 13
ENGLISH Supplied accessories Remote control, 2-way, incl. 4x Remote control, 1-way, incl. 2x Power cable, 2x AAA batteries AAA batteries FM wire antenna, 2x Ethernet cable, 1x PC Suite CD, 1x Mounting kit, 1x (for Station) Your wireless music centre and station 13
User manual
Page 18
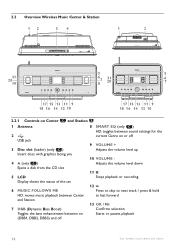
2.2 Overview Wireless Music Center & Station 12 34 1 2 21 20 19 5 5 6 7 8 21 20 6 7 17 15 13 11 9 18 16 14 12 10 17 15 13 11 9 18 16 14 12 10 2.2.1 Controls on Center and Station 1 Antenna 2 USB jack 3 Disc slot (loader) (only ) ... (only ) Ejects a disk from the CD slot 5 LCD Display shows the status of the set 6 MUSIC FOLLOWS ME HD: moves music playback between Center and Station 7 DBB (Dynamic Bass Boost) Toggles the bass enhancement between on (DBB1, DBB2, DBB3) and off 8... OK / 2; Confirms selection Starts or pauses playback 14 Your wireless music centre and station
2.2 Overview Wireless Music Center & Station 12 34 1 2 21 20 19 5 5 6 7 8 21 20 6 7 17 15 13 11 9 18 16 14 12 10 17 15 13 11 9 18 16 14 12 10 2.2.1 Controls on Center and Station 1 Antenna 2 USB jack 3 Disc slot (loader) (only ) ... (only ) Ejects a disk from the CD slot 5 LCD Display shows the status of the set 6 MUSIC FOLLOWS ME HD: moves music playback between Center and Station 7 DBB (Dynamic Bass Boost) Toggles the bass enhancement between on (DBB1, DBB2, DBB3) and off 8... OK / 2; Confirms selection Starts or pauses playback 14 Your wireless music centre and station
User manual
Page 19
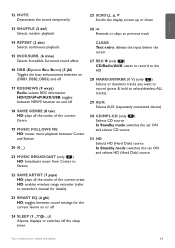
... (separately connected device) 18 y ON / STANDBY / ECO STANDBY Press briefly to Standby or Eco Standby. Your wireless music centre and station 15 Selects Incredible Surround sound effect 21 MUSIC BROADCAST (only ) HD: broadcasts music from Center to Station SMART EQ (only ) HD: toggles between sound settings for the current Genre on or off Note The...
... (separately connected device) 18 y ON / STANDBY / ECO STANDBY Press briefly to Standby or Eco Standby. Your wireless music centre and station 15 Selects Incredible Surround sound effect 21 MUSIC BROADCAST (only ) HD: broadcasts music from Center to Station SMART EQ (only ) HD: toggles between sound settings for the current Genre on or off Note The...
User manual
Page 20
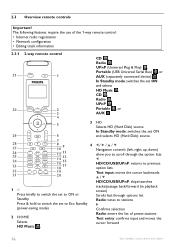
2.3 Overview remote controls Important! The following features require the use of the 1-way remote control: • Internet radio registration • Network configuration • Editing track information 2.3.1 2-way remote control 31 1 30 2 3 4 5 3 29 6 7 28 27 8 10 9 4 ...USB/UPnP: skips/searches tracks/passage back/forward (in playback screen) Scrolls fast through options list Radio: tunes to stations 2 Confirms selection Radio: enters the list of preset stations Text entry: confirms input and moves the cursor forward 16 Your wireless music centre and...
2.3 Overview remote controls Important! The following features require the use of the 1-way remote control: • Internet radio registration • Network configuration • Editing track information 2.3.1 2-way remote control 31 1 30 2 3 4 5 3 29 6 7 28 27 8 10 9 4 ...USB/UPnP: skips/searches tracks/passage back/forward (in playback screen) Scrolls fast through options list Radio: tunes to stations 2 Confirms selection Radio: enters the list of preset stations Text entry: confirms input and moves the cursor forward 16 Your wireless music centre and...
User manual
Page 21
... between Center and Station 20 MUSIC BROADCAST (only ) HD: broadcasts music from Center to Station 21 Spare 22 DIM Toggles display brightness between dim and normal 23 VIEW Toggles between playback screen and previous options list 24 SAME ARTIST (7 pqrs) HD: plays all the tracks of the current artist HD: enables wireless range extender (refer... source In Standby mode: switches the set ON and selects CD source 31 REFRESH Synchronizes the displays of the set and the remote control Your wireless music centre and station 17 ENGLISH 5 OK, 2/;
... between Center and Station 20 MUSIC BROADCAST (only ) HD: broadcasts music from Center to Station 21 Spare 22 DIM Toggles display brightness between dim and normal 23 VIEW Toggles between playback screen and previous options list 24 SAME ARTIST (7 pqrs) HD: plays all the tracks of the current artist HD: enables wireless range extender (refer... source In Standby mode: switches the set ON and selects CD source 31 REFRESH Synchronizes the displays of the set and the remote control Your wireless music centre and station 17 ENGLISH 5 OK, 2/;
User manual
Page 22
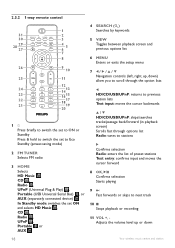
...Press & hold to switch the set to Eco Standby (power-saving mode) 2 FM TUNER Selects FM radio 3 HOME Selects HD Music , CD , Radio , UPnP (Universal Plug & Play) , Portable (USB Universal Serial Bus) , or AUX (separately connected... device) In Standby mode: switches the set ON and selects HD Music , CD , Radio , UPnP , Portable , or AUX 4 SEARCH ( ) Searches by keywords 5 VIEW Toggles between playback screen and previous ...recording 11 VOL +, Adjusts the volume level up , down 18 Your wireless music centre and station
...Press & hold to switch the set to Eco Standby (power-saving mode) 2 FM TUNER Selects FM radio 3 HOME Selects HD Music , CD , Radio , UPnP (Universal Plug & Play) , Portable (USB Universal Serial Bus) , or AUX (separately connected... device) In Standby mode: switches the set ON and selects HD Music , CD , Radio , UPnP , Portable , or AUX 4 SEARCH ( ) Searches by keywords 5 VIEW Toggles between playback screen and previous ...recording 11 VOL +, Adjusts the volume level up , down 18 Your wireless music centre and station
User manual
Page 23
...18 SAME GENRE (8 tuv) HD: plays all the tracks of the current Genre 19 MUSIC FOLLOWS ME HD: moves music playback between Center and Station 20 (0 ) 21 MUSIC BROADCAST (only ) HD: broadcasts music from Center to Station CLEAR Text entry: deletes the input before the cursor 27 REC 0 (only ) CD/... the tracks of the current artist HD: enables wireless range extender (refer to extender's manual for details) 23 SMART EQ (4 ghi) HD: toggles between sound settings for the current Genre on or off 24 SLEEP (1 Adjusts, displays or switches off the sleep timer Your wireless music centre and station 19
...18 SAME GENRE (8 tuv) HD: plays all the tracks of the current Genre 19 MUSIC FOLLOWS ME HD: moves music playback between Center and Station 20 (0 ) 21 MUSIC BROADCAST (only ) HD: broadcasts music from Center to Station CLEAR Text entry: deletes the input before the cursor 27 REC 0 (only ) CD/... the tracks of the current artist HD: enables wireless range extender (refer to extender's manual for details) 23 SMART EQ (4 ghi) HD: toggles between sound settings for the current Genre on or off 24 SLEEP (1 Adjusts, displays or switches off the sleep timer Your wireless music centre and station 19
User manual
Page 24
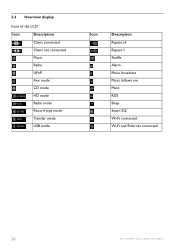
2.4 Overview display Icons of the LCD: Icon Description Client connected Client not connected Music Radio UPnP Aux mode CD mode HD mode Radio mode Record (rip) mode Transfer mode USB mode Icon Description Repeat all Repeat 1 Shuffle Alarm Music broadcast Music follows me Mute RDS Sleep Smart EQ Wi-Fi connected Wi-Fi and Ethernet connected 20 Your wireless music centre and station
2.4 Overview display Icons of the LCD: Icon Description Client connected Client not connected Music Radio UPnP Aux mode CD mode HD mode Radio mode Record (rip) mode Transfer mode USB mode Icon Description Repeat all Repeat 1 Shuffle Alarm Music broadcast Music follows me Mute RDS Sleep Smart EQ Wi-Fi connected Wi-Fi and Ethernet connected 20 Your wireless music centre and station

User manual
Page 25
For the we have enclosed a wall mounting kit. (free standing) (wall mounted) To learn more about wall mounting, see 18 Appendix on How to mount Station to find a suitable location. ENGLISH 3 Installation 3.1 Install Center ( ) and Station ( ) Note Before you decide where and how to install the set, test the Wi-Fi connection and rear cable connections to a wall. Installation 21 Use the free standing. You can install in two ways, free standing (using the supplied stands) or wall mounted (without the stands).
For the we have enclosed a wall mounting kit. (free standing) (wall mounted) To learn more about wall mounting, see 18 Appendix on How to mount Station to find a suitable location. ENGLISH 3 Installation 3.1 Install Center ( ) and Station ( ) Note Before you decide where and how to install the set, test the Wi-Fi connection and rear cable connections to a wall. Installation 21 Use the free standing. You can install in two ways, free standing (using the supplied stands) or wall mounted (without the stands).

User manual
Page 26
... mode) before removing its power plug. The first time you power up (switched on page iii. 3.3 Set up Wi-Fi connection between Center ( ) and Station ( ) Note • Always press & hold y to switch the set . For users in Standby or Eco Standby mode, and still consume some power. Tip For better...
... mode) before removing its power plug. The first time you power up (switched on page iii. 3.3 Set up Wi-Fi connection between Center ( ) and Station ( ) Note • Always press & hold y to switch the set . For users in Standby or Eco Standby mode, and still consume some power. Tip For better...

User manual
Page 30
RDS auto time sync: If you have preset RDS radio stations, you can set the clock, RDS automatic time synchronization and manual time setup. 4 Prepare 4.1 Set the clock The time can be displayed in 24-hour or 12-hour format.You can synchronize the clock with one of the RDS stations. 1 Press MENU to enter the menu screen. 2 Use 3 or 4 and 2 to select Settings followed by Time. 3 Use 3 or 4 and 2 to set up your clock on or . There are two methods to select Auto Time Sync. 26 Prepare
RDS auto time sync: If you have preset RDS radio stations, you can set the clock, RDS automatic time synchronization and manual time setup. 4 Prepare 4.1 Set the clock The time can be displayed in 24-hour or 12-hour format.You can synchronize the clock with one of the RDS stations. 1 Press MENU to enter the menu screen. 2 Use 3 or 4 and 2 to select Settings followed by Time. 3 Use 3 or 4 and 2 to set up your clock on or . There are two methods to select Auto Time Sync. 26 Prepare

User manual
Page 31
ENGLISH 4 Use 3 or 4 and 2 to select the RDS radio station you wish to synchronize the clock with. > The screen shows a confirmation screen: Manual time set: 1 Press MENU to enter the menu screen. 2 Use 3 or 4 and 2 to select Settings followed by Time. 3 Use 3, 4, or the numeric keypad (0-9), and 2 to select Set Time. > The display shows current clock setting (00:00 by default) Prepare 27
ENGLISH 4 Use 3 or 4 and 2 to select the RDS radio station you wish to synchronize the clock with. > The screen shows a confirmation screen: Manual time set: 1 Press MENU to enter the menu screen. 2 Use 3 or 4 and 2 to select Settings followed by Time. 3 Use 3, 4, or the numeric keypad (0-9), and 2 to select Set Time. > The display shows current clock setting (00:00 by default) Prepare 27


