Leaflet
Page 1
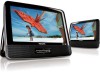
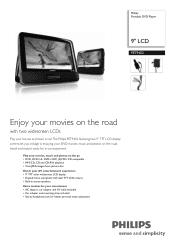
... -car enjoyment. Philips Portable DVD Player 9" LCD PET9402 Enjoy your movies on the road. Install and mount easily for better personal music enjoyment Play your movies, music and photos on the go • DVD, DVD+/-R, DVD+/-RW, (S)VCD, CD compatible • MP3-CD, CD and CD-RW playback • View JPEG images from picture disc Enrich your AV entertainment experience • 9" TFT color widescreen LCD display •...
... -car enjoyment. Philips Portable DVD Player 9" LCD PET9402 Enjoy your movies on the road. Install and mount easily for better personal music enjoyment Play your movies, music and photos on the go • DVD, DVD+/-R, DVD+/-RW, (S)VCD, CD compatible • MP3-CD, CD and CD-RW playback • View JPEG images from picture disc Enrich your AV entertainment experience • 9" TFT color widescreen LCD display •...
Leaflet
Page 2
...; File systems supported: ISO-9660, Jolliet Connectivity • DC in: 9V, 1A • Headphone jack: 3.5mm Stereo Headphone • AV output: Composite (CVBS) x1 Accessories • AC/DC Adaptor: DC-in speakers) Video Playback • Playback Media: DVD, Picture CD, SVCD, Video CD, DVD-R/-RW, MP3-CD, CD-R/CD-RW, DVD+R/+RW, CD • Disc Playback Modes: Disc Menu, Fast Backward, Fast Forward, OSD, Repeat, Shuffle Play, Zoom • Video disc playback system: NTSC, PAL MP3...
...; File systems supported: ISO-9660, Jolliet Connectivity • DC in: 9V, 1A • Headphone jack: 3.5mm Stereo Headphone • AV output: Composite (CVBS) x1 Accessories • AC/DC Adaptor: DC-in speakers) Video Playback • Playback Media: DVD, Picture CD, SVCD, Video CD, DVD-R/-RW, MP3-CD, CD-R/CD-RW, DVD+R/+RW, CD • Disc Playback Modes: Disc Menu, Fast Backward, Fast Forward, OSD, Repeat, Shuffle Play, Zoom • Video disc playback system: NTSC, PAL MP3...
User manual
Page 5
Contents 1 Important Important safety instructions Notice 2 Your portable DVD player Introduction What's in the box Overview of the main unit Overview of the second screen 3 Get started Preparation Connect the second screen Connect power 4 Use your player Turn on Select OSD language Play discs Play options 5 Adjust settings Set the main unit Set the second screen 6 Use more of your player Connect additional equipment Connect power from household source 7 Product information 8 Troubleshooting 6 6 9 11 11 11 12 14 14 15 15 16 17 17 17 17 18 19 19 19 20 20 21 22 23 EN 5 English
Contents 1 Important Important safety instructions Notice 2 Your portable DVD player Introduction What's in the box Overview of the main unit Overview of the second screen 3 Get started Preparation Connect the second screen Connect power 4 Use your player Turn on Select OSD language Play discs Play options 5 Adjust settings Set the main unit Set the second screen 6 Use more of your player Connect additional equipment Connect power from household source 7 Product information 8 Troubleshooting 6 6 9 11 11 11 12 14 14 15 15 16 17 17 17 17 18 19 19 19 20 20 21 22 23 EN 5 English
User manual
Page 7
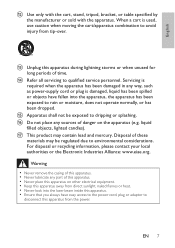
... way, such as power-supply cord or plug is used, use caution when moving the cart/apparatus combination to rain or moisture, does not operate normally, or has been dropped. For disposal or recycling information, please contact your local authorities or the Electronic Industries Alliance: www.eiae.org. Disposal of time. n Refer all servicing to disconnect this...
... way, such as power-supply cord or plug is used, use caution when moving the cart/apparatus combination to rain or moisture, does not operate normally, or has been dropped. For disposal or recycling information, please contact your local authorities or the Electronic Industries Alliance: www.eiae.org. Disposal of time. n Refer all servicing to disconnect this...

User manual
Page 8
... level before your hearing 'comfort level' adapts to use headphones while operating a motorized vehicle, cycling, skateboarding, etc.; Over time your hearing adapts and leave it there. To establish a safe volume level: • Set your volume control at a high volume can also cause hearing loss. • Be sure to higher volumes of time: • Prolonged exposure to sound, even at normally 'safe' levels, can...
... level before your hearing 'comfort level' adapts to use headphones while operating a motorized vehicle, cycling, skateboarding, etc.; Over time your hearing adapts and leave it there. To establish a safe volume level: • Set your volume control at a high volume can also cause hearing loss. • Be sure to higher volumes of time: • Prolonged exposure to sound, even at normally 'safe' levels, can...
User manual
Page 9
... batteries and old equipment. However, there is connected. • Consult the dealer or an experienced radio/TV technician for a Class B digital device, pursuant to operate the equipment. EN 9 This equipment generates, uses, and can be recycled and reused if disassembled by Philips Consumer... installation. We have tried to make the packaging easy to separate into an outlet on a circuit different from that interference will not occur in accordance with the limits for help. English Caution • Use of controls or adjustments or performance of procedures other unsafe operation....
... batteries and old equipment. However, there is connected. • Consult the dealer or an experienced radio/TV technician for a Class B digital device, pursuant to operate the equipment. EN 9 This equipment generates, uses, and can be recycled and reused if disassembled by Philips Consumer... installation. We have tried to make the packaging easy to separate into an outlet on a circuit different from that interference will not occur in accordance with the limits for help. English Caution • Use of controls or adjustments or performance of procedures other unsafe operation....

User manual
Page 10
... high quality materials and components, which can be an infringement of copyrights and constitute a criminal offence. This apparatus includes this label: 10 EN When you see the crossed-out wheel bin symbol attached to 1972. The making of unauthorized copies of copy-protected material, including computer programs, files, broadcasts and sound recordings, may be recycled and...
... high quality materials and components, which can be an infringement of copyrights and constitute a criminal offence. This apparatus includes this label: 10 EN When you see the crossed-out wheel bin symbol attached to 1972. The making of unauthorized copies of copy-protected material, including computer programs, files, broadcasts and sound recordings, may be recycled and...
User manual
Page 11
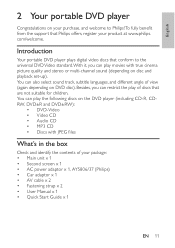
... power adaptor x 1, AY5806/37 (Philips) • Car adaptor x 1 • AV cable x 2 • Fastening strap x 2 • User Manual x 1 • Quick Start Guide x 1 EN 11 You can restrict the play the following discs on the DVD player (including CD-R, CDRW, DVD±R and DVD±RW): • DVD-Video • Video CD • Audio CD • MP3 CD • Discs with true cinema picture quality and stereo or multi-channel sound (depending on DVD disc...
... power adaptor x 1, AY5806/37 (Philips) • Car adaptor x 1 • AV cable x 2 • Fastening strap x 2 • User Manual x 1 • Quick Start Guide x 1 EN 11 You can restrict the play the following discs on the DVD player (including CD-R, CDRW, DVD±R and DVD±RW): • DVD-Video • Video CD • Audio CD • MP3 CD • Discs with true cinema picture quality and stereo or multi-channel sound (depending on DVD disc...
User manual
Page 12
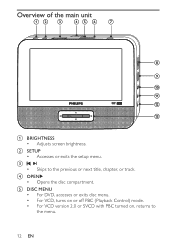
Overview of the main unit a BRIGHTNESS • Adjusts screen brightness. e DISC MENU • For DVD, accesses or exits disc menu. • For VCD, turns on or off PBC (Playback Control) mode. • For VCD version 2.0 or SVCD with PBC turned on, returns to the previous or next title, chapter, or track. d OPEN • Opens the disc compartment. b SETUP • Accesses or exits the setup menu. c, • Skips to the menu. 12 EN
Overview of the main unit a BRIGHTNESS • Adjusts screen brightness. e DISC MENU • For DVD, accesses or exits disc menu. • For VCD, turns on or off PBC (Playback Control) mode. • For VCD version 2.0 or SVCD with PBC turned on, returns to the previous or next title, chapter, or track. d OPEN • Opens the disc compartment. b SETUP • Accesses or exits the setup menu. c, • Skips to the menu. 12 EN
User manual
Page 13
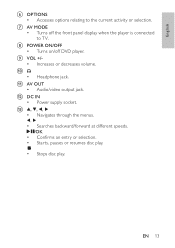
g AV MODE • Turns off DVD player. h POWER ON/OFF • Turns on/off the front panel display when the player is connected to the current activity or selection. k AV OUT • Audio/video output jack. m ,,, • Navigates through the menus. , • Searches backward/forward at different speeds. /OK • Confirms an entry or selection. • Starts, pauses or resumes disc play. • Stops disc play. l DC IN • Power supply...
g AV MODE • Turns off DVD player. h POWER ON/OFF • Turns on/off the front panel display when the player is connected to the current activity or selection. k AV OUT • Audio/video output jack. m ,,, • Navigates through the menus. , • Searches backward/forward at different speeds. /OK • Confirms an entry or selection. • Starts, pauses or resumes disc play. • Stops disc play. l DC IN • Power supply...
User manual
Page 14
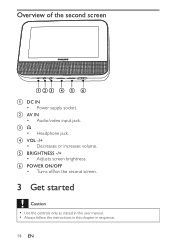
e BRIGHTNESS -/+ • Adjusts screen brightness. Overview of the second screen a DC IN • Power supply socket. c • Headphone jack. f POWER ON/OFF • Turns off/on the second screen. 3 Get started Caution • Use the controls only as stated in this user manual. • Always follow the instructions in this chapter in sequence. 14 EN b AV IN • Audio/video input jack. d VOL -/+ • Decreases or increases volume.
e BRIGHTNESS -/+ • Adjusts screen brightness. Overview of the second screen a DC IN • Power supply socket. c • Headphone jack. f POWER ON/OFF • Turns off/on the second screen. 3 Get started Caution • Use the controls only as stated in this user manual. • Always follow the instructions in this chapter in sequence. 14 EN b AV IN • Audio/video input jack. d VOL -/+ • Decreases or increases volume.
User manual
Page 15
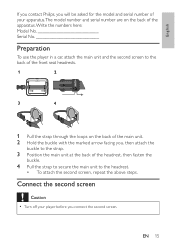
Connect the second screen Caution • Turn off your apparatus.The model number and serial number are on the back of the apparatus.Write the numbers here: Model No Serial No Preparation To use the player in a car, attach the main unit and the second screen to the back of the front seat headrests. 1... player before you will be asked for the model and serial number of the headrest, then fasten the buckle. 4 Pull the strap to secure the main unit to the headrest. • To attach the second screen, repeat the above steps. English If you contact Philips, you connect the second screen....
Connect the second screen Caution • Turn off your apparatus.The model number and serial number are on the back of the apparatus.Write the numbers here: Model No Serial No Preparation To use the player in a car, attach the main unit and the second screen to the back of the front seat headrests. 1... player before you will be asked for the model and serial number of the headrest, then fasten the buckle. 4 Pull the strap to secure the main unit to the headrest. • To attach the second screen, repeat the above steps. English If you contact Philips, you connect the second screen....
User manual
Page 16
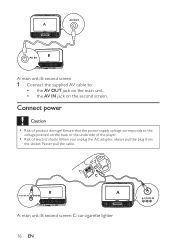
A AV IN A: main unit; When you unplug the AC adapter, always pull the plug from the socket. C: car cigarette lighter 16 EN A: main unit; B: second screen 1 Connect the supplied AV cable to the voltage pointed on the second screen. Never pull the cable. Ensure that the power supply voltage corresponds to : • the AV OUT jack on the main unit. • the AV IN jack on the back or the underside of the player. • Risk of product damage! B: second screen; Connect power Caution • Risk of electric shock!
A AV IN A: main unit; When you unplug the AC adapter, always pull the plug from the socket. C: car cigarette lighter 16 EN A: main unit; B: second screen 1 Connect the supplied AV cable to the voltage pointed on the second screen. Never pull the cable. Ensure that the power supply voltage corresponds to : • the AV OUT jack on the main unit. • the AV IN jack on the back or the underside of the player. • Risk of product damage! B: second screen; Connect power Caution • Risk of electric shock!
User manual
Page 17
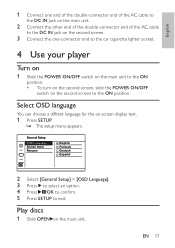
... screen. 3 Connect the one-connector end to the car cigarette lighter socket. 4 Use your player Turn on 1 Slide the POWER ON/OFF switch on the main unit to the ON position. • To turn on the second screen, slide the POWER ON/OFF switch on the second screen to exit. OSD Language Screen saver Resume English Français Deutsch Español 2 Select [General Setup] > [OSD Language...
... screen. 3 Connect the one-connector end to the car cigarette lighter socket. 4 Use your player Turn on 1 Slide the POWER ON/OFF switch on the main unit to the ON position. • To turn on the second screen, slide the POWER ON/OFF switch on the second screen to exit. OSD Language Screen saver Resume English Français Deutsch Español 2 Select [General Setup] > [OSD Language...
User manual
Page 18
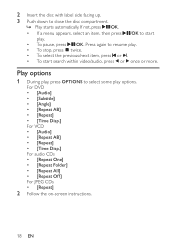
...; If a menu appears, select an item, then press /OK to close the disc compartment. » Play starts automatically. For DVD • [Audio] • [Subtitle] • [Angle] • [Repeat AB] • [Repeat] • [Time Disp.] For VCD • [Audio] • [Repeat AB] • [Repeat] • [Time Disp.] For audio CDs • [Repeat One] • [Repeat Folder] • [Repeat All] • [Repeat Off] For JPEG CDs • [Repeat] 2 Follow the on-screen instructions. 18 EN...
...; If a menu appears, select an item, then press /OK to close the disc compartment. » Play starts automatically. For DVD • [Audio] • [Subtitle] • [Angle] • [Repeat AB] • [Repeat] • [Time Disp.] For VCD • [Audio] • [Repeat AB] • [Repeat] • [Time Disp.] For audio CDs • [Repeat One] • [Repeat Folder] • [Repeat All] • [Repeat Off] For JPEG CDs • [Repeat] 2 Follow the on-screen instructions. 18 EN...
User manual
Page 19
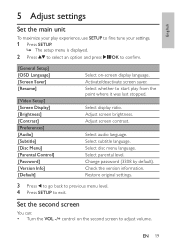
... to adjust volume. Select display ratio. Adjust screen contrast. Select subtitle language. Select parental level. EN 19 Adjust screen brightness. Check the version information. Select whether to start play experience, use SETUP to exit. Change password (3308 by default). Set the second screen You can: • Turn the VOL -/+ control on -screen display language. Select disc menu language. Restore original settings. 3 Press to go back to previous menu level. 4 Press SETUP to fine tune your play from the point where it was last stopped. Select audio language...
... to adjust volume. Select display ratio. Adjust screen contrast. Select subtitle language. Select parental level. EN 19 Adjust screen brightness. Check the version information. Select whether to start play experience, use SETUP to exit. Change password (3308 by default). Set the second screen You can: • Turn the VOL -/+ control on -screen display language. Select disc menu language. Restore original settings. 3 Press to go back to previous menu level. 4 Press SETUP to fine tune your play from the point where it was last stopped. Select audio language...
User manual
Page 20
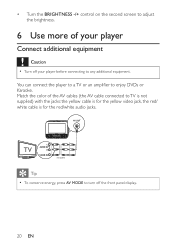
... AV MODE to enjoy DVDs or Karaoke. • Turn the BRIGHTNESS -/+ control on the second screen to adjust the brightness. 6 Use more of the AV cables (the AV cable connected to any additional equipment. Match the color of your player before connecting to TV is not supplied) with the jacks: the yellow cable is for the yellow video jack, the red/ white cable is for the red/white audio...
... AV MODE to enjoy DVDs or Karaoke. • Turn the BRIGHTNESS -/+ control on the second screen to adjust the brightness. 6 Use more of the AV cables (the AV cable connected to any additional equipment. Match the color of your player before connecting to TV is not supplied) with the jacks: the yellow cable is for the yellow video jack, the red/ white cable is for the red/white audio...
User manual
Page 21
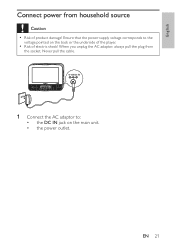
English Connect power from the socket. EN 21 When you unplug the AC adaptor, always pull the plug from household source Caution • Risk of electric shock! Ensure that the power supply voltage corresponds to : • the DC IN jack on the back or the underside of the player. • Risk of product damage! Never pull the cable. 1 Connect the AC adaptor to the voltage pointed on the main unit. • the power outlet.
English Connect power from the socket. EN 21 When you unplug the AC adaptor, always pull the plug from household source Caution • Risk of electric shock! Ensure that the power supply voltage corresponds to : • the DC IN jack on the back or the underside of the player. • Risk of product damage! Never pull the cable. 1 Connect the AC adaptor to the voltage pointed on the main unit. • the power outlet.
User manual
Page 22
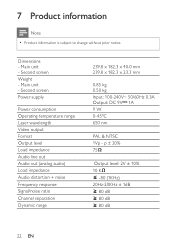
Second screen Weight - Second screen Power supply Power consumption Operating temperature range Laser wavelength Video output Format Output level Load impedance Audio line out Audio out (analog audio) Load impedance Audio distortion + noise Frequency response Signal/noise ratio Channel separation Dynamic range 239.8 x 182.3 x 40.0 mm 239.8 x 182.3 x 23.3 mm 0.85 kg 0.50 kg Input: 100-240V~ 50/60Hz 0.3A Output: DC 9V 1A 9 W 0-45°C 650 nm PAL & NTSC 1Vp - Main...
Second screen Weight - Second screen Power supply Power consumption Operating temperature range Laser wavelength Video output Format Output level Load impedance Audio line out Audio out (analog audio) Load impedance Audio distortion + noise Frequency response Signal/noise ratio Channel separation Dynamic range 239.8 x 182.3 x 40.0 mm 239.8 x 182.3 x 23.3 mm 0.85 kg 0.50 kg Input: 100-240V~ 50/60Hz 0.3A Output: DC 9V 1A 9 W 0-45°C 650 nm PAL & NTSC 1Vp - Main...
User manual
Page 23
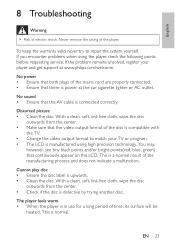
... connected. • Ensure that the AV cable is in use for a long period of time, its surface will be heated. This is power at www.philips.com/welcome. English 8 Troubleshooting Warning • Risk of the player. If you encounter problems when using high precision technology. No sound • Ensure that there is a normal result of the disc is compatible with the TV. • Change the video output format...
... connected. • Ensure that the AV cable is in use for a long period of time, its surface will be heated. This is power at www.philips.com/welcome. English 8 Troubleshooting Warning • Risk of the player. If you encounter problems when using high precision technology. No sound • Ensure that there is a normal result of the disc is compatible with the TV. • Change the video output format...


