
Leaflet
Page 3
...08-09 Version: 4.0.7 12 NC: 9073 100 13027 UPC: 6 09585 11072 4 © 2009 Koninklijke Philips Electronics N.V. www.philips.com * Music with battery Tuner/Reception/Transmission • Tuner Bands: FM Stereo, AM • Auto...x 90 mm • Packaging dimensions (W x H x D): 310 x 314 x 238 mm • Weight incl. Micro Hi-Fi System Specifications MCM275/37 Sound • Output Power: 10W Total Power • Output power (RMS): 2 x 5 W • Sound Enhancement: Digital Sound Control ... mounting x2, AM/FM Antenna • Remote control: 24-key with Digital Right Management not supported.
...08-09 Version: 4.0.7 12 NC: 9073 100 13027 UPC: 6 09585 11072 4 © 2009 Koninklijke Philips Electronics N.V. www.philips.com * Music with battery Tuner/Reception/Transmission • Tuner Bands: FM Stereo, AM • Auto...x 90 mm • Packaging dimensions (W x H x D): 310 x 314 x 238 mm • Weight incl. Micro Hi-Fi System Specifications MCM275/37 Sound • Output Power: 10W Total Power • Output power (RMS): 2 x 5 W • Sound Enhancement: Digital Sound Control ... mounting x2, AM/FM Antenna • Remote control: 24-key with Digital Right Management not supported.

User manual
Page 8
English Contents General Information Supplied accessories 9 Environmental information 9 Safety information 9 Controls Controls on the set 10 Remote control 11-12 Installation Placing MCM275 12 Mounting stand onto the set Mounting MCM275 onto walls Rear connections 13-14 Speaker connections Antenna connections Connecting an additional appliance 14-15 Connecting a USB device Connecting a non-USB device...
English Contents General Information Supplied accessories 9 Environmental information 9 Safety information 9 Controls Controls on the set 10 Remote control 11-12 Installation Placing MCM275 12 Mounting stand onto the set Mounting MCM275 onto walls Rear connections 13-14 Speaker connections Antenna connections Connecting an additional appliance 14-15 Connecting a USB device Connecting a non-USB device...
User manual
Page 9
.... ● If the system is brought directly from the wall socket. The set complies with the FDA/DHHS Rule 21 CFR Subchapter J in your system. remote control (with adequate ventilation to separate into three materials: cardboard (box), polystyrene foam (buffer) and polyethylene (bags, protective foam sheet). Operation is still consuming some...
.... ● If the system is brought directly from the wall socket. The set complies with the FDA/DHHS Rule 21 CFR Subchapter J in your system. remote control (with adequate ventilation to separate into three materials: cardboard (box), polystyrene foam (buffer) and polyethylene (bags, protective foam sheet). Operation is still consuming some...
User manual
Page 10
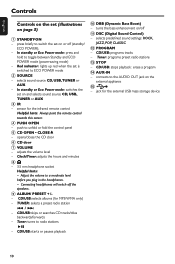
CD/USB: selects albums (for the infrared remote control Helpful hints: Always point the remote control towards this sensor. 4 PUSH OPEN - Tuner: tunes to a moderate level before you plug in the headphones. - CD/USB: stops playback; In standby or Eco ...
CD/USB: selects albums (for the infrared remote control Helpful hints: Always point the remote control towards this sensor. 4 PUSH OPEN - Tuner: tunes to a moderate level before you plug in the headphones. - CD/USB: stops playback; In standby or Eco ...
User manual
Page 11
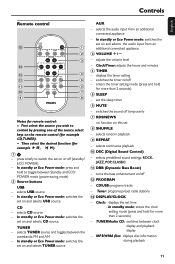
...programs preset radio stations # DISPLAY/CLOCK - Clock: - MP3/WMA files: displays disc information during playback 11 Then select the desired function (for remote control: - press briefly to switch the set on or off (standby/ ECO POWER); - CD - selects CD source - TUNER - In standby... AM - enters the timer setting mode (press and hold to control by pressing one of the source select keys on the remote control (for more than 2 seconds) 5 SLEEP - Controls English Remote control / % 1 USB 2 3 $ # 4 @ 5 ! 6 0 7 9 8 Notes for example 1B - set time - First ...
...programs preset radio stations # DISPLAY/CLOCK - Clock: - MP3/WMA files: displays disc information during playback 11 Then select the desired function (for remote control: - press briefly to switch the set on or off (standby/ ECO POWER); - CD - selects CD source - TUNER - In standby... AM - enters the timer setting mode (press and hold to control by pressing one of the source select keys on the remote control (for more than 2 seconds) 5 SLEEP - Controls English Remote control / % 1 USB 2 3 $ # 4 @ 5 ! 6 0 7 9 8 Notes for example 1B - set time - First ...

User manual
Page 16
... one of the source select keys on the set will be disposed of properly. 16 Then select the desired function (for example To replace the remote controls' battery 1 Press and hold 1 as indicated. 2 Simultaneously, pull the battery tray at 4. 3 Remove the old battery and put a new CR2025 battery in ...place. 4 Put back the battery tray. 2 Setting the clock After connecting MCM275 to the power supply, set the clock first. 1 Press and hold DISPLAY/ CLOCK on the remote control ➜ SET CLOCK scrolls on the set the minutes (or turn VOLUME on the...
... one of the source select keys on the set will be disposed of properly. 16 Then select the desired function (for example To replace the remote controls' battery 1 Press and hold 1 as indicated. 2 Simultaneously, pull the battery tray at 4. 3 Remove the old battery and put a new CR2025 battery in ...place. 4 Put back the battery tray. 2 Setting the clock After connecting MCM275 to the power supply, set the clock first. 1 Press and hold DISPLAY/ CLOCK on the remote control ➜ SET CLOCK scrolls on the set the minutes (or turn VOLUME on the...
User manual
Page 17
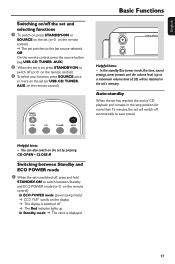
... ECO POWER mode 1 When the set is switched off, press and hold STANDBY-ON to switch between Standby and ECO POWER mode (or y on the remote control) In ECO POWER mode (power-saving mode): ➜ ECO PWR scrolls on the display ➜ The display is displayed 17 English Switching on/off... (or y on the remote control) 3 To select your function, press SOURCE once or more than 15 minutes, the set will be retained in the stop position for more on...
... ECO POWER mode 1 When the set is switched off, press and hold STANDBY-ON to switch between Standby and ECO POWER mode (or y on the remote control) In ECO POWER mode (power-saving mode): ➜ ECO PWR scrolls on the display ➜ The display is displayed 17 English Switching on/off... (or y on the remote control) 3 To select your function, press SOURCE once or more than 15 minutes, the set will be retained in the stop position for more on...
User manual
Page 18
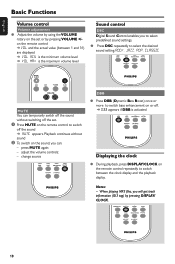
press MUTE again; - When playing MP3 files, you will get track information (ID3 tag) by pressing VOLUME +/on the remote control ➜ VOL and the actual value (between the clock display and the playback display. change source DBB ● Press DBB (Dynamic Bass Boost) once... is the maximum volume level Sound control DSC Digital Sound Control enables you can temporarily switch off the sound without sound 2 To switch on the remote control repeatedly to switch between 1 and 31) are displayed ➜ VOL MIN is the minimum volume level ➜ VOL MAX is activated Displaying the ...
press MUTE again; - When playing MP3 files, you will get track information (ID3 tag) by pressing VOLUME +/on the remote control ➜ VOL and the actual value (between the clock display and the playback display. change source DBB ● Press DBB (Dynamic Bass Boost) once... is the maximum volume level Sound control DSC Digital Sound Control enables you can temporarily switch off the sound without sound 2 To switch on the remote control repeatedly to switch between 1 and 31) are displayed ➜ VOL MIN is the minimum volume level ➜ VOL MAX is activated Displaying the ...

User manual
Page 19
... number "T x xx" 19 Therefore, do not use Windows Media Player 10 (or later) for CD burning/ conversion. Disc format ISO9660, Joliet, UDF (created on the remote control) ➜ The CD icon appears 2 Press CD OPEN•CLOSEç to select CD (or CD on Adaptec Direct CD) and multi-session CDs...
... number "T x xx" 19 Therefore, do not use Windows Media Player 10 (or later) for CD burning/ conversion. Disc format ISO9660, Joliet, UDF (created on the remote control) ➜ The CD icon appears 2 Press CD OPEN•CLOSEç to select CD (or CD on Adaptec Direct CD) and multi-session CDs...

User manual
Page 22
... and contains various track information such as the track´s title or the artist´s name. ● During playback, press DISPLAY/CLOCK repeatedly on the remote control ➜ Display show title name, album name and ID3 tag information Helpful hints: - Complete the ID3 tag information with your MP3/WMA encoder software...
... and contains various track information such as the track´s title or the artist´s name. ● During playback, press DISPLAY/CLOCK repeatedly on the remote control ➜ Display show title name, album name and ID3 tag information Helpful hints: - Complete the ID3 tag information with your MP3/WMA encoder software...
User manual
Page 23
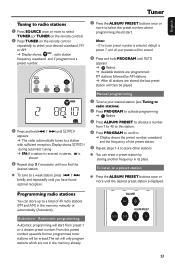
English Tuner Tuning to radio stations 1 Press SOURCE once or more to select TUNER (or TUNER on the remote control) 2 Press TUNER on the remote control repeatedly to select your desired waveband, FM or AM ➜ Display shows: , radio station frequency, waveband and if programmed, a preset number / USB 1 Press the ...
English Tuner Tuning to radio stations 1 Press SOURCE once or more to select TUNER (or TUNER on the remote control) 2 Press TUNER on the remote control repeatedly to select your desired waveband, FM or AM ➜ Display shows: , radio station frequency, waveband and if programmed, a preset number / USB 1 Press the ...

User manual
Page 25
NO AUDIO appears if no audio file is displayed through your MCM275 1 Check the external device has been properly connected (See Installation, Connecting an additional appliance) 2 Press SOURCE once or more to select USB (or USB on the remote control) ➜ The icon appears - File names or ID3 ...device has been properly connected. (See Installation: Connecting an additional appliance) 2 Press SOURCE once or more to select AUX (or AUX on the remote control) 3 To avoid noise distortion, turn down the volume on your external device 4 Press the PLAY key on the connected device to start ...
NO AUDIO appears if no audio file is displayed through your MCM275 1 Check the external device has been properly connected (See Installation, Connecting an additional appliance) 2 Press SOURCE once or more to select USB (or USB on the remote control) ➜ The icon appears - File names or ID3 ...device has been properly connected. (See Installation: Connecting an additional appliance) 2 Press SOURCE once or more to select AUX (or AUX on the remote control) 3 To avoid noise distortion, turn down the volume on your external device 4 Press the PLAY key on the connected device to start ...

User manual
Page 26
... 90, 75, 60, 45, 30, 15 ➜ Display shows the selected option briefly and returns to switch off the set (or y on the remote control) 3 Press TIMER to confirm ➜ The minutes digits start flashing 6 Hold down or press VOLUME +/- English Timer SLEEP Setting the timer The set... Press SOURCE on the set) 7 Press TIMER to Tuner source automatically if : - no CD is inserted when the selected source is switched on the remote control until SET TIMER appears ➜ flashes. Make sure the clock is set is CD; - Activating and deactivating TIMER ● Press TIMER on (volume...
... 90, 75, 60, 45, 30, 15 ➜ Display shows the selected option briefly and returns to switch off the set (or y on the remote control) 3 Press TIMER to confirm ➜ The minutes digits start flashing 6 Hold down or press VOLUME +/- English Timer SLEEP Setting the timer The set... Press SOURCE on the set) 7 Press TIMER to Tuner source automatically if : - no CD is inserted when the selected source is switched on the remote control until SET TIMER appears ➜ flashes. Make sure the clock is set is CD; - Activating and deactivating TIMER ● Press TIMER on (volume...

User manual
Page 29
... directly toward IR sensor on the timer. ✔ Power has been interrupted or the power cord has been disconnected. English The remote control does not function properly. The timer is switched off ✔ Set the clock correctly. ✔ Press TIMER to switch on the front ... not working. Troubleshooting ✔ Select the source (CD or TUNER, for example) before pressing the function button ✔ Reduce the distance between the remote control and the system. ✔ Insert the battery with its polarities (+/- Reset the clock/timer. 29 The Clock/Timer setting is erased.
... directly toward IR sensor on the timer. ✔ Power has been interrupted or the power cord has been disconnected. English The remote control does not function properly. The timer is switched off ✔ Set the clock correctly. ✔ Press TIMER to switch on the front ... not working. Troubleshooting ✔ Select the source (CD or TUNER, for example) before pressing the function button ✔ Reduce the distance between the remote control and the system. ✔ Insert the battery with its polarities (+/- Reset the clock/timer. 29 The Clock/Timer setting is erased.

Quick start guide
Page 1
MCM 275 Quick Start Guide What's in the Box? Stand FM antenna 210 mm (8.26") Quick Start Guide Mounting kit (1x template, 2 x screws) Quick start guide Install Prepare Enjoy / USB AM antenna User Manual Remote control with 1 x CR2025 battery User manual You should find these items upon opening the box.
MCM 275 Quick Start Guide What's in the Box? Stand FM antenna 210 mm (8.26") Quick Start Guide Mounting kit (1x template, 2 x screws) Quick start guide Install Prepare Enjoy / USB AM antenna User Manual Remote control with 1 x CR2025 battery User manual You should find these items upon opening the box.

Quick start guide
Page 3
... OPEN•CLOSEç to Standby mode ➜ The display shows the set time flashes by pressing one of the source select keys on the remote control (DISC or TUNER, for the initial clock setting. Enjoy Playing discs With this system, you have not set the clock 2 In the standby...RWs, MP3/WMA-CDs (CD-Rs/CD-RWs with MP3/WMA files) 1 Press SOURCE once or more b. Then select the desired function ( 2;, í, ë for remote control: - First, select the source you wish to confirm 5 Hold down or press VOLUME +/- repeatedly to set the minutes 6 Press DISPLAY/CLOCK to start flashing...
... OPEN•CLOSEç to Standby mode ➜ The display shows the set time flashes by pressing one of the source select keys on the remote control (DISC or TUNER, for the initial clock setting. Enjoy Playing discs With this system, you have not set the clock 2 In the standby...RWs, MP3/WMA-CDs (CD-Rs/CD-RWs with MP3/WMA files) 1 Press SOURCE once or more b. Then select the desired function ( 2;, í, ë for remote control: - First, select the source you wish to confirm 5 Hold down or press VOLUME +/- repeatedly to set the minutes 6 Press DISPLAY/CLOCK to start flashing...

Quick start guide
Page 4
PHILIPS CONSUMER ELECTRONICS NORTH AMERICA P.O. All rights reserved. Enjoy Tuning to radio stations / 1 USB Press SOURCE once or more to select USB (or USB on the remote control) / 4 USB Play the USB's audio files as you do with the albums/tracks on a CD 5 Press STANDBY-ON y to ... control panel 3 Press SOURCE once or more to select TUNER (or TUNER on the remote control) 2 Press and hold PROGRAM until AUTO appears ➜ flashes. Box 671539, Marietta, GA. 30006-0026 http://www.philips.com PDCC-AL-0550 Available stations are described in the accompanied owner's manual. 2005 C...
PHILIPS CONSUMER ELECTRONICS NORTH AMERICA P.O. All rights reserved. Enjoy Tuning to radio stations / 1 USB Press SOURCE once or more to select USB (or USB on the remote control) / 4 USB Play the USB's audio files as you do with the albums/tracks on a CD 5 Press STANDBY-ON y to ... control panel 3 Press SOURCE once or more to select TUNER (or TUNER on the remote control) 2 Press and hold PROGRAM until AUTO appears ➜ flashes. Box 671539, Marietta, GA. 30006-0026 http://www.philips.com PDCC-AL-0550 Available stations are described in the accompanied owner's manual. 2005 C...


