
Leaflet
Page 3
... 2.0.4 12 NC: 9073 100 12793 UPC: 0 37849 96295 4 © 2009 Koninklijke Philips Electronics N.V. Specifications are the property of Koninklijke Philips Electronics N.V. Micro Hi-Fi System Specifications MCM240/37 Sound • Sound Enhancement: Digital Sound Control 4 modes, Dynamic Bass Boost •...LCD Accessories • Included Accessories: Screws for wall mounting x2, AM/FM Antenna • Remote control: 23-key with battery Dimensions • Weight incl. or their respective owners. www.philips.com Trademarks are subject to change without notice. All Rights reserved.
... 2.0.4 12 NC: 9073 100 12793 UPC: 0 37849 96295 4 © 2009 Koninklijke Philips Electronics N.V. Specifications are the property of Koninklijke Philips Electronics N.V. Micro Hi-Fi System Specifications MCM240/37 Sound • Sound Enhancement: Digital Sound Control 4 modes, Dynamic Bass Boost •...LCD Accessories • Included Accessories: Screws for wall mounting x2, AM/FM Antenna • Remote control: 23-key with battery Dimensions • Weight incl. or their respective owners. www.philips.com Trademarks are subject to change without notice. All Rights reserved.

User manual
Page 8
... 9 Preparations Rear connections 10 - 11 Optional connection 11 Connecting other equipment to your system Before using the remote control 11 Replacing battery (lithium CR2025) into the remote control 11 Controls Controls on the system and remote control 12 Basic Functions Switching the system on 13 Switch the system to Eco Power Standby mode...
... 9 Preparations Rear connections 10 - 11 Optional connection 11 Connecting other equipment to your system Before using the remote control 11 Replacing battery (lithium CR2025) into the remote control 11 Controls Controls on the system and remote control 12 Basic Functions Switching the system on 13 Switch the system to Eco Power Standby mode...
User manual
Page 9
..., hard and stable surface. ● Place the system in your system. Supplied accessories - 2 speaker boxes - Should this occur, the CD player would not operate normally. remote control (with adequate ventilation to prevent internal heat build-up in a location with battery) - To disconnect the system from the power supply completely, remove the...
..., hard and stable surface. ● Place the system in your system. Supplied accessories - 2 speaker boxes - Should this occur, the CD player would not operate normally. remote control (with adequate ventilation to prevent internal heat build-up in a location with battery) - To disconnect the system from the power supply completely, remove the...
User manual
Page 11
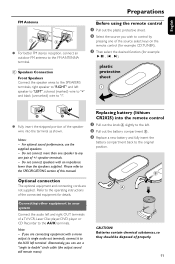
...into the terminal as shown. Note: - Alternatively, you wish to double" cinch cable (the output sound still remain mono). Before using the remote control 1 Pull out the plastic protective sheet. 2 Select the source you can use the supplied speakers. - speaker terminals. - For optimal ...sound performance, use a "single to control by pressing one pair of the speaker wire into the remote control 1 Pull out the knob A slightly to the left. 2 Pull out the battery compartment B . 3 Replace a new battery and fully...
...into the terminal as shown. Note: - Alternatively, you wish to double" cinch cable (the output sound still remain mono). Before using the remote control 1 Pull out the plastic protective sheet. 2 Select the source you can use the supplied speakers. - speaker terminals. - For optimal ...sound performance, use a "single to control by pressing one pair of the speaker wire into the remote control 1 Pull out the knob A slightly to the left. 2 Pull out the battery compartment B . 3 Replace a new battery and fully...

User manual
Page 12
...Sound Control) - connects headphones Notes for TUNER ........ shows the status of a current/previous/subsequent track 8 DBB (Dynamic Bass Boost) - for remote control: - sets the clock function. - for tuner, displays RDS information. (not for TUNER ........ skips to standby/normal standby with clock ...of a current/previous/subsequent album. 9 stops disc playback or erases a disc programme starts or interrupts playback. enhances the bass. 9 BAND - remote sensor 5 VOLUME (3 / 4 ) (+/-) - selects a preset radio station. Then select the desired function (for CD/MP3-CD fast searches...
...Sound Control) - connects headphones Notes for TUNER ........ shows the status of a current/previous/subsequent track 8 DBB (Dynamic Bass Boost) - for remote control: - sets the clock function. - for tuner, displays RDS information. (not for TUNER ........ skips to standby/normal standby with clock ...of a current/previous/subsequent album. 9 stops disc playback or erases a disc programme starts or interrupts playback. enhances the bass. 9 BAND - remote sensor 5 VOLUME (3 / 4 ) (+/-) - selects a preset radio station. Then select the desired function (for CD/MP3-CD fast searches...

User manual
Page 13
...effect: ROCK/ JAZZ/ POP/ CLASSIC. 3 Press DBB to switch bass enhancement on or off. ➜ Display shows: DBB. 4 Press MUTE on the remote). ➜ The backlight for clock display is operated. Switching the system to the CD source. press MUTE again; - Switching the system on ● Press... STANDBY-ON (or B on the remote). ➜ The system will switch to the last selected source. ● Press CD, TUNER or AUX on the remote control. ➜ The system will switch to the selected source. ● Press OPEN•...
...effect: ROCK/ JAZZ/ POP/ CLASSIC. 3 Press DBB to switch bass enhancement on or off. ➜ Display shows: DBB. 4 Press MUTE on the remote). ➜ The backlight for clock display is operated. Switching the system to the CD source. press MUTE again; - Switching the system on ● Press... STANDBY-ON (or B on the remote). ➜ The system will switch to the last selected source. ● Press CD, TUNER or AUX on the remote control. ➜ The system will switch to the selected source. ● Press OPEN•...

User manual
Page 14
...To find a passage within a track 1 Press and hold down on ALBUM/TUNE à / á (or ALBUM -/+ à /á on the remote). ➜ Normal playback continues. To interrupt playback ● Press ÉÅduring disc playback. Loading a disc This CD player plays Audio Discs including CD...shortly after loading a disc or in the PAUSE position, you want, release ALBUM/TUNE à /á (or ALBUM -/+ à /á on the remote). ➜ The disc is interrupted. ➜ To resume, press ÉÅ again. In MP3-CD mode ● Press DISPLAY repeatedly to start playback...
...To find a passage within a track 1 Press and hold down on ALBUM/TUNE à / á (or ALBUM -/+ à /á on the remote). ➜ Normal playback continues. To interrupt playback ● Press ÉÅduring disc playback. Loading a disc This CD player plays Audio Discs including CD...shortly after loading a disc or in the PAUSE position, you want, release ALBUM/TUNE à /á (or ALBUM -/+ à /á on the remote). ➜ The disc is interrupted. ➜ To resume, press ÉÅ again. In MP3-CD mode ● Press DISPLAY repeatedly to start playback...

User manual
Page 15
...-rates: 32~256 (kbps), variable bitrates REPEAT plays the current track continuously 1 To select your play mode, press SHUFFLE or REPEAT on the remote control before or during playback until the display shows the desired function. (SHUFFLE, REPEAT, REPEAT ALL) 2 PressÉÅ to start playback...to enter the programming mode. ➜ A track number is shown and PROGRAM flashes. 2 Use PRESETí / ë (or í / ë on the remote) to select your desired track number. ➜ For MP3 CD, press ALBUM/TUNE à /á (or ALBUM -/+ à /á on filename length) - ...
...-rates: 32~256 (kbps), variable bitrates REPEAT plays the current track continuously 1 To select your play mode, press SHUFFLE or REPEAT on the remote control before or during playback until the display shows the desired function. (SHUFFLE, REPEAT, REPEAT ALL) 2 PressÉÅ to start playback...to enter the programming mode. ➜ A track number is shown and PROGRAM flashes. 2 Use PRESETí / ë (or í / ë on the remote) to select your desired track number. ➜ For MP3 CD, press ALBUM/TUNE à /á (or ALBUM -/+ à /á on filename length) - ...

User manual
Page 17
...Repeat step 3 if necessary until you have found optimal reception. 1 Press PRESETí / ë (or í / ë on the remote) to select the preset number where programming should start with sufficient reception. From this station. 4 Press PROGRAM again to confirm the setting. ➜..."Tuning to radio stations"). 2 Press PROGRAM to activate programming. 3 Press PRESETí / ë (or í / ë on the remote) to allocate a number from 1 to 40 to this preset number upwards, former programmed radio stations will start . English Radio Reception Tuning to radio stations...
...Repeat step 3 if necessary until you have found optimal reception. 1 Press PRESETí / ë (or í / ë on the remote) to select the preset number where programming should start with sufficient reception. From this station. 4 Press PROGRAM again to confirm the setting. ➜..."Tuning to radio stations"). 2 Press PROGRAM to activate programming. 3 Press PRESETí / ë (or í / ë on the remote) to allocate a number from 1 to 40 to this preset number upwards, former programmed radio stations will start . English Radio Reception Tuning to radio stations...

User manual
Page 18
... clock display is pressed within 30 seconds. English Clock/Timer Setting the clock 1 In standby mode or system on, press and hold TIMER on the remote control for more than 3 seconds. ➜ Display sequence scrolls SET TIMER and SELECT SOURCE. ➜ Display sequence shows CD, TUNER and flashes. ... for a few seconds, then the system resumes to confirm. ➜ The timer is displayed. Activating and deactivating TIMER ● Press TIMER on the remote to turn off the timer or turn on the display. ➜ The clock digits for the hours flash. 2 Press VOLUME (3 / 4) (+/-) to...
... clock display is pressed within 30 seconds. English Clock/Timer Setting the clock 1 In standby mode or system on, press and hold TIMER on the remote control for more than 3 seconds. ➜ Display sequence scrolls SET TIMER and SELECT SOURCE. ➜ Display sequence shows CD, TUNER and flashes. ... for a few seconds, then the system resumes to confirm. ➜ The timer is displayed. Activating and deactivating TIMER ● Press TIMER on the remote to turn off the timer or turn on the display. ➜ The clock digits for the hours flash. 2 Press VOLUME (3 / 4) (+/-) to...

User manual
Page 19
English Activating and deactivating SLEEP The sleep timer enables the system to switch off by itself after a set period of the sleep time options in sequence: 90, 60, 45, 30, 15, OFF, 90... Once SLEEP is activated, SLEEP is display. ● To deactivate, press SLEEP on the remote control repeatedly until OFF is shown, or press STANDBY-ON/ (or B on the remote control once or more. ➜ Display shows SLEEP and one of time. ● Press SLEEP on the remote). ➜ OFF is displayed. Clock/Timer 19 if you have selected a time.
English Activating and deactivating SLEEP The sleep timer enables the system to switch off by itself after a set period of the sleep time options in sequence: 90, 60, 45, 30, 15, OFF, 90... Once SLEEP is activated, SLEEP is display. ● To deactivate, press SLEEP on the remote control repeatedly until OFF is shown, or press STANDBY-ON/ (or B on the remote control once or more. ➜ Display shows SLEEP and one of time. ● Press SLEEP on the remote). ➜ OFF is displayed. Clock/Timer 19 if you have selected a time.

User manual
Page 21
...for example) before taking the system for help. If you try to repair the system yourself, as indicated. ✔ Replace the battery. ✔ Point the remote control directly toward IR sensor on the timer. ✔ Power has been interrupted or the power cord has been disconnected. Problem "NO DISC" is a risk... setting is of the system. ✔ Set the clock correctly. ✔ Press TIMER to remedy a problem by following these hints, consult your dealer or Philips for repair. The remote control does not function properly. The left and right sound outputs are pressed.
...for example) before taking the system for help. If you try to repair the system yourself, as indicated. ✔ Replace the battery. ✔ Point the remote control directly toward IR sensor on the timer. ✔ Power has been interrupted or the power cord has been disconnected. Problem "NO DISC" is a risk... setting is of the system. ✔ Set the clock correctly. ✔ Press TIMER to remedy a problem by following these hints, consult your dealer or Philips for repair. The remote control does not function properly. The left and right sound outputs are pressed.

Quick start guide
Page 1
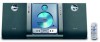
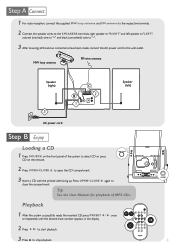
Step A Connect Step B Enjoy Stand 1 Quick Start Guide Wall 3 Mounting Quick Start Guide Wall Mounting FM and MW antenna 2 User Manual User manual Remote Control Pull out the plastic protective sheet. 2 x screw and plug assembly You should find these items upon opening the box. MCM240 Quick start guide What's in the Box?
Step A Connect Step B Enjoy Stand 1 Quick Start Guide Wall 3 Mounting Quick Start Guide Wall Mounting FM and MW antenna 2 User Manual User manual Remote Control Pull out the plastic protective sheet. 2 x screw and plug assembly You should find these items upon opening the box. MCM240 Quick start guide What's in the Box?
Quick start guide
Page 2
... antenna to the respective terminals. 2 Connect the speaker wires to the SPEAKERS terminals, right speaker to "RIGHT" and left ) Loading a CD 1 Press SOURCE on the remote. 2 Press OPEN•CLOSE 0 to open the CD compartment. 3 Insert a CD with the printed side facing up.
... antenna to the respective terminals. 2 Connect the speaker wires to the SPEAKERS terminals, right speaker to "RIGHT" and left ) Loading a CD 1 Press SOURCE on the remote. 2 Press OPEN•CLOSE 0 to open the CD compartment. 3 Insert a CD with the printed side facing up.


