Leaflet
Page 2
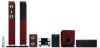
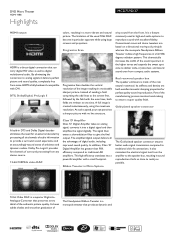
... signal digitally. DVD Micro Theater HDMI 1080i Highlights MCD759D/37 HDMI output HDMI is a direct digital connection that can carry digital HD video as well as close to deliver wide, crystal-clear, and natural sound even from compact audio systems. Real rosewood speaker box The speaker enclosure is made of the real, natural rosewood. Instead of surround processing from the front. At such a speed, your eye perceives a sharper picture with DVI. Dolby...
... signal digitally. DVD Micro Theater HDMI 1080i Highlights MCD759D/37 HDMI output HDMI is a direct digital connection that can carry digital HD video as well as close to deliver wide, crystal-clear, and natural sound even from compact audio systems. Real rosewood speaker box The speaker enclosure is made of the real, natural rosewood. Instead of surround processing from the front. At such a speed, your eye perceives a sharper picture with DVI. Dolby...

Leaflet
Page 3
...: FM Stereo, AM • Auto digital tuning • Station presets: 40 • Tuner Enhancements: Auto Store Connectivity • Video Output - or their respective owners. All Rights reserved. Trademarks are subject to change without notice. DVD Micro Theater HDMI 1080i Specifications MCD759D/37 Picture/Display • D/A converter: 12bit, 108MHz • Picture enhancement: High Def (720p, 1080i), Video upsampling, Video upscaling Sound • Output Power: Total 800W RMS • Sound Enhancement: Class "D" Digital Amplifier, Digital Sound Control 4 modes, Dynamic Bass Boost...
...: FM Stereo, AM • Auto digital tuning • Station presets: 40 • Tuner Enhancements: Auto Store Connectivity • Video Output - or their respective owners. All Rights reserved. Trademarks are subject to change without notice. DVD Micro Theater HDMI 1080i Specifications MCD759D/37 Picture/Display • D/A converter: 12bit, 108MHz • Picture enhancement: High Def (720p, 1080i), Video upsampling, Video upscaling Sound • Output Power: Total 800W RMS • Sound Enhancement: Class "D" Digital Amplifier, Digital Sound Control 4 modes, Dynamic Bass Boost...

User manual (English)
Page 2
... the Class B limits for home and other rights owners. CAUTION Use of controls or adjustments or performance of certain U.S. Manufactured under license. Reserve engineering or disassembly is a trademark of Dolby Laboratories. This product incorporates copyright protection technology that is protected by Macrovision Corporation, and is intended for radio noise emissions from Dolby Laboratories. COPYRIGHT 1996, 2000 DIGITAL THEATER SYSTEMS, INC. DivX, DivX...
... the Class B limits for home and other rights owners. CAUTION Use of controls or adjustments or performance of certain U.S. Manufactured under license. Reserve engineering or disassembly is a trademark of Dolby Laboratories. This product incorporates copyright protection technology that is protected by Macrovision Corporation, and is intended for radio noise emissions from Dolby Laboratories. COPYRIGHT 1996, 2000 DIGITAL THEATER SYSTEMS, INC. DivX, DivX...

User manual (English)
Page 3
You've selected one of the most comprehensive warranties and outstanding service networks in the industry.What's more, your purchase guarantees you 'll receive notification directly from our convenient home shopping network. This "bolt of lightning" indicates uninsulated material within your model with your purchase for...operating and maintenance problems. WARNING: To reduce the risk of saying welcome and thanks for many years to come. C A UTI ON RISK OF ELECTRIC SHOCK DO NOT OPEN CAUTION: TO REDUCE THE RISK OF ELECTRIC SHOCK, DO NOT REMOVE COVER (OR BACK). Dear PHILIPS product owner...
You've selected one of the most comprehensive warranties and outstanding service networks in the industry.What's more, your purchase guarantees you 'll receive notification directly from our convenient home shopping network. This "bolt of lightning" indicates uninsulated material within your model with your purchase for...operating and maintenance problems. WARNING: To reduce the risk of saying welcome and thanks for many years to come. C A UTI ON RISK OF ELECTRIC SHOCK DO NOT OPEN CAUTION: TO REDUCE THE RISK OF ELECTRIC SHOCK, DO NOT REMOVE COVER (OR BACK). Dear PHILIPS product owner...

User manual (English)
Page 6
... deactivate Progressive manually Step 3: Setting language preference 21 Setting the OSD Language Setting the Audio, Subtitle and Disc Menu language Basic Functions Switching the system on/off 22 Switching the system to Eco Power Standby mode 22 Power-saving automatic standby 22 Volume control 22 Sound Control 22~23 DBB (Dynamic Bass Boost) DSC (Digital Sound Control) Selecting surround sound Dimming the display screen 23 Disc Operations Playable Discs 24 Playing discs 24 Using the Disc Menu 25 Basic playback controls 25~27 Pausing playback (DVD/VCD/CD...
... deactivate Progressive manually Step 3: Setting language preference 21 Setting the OSD Language Setting the Audio, Subtitle and Disc Menu language Basic Functions Switching the system on/off 22 Switching the system to Eco Power Standby mode 22 Power-saving automatic standby 22 Volume control 22 Sound Control 22~23 DBB (Dynamic Bass Boost) DSC (Digital Sound Control) Selecting surround sound Dimming the display screen 23 Disc Operations Playable Discs 24 Playing discs 24 Using the Disc Menu 25 Basic playback controls 25~27 Pausing playback (DVD/VCD/CD...
User manual (English)
Page 8
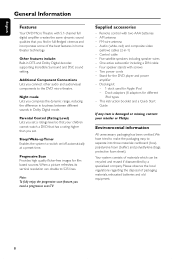
... quality flicker-free images for the DVD player and power amplifier - Audio (white, red) and composite video (yellow) cables (2-in DTS and Dolby Digital decoder, supporting Incredible Surround and DSC sound setting. Stand for film based sources. Parental Control (Rating Level) Lets you set . Sleep/Wake-up Timer Enables the system to separate into three materials: cardboard (box), polystyrene foam (buffer) and polyethylene (bags, protective foam sheet). Five satellite speakers including speaker wires - Environmental...
... quality flicker-free images for the DVD player and power amplifier - Audio (white, red) and composite video (yellow) cables (2-in DTS and Dolby Digital decoder, supporting Incredible Surround and DSC sound setting. Stand for film based sources. Parental Control (Rating Level) Lets you set . Sleep/Wake-up Timer Enables the system to separate into three materials: cardboard (box), polystyrene foam (buffer) and polyethylene (bags, protective foam sheet). Five satellite speakers including speaker wires - Environmental...

User manual (English)
Page 10
... and at the bottom of the subwoofer. A separate power switch is provided on the wall where the speaker is to enjoy 5.1-channel sound output. Allow adequate ventilation around the DVD system. 10 OR 2 Alternatively, you can choose to your TV. - For best possible surround sound, all connections in the above the TV or the DVD system so that the center channel's sound is located at an angle...
... and at the bottom of the subwoofer. A separate power switch is provided on the wall where the speaker is to enjoy 5.1-channel sound output. Allow adequate ventilation around the DVD system. 10 OR 2 Alternatively, you can choose to your TV. - For best possible surround sound, all connections in the above the TV or the DVD system so that the center channel's sound is located at an angle...

User manual (English)
Page 14
... making connections, make or change any connection with Dolby Digital decoder). Before starting operation, press SOURCE on the front panel to select AUX or press AUX on the remote in the AC power cords of the main set, subwoofer and TV set the DIGITAL OUT according to the audio connection. (See "DIGITAL OUT".) Using the VCR for complete connection and usage details. Additional: Connecting additional equipment IMPORTANT! - B A AUDIO OUT L R Television Viewing and listening to the playback of jacks. - English Connections...
... making connections, make or change any connection with Dolby Digital decoder). Before starting operation, press SOURCE on the front panel to select AUX or press AUX on the remote in the AC power cords of the main set, subwoofer and TV set the DIGITAL OUT according to the audio connection. (See "DIGITAL OUT".) Using the VCR for complete connection and usage details. Additional: Connecting additional equipment IMPORTANT! - B A AUDIO OUT L R Television Viewing and listening to the playback of jacks. - English Connections...

User manual (English)
Page 18
English Functional Overview $ SURROUND - stops disc playback or erases a program. & DISC/TUNER/iPod/AUX - For tuner (TUNER): press to the MENU button on the system automatically. Power-on TV screen during playback - Playback mode - selects a DVD camera angle. £ DISPLAY/MENU - sets Stereo, Mono-Left or Mono-Right sound mode. repeats playback of the source select keys on a disc. § MODE - selects various repeat modes or the shuffle play mode for individual speakers. • DBB - adjusts volume level for a disc. ≥ CH. enables or disables bass enhancement. ª...
English Functional Overview $ SURROUND - stops disc playback or erases a program. & DISC/TUNER/iPod/AUX - For tuner (TUNER): press to the MENU button on the system automatically. Power-on TV screen during playback - Playback mode - selects a DVD camera angle. £ DISPLAY/MENU - sets Stereo, Mono-Left or Mono-Right sound mode. repeats playback of the source select keys on a disc. § MODE - selects various repeat modes or the shuffle play mode for individual speakers. • DBB - adjusts volume level for a disc. ≥ CH. enables or disables bass enhancement. ª...
User manual (English)
Page 19
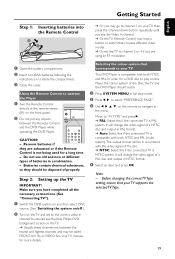
... use old and new or different types of a PAL disc and output in NTSC format. 4 Select an item and press OK. Before changing the current TV Type setting, ensure that chooses different video modes. ➜ Or, set the TV to channel 3 or 4 if you have a button or switch that your TV supports the selected TV Type. 19 Make sure you are between the Remote Control and the DVD Player while operating...
... use old and new or different types of a PAL disc and output in NTSC format. 4 Select an item and press OK. Before changing the current TV Type setting, ensure that chooses different video modes. ➜ Or, set the TV to channel 3 or 4 if you have a button or switch that your TV supports the selected TV Type. 19 Make sure you are between the Remote Control and the DVD Player while operating...
User manual (English)
Page 24
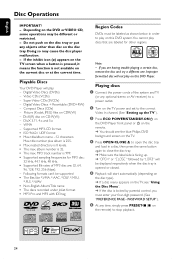
.... Supported MP3-CD format. • ISO 9660 / UDF format • Max. album number is 8 levels. • The max. Playing discs 1 Connect the power cords of MP3 disc are: 32, 64, 96, 128, 192, 256 (kbps). - PASSWORD SETUP"). 6 At any optional stereo or AV receiver) to a power outlet. 2 Turn on the TV power and set to the correct Video In channel. (See "Setting up the TV"). 3 Press ECO POWER/STANDBY-ONB on the DVD Player front panel or...
.... Supported MP3-CD format. • ISO 9660 / UDF format • Max. album number is 8 levels. • The max. Playing discs 1 Connect the power cords of MP3 disc are: 32, 64, 96, 128, 192, 256 (kbps). - PASSWORD SETUP"). 6 At any optional stereo or AV receiver) to a power outlet. 2 Turn on the TV power and set to the correct Video In channel. (See "Setting up the TV"). 3 Press ECO POWER/STANDBY-ONB on the DVD Player front panel or...

User manual (English)
Page 27
... Media Digital Rights Management). Note: - Camera Angle (DVD) ● Press ANGLE repeatedly to select different audio languages. The disc reading time may exceed 10 seconds due to open the album. General operation 1 Load an MP3/WMA disc. ➜ The data disc menu appears on the TV screen. 2 Use 1 2 3 4 or Numeric Keypad (0-9) to select a play option. 3 Press OK to switch between Album and Filelist. 27 Disc Operations English...
... Media Digital Rights Management). Note: - Camera Angle (DVD) ● Press ANGLE repeatedly to select different audio languages. The disc reading time may exceed 10 seconds due to open the album. General operation 1 Load an MP3/WMA disc. ➜ The data disc menu appears on the TV screen. 2 Use 1 2 3 4 or Numeric Keypad (0-9) to select a play option. 3 Press OK to switch between Album and Filelist. 27 Disc Operations English...

User manual (English)
Page 31
... feature is disabled. Follow the instructions and download the video onto a CD-R for 5.1-channel sound output. 31 DOWNMIX This option allows you to rent and purchase videos using the DivX® VOD service. System Menu Options Notes: - AUDIO SETUP PAGE The options included in ANALOG AUDIO SETUP page are: "DOWNMIX", "FRONT SPEAKER", "CENTER SPEAKER", "REAR SPEAKER", "SUBWOOFER", "TEST SPEAKER" and "DIALOG". 2 Press OK to exit. 3 Use the registration code to purchase or rent the...
... feature is disabled. Follow the instructions and download the video onto a CD-R for 5.1-channel sound output. 31 DOWNMIX This option allows you to rent and purchase videos using the DivX® VOD service. System Menu Options Notes: - AUDIO SETUP PAGE The options included in ANALOG AUDIO SETUP page are: "DOWNMIX", "FRONT SPEAKER", "CENTER SPEAKER", "REAR SPEAKER", "SUBWOOFER", "TEST SPEAKER" and "DIALOG". 2 Press OK to exit. 3 Use the registration code to purchase or rent the...

User manual (English)
Page 32
... mono sound will be automatically generated. CENTER SPEAKER Adjusts the volume level for front speakers. Note: - English System Menu Options FRONT SPEAKER Adjusts the volume levels for the center speaker. REAR SPEAKER Adjusts the volume levels for the subwoofer. Options include Options include "LARGE", "SMALL" and "OFF". TEST SPEAKER The test tone will send output signals to a multi-channel decoder/receiver. ➜ SPDIF/PCM: Only if your DIGITAL OUT (COAXIAL or OPTICAL) to Left speaker and Right speaker. 3D PROCESSING The options included in DIGITAL AUDIO SETUP...
... mono sound will be automatically generated. CENTER SPEAKER Adjusts the volume level for front speakers. Note: - English System Menu Options FRONT SPEAKER Adjusts the volume levels for the center speaker. REAR SPEAKER Adjusts the volume levels for the subwoofer. Options include Options include "LARGE", "SMALL" and "OFF". TEST SPEAKER The test tone will send output signals to a multi-channel decoder/receiver. ➜ SPDIF/PCM: Only if your DIGITAL OUT (COAXIAL or OPTICAL) to Left speaker and Right speaker. 3D PROCESSING The options included in DIGITAL AUDIO SETUP...
User manual (English)
Page 34
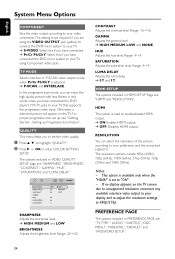
... connected the DVD player's Y Pb Pr jacks to your TV that supports the progressive video input. QUALITY This menu helps you to set to "ON". - BRIGHTNESS Adjusts the brightness level. HUE Adjusts the hue level. LUMA DELAY Adjusts the luma delay. ➜ 0 T and 1 T. This option is available only when the "HDMI" is set the video quality. 1 Press 3 4 to highlight "QUALITY". 2 Press 2 or OK to enter COLOR SETTING SETUP. In the progressive scan mode...
... connected the DVD player's Y Pb Pr jacks to your TV that supports the progressive video input. QUALITY This menu helps you to set to "ON". - BRIGHTNESS Adjusts the brightness level. HUE Adjusts the hue level. LUMA DELAY Adjusts the luma delay. ➜ 0 T and 1 T. This option is available only when the "HDMI" is set the video quality. 1 Press 3 4 to highlight "QUALITY". 2 Press 2 or OK to enter COLOR SETTING SETUP. In the progressive scan mode...
User manual (English)
Page 43
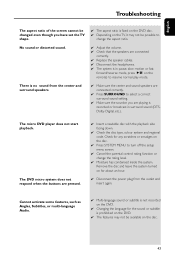
... or fast forward/reverse mode, press ÉÅ on the remote) to turn off the setup menu screen. ✔ Cancel the parental control rating function or change the aspect ratio. No sound or distorted sound. ✔ Adjust the volume. ✔ Check that the speakers are connected correctly. ✔ Replace the speaker cables. ✔ Disconnect the headphones. ✔ The system is in surround sound (DTS, Dolby Digital, etc.). The micro DVD player does not start...
... or fast forward/reverse mode, press ÉÅ on the remote) to turn off the setup menu screen. ✔ Cancel the parental control rating function or change the aspect ratio. No sound or distorted sound. ✔ Adjust the volume. ✔ Check that the speakers are connected correctly. ✔ Replace the speaker cables. ✔ Disconnect the headphones. ✔ The system is in surround sound (DTS, Dolby Digital, etc.). The micro DVD player does not start...
User manual (English)
Page 44
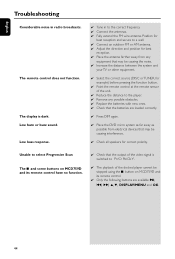
...; Replace the batteries with new ones. ✔ Check that the batteries are available: 2;, ¡1, 2™, 3, 4, DISPLAY/MENU and OK. 44 English Troubleshooting Considerable noise in to the correct frequency. ✔ Connect the antennas. ✔ Fully extend the FM wire antenna. Low hum or buzz sound. Low bass response. ✔ Tune in radio broadcasts. The remote control does not function. Unable to select Progressive Scan The 9 and some buttons on MCD759D and...
...; Replace the batteries with new ones. ✔ Check that the batteries are available: 2;, ¡1, 2™, 3, 4, DISPLAY/MENU and OK. 44 English Troubleshooting Considerable noise in to the correct frequency. ✔ Connect the antennas. ✔ Fully extend the FM wire antenna. Low hum or buzz sound. Low bass response. ✔ Tune in radio broadcasts. The remote control does not function. Unable to select Progressive Scan The 9 and some buttons on MCD759D and...

User manual (English)
Page 45
... display. Surround: A system for the selection of its high compression ratio. Each title is assigned a chapter number enabling you to receive progressive scan output from the product label. VIDEO OUT jack: Jack on a Disc. Disc menu: A screen display prepared for users to create realistic three-dimensional sound fields full of the DVD System that are compatible with a sound data compression system, "MPE" is needed to locate the chapter you use more channels...
... display. Surround: A system for the selection of its high compression ratio. Each title is assigned a chapter number enabling you to receive progressive scan output from the product label. VIDEO OUT jack: Jack on a Disc. Disc menu: A screen display prepared for users to create realistic three-dimensional sound fields full of the DVD System that are compatible with a sound data compression system, "MPE" is needed to locate the chapter you use more channels...

Quick start guide (English)
Page 2
... set it to select disc source. 2 Turn on the wall. - For connecting to a Progressive Scan TV, refer to a TV. 5 Connect the iPod dock. 6 Connect the power cords of the system and TV. iPod dock 5 Front Speaker (Right) 1 Connect the speaker cables. 2 Connect the AM and FM antennas. 3 Connect the control cable. 4 Connect the composite video and audio cables to the user manual for other TV connection options. - See the User Manual for proper connections and detailed setup. AC power 6 Front Speaker (Left) AM antenna 4 FM antenna 2 1 3 Subwoofer 1 Center Speaker Rear Speaker...
... set it to select disc source. 2 Turn on the wall. - For connecting to a Progressive Scan TV, refer to a TV. 5 Connect the iPod dock. 6 Connect the power cords of the system and TV. iPod dock 5 Front Speaker (Right) 1 Connect the speaker cables. 2 Connect the AM and FM antennas. 3 Connect the control cable. 4 Connect the composite video and audio cables to the user manual for other TV connection options. - See the User Manual for proper connections and detailed setup. AC power 6 Front Speaker (Left) AM antenna 4 FM antenna 2 1 3 Subwoofer 1 Center Speaker Rear Speaker...
Quick start guide (English)
Page 3
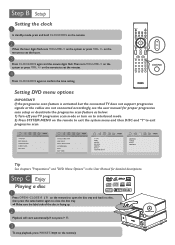
..., press PRESET-/9 (9 on the remote) to open the disc tray and load in the User Manual for proper progressive scan setup or deactivate the progressive scan feature as below: 1) Turn off your TV progressive scan mode or turn VOLUME-/+ on the system or press VOL +/- OPEN•CLOSE Setting the clock 1 In standby mode, press and hold CLOCK/RDS on the remote. 2 When the hour digits flash, turn on...
..., press PRESET-/9 (9 on the remote) to open the disc tray and load in the User Manual for proper progressive scan setup or deactivate the progressive scan feature as below: 1) Turn off your TV progressive scan mode or turn VOLUME-/+ on the system or press VOL +/- OPEN•CLOSE Setting the clock 1 In standby mode, press and hold CLOCK/RDS on the remote. 2 When the hour digits flash, turn on...


