
User manual
Page 7
... Control 19 Using the Remote Control to operate the Player Step 2: Setting up the TV 19~20 Setting up Progressive Scan feature To deactivate Progressive manually Step 3: Setting language preference 21 Setting the OSD Language Setting the Audio, Subtitle and Disc Menu language Basic Functions Switching the system on/off 22...
... Control 19 Using the Remote Control to operate the Player Step 2: Setting up the TV 19~20 Setting up Progressive Scan feature To deactivate Progressive manually Step 3: Setting language preference 21 Setting the OSD Language Setting the Audio, Subtitle and Disc Menu language Basic Functions Switching the system on/off 22...
User manual
Page 12
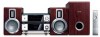
.../red-not supplied) to connect AUX IN jacks to the corresponding AUDIO OUT jacks on the TV set. 2 To hear the TV channels through this manual. 1 Use the composite video cable (yellow) to connect the system's VIDEO OUT jack to the video input jack (or labelled as shown. Please refer to...
.../red-not supplied) to connect AUX IN jacks to the corresponding AUDIO OUT jacks on the TV set. 2 To hear the TV channels through this manual. 1 Use the composite video cable (yellow) to connect the system's VIDEO OUT jack to the video input jack (or labelled as shown. Please refer to...
User manual
Page 13
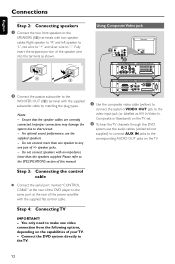
... hear the TV channels through this DVD system, use the audio cables (white/red-not supplied) to connect AUX IN jacks to your TV user manual. English Using Component Video jacks (Y Pb Pr) IMPORTANT! - Note: - If S-Video is required. Connections Using S-Video jack IMPORTANT! - If your TV does not support Progressive...
... hear the TV channels through this DVD system, use the audio cables (white/red-not supplied) to connect AUX IN jacks to your TV user manual. English Using Component Video jacks (Y Pb Pr) IMPORTANT! - Note: - If S-Video is required. Connections Using S-Video jack IMPORTANT! - If your TV does not support Progressive...
User manual
Page 15
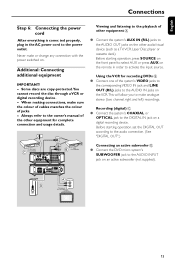
Always refer to the owner's manual of the other audio/visual device (such as a TV,VCR, Laser Disc player or cassette deck). Viewing and listening to the playback of other equipment A &#...
Always refer to the owner's manual of the other audio/visual device (such as a TV,VCR, Laser Disc player or cassette deck). Viewing and listening to the playback of other equipment A &#...
User manual
Page 19
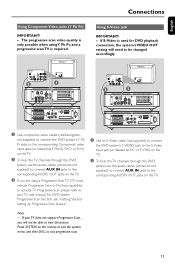
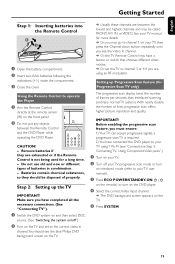
... old and new or different types of lines, progressive scan offers higher picture resolution and quality. Using Component Video jacks".) 1 Turn on your TV user manual). 3 Press ECO POWER/STANDBY-ON B (B on the TV and set the TV to channel 3 or 4 if you see "Connections-Step 5: Connecting TV..., so they are between the Remote Control and the DVD Player while operating the DVD Player. Remove batteries if they should see the blue Philips DVD background screen on the TV. ➜ Usually these channels are exhausted or if the Remote Control is required. 2) You have connected ...
... old and new or different types of lines, progressive scan offers higher picture resolution and quality. Using Component Video jacks".) 1 Turn on your TV user manual). 3 Press ECO POWER/STANDBY-ON B (B on the TV and set the TV to channel 3 or 4 if you see "Connections-Step 5: Connecting TV..., so they are between the Remote Control and the DVD Player while operating the DVD Player. Remove batteries if they should see the blue Philips DVD background screen on the TV. ➜ Usually these channels are exhausted or if the Remote Control is required. 2) You have connected ...
User manual
Page 20
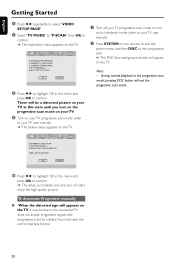
... the connected TV does not accept progressive signals, and progressive is complete now and you can start enjoy the high quality picture. To deactivate Progressive manually ● When the distorted sign still appears on the TV. English Getting Started 6 Press 1 2 repeatedly to select "VIDEO SETUP PAGE". 7 Select "TV MODE" ... scan mode or turn on the progressive scan mode on your TV. 9 Turn on your TV progressive scan mode (refer to your TV user manual). 2 Press SYSTEM on the remote to exit the system menu and then DISC to exit progressive scan. ➜ The DVD blue background screen ...
... the connected TV does not accept progressive signals, and progressive is complete now and you can start enjoy the high quality picture. To deactivate Progressive manually ● When the distorted sign still appears on the TV. English Getting Started 6 Press 1 2 repeatedly to select "VIDEO SETUP PAGE". 7 Select "TV MODE" ... scan mode or turn on the progressive scan mode on your TV. 9 Turn on your TV progressive scan mode (refer to your TV user manual). 2 Press SYSTEM on the remote to exit the system menu and then DISC to exit progressive scan. ➜ The DVD blue background screen ...
User manual
Page 36
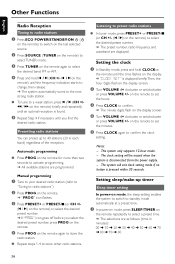
... than two seconds to select a preset time. ➜ The selections are displayed. The system will be erased when the system is pressed within 30 seconds. Manual progamming 1 Tune to your desired radio station (refer to "Tuning to radio stations"). 2 Press PROG on the remote. ➜ "PROG" icon flashes. 3 Press PRESET+ or...
... than two seconds to select a preset time. ➜ The selections are displayed. The system will be erased when the system is pressed within 30 seconds. Manual progamming 1 Tune to your desired radio station (refer to "Tuning to radio stations"). 2 Press PROG on the remote. ➜ "PROG" icon flashes. 3 Press PRESET+ or...
User manual
Page 39
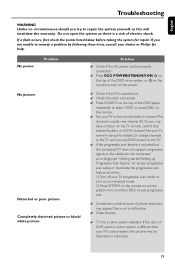
... screen on the remote to exit the system menu and then DISC to remedy a problem by following these hints, consult your dealer or Philips for proper progressive scan setup or deactivate the progressive scan feature as below before taking the system for details. If the disc's or DVD... system's colour system is different than your TV owner's manual for repair. Or, you see "Getting started-Setting up Progressive Scan feature" for help. See your TV's colour system, the picture may appear...
... screen on the remote to exit the system menu and then DISC to remedy a problem by following these hints, consult your dealer or Philips for proper progressive scan setup or deactivate the progressive scan feature as below before taking the system for details. If the disc's or DVD... system's colour system is different than your TV owner's manual for repair. Or, you see "Getting started-Setting up Progressive Scan feature" for help. See your TV's colour system, the picture may appear...
Quick start guide
Page 1
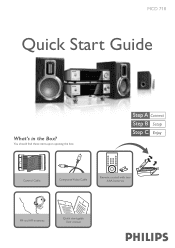
You should find these items upon opening the box. MCD 718 Quick Start Guide What's in the Box? Control Cable Composite Video Cable Remote control with two AAA batteries FM and AM antennas 1 Quick Start Guide U ser 2 M anual Quick start guide User manual
You should find these items upon opening the box. MCD 718 Quick Start Guide What's in the Box? Control Cable Composite Video Cable Remote control with two AAA batteries FM and AM antennas 1 Quick Start Guide U ser 2 M anual Quick start guide User manual
Quick start guide
Page 2
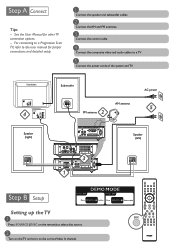
For connecting to a Progressive Scan TV, refer to the user manual for other TV connection options. - Subwoofer FM antenna AM antenna AC power Speaker (right) Speaker (left) Setting up the TV 1 Press SOURCE (DISC on the ... select disc source. 2 Turn on the TV and set it to a TV. 5 Connect the power cords of the system and TV. Tips - See the User Manual for proper connections and detailed setup. 1 Connect the speaker and subwoofer cables. 2 Connect the AM and FM antennas. 3 Connect the control cable. 4 Connect the composite...
For connecting to a Progressive Scan TV, refer to the user manual for other TV connection options. - Subwoofer FM antenna AM antenna AC power Speaker (right) Speaker (left) Setting up the TV 1 Press SOURCE (DISC on the ... select disc source. 2 Turn on the TV and set it to a TV. 5 Connect the power cords of the system and TV. Tips - See the User Manual for proper connections and detailed setup. 1 Connect the speaker and subwoofer cables. 2 Connect the AM and FM antennas. 3 Connect the control cable. 4 Connect the composite...
Quick start guide
Page 3
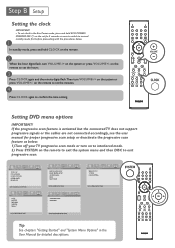
To set clock in the User Manual for proper progressive scan setup or deactivate the progressive scan feature as below . 1 In standby mode, press and hold ECO POWER/ STANDBY-ON 2 on the ... the progressive scan feature is activated but the connected TV does not support progressive signals or the cables are not connected accordingly, see the user manual for detailed descriptions. Setting DVD menu options IMPORTANT! CLOSED CAPTIONS Tip See chapters "Getting Started" and "System Menu Options" in the Eco Power mode, press...
To set clock in the User Manual for proper progressive scan setup or deactivate the progressive scan feature as below . 1 In standby mode, press and hold ECO POWER/ STANDBY-ON 2 on the ... the progressive scan feature is activated but the connected TV does not support progressive signals or the cables are not connected accordingly, see the user manual for detailed descriptions. Setting DVD menu options IMPORTANT! CLOSED CAPTIONS Tip See chapters "Getting Started" and "System Menu Options" in the Eco Power mode, press...
Quick start guide
Page 4
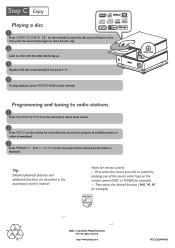
... all available stations in order of the source select keys on the remote control (DISC or TUNER, for example). 2005 C Koninklijie Philips Electronics N.V. http://www.philips.com PDCC-JS/JW-0615 Then select the desired function ( 2;, í, ë for example). - Notes for more than ...CH on the remote) until the desired preset station is displayed. Tip Detailed playback features and additional functions are described in the accompany owner's manual. All rights reserved. Programming and tuning to radio stations 1 Press SOURCE (TUNER on the remote) to close the disc tray. 2 Load...
... all available stations in order of the source select keys on the remote control (DISC or TUNER, for example). 2005 C Koninklijie Philips Electronics N.V. http://www.philips.com PDCC-JS/JW-0615 Then select the desired function ( 2;, í, ë for example). - Notes for more than ...CH on the remote) until the desired preset station is displayed. Tip Detailed playback features and additional functions are described in the accompany owner's manual. All rights reserved. Programming and tuning to radio stations 1 Press SOURCE (TUNER on the remote) to close the disc tray. 2 Load...


