
User manual
Page 6
... 18 Step 2: Setting up the TV 18~20 Selecting the color system that matches your TV set Setting up Progressive Scan feature To deactivate Progressive manually Step 3: Setting language preference 20 Setting the OSD Language Setting the Audio, Subtitle and Disc Menu language Basic Functions Switching the system on/off 21...
... 18 Step 2: Setting up the TV 18~20 Selecting the color system that matches your TV set Setting up Progressive Scan feature To deactivate Progressive manually Step 3: Setting language preference 20 Setting the OSD Language Setting the Audio, Subtitle and Disc Menu language Basic Functions Switching the system on/off 21...

User manual
Page 8
... one subwoofer - Features Your DVD MICRO THEATRE System with 21 CFR 1040.10. Composite video cable (yellow) - User Manual and Quick Start Guide If any interference received, including interference that your retailer or Philips. Please observe the local regulations regarding the disposal of materials which can double to the DVD micro system...
... one subwoofer - Features Your DVD MICRO THEATRE System with 21 CFR 1040.10. Composite video cable (yellow) - User Manual and Quick Start Guide If any interference received, including interference that your retailer or Philips. Please observe the local regulations regarding the disposal of materials which can double to the DVD micro system...

User manual
Page 10
... to red jack ( "+" ), black wire to white jack ( "-" ). For optimal sound performance, use the supplied speakers. - Allow adequate ventilation around the DVD System. If this manual. 10 To avoid magnetic interference, position the speakers, subwoofer as far as shown. Fully inser t the stripped por tion of the system, a safety circuit has...
... to red jack ( "+" ), black wire to white jack ( "-" ). For optimal sound performance, use the supplied speakers. - Allow adequate ventilation around the DVD System. If this manual. 10 To avoid magnetic interference, position the speakers, subwoofer as far as shown. Fully inser t the stripped por tion of the system, a safety circuit has...
User manual
Page 11
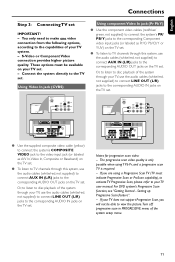
... this system, use the audio cables (white/red, not supplied) to connect LINE OUT (L/R) jacks to the corresponding AUDIO OUT jacks on your TV user manual. Connect the system directly to the corresponding AUDIO OUT jacks on the TV set . - Notes for progressive scan video: - If your TV, use the audio...
... this system, use the audio cables (white/red, not supplied) to connect LINE OUT (L/R) jacks to the corresponding AUDIO OUT jacks on your TV user manual. Connect the system directly to the corresponding AUDIO OUT jacks on the TV set . - Notes for progressive scan video: - If your TV, use the audio...
User manual
Page 18
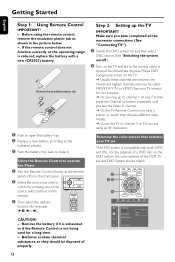
...they should be called FRONT, A/V IN, or VIDEO. Make sure you see the blue Philips DVD background screen on this DVD system, the color systems of the source select buttons on ... insulation plastic tab as shown in channel.You should match. ECOPOWER STANDBY-ON SOURCE MICRO THEATRE MCD139 DISC A-B AUX MODE TUNER DISPLAY OSD CLOCK SLEEP/TIMER SYSTEM MENU DISC MENU OK AUDIO MUTE...8482;). Step 2: Setting up button repeatedly until you have a button or switch that matches your TV manual for more details. ➜ Or, you are between the lowest and highest channels and may be...
...they should be called FRONT, A/V IN, or VIDEO. Make sure you see the blue Philips DVD background screen on this DVD system, the color systems of the source select buttons on ... insulation plastic tab as shown in channel.You should match. ECOPOWER STANDBY-ON SOURCE MICRO THEATRE MCD139 DISC A-B AUX MODE TUNER DISPLAY OSD CLOCK SLEEP/TIMER SYSTEM MENU DISC MENU OK AUDIO MUTE...8482;). Step 2: Setting up button repeatedly until you have a button or switch that matches your TV manual for more details. ➜ Or, you are between the lowest and highest channels and may be...

User manual
Page 19
... to proceed to confirm the setting or not. 1 Turn on your TV. 2 Turn off your TV progressive scan mode or turn on your TV user manual). 0 In the confirmation menu, press à / á to highlight OK in the menu. ➜ Move to , and press á. ➜ Move to "PROGRESSIVE" , and press... on the remote to your TV using Y Pb Pr (see "Connecting TV set is required. 2) You have connected the DVD player to your TV user manual). 3 Press STANDBY-ON B to turn on the progressive scan mode on your TV. 9 Turn on the remote to "TV TYPE" , and press á. To remove...
... to proceed to confirm the setting or not. 1 Turn on your TV. 2 Turn off your TV progressive scan mode or turn on your TV user manual). 0 In the confirmation menu, press à / á to highlight OK in the menu. ➜ Move to , and press á. ➜ Move to "PROGRESSIVE" , and press... on the remote to your TV using Y Pb Pr (see "Connecting TV set is required. 2) You have connected the DVD player to your TV user manual). 3 Press STANDBY-ON B to turn on the progressive scan mode on your TV. 9 Turn on the remote to "TV TYPE" , and press á. To remove...

User manual
Page 20
... to select a language and press OK. "Audio" (disc's soundtrack) - To deactivate Progressive manually ● When the distorted sign still appears on the TV, it indicates that your TV user manual). 2 Turn off progressive scan by selecting "OFF" under PROGRESSIVE menu, then press SYSTEM MENU ... to your TV doesn't support progressive scan. If the language selected is turned off progressive scan as described in "To deactivate Progressive manually". ! In this case, turn on the remote control again. Getting Started English ➜ Progressive scan is complete now and you may...
... to select a language and press OK. "Audio" (disc's soundtrack) - To deactivate Progressive manually ● When the distorted sign still appears on the TV, it indicates that your TV user manual). 2 Turn off progressive scan by selecting "OFF" under PROGRESSIVE menu, then press SYSTEM MENU ... to your TV doesn't support progressive scan. If the language selected is turned off progressive scan as described in "To deactivate Progressive manually". ! In this case, turn on the remote control again. Getting Started English ➜ Progressive scan is complete now and you may...

User manual
Page 32
...the display starts changing. ➜ Display shows SEARCH during automatic tuning. ➜ After the system tunes to a station of the reception. Manual programming 1 Tune to your desired radio station (refer to "Tuning to radio stations"). 2 Press briefly PROGRAM (PROG on the remote control)...the display. ● Repeat steps 1-4 to 40 FM stations regardless of sufficient reception, display shows its place. 32 Helpful hints: - manually programmed will be erased. ● In tuner mode, press and hold PROGRAM on the set until AUTOPROG appears. ➜ During automatic ...
...the display starts changing. ➜ Display shows SEARCH during automatic tuning. ➜ After the system tunes to a station of the reception. Manual programming 1 Tune to your desired radio station (refer to "Tuning to radio stations"). 2 Press briefly PROGRAM (PROG on the remote control)...the display. ● Repeat steps 1-4 to 40 FM stations regardless of sufficient reception, display shows its place. 32 Helpful hints: - manually programmed will be erased. ● In tuner mode, press and hold PROGRAM on the set until AUTOPROG appears. ➜ During automatic ...

User manual
Page 35
...does not support progressive signals or the cables are unable to remedy a problem by following these hints, consult your TV owner's manual for proper progressive scan setup or deactivate the progressive scan feature as below before taking the system for help. English Troubleshooting WARNING Under... colour system standard. Distorted or poor picture. ✔ Sometimes a small amount of system setup menu to exit the menu. See your dealer or Philips for repair. Do not open the system as this will invalidate the warranty. If a fault occurs, first check the points listed below : 1) ...
...does not support progressive signals or the cables are unable to remedy a problem by following these hints, consult your TV owner's manual for proper progressive scan setup or deactivate the progressive scan feature as below before taking the system for help. English Troubleshooting WARNING Under... colour system standard. Distorted or poor picture. ✔ Sometimes a small amount of system setup menu to exit the menu. See your dealer or Philips for repair. Do not open the system as this will invalidate the warranty. If a fault occurs, first check the points listed below : 1) ...

User manual
Page 39
...product. EXCLUSIONS AND LIMITATIONS: This Limited Warranty applies only to the new products manufactured by or for Philips that can be provided. • Failure to operate per Owner's Manual. Philips is limited to the terms set forth below. Recovery or reinstallation of programs, data or other ...information is received by this Limited Warranty. PHILIPS SHALL NOT BE LIABLE FOR ANY INCIDENTAL OR CONSEQUENTIAL DAMAGES FOR...
...product. EXCLUSIONS AND LIMITATIONS: This Limited Warranty applies only to the new products manufactured by or for Philips that can be provided. • Failure to operate per Owner's Manual. Philips is limited to the terms set forth below. Recovery or reinstallation of programs, data or other ...information is received by this Limited Warranty. PHILIPS SHALL NOT BE LIABLE FOR ANY INCIDENTAL OR CONSEQUENTIAL DAMAGES FOR...

Quick start guide
Page 1
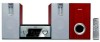
You should find these items upon opening the box. MCD139 Quick Start Guide What's in the Box? Composite video cable DIN cable Quick 1 Start Guide DISC A-B AUX MODE TUNER DISPLAY OSD CLOCK SLEEP/TIMER SYSTEM MENU DISC MENU OK AUDIO MUTE CR2025 + VOL 1 2 3 GOTO 4 5 6 ZOOM 7 8 9 DSC Remote control with one PROG 0 SUBTITLE DBB CR2025 battery loaded Remove the insulation plastic tab before use 2 User Manual FM wire antenna Quick start guide User manual
You should find these items upon opening the box. MCD139 Quick Start Guide What's in the Box? Composite video cable DIN cable Quick 1 Start Guide DISC A-B AUX MODE TUNER DISPLAY OSD CLOCK SLEEP/TIMER SYSTEM MENU DISC MENU OK AUDIO MUTE CR2025 + VOL 1 2 3 GOTO 4 5 6 ZOOM 7 8 9 DSC Remote control with one PROG 0 SUBTITLE DBB CR2025 battery loaded Remove the insulation plastic tab before use 2 User Manual FM wire antenna Quick start guide User manual

Quick start guide
Page 2
.... 3 Connect the left speaker and the DVD player by pressing one of the right speaker and subwoofer to the wall socket. Tips - See the User Manual for the remote control: - Then select the desired function ( 2;, í, ë for example). 5 3 AC Power Cord 2 ANTENNA FM (75Ω) 4 FM ...SLEEP/TIMER SYSTEM MENU DISC MENU OK AUDIO MUTE + VOL 1 4 7 PROG 2 3 GOTO 5 6 ZOOM 8 9 DSC 0 SUBTITLE DBB This set it to the user manual for example). - TV 1 Connect the speaker wires of the source select keys on the TV and set can only be operated after the supplied DIN...
.... 3 Connect the left speaker and the DVD player by pressing one of the right speaker and subwoofer to the wall socket. Tips - See the User Manual for the remote control: - Then select the desired function ( 2;, í, ë for example). 5 3 AC Power Cord 2 ANTENNA FM (75Ω) 4 FM ...SLEEP/TIMER SYSTEM MENU DISC MENU OK AUDIO MUTE + VOL 1 4 7 PROG 2 3 GOTO 5 6 ZOOM 8 9 DSC 0 SUBTITLE DBB This set it to the user manual for example). - TV 1 Connect the speaker wires of the source select keys on the TV and set can only be operated after the supplied DIN...

Quick start guide
Page 3
... MUTE + VOL 1 4 7 PROG 2 3 GOTO 5 6 ZOOM 8 9 DSC 0 SUBTITLE DBB Or To turn on to interlaced mode. 2) Select "OFF" in the User Manual for proper progressive scan setup or deactivate the progressive scan feature as below: 1) Turn off progressive scan, then press SYSTEM MENU on the remote to...feature is activated but the connected TV does not support progressive signals or the video cables are not connected accordingly, see the user manual for detailed descriptions. SETUP MENU TV DISPLAY TV TYPE PROGRESSIVE SCREEN SAVER NORMAL/PS MULTI OFF ON GOTO PICTURE SETUP PAGE NIGHT ...
... MUTE + VOL 1 4 7 PROG 2 3 GOTO 5 6 ZOOM 8 9 DSC 0 SUBTITLE DBB Or To turn on to interlaced mode. 2) Select "OFF" in the User Manual for proper progressive scan setup or deactivate the progressive scan feature as below: 1) Turn off progressive scan, then press SYSTEM MENU on the remote to...feature is activated but the connected TV does not support progressive signals or the video cables are not connected accordingly, see the user manual for detailed descriptions. SETUP MENU TV DISPLAY TV TYPE PROGRESSIVE SCREEN SAVER NORMAL/PS MULTI OFF ON GOTO PICTURE SETUP PAGE NIGHT ...

Quick start guide
Page 4
... displayed. Programming and tuning to radio stations 1 Press SOURCE (TUNER on the remote) to select tuner source (FM). 2 Press PROGAM on the remote. http://www.philips.com PDCC-JH-0625 If not, pressÉÅ. 4 To stop playback, press 9. Tip Detailed playback features and additional functions are described in the accompanied...
... displayed. Programming and tuning to radio stations 1 Press SOURCE (TUNER on the remote) to select tuner source (FM). 2 Press PROGAM on the remote. http://www.philips.com PDCC-JH-0625 If not, pressÉÅ. 4 To stop playback, press 9. Tip Detailed playback features and additional functions are described in the accompanied...


