
User Guide
Page 3
...the distance between the equipment and receiver. - NOTE: This Philips projector uses three LCD (Liquid Crystal Display) panels.These panels contain a total of contents 3 Introduction 3 Packaging contents 3 2. Your projector might have some inactive pixels - which case the user will.... - Also, any interference received, including interference that to the following : Philips Consumer Electronics Company One Philips Drive Knoxville, TN 37914 Telephone (1888) 873-4672 3 Important note for XGA projector) pixels. Important Safeguards 4 4. You will be determined by one of contents...
...the distance between the equipment and receiver. - NOTE: This Philips projector uses three LCD (Liquid Crystal Display) panels.These panels contain a total of contents 3 Introduction 3 Packaging contents 3 2. Your projector might have some inactive pixels - which case the user will.... - Also, any interference received, including interference that to the following : Philips Consumer Electronics Company One Philips Drive Knoxville, TN 37914 Telephone (1888) 873-4672 3 Important note for XGA projector) pixels. Important Safeguards 4 4. You will be determined by one of contents...
User Guide
Page 4
... technician has used replacement parts specified by PHILIPS, as the original parts. Follow all servicing to check that are provided for use a chemical duster or polisher-cleaner because it from the wall socket and disconnect any kind into the aperture and lens while operating the projector as they may result in the...
... technician has used replacement parts specified by PHILIPS, as the original parts. Follow all servicing to check that are provided for use a chemical duster or polisher-cleaner because it from the wall socket and disconnect any kind into the aperture and lens while operating the projector as they may result in the...

User Guide
Page 5
... keyboard and remote control keys, see the 'Projector Max' user guide on the CD-ROM, allows operation of your computer as well as Cursor Control and are detected for data input only and accessible in the room. High reliability and excellent brightness The Philips UHP lamp guarantees long life, excellent brightness over...
... keyboard and remote control keys, see the 'Projector Max' user guide on the CD-ROM, allows operation of your computer as well as Cursor Control and are detected for data input only and accessible in the room. High reliability and excellent brightness The Philips UHP lamp guarantees long life, excellent brightness over...
User Guide
Page 6
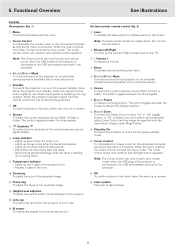
... To manipulate the mouse cursor on the connected computer as long as the menu is active the Cursor Control controls the menu cursor. When the projector receives a signal from the remote control. 6 Lights up orange when lamp life has almost expired. - up red. Volume + To adjust the volume.... connected sound amplifier) and to the USB downstream terminal of the computer. 0 Zoomring To adjust the size of the projected image. ! When the projector is connected to mute the picture. 6 Source To select the current projection source (Data, S-Video or Video). Lights up red when lamp life...
... To manipulate the mouse cursor on the connected computer as long as the menu is active the Cursor Control controls the menu cursor. When the projector receives a signal from the remote control. 6 Lights up orange when lamp life has almost expired. - up red. Volume + To adjust the volume.... connected sound amplifier) and to the USB downstream terminal of the computer. 0 Zoomring To adjust the size of the projected image. ! When the projector is connected to mute the picture. 6 Source To select the current projection source (Data, S-Video or Video). Lights up red when lamp life...
User Guide
Page 7
...camera or TV with AV output socket. Functional Overview See illustrations On compact remote control (fig. 3) 1 Stand by On To switch the projector in Input socket to connect to mute the picture. 0 Cursor Control To manipulate the mouse cursor on the monitor. h Data in Input ..., Laser Disc player, video camera or TV with the zoom factor chosen under Magnification. 9 A(udio)/V(ideo) Mute To mute the sound of the projector is simultaneously shown on the connected computer as long as the Left and Right mouse keys of a computer or Component video source. l Dust filter...
...camera or TV with AV output socket. Functional Overview See illustrations On compact remote control (fig. 3) 1 Stand by On To switch the projector in Input socket to connect to mute the picture. 0 Cursor Control To manipulate the mouse cursor on the monitor. h Data in Input ..., Laser Disc player, video camera or TV with the zoom factor chosen under Magnification. 9 A(udio)/V(ideo) Mute To mute the sound of the projector is simultaneously shown on the connected computer as long as the Left and Right mouse keys of a computer or Component video source. l Dust filter...
User Guide
Page 8
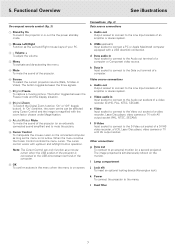
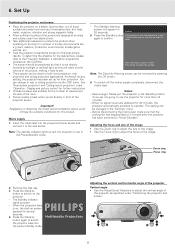
...menu. - Before disconnecting the mains lead, make sure that it is on the projector. - Stabnyd A MVute Volume Lamp RC Keystone Stabnyd A MVute Volume Lamp RC Keystone Menu OK Zoom ring Focus ring Menu OK 2. PHILIPS - Press the Stand by sunlight or artificial light, as specified under 'Operation -... Insert the mains lead into the power standby mode. Press the Standby button If the projector is best when you can be positioned so ...
...menu. - Before disconnecting the mains lead, make sure that it is on the projector. - Stabnyd A MVute Volume Lamp RC Keystone Stabnyd A MVute Volume Lamp RC Keystone Menu OK Zoom ring Focus ring Menu OK 2. PHILIPS - Press the Stand by sunlight or artificial light, as specified under 'Operation -... Insert the mains lead into the power standby mode. Press the Standby button If the projector is best when you can be positioned so ...
User Guide
Page 9
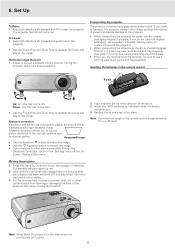
...). The standby indicator lights up red. 2. To Lower: • Keep both adjusters (A) pressed and lift to raise the projector. - Transporting the projector The projector contains many glass and precision parts. Inserting the batteries in a carrying case (such as indicated inside the battery compartment. 3....angle (horizon) • Adjust or correct a possible tilted picture by On button to readjust the focus and size of the projector lens when moving the projector. Down: turn the feet to narrow the image. • This correction function also is approximately 15 m (± 50 ...
...). The standby indicator lights up red. 2. To Lower: • Keep both adjusters (A) pressed and lift to raise the projector. - Transporting the projector The projector contains many glass and precision parts. Inserting the batteries in a carrying case (such as indicated inside the battery compartment. 3....angle (horizon) • Adjust or correct a possible tilted picture by On button to readjust the focus and size of the projector lens when moving the projector. Down: turn the feet to narrow the image. • This correction function also is approximately 15 m (± 50 ...
User Guide
Page 10
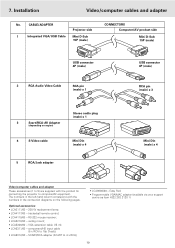
...); • LCA9000/20 - Optional accessories: • LCA3111/00 - 200 W replacement lamp; • LCA4117/00 - RS-232 mouse receiver; • LCA2210/00 - CABLE/ADAPTER Projector side 1 Integrated VGA/USB Cable Mini D-Sub 15P (male) CONNECTORS Computer/AV product side Mini D-Sub 15P (male) USB connector 4P (male) 2 RCA Audio Video...computer cables and adapter These accessories (1 to 5) are supplied with the numbers in the left-hand column correspond with the product for connecting the projector to computer/AV equipment. trackerball remote control; • LCA4119/00 -
...); • LCA9000/20 - Optional accessories: • LCA3111/00 - 200 W replacement lamp; • LCA4117/00 - RS-232 mouse receiver; • LCA2210/00 - CABLE/ADAPTER Projector side 1 Integrated VGA/USB Cable Mini D-Sub 15P (male) CONNECTORS Computer/AV product side Mini D-Sub 15P (male) USB connector 4P (male) 2 RCA Audio Video...computer cables and adapter These accessories (1 to 5) are supplied with the numbers in the left-hand column correspond with the product for connecting the projector to computer/AV equipment. trackerball remote control; • LCA4119/00 -
User Guide
Page 11
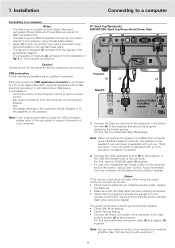
... Volume setting. • Connect the Audio out socket of the computer to the USB downstream port of the projector and secure the plugs by tightening the thumb screws. Projector (1) (2) (1) Mac/PC (5) USB Audio out optional Philips VGA/MAC adapter DDaattaa oouutt Note: If you experience problems using standard data cables. - PC (Desk Top...
... Volume setting. • Connect the Audio out socket of the computer to the USB downstream port of the projector and secure the plugs by tightening the thumb screws. Projector (1) (2) (1) Mac/PC (5) USB Audio out optional Philips VGA/MAC adapter DDaattaa oouutt Note: If you experience problems using standard data cables. - PC (Desk Top...
User Guide
Page 12
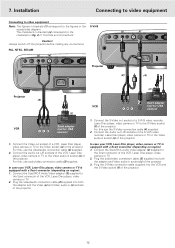
... version) 1. Installation Connecting to video equipment Connecting to video equipment Note: The figures in brackets (1) correspond to the Scart connector of the projector. 7. In case your VCR, Laser Disc player, video camera or TV is equipped with a Scart connector (depending on region): 1. Connect... or TV. 2. Connect the Audio out L/R sockets of the VCR, Laser Disc player, video camera or TV to the Scart connector of the projector. For this , use the S-Video connection cable (4) supplied. 2. Audio out USB Vvideo audio-in DDaattaa audio-in Video S-Video Data out D...
... version) 1. Installation Connecting to video equipment Connecting to video equipment Note: The figures in brackets (1) correspond to the Scart connector of the projector. 7. In case your VCR, Laser Disc player, video camera or TV is equipped with a Scart connector (depending on region): 1. Connect... or TV. 2. Connect the Audio out L/R sockets of the VCR, Laser Disc player, video camera or TV to the Scart connector of the projector. For this , use the S-Video connection cable (4) supplied. 2. Audio out USB Vvideo audio-in DDaattaa audio-in Video S-Video Data out D...
User Guide
Page 13
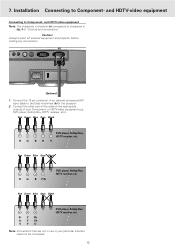
... making any connections. (h) Video audio-in Data audio-in Video S-Video Data out Data in fig. 4 of the projector. 2. DVD player, Settop Box, HDTV receiver, etc.). Red Green Blue Grey Black Pr Y Pb Cr Y Cb VYU DVD player, Settop Box, HDTV receiver, etc. Red ...
... making any connections. (h) Video audio-in Data audio-in Video S-Video Data out Data in fig. 4 of the projector. 2. DVD player, Settop Box, HDTV receiver, etc.). Red Green Blue Grey Black Pr Y Pb Cr Y Cb VYU DVD player, Settop Box, HDTV receiver, etc. Red ...
User Guide
Page 14
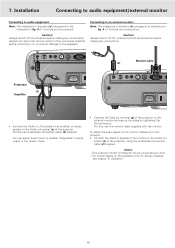
... (a) correspond to the Audio out socket (a) of the connected amplifier before making any connections. Always switch off the projector before switching it on the operation with the monitor. Installation Connecting to audio equipment/external monitor Connecting to audio equipment ...- For this use the monitor cable supplied with On Screen Displays see chapter '8. Notes: - Always switch off PC, external monitor and projector before making any connections. (a) Audio out USB Vvideo audio-in DDaattaa audio-in Video S-Video Data out Monitor cable (2) (a) (g) Projecteur...
... (a) correspond to the Audio out socket (a) of the connected amplifier before making any connections. Always switch off the projector before switching it on the operation with the monitor. Installation Connecting to audio equipment/external monitor Connecting to audio equipment ...- For this use the monitor cable supplied with On Screen Displays see chapter '8. Notes: - Always switch off PC, external monitor and projector before making any connections. (a) Audio out USB Vvideo audio-in DDaattaa audio-in Video S-Video Data out Monitor cable (2) (a) (g) Projecteur...
User Guide
Page 15
... seconds. - These messages will switch off automatically. S-Video A/V Muted Video selected as source. The menu bar appears on the projector. - Display Picture Audio Settings Depending on the computer or start up or goes down, - Horizontal size under menu Picture when ... Please contact a service centre for the selected source. When the average PHILIPS lamplife time has almost expired and less than 100 hours remain, the message 'Warning: lamplife has almost Multimedia Projectors expired' will automatically be displayed when the menu option Feedback is switched to...
... seconds. - These messages will switch off automatically. S-Video A/V Muted Video selected as source. The menu bar appears on the projector. - Display Picture Audio Settings Depending on the computer or start up or goes down, - Horizontal size under menu Picture when ... Please contact a service centre for the selected source. When the average PHILIPS lamplife time has almost expired and less than 100 hours remain, the message 'Warning: lamplife has almost Multimedia Projectors expired' will automatically be displayed when the menu option Feedback is switched to...
User Guide
Page 16
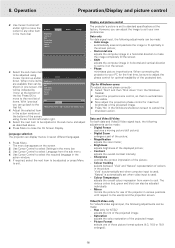
...Operation Preparation/Display and picture control 2. Move pointer left and/or right. 5. Contrast adjusts the overall contrast intensity; - Now adjust the projectors phase control for NTSC) adjusts the tint of the displayed picture; - Use Cursor Control to select Language from warm to the user(s) ... the computer image in the sub menu and adjust as described above. 6. Tip for optimal readability of the picture; - Adjust the projectors size control, so that no vertical bars are available than can be Contrast shown in one of colours in the screen picture; - Digital...
...Operation Preparation/Display and picture control 2. Move pointer left and/or right. 5. Contrast adjusts the overall contrast intensity; - Now adjust the projectors phase control for NTSC) adjusts the tint of the displayed picture; - Use Cursor Control to select Language from warm to the user(s) ... the computer image in the sub menu and adjust as described above. 6. Tip for optimal readability of the picture; - Adjust the projectors size control, so that no vertical bars are available than can be Contrast shown in one of colours in the screen picture; - Digital...
User Guide
Page 17
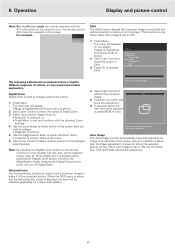
... On to switch Digital Zoom on the remote control. When Digital Zoom is set to exit and continue with the AV mute button on the projector or on . • Press OK to continue, or • Press Menu to OFF. 1. If required, select the next item to select centre of the picture...
... On to switch Digital Zoom on the remote control. When Digital Zoom is set to exit and continue with the AV mute button on the projector or on . • Press OK to continue, or • Press Menu to OFF. 1. If required, select the next item to select centre of the picture...
User Guide
Page 18
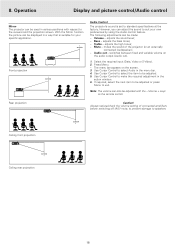
... (Data, Video or S-Video). 2. With the Mirror function the picture can be made: - SCREEN Front projection SCREEN Audio Control The projector's sound is suitable for your own preferences by using the Audio control feature. Volume - Mute - switches between fixed and variable volume on... - Use Cursor Control to exit. Always reduce/check the volume setting of the projector (or an externally connected loudspeaker); - Audio out - Operation Display and picture control/Audio control Mirror The projector can also be used in the menu bar. 4. Press Menu. - Note: The...
... (Data, Video or S-Video). 2. With the Mirror function the picture can be made: - SCREEN Front projection SCREEN Audio Control The projector's sound is suitable for your own preferences by using the Audio control feature. Volume - Mute - switches between fixed and variable volume on... - Use Cursor Control to exit. Always reduce/check the volume setting of the projector (or an externally connected loudspeaker); - Audio out - Operation Display and picture control/Audio control Mirror The projector can also be used in the menu bar. 4. Press Menu. - Note: The...
User Guide
Page 19
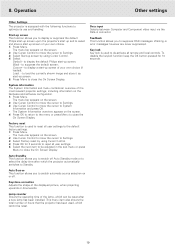
...shows the total number of your own choice (if loaded); Feedback This function allows you to display or suppress the default Philips start-up screen upon the projector's start up and to select the delay time after a new lamp has been installed. The menu bar appears on or.... Black - Keystone correction Adjusts the shape of the most relevant projector settings, including information on the screen. 2. Press Menu. - Select Start-up screen; to display the default Philips start -up screen of hours that the projector has been used to reset all user settings to close the On...
...shows the total number of your own choice (if loaded); Feedback This function allows you to display or suppress the default Philips start-up screen upon the projector's start up and to select the delay time after a new lamp has been installed. The menu bar appears on or.... Black - Keystone correction Adjusts the shape of the most relevant projector settings, including information on the screen. 2. Press Menu. - Select Start-up screen; to display the default Philips start -up screen of hours that the projector has been used to reset all user settings to close the On...
User Guide
Page 20
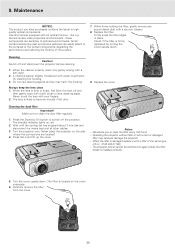
...with water is sufficient for cleaning the housing. 3. Press the Stand by turning the cover upside down . LLAAMMPP A Notes: - Operating the projector without filter or with a soft cloth. 2. When the filter is dusty, clean it with a vacuum cleaner. 8. Carefully remove the filter... the cabinet is damaged replace it by gently wiping with a torn or damaged filter may harm the housing. 9. FILTER 2. Turn the projector over. Check if the filter is installed correctly. Turn the cover upside down . Replace the filter. A chamois leather slightly moistened with ...
...with water is sufficient for cleaning the housing. 3. Press the Stand by turning the cover upside down . LLAAMMPP A Notes: - Operating the projector without filter or with a soft cloth. 2. When the filter is dusty, clean it with a vacuum cleaner. 8. Carefully remove the filter... the cabinet is damaged replace it by gently wiping with a torn or damaged filter may harm the housing. 9. FILTER 2. Turn the projector over. Check if the filter is installed correctly. Turn the cover upside down . Replace the filter. A chamois leather slightly moistened with ...
User Guide
Page 21
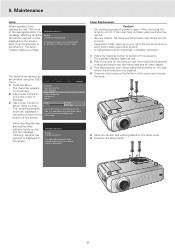
... and the message 'Warning: lamplife has expired' is open. Display Picture Audio Settings Language Keystone correction Start-up red. 2. Multimedia projectors Warning: Lamplife has expired It is suggested to change the lamp, to avoid sudden failure and to touch. - A high-pressure ... cover. 6. Lamp Replacement Caution! - The standby indicator lights up screen Lamp counter System information Factory reset (more) Lamp 5 hours Projector 2453 hours Lamp counter shows the operating hours of the average lamplife, the message 'Warning: lamplife has almost expired' will be checked...
... and the message 'Warning: lamplife has expired' is open. Display Picture Audio Settings Language Keystone correction Start-up red. 2. Multimedia projectors Warning: Lamplife has expired It is suggested to change the lamp, to avoid sudden failure and to touch. - A high-pressure ... cover. 6. Lamp Replacement Caution! - The standby indicator lights up screen Lamp counter System information Factory reset (more) Lamp 5 hours Projector 2453 hours Lamp counter shows the operating hours of the average lamplife, the message 'Warning: lamplife has almost expired' will be checked...
User Guide
Page 22
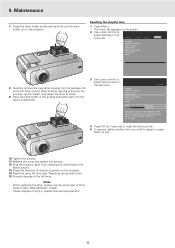
... same type of lamp in special chemical disposal bins. 22 Place the lamp holder in the Mains socket. 13. It is inserted. Plug the projector back in by On button to select Settings in the sub menu. Notes: - Please dispose of lamp LCA3111/00, 12NC 8670 931 11009). ...Picture Language Keystone correction Start-up screen Lamp counter System informatyion... Factory reset (more ) Lamp 0 hours Projector 2453 hours Lamp counter shows the operating hours of the projector. Do not drop, as the impact may cause the lamp to exit. 10. Tighten the screws. 11. Reset the lamp life time (...
... same type of lamp in special chemical disposal bins. 22 Place the lamp holder in the Mains socket. 13. It is inserted. Plug the projector back in by On button to select Settings in the sub menu. Notes: - Please dispose of lamp LCA3111/00, 12NC 8670 931 11009). ...Picture Language Keystone correction Start-up screen Lamp counter System informatyion... Factory reset (more ) Lamp 0 hours Projector 2453 hours Lamp counter shows the operating hours of the projector. Do not drop, as the impact may cause the lamp to exit. 10. Tighten the screws. 11. Reset the lamp life time (...


