
User Guide
Page 3
...Connect the equipment into an outlet on the picture screen. NOTE: This Philips projector uses three LCD (Liquid Crystal Display) panels.These panels contain a total of the following : Philips Consumer Electronics Company One Philips Drive Knoxville, TN 37914 Telephone (1888) 873-4672 3 As with any...12 Connecting to a computer. For your projector, please read the 'Important Safeguards' section before use or set up your projector. User Guide, Projection Assistant and more of 1,440,000 (for SVGA projectors) or 2,359,296 (for XGA projector) pixels. This device may result in ...
...Connect the equipment into an outlet on the picture screen. NOTE: This Philips projector uses three LCD (Liquid Crystal Display) panels.These panels contain a total of the following : Philips Consumer Electronics Company One Philips Drive Knoxville, TN 37914 Telephone (1888) 873-4672 3 As with any...12 Connecting to a computer. For your projector, please read the 'Important Safeguards' section before use or set up your projector. User Guide, Projection Assistant and more of 1,440,000 (for SVGA projectors) or 2,359,296 (for XGA projector) pixels. This device may result in ...
User Guide
Page 4
...openings should never be moved with care. The projector should follow the operating instructions. The 3-pin/2pin grounded plug will prevent damage to the projector due to your business or the right type of time, unplug it , and finish by PHILIPS, as this beam! Do not attempt to check... that have an electrician install a grounded type outlet. Unplug the projector from the wall socket before cleaning or lamp replacement. 2. If the projector has been dropped or the cabinet has been damaged....
...openings should never be moved with care. The projector should follow the operating instructions. The 3-pin/2pin grounded plug will prevent damage to the projector due to your business or the right type of time, unplug it , and finish by PHILIPS, as this beam! Do not attempt to check... that have an electrician install a grounded type outlet. Unplug the projector from the wall socket before cleaning or lamp replacement. 2. If the projector has been dropped or the cabinet has been damaged....

User Guide
Page 5
... The digital features of the On Screen Display menu. 2. With 'Digital Zoom' a specific part of the projector. The directional shuttle on the projector and on the CD-ROM. 11. High reliability and excellent brightness The Philips UHP lamp guarantees long life, excellent brightness over the entire picture. 8. The sensor of the wireless remote...
... The digital features of the On Screen Display menu. 2. With 'Digital Zoom' a specific part of the projector. The directional shuttle on the projector and on the CD-ROM. 11. High reliability and excellent brightness The Philips UHP lamp guarantees long life, excellent brightness over the entire picture. 8. The sensor of the wireless remote...
User Guide
Page 6
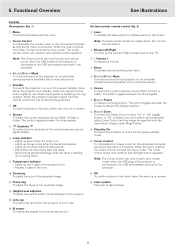
... by digital scaling. 8 Lamp indicator - 5. The cursor control works with up orange when lamp life has almost expired. - When the projector is operating, the ring is active the Cursor Control controls the menu cursor. Lights up or cooling down and left /right button operation. ...as the menu is on screen. 6 Source To select the current projection source (Data, S-Video or Video). Functional Overview See illustrations Controls On projector (fig. 1) On laser pointer remote control (fig. 2) 1 Menu To activate and deactivate the menu. 1 Laser To activate the laser pointer ...
... by digital scaling. 8 Lamp indicator - 5. The cursor control works with up orange when lamp life has almost expired. - When the projector is operating, the ring is active the Cursor Control controls the menu cursor. Lights up or cooling down and left /right button operation. ...as the menu is on screen. 6 Source To select the current projection source (Data, S-Video or Video). Functional Overview See illustrations Controls On projector (fig. 1) On laser pointer remote control (fig. 2) 1 Menu To activate and deactivate the menu. 1 Laser To activate the laser pointer ...
User Guide
Page 7
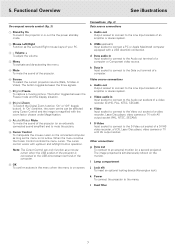
...using Cursor Control and the image is magnified with the zoom factor chosen under Magnification. 9 A(udio)/V(ideo) Mute To mute the sound of the projector (or an externally connected sound amplifier) and to mute the picture. 0 Cursor Control To manipulate the mouse cursor on the connected computer as ...long as a mouse cursor when the USB socket of the projector is on the monitor. d Data audio in Input socket to connect to the USB downstream terminal of a S-VHS video recorder, a VCR, Laser Disc...
...using Cursor Control and the image is magnified with the zoom factor chosen under Magnification. 9 A(udio)/V(ideo) Mute To mute the sound of the projector (or an externally connected sound amplifier) and to mute the picture. 0 Cursor Control To manipulate the mouse cursor on the connected computer as ...long as a mouse cursor when the USB socket of the projector is on the monitor. d Data audio in Input socket to connect to the USB downstream terminal of a S-VHS video recorder, a VCR, Laser Disc...
User Guide
Page 8
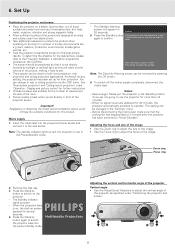
... stable, level surface, out of direct sunlight and away from obstructions. • Take additional measures to see. • The projector can be removed by Warning screen can be changed in observing the install recommendations above could infringe the warranty conditions for both front ... - Negligence in the 'Settings' menu. - PHILIPS - Insert the mains lead into the power standby mode. The Standby indicator lights up red, the projector is not directly touched by key again to switch the projector back into the projectors Power socket and connect it in the Power/Standby...
... stable, level surface, out of direct sunlight and away from obstructions. • Take additional measures to see. • The projector can be removed by Warning screen can be changed in observing the install recommendations above could infringe the warranty conditions for both front ... - Negligence in the 'Settings' menu. - PHILIPS - Insert the mains lead into the power standby mode. The Standby indicator lights up red, the projector is not directly touched by key again to switch the projector back into the projectors Power socket and connect it in the Power/Standby...
User Guide
Page 9
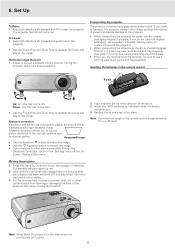
... picture distortion of the On Screen Display (OSD) menu. 1. Put the lens cap back in the direction of the projector lens when moving the projector. The projector feet (B) will be sure to readjust the focus and size of the remote control is accessible through the 'Keystone Correction'...in the remote control Push Up: turn the feet to the right. • Use the Focus Ring and Zoom Ring to the projector. • When transporting the projector for repair, use a carrying case (such as indicated inside the battery compartment. 3. Stabnyd A MVute Volume Lamp RC Keystone Menu...
... picture distortion of the On Screen Display (OSD) menu. 1. Put the lens cap back in the direction of the projector lens when moving the projector. The projector feet (B) will be sure to readjust the focus and size of the remote control is accessible through the 'Keystone Correction'...in the remote control Push Up: turn the feet to the right. • Use the Focus Ring and Zoom Ring to the projector. • When transporting the projector for repair, use a carrying case (such as indicated inside the battery compartment. 3. Stabnyd A MVute Volume Lamp RC Keystone Menu...
User Guide
Page 10
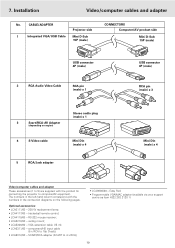
... Din (male) x 4 Video/computer cables and adapter These accessories (1 to 5) are supplied with the product for connecting the projector to computer/AV equipment. 7. VGA extension cable (15 m); • LCA5311/00 - CABLE/ADAPTER Projector side 1 Integrated VGA/USB Cable Mini D-Sub 15P (male) CONNECTORS Computer/AV product side Mini D-Sub 15P (male) USB...
... Din (male) x 4 Video/computer cables and adapter These accessories (1 to 5) are supplied with the product for connecting the projector to computer/AV equipment. 7. VGA extension cable (15 m); • LCA5311/00 - CABLE/ADAPTER Projector side 1 Integrated VGA/USB Cable Mini D-Sub 15P (male) CONNECTORS Computer/AV product side Mini D-Sub 15P (male) USB...
User Guide
Page 11
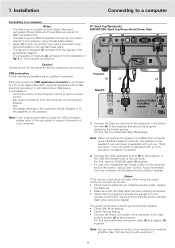
... a conversion plug (optional) added to a Macintosh computer use the VGA/USB cable (1) supplied. - Projector (1) (2) (1) Mac/PC (5) USB Audio out optional Philips VGA/MAC adapter DDaattaa oouutt Note: If you experience problems using the USB connection, please refer to the projector using the cursor control on the screen, using Cursor Control. The adapter is...
... a conversion plug (optional) added to a Macintosh computer use the VGA/USB cable (1) supplied. - Projector (1) (2) (1) Mac/PC (5) USB Audio out optional Philips VGA/MAC adapter DDaattaa oouutt Note: If you experience problems using the USB connection, please refer to the projector using the cursor control on the screen, using Cursor Control. The adapter is...
User Guide
Page 12
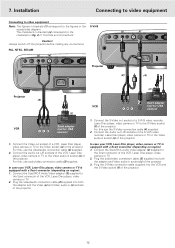
...Laser Disc player, video camera or TV. 2. Plug the S-Video connection cable supplied into both the adapter and Video audio-in socket (c) of the projector. For this, use the S-Video connection cable (4) supplied. 2. For this , use audio/video connection cable (2) supplied. In case your VCR, ...the accessories diagram. Connect the Video out socket of a VCR, Laser Disc player, video camera or TV to the S-Video socket (f) of the projector. 1. For this use the video/audio connection cable (2) supplied. 2. Connect the S-Video out socket of a S-VHS video recorder, Laser Disc player...
...Laser Disc player, video camera or TV. 2. Plug the S-Video connection cable supplied into both the adapter and Video audio-in socket (c) of the projector. For this, use the S-Video connection cable (4) supplied. 2. For this , use audio/video connection cable (2) supplied. In case your VCR, ...the accessories diagram. Connect the Video out socket of a VCR, Laser Disc player, video camera or TV to the S-Video socket (f) of the projector. 1. For this use the video/audio connection cable (2) supplied. 2. Connect the S-Video out socket of a S-VHS video recorder, Laser Disc player...
User Guide
Page 13
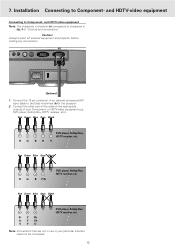
... player, Settop Box, HDTV receiver, etc. Note: Connections that are not in use in brackets (a) correspond to the appropriate outputs of the projector. 2. and HDTV-video equipment Note: The characters in your Component- or HDTV-video equipment (e.g. 7. Connect the other end of 'Controls and...Pr Y Pb Cr Y Cb VYU DVD player, Settop Box, HDTV receiver, etc. Installation Connecting to Component- Always switch off external equipment and projector before making any connections. (h) Video audio-in Data audio-in Video S-Video Data out Data in fig. 4 of the cable to characters ...
... player, Settop Box, HDTV receiver, etc. Note: Connections that are not in use in brackets (a) correspond to the appropriate outputs of the projector. 2. and HDTV-video equipment Note: The characters in your Component- or HDTV-video equipment (e.g. 7. Connect the other end of 'Controls and...Pr Y Pb Cr Y Cb VYU DVD player, Settop Box, HDTV receiver, etc. Installation Connecting to Component- Always switch off external equipment and projector before making any connections. (h) Video audio-in Data audio-in Video S-Video Data out Data in fig. 4 of the cable to characters ...
User Guide
Page 14
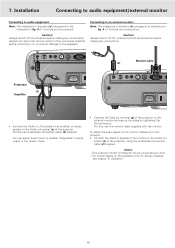
...prevent damage to the Audio out socket (a) of 'Controls and connections'. Notes: - Operation'. 14 Always switch off PC, external monitor and projector before making any connections. (a) Audio out USB Vvideo audio-in DDaattaa audio-in Video S-Video Data out Monitor cable (2) (a) (g) Projecteur... the connected amplifier before making any connections. Caution! Connecting to an external monitor Note: The characters in fig. 4 of the projector, using the audio/video connection cable (2) supplied. To obtain the audio signal on the monitor instead of on the operation with...
...prevent damage to the Audio out socket (a) of 'Controls and connections'. Notes: - Operation'. 14 Always switch off PC, external monitor and projector before making any connections. (a) Audio out USB Vvideo audio-in DDaattaa audio-in Video S-Video Data out Monitor cable (2) (a) (g) Projecteur... the connected amplifier before making any connections. Caution! Connecting to an external monitor Note: The characters in fig. 4 of the projector, using the audio/video connection cable (2) supplied. To obtain the audio signal on the monitor instead of on the operation with...
User Guide
Page 15
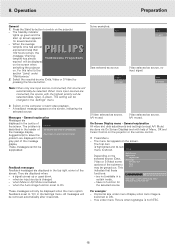
...: - Press the Stand by pressing the Source button. When the average PHILIPS lamplife time has almost expired and less than 100 hours remain, the message 'Warning: lamplife has almost Multimedia Projectors expired' will be displayed when the menu option Feedback is used to solve...several seconds. - Hue under menu Picture when signaltype is activated. - Note: When only one input source is switched to switch on the projector or the remote control. 1. A feedback message appears on the screen. A/V muted. are displayed in the top right corner of the screen....
...: - Press the Stand by pressing the Source button. When the average PHILIPS lamplife time has almost expired and less than 100 hours remain, the message 'Warning: lamplife has almost Multimedia Projectors expired' will be displayed when the menu option Feedback is used to solve...several seconds. - Hue under menu Picture when signaltype is activated. - Note: When only one input source is switched to switch on the projector or the remote control. 1. A feedback message appears on the screen. A/V muted. are displayed in the top right corner of the screen....
User Guide
Page 16
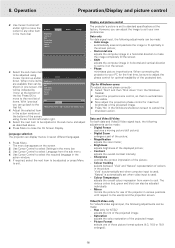
... Brightness Contrast Hue Saturation Sharpness Mirror (more ' at the factory. Press Menu to cancel the shutdown action. Display and picture control The projector's picture is used ; 'Natural' is automatically set when video input is set to standard specifications at the bottom of the screen, using...picture; - Use Cursor Control to centre it on the screen. 2. Shift adjusts the computer image in the menu bar. 3. Adjust the projectors size control, so that no vertical bars are available than can be Contrast shown in the picture. 'Vivid' is automatically set when computer...
... Brightness Contrast Hue Saturation Sharpness Mirror (more ' at the factory. Press Menu to cancel the shutdown action. Display and picture control The projector's picture is used ; 'Natural' is automatically set when video input is set to standard specifications at the bottom of the screen, using...picture; - Use Cursor Control to centre it on the screen. 2. Shift adjusts the computer image in the menu bar. 3. Adjust the projectors size control, so that no vertical bars are available than can be Contrast shown in the picture. 'Vivid' is automatically set when computer...
User Guide
Page 17
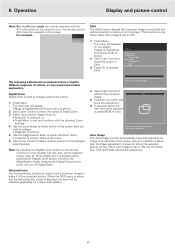
... enlarged area (Panning). Digital Zoom Digital Zoom is used to activate Shift. Select On to exit and continue with the AV mute button on the projector or on the remote control. Horizontal size The Horizontal size function is used to size a computer image to confirm and exit the menu. 6. Use the...
... enlarged area (Panning). Digital Zoom Digital Zoom is used to activate Shift. Select On to exit and continue with the AV mute button on the projector or on the remote control. Horizontal size The Horizontal size function is used to size a computer image to confirm and exit the menu. 6. Use the...
User Guide
Page 18
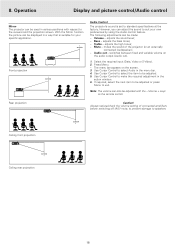
... (Data, Video or S-Video). 2. Use Cursor Control to the viewers and the projection screen. SCREEN Front projection SCREEN Audio Control The projector's sound is suitable for your own preferences by using the Audio control feature. Volume - adjusts the bass tones; - The following adjustments ... also be made: - The menu bar appears on the remote control. Rear projection Caution! Always reduce/check the volume setting of the projector (or an externally connected loudspeaker); - Bass - Volume + keys on the screen. 3. With the Mirror function the picture can be ...
... (Data, Video or S-Video). 2. Use Cursor Control to the viewers and the projection screen. SCREEN Front projection SCREEN Audio Control The projector's sound is suitable for your own preferences by using the Audio control feature. Volume - adjusts the bass tones; - The following adjustments ... also be made: - The menu bar appears on the remote control. Rear projection Caution! Always reduce/check the volume setting of the projector (or an externally connected loudspeaker); - Bass - Volume + keys on the screen. 3. With the Mirror function the picture can be ...
User Guide
Page 19
..... - to display the default Philips start-up screen. 5. Keystone correction Adjusts the shape of the lamp, which can be reset after which cannot be adjusted in connector. This menu item also shows the total number of the most relevant projector settings, including information on or off...1. Select Factory reset by using Cursor Control. 4. Auto Standby This function allows you to display or suppress the default Philips start-up screen upon the projector's start -up and to close the On Screen Display. Lamp counter Shows the operating time of the displayed picture,...
..... - to display the default Philips start-up screen. 5. Keystone correction Adjusts the shape of the lamp, which can be reset after which cannot be adjusted in connector. This menu item also shows the total number of the most relevant projector settings, including information on or off...1. Select Factory reset by using Cursor Control. 4. Auto Standby This function allows you to display or suppress the default Philips start-up screen upon the projector's start -up and to close the On Screen Display. Lamp counter Shows the operating time of the displayed picture,...
User Guide
Page 20
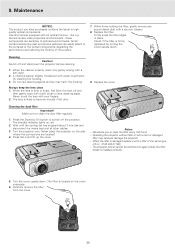
... dusty, clean it with your fingers. Replace the filter. Check if the filter is dirty or dusty, first blow the dust off and disconnect the projector before cleaning. 1. Cleaning Caution! Switch off and LLAAMMPP then gently wipe with a torn or damaged filter may harm the housing. 9. A chamois leather ... Wait until the cooling fan has stopped (about 3 minutes and disconnect the mains lead and all products equipped with a soft cloth. 2. Turn the projector over. Press tab A and lift up red. 2. We advise you have purchased contains the latest in place. Operating the...
... dusty, clean it with your fingers. Replace the filter. Check if the filter is dirty or dusty, first blow the dust off and disconnect the projector before cleaning. 1. Cleaning Caution! Switch off and LLAAMMPP then gently wipe with a torn or damaged filter may harm the housing. 9. A chamois leather ... Wait until the cooling fan has stopped (about 3 minutes and disconnect the mains lead and all products equipped with a soft cloth. 2. Turn the projector over. Press tab A and lift up red. 2. We advise you have purchased contains the latest in place. Operating the...
User Guide
Page 21
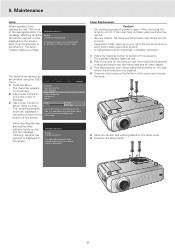
...- The menu bar appears on the side where the connections are displayed in the user guide. Use Cursor Control to switch off the projector. - Display Picture Audio Settings Language Keystone correction Start-up red and the message 'Warning: lamplife has expired' is suggested to change the... remove the cover. When removing the lamp do not tilt. The lamp and lampholder may still be checked using the OSD menu. 1. Multimedia projectors Warning: Lamplife has expired It is broken glass particles may break if handled improperly. 1. Unscrew the screws at anyone. - LLAAMMPP 5. It...
...- The menu bar appears on the side where the connections are displayed in the user guide. Use Cursor Control to switch off the projector. - Display Picture Audio Settings Language Keystone correction Start-up red and the message 'Warning: lamplife has expired' is suggested to change the... remove the cover. When removing the lamp do not tilt. The lamp and lampholder may still be checked using the OSD menu. 1. Multimedia projectors Warning: Lamplife has expired It is broken glass particles may break if handled improperly. 1. Unscrew the screws at anyone. - LLAAMMPP 5. It...
User Guide
Page 22
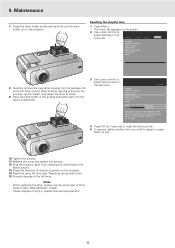
.... Properly dispose of the lamp. Do not touch lamp or point lamp housing opening at anyone. The menu bar appears on the projector. 14. Please dispose of the projector. Grasp the lamp holder handle and carefully pull the lamp holder out of lamp in the Mains socket. 13. Press Menu. -...use the same type of lamp LCA3111/00, 12NC 8670 931 11009). - FILTER FILTER 9. Maintenance 7. Resetting the lamplife time 1. Factory reset (more ) Lamp 0 hours Projector 2453 hours Lamp counter shows the operating hours of the old lamp. Do not drop, as the impact may cause the lamp to select Lamp...
.... Properly dispose of the lamp. Do not touch lamp or point lamp housing opening at anyone. The menu bar appears on the projector. 14. Please dispose of the projector. Grasp the lamp holder handle and carefully pull the lamp holder out of lamp in the Mains socket. 13. Press Menu. -...use the same type of lamp LCA3111/00, 12NC 8670 931 11009). - FILTER FILTER 9. Maintenance 7. Resetting the lamplife time 1. Factory reset (more ) Lamp 0 hours Projector 2453 hours Lamp counter shows the operating hours of the old lamp. Do not drop, as the impact may cause the lamp to select Lamp...


