
User Guide
Page 3
...two conditions: 1. Audio/Video RCA Cable - For your purchase of one or more on , the user is the following: Philips Consumer Electronics Company One Philips Drive Knoxville, TN 37914 Telephone (1888) 873-4672 Packaging contents Please confirm that , used in which case the user will ... as the European CE marking. Integrated VGA/USB cable - Introduction 3 Table of your projector. - We are provided to correct the interference by one of the trackball remote control 20 Lamp 21 Lamp replacement 21 Resetting the lamplife time 22 10. Quick set up Card 3 The responsible ...
...two conditions: 1. Audio/Video RCA Cable - For your purchase of one or more on , the user is the following: Philips Consumer Electronics Company One Philips Drive Knoxville, TN 37914 Telephone (1888) 873-4672 Packaging contents Please confirm that , used in which case the user will ... as the European CE marking. Integrated VGA/USB cable - Introduction 3 Table of your projector. - We are provided to correct the interference by one of the trackball remote control 20 Lamp 21 Lamp replacement 21 Resetting the lamplife time 22 10. Quick set up Card 3 The responsible ...
User Guide
Page 4
...that are covered by placing the projector on the projector. 12. Opening or removing covers may cause hazards. 4. D. Never touch the lens with a projector. 6. Unplug the projector from the type of these instructions for use attachments not recommended by PHILIPS, as this can perform many ...unit and peel the paint. 3. Do not place the projector on the power cord. If the projector has been exposed to clean the projector unit. Save these instructions before cleaning or lamp replacement. 2. This projector has been engineered and manufactured to check that is left ...
...that are covered by placing the projector on the projector. 12. Opening or removing covers may cause hazards. 4. D. Never touch the lens with a projector. 6. Unplug the projector from the type of these instructions for use attachments not recommended by PHILIPS, as this can perform many ...unit and peel the paint. 3. Do not place the projector on the power cord. If the projector has been exposed to clean the projector unit. Save these instructions before cleaning or lamp replacement. 2. This projector has been engineered and manufactured to check that is left ...
User Guide
Page 5
... and are not correct. When the menu is fully PC and MAC compatible. 3. Furthermore, the projector has an excellent brightness- and colour uniformity over the lamp's lifetime and excellent colour reproduction. The 'digital freeze' feature enables you to connect to operate both...is equipped with a USB interface, resulting in the room. High reliability and excellent brightness The Philips UHP lamp guarantees long life, excellent brightness over the entire picture. 5 The projector is active, the Cursor Control controls the menu cursor. USB The USB (Universal Serial Bus)...
... and are not correct. When the menu is fully PC and MAC compatible. 3. Furthermore, the projector has an excellent brightness- and colour uniformity over the lamp's lifetime and excellent colour reproduction. The 'digital freeze' feature enables you to connect to operate both...is equipped with a USB interface, resulting in the room. High reliability and excellent brightness The Philips UHP lamp guarantees long life, excellent brightness over the entire picture. 5 The projector is active, the Cursor Control controls the menu cursor. USB The USB (Universal Serial Bus)...
User Guide
Page 6
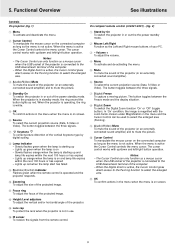
... size of the vertical keystone type by On To switch the projector in use. $ IR sensor To receive the signals from the remote control. On compact remote control (LC4341/4331) - (fig. 2) 1 Stand by digital scaling. 8 Lamp indicator - Slowly flashes orange when the lamp is active the Cursor Control controls the menu cursor. When the...
... size of the vertical keystone type by On To switch the projector in use. $ IR sensor To receive the signals from the remote control. On compact remote control (LC4341/4331) - (fig. 2) 1 Stand by digital scaling. 8 Lamp indicator - Slowly flashes orange when the lamp is active the Cursor Control controls the menu cursor. When the...
User Guide
Page 7
... i Lock slit To insert an optional locking device (Kensington lock). k Dust filter ! a Audio out Output socket to connect to an external monitor (or a second projector). Volume + To adjust the volume. 7 Source To select the current projection source (Data, S-Video or Video). Other connections f Data out To connect to the Line... buttons of a computer. d Video Input socket to connect to the mains. The image projected is active the Cursor Control controls the menu cursor. h Lamp compartment 9 D(igital)-Zoom To switch the Digital Zoom function 'On' or 'Off' (toggle button).
... i Lock slit To insert an optional locking device (Kensington lock). k Dust filter ! a Audio out Output socket to connect to an external monitor (or a second projector). Volume + To adjust the volume. 7 Source To select the current projection source (Data, S-Video or Video). Other connections f Data out To connect to the Line... buttons of a computer. d Video Input socket to connect to the mains. The image projected is active the Cursor Control controls the menu cursor. h Lamp compartment 9 D(igital)-Zoom To switch the Digital Zoom function 'On' or 'Off' (toggle button).
User Guide
Page 8
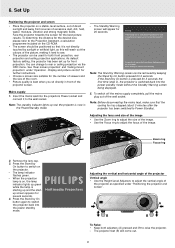
... been switched to rear or ceiling projection via the OSD menu. Remove the lens cap. 3. PHILIPS Multimedia Projectors Adjusting the vertical and horizontal angle of the projector Vertical angle • Use the Height/Level Adjusters to adjust the focus of the room. • Picture ...being displayed. 5. Keystone Menu OK Stabnyd A MVute Volume Lamp RC Keystone Menu OK Zoom ring Focus ring 2. When the projection lamp is on the projector. - 6. Face the projector towards the screen for 3 seconds. To switch off projector keep stand-by On button pressed for front projection. ...
... been switched to rear or ceiling projection via the OSD menu. Remove the lens cap. 3. PHILIPS Multimedia Projectors Adjusting the vertical and horizontal angle of the projector Vertical angle • Use the Height/Level Adjusters to adjust the focus of the room. • Picture ...being displayed. 5. Keystone Menu OK Stabnyd A MVute Volume Lamp RC Keystone Menu OK Zoom ring Focus ring 2. When the projection lamp is on the projector. - 6. Face the projector towards the screen for 3 seconds. To switch off projector keep stand-by On button pressed for front projection. ...
User Guide
Page 9
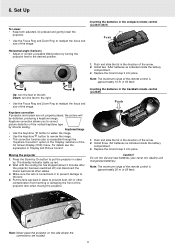
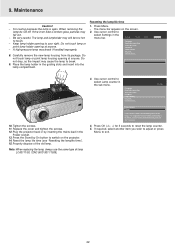
...Replace the lid and snap it into place. Moving the projector 1. Push and slide the lid in the 'Display' submenu of the image. Caution! Stabnyd A MVute Volume Lamp RC Keystone Menu OK Note: Never place the projector on the side where the connections are not properly placed.... 3. 6. Press the Stand by On button to put the projector in place to the desired position. 1. Note: The maximum range of the projector lens when moving the projector. Inserting the batteries in the compact remote control (LC4341/4331) Push Horizontal angle (horizon) • Adjust or correct ...
...Replace the lid and snap it into place. Moving the projector 1. Push and slide the lid in the 'Display' submenu of the image. Caution! Stabnyd A MVute Volume Lamp RC Keystone Menu OK Note: Never place the projector on the side where the connections are not properly placed.... 3. 6. Press the Stand by On button to put the projector in place to the desired position. 1. Note: The maximum range of the projector lens when moving the projector. Inserting the batteries in the compact remote control (LC4341/4331) Push Horizontal angle (horizon) • Adjust or correct ...
User Guide
Page 15
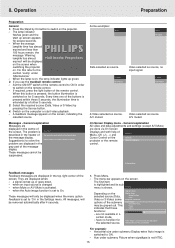
... 'On' in the Settings menu. Keystone correction Auto Image Horizontal size... Hue under submenu Picture when signaltype is used to the section 'Lamp' under submenu Display when Auto image is extended by a further 5 seconds. 3. If you use the trackball remote control: - If required...to solve the Please contact a service centre for 5 seconds. When the average PHILIPS lamplife time has almost expired and less than 100 hours remain, the message 'Warning: lamplife has almost Multimedia Projectors expired' will only be displayed when the menu option Feedback is activated. - have...
... 'On' in the Settings menu. Keystone correction Auto Image Horizontal size... Hue under submenu Picture when signaltype is used to the section 'Lamp' under submenu Display when Auto image is extended by a further 5 seconds. 3. If you use the trackball remote control: - If required...to solve the Please contact a service centre for 5 seconds. When the average PHILIPS lamplife time has almost expired and less than 100 hours remain, the message 'Warning: lamplife has almost Multimedia Projectors expired' will only be displayed when the menu option Feedback is activated. - have...
User Guide
Page 21
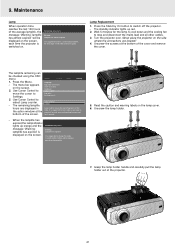
... confirmation key pressed for the lamp to cool down and the cooling fan to Settings. 3. Unscrew the lamp holder. 7. Use Cursor Control to switch off the projector. - Audio Settings Lamp counter 5 hours Lamp counter shows the operating hours of the projector. 21 When the lamplife has...and all other cables. 3. FILTER FILTER FILTER 9. Grasp the lamp holder handle and carefully pull the lamp holder out of the lamp. LLAAMMPP 5. The menu bar appears on the lamp cover. 6. Never place the projector on the side where the connections are displayed in the user guide...
... confirmation key pressed for the lamp to cool down and the cooling fan to Settings. 3. Unscrew the lamp holder. 7. Use Cursor Control to switch off the projector. - Audio Settings Lamp counter 5 hours Lamp counter shows the operating hours of the projector. 21 When the lamplife has...and all other cables. 3. FILTER FILTER FILTER 9. Grasp the lamp holder handle and carefully pull the lamp holder out of the lamp. LLAAMMPP 5. The menu bar appears on the lamp cover. 6. Never place the projector on the side where the connections are displayed in the user guide...
User Guide
Page 22
... the lamplife time Caution! 1. When removing the - Do Factory reset... Plug the projector back in the sub menu. Properly dispose of the lamp. Note: When replacing the lamp, always use the same type of lamp LCA3111/00, 12NC 8670 931 11009). 3. To reset keep confirmation key pressed for ...cover and tighten the screws. 12. Use cursor control to select Lamp counter in by On button to your right. The menu bar appears on the projector. 14. Be very careful. not touch lamp or point lamp housing opening to switch on the screen. Settings FILTER 10. Tighten...
... the lamplife time Caution! 1. When removing the - Do Factory reset... Plug the projector back in the sub menu. Properly dispose of the lamp. Note: When replacing the lamp, always use the same type of lamp LCA3111/00, 12NC 8670 931 11009). 3. To reset keep confirmation key pressed for ...cover and tighten the screws. 12. Use cursor control to select Lamp counter in by On button to your right. The menu bar appears on the projector. 14. Be very careful. not touch lamp or point lamp housing opening to switch on the screen. Settings FILTER 10. Tighten...
User Guide
Page 23
...flashing press any key to activate the projector again. PROBLEM - IR sensor is active. • Cancel A/V-mute. Poor colour - If you try to switch on the projector. Lamp holder cover is not closed correctly or the lamp holder is damaged. • Install ...the filter holder correctly (see 'Lamp replacement' under 'Maintenance'). - Too high ambient temperature • The projector will restart the lamp automatically within a few seconds. -...
...flashing press any key to activate the projector again. PROBLEM - IR sensor is active. • Cancel A/V-mute. Poor colour - If you try to switch on the projector. Lamp holder cover is not closed correctly or the lamp holder is damaged. • Install ...the filter holder correctly (see 'Lamp replacement' under 'Maintenance'). - Too high ambient temperature • The projector will restart the lamp automatically within a few seconds. -...


