User Guide
Page 3
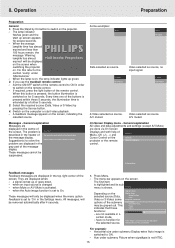
... 22 10. Soft bag - User Guide, Projection Assistant and more than 15 minutes. Things You Should Know Table of the projector ....8 Moving the projector 9 Inserting the batteries in the compact remote control ...........9 Inserting the batteries in accordance with the user's guide, may not cause... operated in which can radiate radio frequency energy and, if not installed and used properly, it is the following: Philips Consumer Electronics Company One Philips Drive Knoxville, TN 37914 Telephone (1888) 873-4672 Packaging contents Please confirm that to an external monitor 14 8....
... 22 10. Soft bag - User Guide, Projection Assistant and more than 15 minutes. Things You Should Know Table of the projector ....8 Moving the projector 9 Inserting the batteries in the compact remote control ...........9 Inserting the batteries in accordance with the user's guide, may not cause... operated in which can radiate radio frequency energy and, if not installed and used properly, it is the following: Philips Consumer Electronics Company One Philips Drive Knoxville, TN 37914 Telephone (1888) 873-4672 Packaging contents Please confirm that to an external monitor 14 8....
User Guide
Page 4
... touch dangerous voltage points or short cut parts, which may cause damage and will prevent damage to the projector due to protect it , and finish by PHILIPS, as they may damage your projector dealer or local power company. 10. If the lens becomes dirty or smudged, clean it with too... many useful functions. This projector has been engineered and manufactured to rain or water. IMPROPER USE CAN RESULT IN ...
... touch dangerous voltage points or short cut parts, which may cause damage and will prevent damage to the projector due to protect it , and finish by PHILIPS, as they may damage your projector dealer or local power company. 10. If the lens becomes dirty or smudged, clean it with too... many useful functions. This projector has been engineered and manufactured to rain or water. IMPROPER USE CAN RESULT IN ...
User Guide
Page 5
...to computers equipped with models LC4345 and available as for connecting external audio equipment via the 'Display' submenu of the projector are not correct. Adjustable Screen Capability The diagonal picture size of great value for data input only and accessible in...format options 4:3, 16:9 or 16:9 enlarged. 9. High reliability and excellent brightness The Philips UHP lamp guarantees long life, excellent brightness over the entire picture. 5 Furthermore, the projector has an excellent brightness- and colour uniformity over the lamp's lifetime and excellent colour ...
...to computers equipped with models LC4345 and available as for connecting external audio equipment via the 'Display' submenu of the projector are not correct. Adjustable Screen Capability The diagonal picture size of great value for data input only and accessible in...format options 4:3, 16:9 or 16:9 enlarged. 9. High reliability and excellent brightness The Philips UHP lamp guarantees long life, excellent brightness over the entire picture. 5 Furthermore, the projector has an excellent brightness- and colour uniformity over the lamp's lifetime and excellent colour ...
User Guide
Page 6
... your PC. 3 - The button toggles between the three signals. 7 D(igital)-Freeze To capture a moving picture. Functional Overview See illustrations Controls On projector (fig. 1) 1 Menu To activate and deactivate the menu. 2 Cursor Control To manipulate the mouse cursor on screen. 6 Slowly flashes orange when...when the remote control is on the connected computer as long as the Left and Right mouse buttons of the computer. - On compact remote control (LC4341/4331) - (fig. 2) 1 Stand by digital scaling. 8 Lamp indicator - 5. The button toggles between the three signals. 7 Keystone To ...
... your PC. 3 - The button toggles between the three signals. 7 D(igital)-Freeze To capture a moving picture. Functional Overview See illustrations Controls On projector (fig. 1) 1 Menu To activate and deactivate the menu. 2 Cursor Control To manipulate the mouse cursor on screen. 6 Slowly flashes orange when...when the remote control is on the connected computer as long as the Left and Right mouse buttons of the computer. - On compact remote control (LC4341/4331) - (fig. 2) 1 Stand by digital scaling. 8 Lamp indicator - 5. The button toggles between the three signals. 7 Keystone To ...
User Guide
Page 7
...- The button toggles between the 'Freeze' mode and the normal display situation. a Audio out Output socket to connect to the Line Input sockets of the projector (or an externally connected sound amplifier) and to connect a PC or Apple Macintosh computer equipped with AV output socket (PAL, NTSC, SECAM). 5 Stand ...by On To switch the projector in the menu when the menu is connected to select the enlarged area. d Video Input socket to connect to the Video out socket of a...
...- The button toggles between the 'Freeze' mode and the normal display situation. a Audio out Output socket to connect to the Line Input sockets of the projector (or an externally connected sound amplifier) and to connect a PC or Apple Macintosh computer equipped with AV output socket (PAL, NTSC, SECAM). 5 Stand ...by On To switch the projector in the menu when the menu is connected to select the enlarged area. d Video Input socket to connect to the Video out socket of a...
User Guide
Page 8
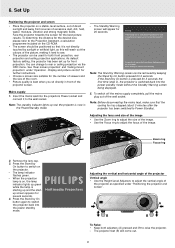
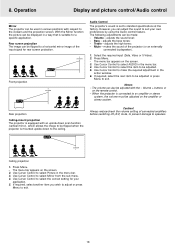
...Keep both front projection, rear projection and ceiling projection applications. To determine the distance for the desired size, please refer to see. • The projector can be removed by keeping the Stand by key pressed for several seconds. 4. Display and picture control' for further instructions. • Choose a ...screen size suitable for both adjusters (A) pressed and lift to adjust the vertical angle of the wall socket. PHILIPS Multimedia Projectors Adjusting the vertical and horizontal angle of the image. Press OK key to adjust the focus of the...
...Keep both front projection, rear projection and ceiling projection applications. To determine the distance for the desired size, please refer to see. • The projector can be removed by keeping the Stand by key pressed for several seconds. 4. Display and picture control' for further instructions. • Choose a ...screen size suitable for both adjusters (A) pressed and lift to adjust the vertical angle of the wall socket. PHILIPS Multimedia Projectors Adjusting the vertical and horizontal angle of the image. Press OK key to adjust the focus of the...
User Guide
Page 9
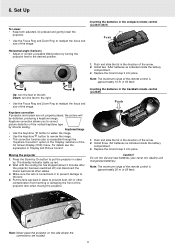
..., the picture will be distorted, producing a keystone image. Set Up To Lower: • Keep both adjusters (A) pressed and gently lower the projector. • Use the Focus Ring and Zoom Ring to correct picture distortion of the arrow. 2. For details see the explanation in the trackball... remote control (LC4345) Push 1. Push and slide the lid in the compact remote control (LC4341/4331) Push Horizontal angle (horizon) • Adjust or correct a possible tilted picture by internal scaling. Up: turn the feet to the right....
..., the picture will be distorted, producing a keystone image. Set Up To Lower: • Keep both adjusters (A) pressed and gently lower the projector. • Use the Focus Ring and Zoom Ring to correct picture distortion of the arrow. 2. For details see the explanation in the trackball... remote control (LC4345) Push 1. Push and slide the lid in the compact remote control (LC4341/4331) Push Horizontal angle (horizon) • Adjust or correct a possible tilted picture by internal scaling. Up: turn the feet to the right....
User Guide
Page 10
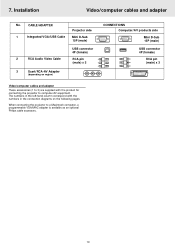
CABLE/ADAPTER 1 Integrated VGA/USB Cable 2 RCA Audio Video Cable Projector side Mini D-Sub 15P (male) USB connector 4P (female) RCA pin (male) x 3 3 Scart/RCA-AV Adapter (depending on the following pages. The ...) RCA pin (male) x 3 Video/computer cables and adapter These accessories (1 to 3) are supplied with the product for connecting the projector to a Macintosh computer, a programmable VGA/MAC adapter is available as an optional Philips cable accessory. 10 7. When connecting the projector to computer/AV equipment. Installation Video/computer cables and adapter No.
CABLE/ADAPTER 1 Integrated VGA/USB Cable 2 RCA Audio Video Cable Projector side Mini D-Sub 15P (male) USB connector 4P (female) RCA pin (male) x 3 3 Scart/RCA-AV Adapter (depending on the following pages. The ...) RCA pin (male) x 3 Video/computer cables and adapter These accessories (1 to 3) are supplied with the product for connecting the projector to a Macintosh computer, a programmable VGA/MAC adapter is available as an optional Philips cable accessory. 10 7. When connecting the projector to computer/AV equipment. Installation Video/computer cables and adapter No.
User Guide
Page 11
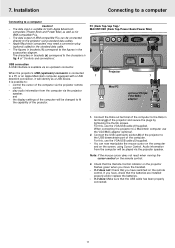
... does: Make sure that the USB cable has been properly connected. 11 If it does not: Check that you move the trackball. - 7. Projector 1 1 Mac/PC USB optional Philips VGA/MAC adapter DDaattaa oouutt A 1. Connect the Data out terminal of the computer via the... projector speaker, and - control the cursor of the computer to the projector using Cursor Control. Note: If the mouse cursor does not react when moving the cursor control on the projector flashes ...
... does: Make sure that the USB cable has been properly connected. 11 If it does not: Check that you move the trackball. - 7. Projector 1 1 Mac/PC USB optional Philips VGA/MAC adapter DDaattaa oouutt A 1. Connect the Data out terminal of the computer via the... projector speaker, and - control the cursor of the computer to the projector using Cursor Control. Note: If the mouse cursor does not react when moving the cursor control on the projector flashes ...
User Guide
Page 12
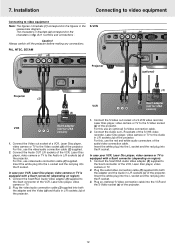
... equipped with a Scart connector (depending on region): 1. Connect the Scart/RCA Audio Video adapter (3) supplied to the Video socket (d) of the projector. 1. Plug the audio/video connection cable (2) supplied into the R socket. Plug an (optional) S-Video connection cable into the R socket. ...S-Video DDaatataoiunt DDa PAL, NTSC, SECAM (c) (d) Audio out USB RL Audio in brackets (1) correspond to the S-Video socket (e) of the projector. Connect the Audio out L/R sockets of the S-VHS video recorder, Laser Disc player, video camera or TV to the characters in L/R sockets...
... equipped with a Scart connector (depending on region): 1. Connect the Scart/RCA Audio Video adapter (3) supplied to the Video socket (d) of the projector. 1. Plug the audio/video connection cable (2) supplied into the R socket. Plug an (optional) S-Video connection cable into the R socket. ...S-Video DDaatataoiunt DDa PAL, NTSC, SECAM (c) (d) Audio out USB RL Audio in brackets (1) correspond to the S-Video socket (e) of the projector. Connect the Audio out L/R sockets of the S-VHS video recorder, Laser Disc player, video camera or TV to the characters in L/R sockets...
User Guide
Page 13
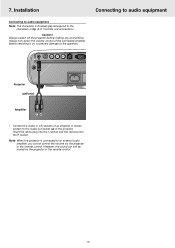
...to prevent damage to an external audio amplifier, you cannot control the volume via the projector or the remote control. 13 However, the sound can still be muted via the projector or the remote control. Installation Connecting to audio equipment Note: The characters in fig. ...4 of the connected amplifier before making any connections. Connecting to audio equipment (a) Audio out USB RL Audio in RL Video S-Video DDaatataoiunt Projector (optional) Amplifier L Audio R in • Connect the Audio in L/R sockets of an amplifier or stereo system to the characters in brackets...
...to prevent damage to an external audio amplifier, you cannot control the volume via the projector or the remote control. 13 However, the sound can still be muted via the projector or the remote control. Installation Connecting to audio equipment Note: The characters in fig. ...4 of the connected amplifier before making any connections. Connecting to audio equipment (a) Audio out USB RL Audio in RL Video S-Video DDaatataoiunt Projector (optional) Amplifier L Audio R in • Connect the Audio in L/R sockets of an amplifier or stereo system to the characters in brackets...

User Guide
Page 14
...to an external monitor Connecting to an external monitor Note: The characters in brackets (a) correspond to the Audio out socket (a) of the projector. • Insert the white plug into the L socket and the red plug into the R socket. Caution! For this , ...different audio connection cable with a 3.5 mm mini jack is required. Some monitors have a single Audio in RL Video S-Video DDaatataoiunt (g) DDaattaaoinut Projector (1) Mac/PC (optional) USB DDaattaa oouutt AAuuddiioo oouutt 14 Connect the Data out terminal of 'Controls and connections'. Connect the Data out terminal...
...to an external monitor Connecting to an external monitor Note: The characters in brackets (a) correspond to the Audio out socket (a) of the projector. • Insert the white plug into the L socket and the red plug into the R socket. Caution! For this , ...different audio connection cable with a 3.5 mm mini jack is required. Some monitors have a single Audio in RL Video S-Video DDaatataoiunt (g) DDaattaaoinut Projector (1) Mac/PC (optional) USB DDaattaa oouutt AAuuddiioo oouutt 14 Connect the Data out terminal of 'Controls and connections'. Connect the Data out terminal...
User Guide
Page 15
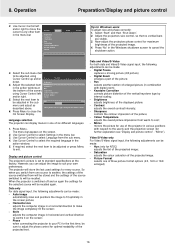
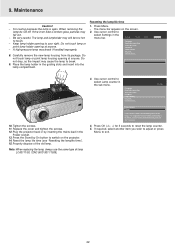
...flashes green and the start video playback. - When the average PHILIPS lamplife time has almost expired and less than 100 hours remain, the message 'Warning: lamplife has almost Multimedia Projectors expired' will only be displayed when the menu option Feedback is ...General explanation Messages are done via On Screen Displays and with help of the screen. Suggestion(s) to switch on the Submenu projector or the remote Submenu highlight control. 8. General explanation All video and data adjustments and settings (except A/V Mute) are ...
...flashes green and the start video playback. - When the average PHILIPS lamplife time has almost expired and less than 100 hours remain, the message 'Warning: lamplife has almost Multimedia Projectors expired' will only be displayed when the menu option Feedback is ...General explanation Messages are done via On Screen Displays and with help of the screen. Suggestion(s) to switch on the Submenu projector or the remote Submenu highlight control. 8. General explanation All video and data adjustments and settings (except A/V Mute) are ...
User Guide
Page 16
... be adjusted using Cursor Control left and/or right. Press 'No' in the menu bar. 3. Brightness 4. Phase when connecting the projector to your own preferences. Contrast adjusts the overall contrast intensity; - Colour temperature Picture format Mirror 5. Press Menu to adjust the phase ...adjusts the computer image in the menu bar. Shift adjusts the computer image in combination with respect to another section of the projector in various positions with digital zoom); - Data and Video/S-Video For both data and Video/S-Video signal input, the following ...
... be adjusted using Cursor Control left and/or right. Press 'No' in the menu bar. 3. Brightness 4. Phase when connecting the projector to your own preferences. Contrast adjusts the overall contrast intensity; - Colour temperature Picture format Mirror 5. Press Menu to adjust the phase ...adjusts the computer image in the menu bar. Shift adjusts the computer image in combination with respect to another section of the projector in various positions with digital zoom); - Data and Video/S-Video For both data and Video/S-Video signal input, the following ...
User Guide
Page 17
... takes care for phase adjustment. Display is highlighted Display Picture Audio Settings and its sub menu is enlarged with the AV mute button on the projector or on the remote control. Phase activate Shift. The following adjustments procedures follow a slightly different sequence of the image. Panning is only possible when the...
... takes care for phase adjustment. Display is highlighted Display Picture Audio Settings and its sub menu is enlarged with the AV mute button on the projector or on the remote control. Phase activate Shift. The following adjustments procedures follow a slightly different sequence of the image. Panning is only possible when the...
User Guide
Page 18
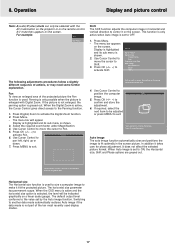
...factory. Use Cursor Control to the ceiling. 8. The menu bar appears on the screen. 2. Rear projection Ceiling-mount projection The projector is mounted upside down to select the correct setting for your own preferences by using the Audio control feature. Caution! Always reduce/...adjusts the bass tones; - mutes the sound of the input signal for a specific application. Use Cursor Control to a horizontal mirror image of the projector (or an externally connected loudspeaker). 1. The volume can be used in a way that is connected to exit. The menu bar appears on the ...
...factory. Use Cursor Control to the ceiling. 8. The menu bar appears on the screen. 2. Rear projection Ceiling-mount projection The projector is mounted upside down to select the correct setting for your own preferences by using the Audio control feature. Caution! Always reduce/...adjusts the bass tones; - mutes the sound of the input signal for a specific application. Use Cursor Control to a horizontal mirror image of the projector (or an externally connected loudspeaker). 1. The volume can be used in a way that is connected to exit. The menu bar appears on the ...
User Guide
Page 19
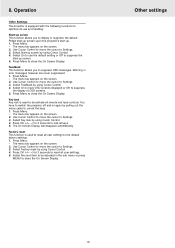
...the screen. 2. Press Menu to suppress OSD messages. You have OSD screens displayed or Off to display or suppress the default Philips start-up screen upon the projector's start -up screen by using Cursor Control. 4. Use Cursor Control to move the cursor to suppress the start up screen... Settings. 3. Press Menu. - Select Factory reset by using Cursor Control. 4. Operation Other Settings The projector is used to reset all user settings. 5. Select On to have to switch the projector off and on again by pulling out the mains cable to Settings. 3. Press Menu to lock all...
...the screen. 2. Press Menu to suppress OSD messages. You have OSD screens displayed or Off to display or suppress the default Philips start-up screen upon the projector's start -up screen by using Cursor Control. 4. Use Cursor Control to move the cursor to suppress the start up screen... Settings. 3. Press Menu. - Select Factory reset by using Cursor Control. 4. Operation Other Settings The projector is used to reset all user settings. 5. Select On to have to switch the projector off and on again by pulling out the mains cable to Settings. 3. Press Menu to lock all...
User Guide
Page 20
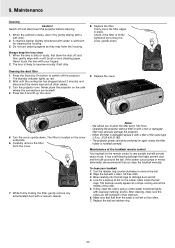
...provide years of the same type (12 nc: 3122 434 01180). - Firmly press the filter edges in their channels. 6. Never place the projector on the remote control is dirty or dusty, first blow the dust off and then gently wipe with a vacuum cleaner. The filter is ... a cotton swab moistened lightly with a filter of use cleaning agents as a stripe running around the ball. 9. Do not use . LLAAMMPP 3. The projector power cannot be switched on the cover underside. 6. If the screen cursor jumps or moves abnormally, we recommend that fluff from the cover. 7. Operating the...
...provide years of the same type (12 nc: 3122 434 01180). - Firmly press the filter edges in their channels. 6. Never place the projector on the remote control is dirty or dusty, first blow the dust off and then gently wipe with a vacuum cleaner. The filter is ... a cotton swab moistened lightly with a filter of use cleaning agents as a stripe running around the ball. 9. Do not use . LLAAMMPP 3. The projector power cannot be switched on the cover underside. 6. If the screen cursor jumps or moves abnormally, we recommend that fluff from the cover. 7. Operating the...
User Guide
Page 21
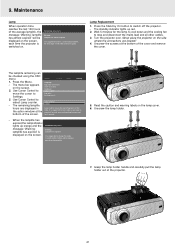
...expired It is suggested to reset when a new lamp is inserted. The lamplife remaining can be displayed on the screen, each time the projector is suggested to improve overall picture quality. The menu bar appears on the lamp cover. 6. Use Cursor Control to move the cursor ...Feedback Lamp counter Key lock... Unscrew the screws at the bottom of the screen. Wait 5 minutes for 3 seconds. - Turn the projector over. Never place the projector on . The remaining lamplife hours are located! 4. Maintenance Lamp When operation time reaches the last 100 hours of the cover and ...
...expired It is suggested to reset when a new lamp is inserted. The lamplife remaining can be displayed on the screen, each time the projector is suggested to improve overall picture quality. The menu bar appears on the lamp cover. 6. Use Cursor Control to move the cursor ...Feedback Lamp counter Key lock... Unscrew the screws at the bottom of the screen. Wait 5 minutes for 3 seconds. - Turn the projector over. Never place the projector on . The remaining lamplife hours are located! 4. Maintenance Lamp When operation time reaches the last 100 hours of the cover and ...
User Guide
Page 22
... the sub menu. Place the lamp holder in the - Note: When replacing the lamp, always use the same type of the old lamp. Plug the projector back in the Power socket. 13. Press the Stand by inserting the mains lead in by On button to touch. Use cursor control to your... still be too hot menu bar. Properly dispose of lamp LCA3111/00, 12NC 8670 931 11009). 3. Be very careful. The menu bar appears on the projector. 14. Carefully remove the new lamp housing from its package. Replace the cover and tighten the screws. 12. Press Menu. - It is suggested to reset...
... the sub menu. Place the lamp holder in the - Note: When replacing the lamp, always use the same type of the old lamp. Plug the projector back in the Power socket. 13. Press the Stand by inserting the mains lead in by On button to touch. Use cursor control to your... still be too hot menu bar. Properly dispose of lamp LCA3111/00, 12NC 8670 931 11009). 3. Be very careful. The menu bar appears on the projector. 14. Carefully remove the new lamp housing from its package. Replace the cover and tighten the screws. 12. Press Menu. - It is suggested to reset...


