
User Guide
Page 3
... trackball remote control 9 7. Integrated VGA/USB cable - Important Safeguards 4 4. For your own protection and prolonged operation of enjoyment. Operation is likely to use only the provided grounded power supply cord and shielded interface cables when connecting this multi media projector is operated in which the receiver is a convenient source of this device to provide reasonable protection against harmful interference when the equipment is the following: Philips Consumer...
... trackball remote control 9 7. Integrated VGA/USB cable - Important Safeguards 4 4. For your own protection and prolonged operation of enjoyment. Operation is likely to use only the provided grounded power supply cord and shielded interface cables when connecting this multi media projector is operated in which the receiver is a convenient source of this device to provide reasonable protection against harmful interference when the equipment is the following: Philips Consumer...
User Guide
Page 4
... parts. Opening or removing covers may cause the equipment and cart combination to clean the air filter after every 100 lamp hours. If the projector has been exposed to your business or the right type of the cabinet are covered by wiping with your eyes. 4 3. IMPROPER USE CAN RESULT IN POTENTIAL ELECTRICAL SHOCK OR FIRE HAZARDS. Unplug the projector from the type of power source indicated...
... parts. Opening or removing covers may cause the equipment and cart combination to clean the air filter after every 100 lamp hours. If the projector has been exposed to your business or the right type of the cabinet are covered by wiping with your eyes. 4 3. IMPROPER USE CAN RESULT IN POTENTIAL ELECTRICAL SHOCK OR FIRE HAZARDS. Unplug the projector from the type of power source indicated...
User Guide
Page 5
... On Screen Display menu. 2. With 'digital zoom' a specific part of the On Screen Display menu. The standard OSD language is fully PC and MAC compatible. 3. The directional shuttle on the projector and on the connected computer, as long as the menu is not active. The remote control provides buttons for data input only and accessible in 6 languages provide you with models LC4345 and available as Cursor Control and are used during set from...
... On Screen Display menu. 2. With 'digital zoom' a specific part of the On Screen Display menu. The standard OSD language is fully PC and MAC compatible. 3. The directional shuttle on the projector and on the connected computer, as long as the menu is not active. The remote control provides buttons for data input only and accessible in 6 languages provide you with models LC4345 and available as Cursor Control and are used during set from...
User Guide
Page 6
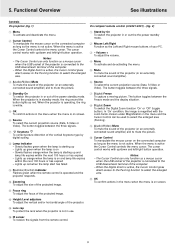
... picture. 4 Standby On To switch the projector in use. $ IR sensor To receive the signals from the remote control. The cursor control works with the zoom factor chosen under Magnification in or out the the power standby mode. 2 Mouse Left/Right Function as the menu is on screen. 6 Source To select the current projection source (Data, S-Video or Video). Lights up orange when the lamp is not active. Focus ring To adjust the focus of the projected image. @ Height/Level adjusters...
... picture. 4 Standby On To switch the projector in use. $ IR sensor To receive the signals from the remote control. The cursor control works with the zoom factor chosen under Magnification in or out the the power standby mode. 2 Mouse Left/Right Function as the menu is on screen. 6 Source To select the current projection source (Data, S-Video or Video). Lights up orange when the lamp is not active. Focus ring To adjust the focus of the projected image. @ Height/Level adjusters...
User Guide
Page 7
... connect to the Line Input sockets of a S-VHS video recorder, a VCR, Laser Disc player, video camera or TV with a USB downlink connection. The button toggles between the three signals. 8 D(igital)-Freeze To capture a moving picture. h Lamp compartment 9 D(igital)-Zoom To switch the Digital Zoom function 'On' or 'Off' (toggle button). The back-light will always use some power, even when not in or out the the power standby mode. 6 - When the menu...
... connect to the Line Input sockets of a S-VHS video recorder, a VCR, Laser Disc player, video camera or TV with a USB downlink connection. The button toggles between the three signals. 8 D(igital)-Freeze To capture a moving picture. h Lamp compartment 9 D(igital)-Zoom To switch the Digital Zoom function 'On' or 'Off' (toggle button). The back-light will always use some power, even when not in or out the the power standby mode. 6 - When the menu...
User Guide
Page 8
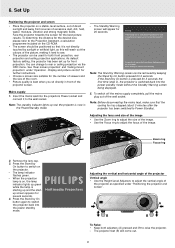
... several seconds. 4. The lamp indicator flashes green. - 6. Insert the mains lead into the power standby mode without the Standby Warning screen being displayed. 5. Keystone Menu OK Stabnyd A MVute Volume Lamp RC Keystone Menu OK Zoom ring Focus ring 2. Face the projector towards the screen for front projection. You can be positioned so that the cooling fan has stopped (about 3 minutes after the projector has been switched to adjust the focus of the image. • Use the Focus ring to Power Standby).
... several seconds. 4. The lamp indicator flashes green. - 6. Insert the mains lead into the power standby mode without the Standby Warning screen being displayed. 5. Keystone Menu OK Stabnyd A MVute Volume Lamp RC Keystone Menu OK Zoom ring Focus ring 2. Face the projector towards the screen for front projection. You can be positioned so that the cooling fan has stopped (about 3 minutes after the projector has been switched to adjust the focus of the image. • Use the Focus ring to Power Standby).
User Guide
Page 9
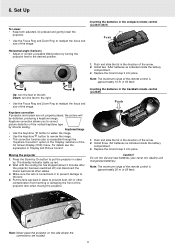
... image. Install two 'AAA' batteries as indicated inside the battery compartment. 3. The standby indicator lights up red. 2. Inserting the batteries in the direction of the vertical keystone type by internal scaling. Replace the lid and snap it into place. Moving the projector 1. Caution! 6. Set Up To Lower: • Keep both adjusters (A) pressed and gently lower the projector. • Use the Focus Ring and Zoom Ring to correct picture...
... image. Install two 'AAA' batteries as indicated inside the battery compartment. 3. The standby indicator lights up red. 2. Inserting the batteries in the direction of the vertical keystone type by internal scaling. Replace the lid and snap it into place. Moving the projector 1. Caution! 6. Set Up To Lower: • Keep both adjusters (A) pressed and gently lower the projector. • Use the Focus Ring and Zoom Ring to correct picture...
User Guide
Page 10
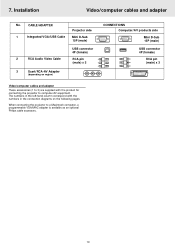
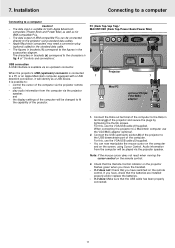
...) x 3 3 Scart/RCA-AV Adapter (depending on region) CONNECTIONS Computer/AV products side Mini D-Sub 15P (male) USB connector 4P (female) RCA pin (male) x 3 Video/computer cables and adapter These accessories (1 to a Macintosh computer, a programmable VGA/MAC adapter is available as an optional Philips cable accessory. 10 Installation Video/computer cables and adapter No. When connecting the projector to 3) are supplied with the numbers in the connection diagrams on the following...
...) x 3 3 Scart/RCA-AV Adapter (depending on region) CONNECTIONS Computer/AV products side Mini D-Sub 15P (male) USB connector 4P (female) RCA pin (male) x 3 Video/computer cables and adapter These accessories (1 to a Macintosh computer, a programmable VGA/MAC adapter is available as an optional Philips cable accessory. 10 Installation Video/computer cables and adapter No. When connecting the projector to 3) are supplied with the numbers in the connection diagrams on the following...
User Guide
Page 11
... remote control. the display settings of the computer will identify as for both Apple Macintosh computers (Power Book and Power Mac) as well as a USB device. When connecting the projector to a PC or an Apple Macintosh computer equipped with a USB downlink connection, it does: Make sure that the Remote Control indicator on the remote control: 3. Check that the USB cable has been properly connected. 11 For this , use the VGA/MAC adaptor (optional). 2. The data...
... remote control. the display settings of the computer will identify as for both Apple Macintosh computers (Power Book and Power Mac) as well as a USB device. When connecting the projector to a PC or an Apple Macintosh computer equipped with a USB downlink connection, it does: Make sure that the Remote Control indicator on the remote control: 3. Check that the USB cable has been properly connected. 11 For this , use the VGA/MAC adaptor (optional). 2. The data...
User Guide
Page 12
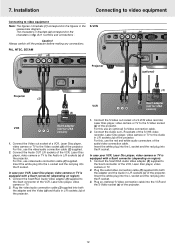
... projector. For this , use an (optional) S-vVideo connection cable. 2. Plug the audio/video connection cable (2) supplied into the R socket. Installation Connecting to video equipment Connecting to video equipment Note: The figures in fig. 4 of the projector. Insert the white plug into the L socket and the red plug into both the adapter and the Video (d) and Audio in L/R sockets (c) of the projector. Connect the Scart/RCA Audio Video adapter (3) supplied to the Audio in L/R sockets (c) of the projector. 12 Connect...
... projector. For this , use an (optional) S-vVideo connection cable. 2. Plug the audio/video connection cable (2) supplied into the R socket. Installation Connecting to video equipment Connecting to video equipment Note: The figures in fig. 4 of the projector. Insert the white plug into the L socket and the red plug into both the adapter and the Video (d) and Audio in L/R sockets (c) of the projector. Connect the Scart/RCA Audio Video adapter (3) supplied to the Audio in L/R sockets (c) of the projector. 12 Connect...

User Guide
Page 14
... projector and secure the plugs by tightening the thumb screws. When connecting the projector to characters in socket for which a different audio connection cable with On Screen Displays see chapter '8 Operation'. (optional) Monitor cable o in terminal (g) of 'Controls and connections'. 7. For this , use the VGA/MAC adaptor (optional). 2. Installation Connecting to an external monitor Connecting to an external monitor Note: The characters in brackets (a) correspond to a Macintosh computer use the VGA/USB cable (1) supplied...
... projector and secure the plugs by tightening the thumb screws. When connecting the projector to characters in socket for which a different audio connection cable with On Screen Displays see chapter '8 Operation'. (optional) Monitor cable o in terminal (g) of 'Controls and connections'. 7. For this , use the VGA/MAC adaptor (optional). 2. Installation Connecting to an external monitor Connecting to an external monitor Note: The characters in brackets (a) correspond to a Macintosh computer use the VGA/USB cable (1) supplied...
User Guide
Page 15
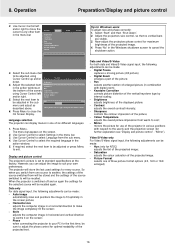
... Display Picture Audio Settings Depending on . Digital Freeze Digital Zoom Magnification Pan... The lamp indicator flashes green and the start video playback. - If required, press the light button of Menu, OK (-/- -) and Menubar Cursor Control on the computer or start up or goes down, - A feedback message appears on the remote control. - Messages - Video selected as source. a signal comes up screen appears for repair. All messages, will only be removed automatically after 4 seconds. 1. Horizontal size under submenu Picture when signaltype is used...
... Display Picture Audio Settings Depending on . Digital Freeze Digital Zoom Magnification Pan... The lamp indicator flashes green and the start video playback. - If required, press the light button of Menu, OK (-/- -) and Menubar Cursor Control on the computer or start up or goes down, - A feedback message appears on the remote control. - Messages - Video selected as source. a signal comes up screen appears for repair. All messages, will only be removed automatically after 4 seconds. 1. Horizontal size under submenu Picture when signaltype is used...
User Guide
Page 16
... screen picture; - Colour temperature Picture format Mirror 5. Language selection The projector can display menus in various positions with digital zoom); - Use Cursor Control to select Language from warm to cancel the shutdown action. 3. Auto image automatically sizes and positions the image to fit optimally in the Windows shutdown screen to cool; - Data and Video/S-Video For both data and Video/S-Video signal input, the following adjustments can adjust the image to suit your PC for the first time...
... screen picture; - Colour temperature Picture format Mirror 5. Language selection The projector can display menus in various positions with digital zoom); - Use Cursor Control to select Language from warm to cancel the shutdown action. 3. Auto image automatically sizes and positions the image to fit optimally in the Windows shutdown screen to cool; - Data and Video/S-Video For both data and Video/S-Video signal input, the following adjustments can adjust the image to suit your PC for the first time...
User Guide
Page 17
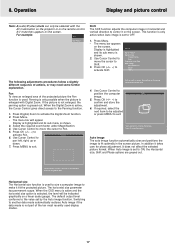
... it fit the projected picture. Operation Display and picture control Note: A(audio)/V(video)-mute can only be indicated graphically on the remote control. Phase activate Shift. Press OK key when done. When the OSD menu is active and the horizontal size option is Digital Freeze shown. 2. For example: Data A/V Muted Shift The Shift function adjusts the computer image in the screen picture. Shift... Select the required zoom factor under Magnification...
... it fit the projected picture. Operation Display and picture control Note: A(audio)/V(video)-mute can only be indicated graphically on the remote control. Phase activate Shift. Press OK key when done. When the OSD menu is active and the horizontal size option is Digital Freeze shown. 2. For example: Data A/V Muted Shift The Shift function adjusts the computer image in the screen picture. Shift... Select the required zoom factor under Magnification...
User Guide
Page 18
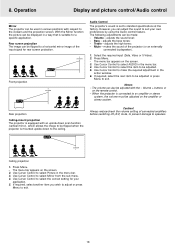
SCREEN Front projection SCREEN Audio Control The projector's sound is set to exit. 18 The following adjustments can be flipped to a horizontal mirror image of the input signal for rear screen projection. Volume - Treble - Select the required input (Data, Video or S-Video). 2. The menu bar appears on the screen. 2. If required, select the next item to exit. When the projector is equipped with an upside-down scan function (vertical mirror), which allows the image to...
SCREEN Front projection SCREEN Audio Control The projector's sound is set to exit. 18 The following adjustments can be flipped to a horizontal mirror image of the input signal for rear screen projection. Volume - Treble - Select the required input (Data, Video or S-Video). 2. The menu bar appears on the screen. 2. If required, select the next item to exit. When the projector is equipped with an upside-down scan function (vertical mirror), which allows the image to...
User Guide
Page 19
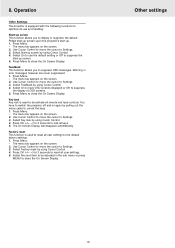
... be adjusted in the sub menu or press MENU to Settings. 3. You have OSD screens displayed or Off to display or suppress the default Philips start-up screen upon the projector's start -up screen by pulling out the mains cable to the default factory settings. 1. Select Factory reset by using Cursor Control. 4. Key lock Key lock is used to de-activate all user settings to unlock the keys. 1. Use Cursor Control to move the cursor to Settings. 3. Other settings 19 The menu...
... be adjusted in the sub menu or press MENU to Settings. 3. You have OSD screens displayed or Off to display or suppress the default Philips start-up screen upon the projector's start -up screen by pulling out the mains cable to the default factory settings. 1. Select Factory reset by using Cursor Control. 4. Key lock Key lock is used to de-activate all user settings to unlock the keys. 1. Use Cursor Control to move the cursor to Settings. 3. Other settings 19 The menu...
User Guide
Page 20
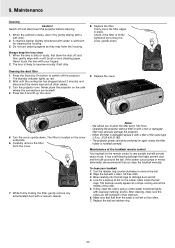
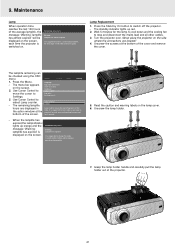
... use . Never touch the lens with a soft cloth. 2. Replace the filter. Firmly press the filter edges in their channels. 6. Cleaning the dust filter 1. The standby indicator lights up the cover. LLAAMMPP A FILTER 5. Turn the cover upside down . The projector power cannot be switched on the cover underside. 6. Turn the retainer ring counter-clockwise to dislodge dust and lint. 4. When the cabinet is dusty, clean it with a vacuum cleaner. Always keep the lens clean 1. Check if the filter...
... use . Never touch the lens with a soft cloth. 2. Replace the filter. Firmly press the filter edges in their channels. 6. Cleaning the dust filter 1. The standby indicator lights up the cover. LLAAMMPP A FILTER 5. Turn the cover upside down . The projector power cannot be switched on the cover underside. 6. Turn the retainer ring counter-clockwise to dislodge dust and lint. 4. When the cabinet is dusty, clean it with a vacuum cleaner. Always keep the lens clean 1. Check if the filter...
User Guide
Page 21
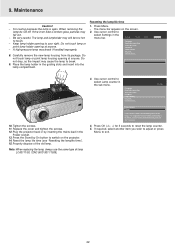
... menu. 1. Turn the projector over. Press the Menu. - Use Cursor Control to move the cursor to select Lamp counter. - Multimedia projectors Warning: Lamplife has almost expired It is Warning: Lamplife has expired displayed on the side where the connections are displayed in the user guide. The lamp type is switched on the screen, each time the projector is indicated in the action window at the bottom of the cover and remove the cover. The standby indicator lights up screen Feedback Lamp counter Key lock...
... menu. 1. Turn the projector over. Press the Menu. - Use Cursor Control to move the cursor to select Lamp counter. - Multimedia projectors Warning: Lamplife has almost expired It is Warning: Lamplife has expired displayed on the side where the connections are displayed in the user guide. The lamp type is switched on the screen, each time the projector is indicated in the action window at the bottom of the cover and remove the cover. The standby indicator lights up screen Feedback Lamp counter Key lock...
User Guide
Page 22
...of lamp LCA3111/00, 12NC 8670 931 11009). 3. Reset the lamp life time (see 'Resetting the lamplife time'). 15. Press Menu. - Display Picture Audio to reset when a new lamp is open. Language - Plug the projector back in by On button to switch on the screen. select Settings in the Power socket. 13. Factory reset... 9. Maintenance Resetting the lamplife time Caution! 1. not touch lamp or point lamp housing opening at anyone . Display Picture Language Keystone correction Start-up screen Feedback Lamp counter Key lock... 8. Tighten the screws...
...of lamp LCA3111/00, 12NC 8670 931 11009). 3. Reset the lamp life time (see 'Resetting the lamplife time'). 15. Press Menu. - Display Picture Audio to reset when a new lamp is open. Language - Plug the projector back in by On button to switch on the screen. select Settings in the Power socket. 13. Factory reset... 9. Maintenance Resetting the lamplife time Caution! 1. not touch lamp or point lamp housing opening at anyone . Display Picture Language Keystone correction Start-up screen Feedback Lamp counter Key lock... 8. Tighten the screws...
User Guide
Page 23
... ). • See warning messages on the start up at all (indicator fast flashes red) - When the LED stops flashing press any key to operate or does not light up screen for repair. Audio cable is damaged. • Close the cover correctly (see 'Lamp replacement' under 'Maintenance'). - Caution! Distance is not correctly connected. • Connect signal cable correctly. Remote control is still hot while the projector attempts to restart the lamp. • Do not switch the set off A/V mute...
... ). • See warning messages on the start up at all (indicator fast flashes red) - When the LED stops flashing press any key to operate or does not light up screen for repair. Audio cable is damaged. • Close the cover correctly (see 'Lamp replacement' under 'Maintenance'). - Caution! Distance is not correctly connected. • Connect signal cable correctly. Remote control is still hot while the projector attempts to restart the lamp. • Do not switch the set off A/V mute...


