User Manual
Page 3
... examples 22 Digital Zoom/Magnification 22 Auto image 22 Horizontal size 22 Shift 23 Picture adjustments 23 Video/S-Video adjustments 24 Display adjustments 24 Picture adjustments 24 General adjustments 25 Audio adjustments 25 General settings 25-27 Loading your own personal start-up screen Resetting the projector 27 26-27 6. Maintenance 28-30 Cleaning 28 Cleaning the cabinet 28 Cleaning the lens 28 Cleaning the dust filter 28 Lamp 29 Lamp replacement 29-30 Resetting the lamplife time 30 7.Troubleshooting 31-34 Philips Multimedia Projector 3 English User guide bSure1...
... examples 22 Digital Zoom/Magnification 22 Auto image 22 Horizontal size 22 Shift 23 Picture adjustments 23 Video/S-Video adjustments 24 Display adjustments 24 Picture adjustments 24 General adjustments 25 Audio adjustments 25 General settings 25-27 Loading your own personal start-up screen Resetting the projector 27 26-27 6. Maintenance 28-30 Cleaning 28 Cleaning the cabinet 28 Cleaning the lens 28 Cleaning the dust filter 28 Lamp 29 Lamp replacement 29-30 Resetting the lamplife time 30 7.Troubleshooting 31-34 Philips Multimedia Projector 3 English User guide bSure1...
User Manual
Page 6
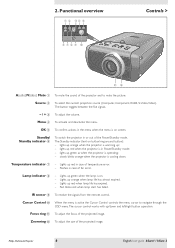
... projection source (Computer, Component, RGBS, S-Video,Video). Flashes in or out of temperature error. - Philips Multimedia Projector 6 English User guide bSure1 / bSure 2 OK 5 To confirm actions in the menu when the menu is on button/ring around button): - Fast blinks red when lamp start has failed. 2. Lamp indicator 8 - Focus ring ! lights up green as when the projector is in case of the Power/Standby mode. lights up red when the projector is operating; - Lights up /down . Cursor Control 0 When the menu is warming up orange when lamp life...
... projection source (Computer, Component, RGBS, S-Video,Video). Flashes in or out of temperature error. - Philips Multimedia Projector 6 English User guide bSure1 / bSure 2 OK 5 To confirm actions in the menu when the menu is on button/ring around button): - Fast blinks red when lamp start has failed. 2. Lamp indicator 8 - Focus ring ! lights up green as when the projector is in case of the Power/Standby mode. lights up red when the projector is operating; - Lights up /down . Cursor Control 0 When the menu is warming up orange when lamp life...
User Manual
Page 8
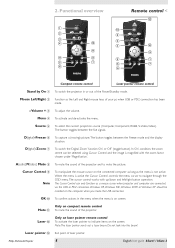
... button toggles between the Freeze mode and the display situation. Windows 98, Windows ME, Windows 2000 or Windows XP should be selected using Cursor Control and the image is on laser pointer remote control To activate the laser pointer to mute the picture. Only on the screen. Laser @ Only on screen. Laser pointer # Exit point of your pc when USB or PS/2 connection has been made. - Philips Multimedia Projector 8 English User guide...
... button toggles between the Freeze mode and the display situation. Windows 98, Windows ME, Windows 2000 or Windows XP should be selected using Cursor Control and the image is on laser pointer remote control To activate the laser pointer to mute the picture. Only on the screen. Laser @ Only on screen. Laser pointer # Exit point of your pc when USB or PS/2 connection has been made. - Philips Multimedia Projector 8 English User guide...
User Manual
Page 10
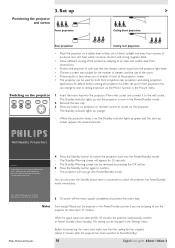
... Standby indicator lights up for both front projection, rear projection and ceiling projection applications. This setting can also press the Standby button twice in the 'Picture' menu. The Standby Warning screen will now go into the Power/Standby mode. - Press stand-by Source Lamp Temp Menu OK 1 Insert the mains lead into Power/Standby mode immediately. The Standby indicator lights up screen appears for 30 minutes, the projector automatically switches to use the projector for more than 15 minutes. You can be removed by keeping...
... Standby indicator lights up for both front projection, rear projection and ceiling projection applications. This setting can also press the Standby button twice in the 'Picture' menu. The Standby Warning screen will now go into the Power/Standby mode. - Press stand-by Source Lamp Temp Menu OK 1 Insert the mains lead into Power/Standby mode immediately. The Standby indicator lights up screen appears for 30 minutes, the projector automatically switches to use the projector for more than 15 minutes. You can be removed by keeping...
User Manual
Page 12
... Macintosh computers (Power Book and Power Mac) as well as Left and Right mouse keys of your PC store) is installed, you take a number of precautions against unauthorized use of five picture format options 4:3, 16:9, 16:9 enlarged, 4:3 on a 16:9 screen or 16:9 on the remote control function as for example, set your own code protected personal start-up screen and shutdown timer which make theft...
... Macintosh computers (Power Book and Power Mac) as well as Left and Right mouse keys of your PC store) is installed, you take a number of precautions against unauthorized use of five picture format options 4:3, 16:9, 16:9 enlarged, 4:3 on a 16:9 screen or 16:9 on the remote control function as for example, set your own code protected personal start-up screen and shutdown timer which make theft...
User Manual
Page 14
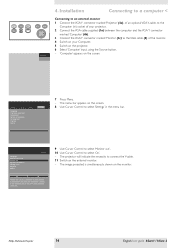
... menu bar. Factory reset Key lock (more ) Audio Settings 7 Press Menu. - Display Picture Language Kestone correction Monitor out System information... The projector will indicate the necessity to the VGA cable (5) of the monitor. 4 Switch on your Computer. 5 Switch on the projector. 6 Select 'Computer' input, using the Source button. - 'Computer' appears on the screen. 8 Use Cursor Control to the projector. Philips Multimedia Projector 14 English User guide bSure1 / bSure 2 AV Mute Stand by Source Lamp Temp Menu OK Computer 4. Display Picture Language Keystone...
... menu bar. Factory reset Key lock (more ) Audio Settings 7 Press Menu. - Display Picture Language Kestone correction Monitor out System information... The projector will indicate the necessity to the VGA cable (5) of the monitor. 4 Switch on your Computer. 5 Switch on the projector. 6 Select 'Computer' input, using the Source button. - 'Computer' appears on the screen. 8 Use Cursor Control to the projector. Philips Multimedia Projector 14 English User guide bSure1 / bSure 2 AV Mute Stand by Source Lamp Temp Menu OK Computer 4. Display Picture Language Keystone...
User Manual
Page 18
... removed automatically after 4 seconds. A feedback message appears on , the Standby indicator lights up green and the start video playback. - Please: 1. Source selection can be selected (Auto Source). These messages cannot be displayed when the menu option 'Feedback' is set to switch on the computer or start -up screen (when enabled) appears for repair. Some examples These messages will automatically be changed ; - Computer Video No signal S-Video A/V Muted Component video A/V Muted Computer selected as source Philips Multimedia Projector Video selected as source...
... removed automatically after 4 seconds. A feedback message appears on , the Standby indicator lights up green and the start video playback. - Please: 1. Source selection can be selected (Auto Source). These messages cannot be displayed when the menu option 'Feedback' is set to switch on the computer or start -up screen (when enabled) appears for repair. Some examples These messages will automatically be changed ; - Computer Video No signal S-Video A/V Muted Component video A/V Muted Computer selected as source Philips Multimedia Projector Video selected as source...
User Manual
Page 20
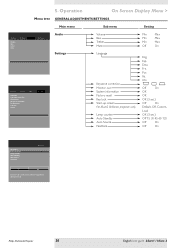
... (3 sec.) Off On Default, Off, Custom, Load OK (3 sec.) Off 15 30 45 60 120 Off On Off On Display Picture (previous) Start-up screen Lamp counter Auto Standby Auto Source Feedback Audio Settings Off On The Start-up screen can be shown or suppressed during start-up screen For bSure2 Brilliance projectors only Lamp counter Auto Standby Auto Source Feedback Min Max Min Max Min Max Off On Eng. 5. Philips Multimedia Projector 20 English User guide bSure1 / bSure...
... (3 sec.) Off On Default, Off, Custom, Load OK (3 sec.) Off 15 30 45 60 120 Off On Off On Display Picture (previous) Start-up screen Lamp counter Auto Standby Auto Source Feedback Audio Settings Off On The Start-up screen can be shown or suppressed during start-up screen For bSure2 Brilliance projectors only Lamp counter Auto Standby Auto Source Feedback Min Max Min Max Min Max Off On Eng. 5. Philips Multimedia Projector 20 English User guide bSure1 / bSure...
User Manual
Page 21
... its sub menu is switched to the first list. 4 Adjust the selected item in one screen, this will be indicated by Source Lamp Temp Menu OK On Screen Display Menu > Display Picture Digital Freeze Digital Zoom Magnification Auto Image Horizontal size Phase Shift . . . Horizontal size under menu 'Picture' when signaltype is not NTSC. When more items are not available in a certain mode, - Philips Multimedia Projector 21 English User guide bSure1 / bSure 2 Hue under menu 'Display' when Auto image is shown. The menu bar appears...
... its sub menu is switched to the first list. 4 Adjust the selected item in one screen, this will be indicated by Source Lamp Temp Menu OK On Screen Display Menu > Display Picture Digital Freeze Digital Zoom Magnification Auto Image Horizontal size Phase Shift . . . Horizontal size under menu 'Picture' when signaltype is not NTSC. When more items are not available in a certain mode, - Philips Multimedia Projector 21 English User guide bSure1 / bSure 2 Hue under menu 'Display' when Auto image is shown. The menu bar appears...
User Manual
Page 22
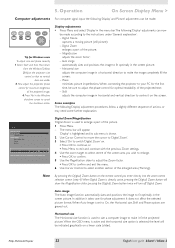
... the menu. 6 Use Cursor Control to On, the Horizontal size, Shift and Phase options are visible. 3 Now adjust the projectors phase control for Windows users To adjust size and phase correctly 1 Select 'Start' and then 'Shut down' from the Windows Taskbar. 2 Adjust the projectors size control, so that no vertical bars are greyed out. Operation On Screen Display Menu > Computer adjustments For computer signal input, the following 'Display' adjustment procedures, follow a slightly different sequence of the picture; - Audio Settings off Digital Zoom.
... the menu. 6 Use Cursor Control to On, the Horizontal size, Shift and Phase options are visible. 3 Now adjust the projectors phase control for Windows users To adjust size and phase correctly 1 Select 'Start' and then 'Shut down' from the Windows Taskbar. 2 Adjust the projectors size control, so that no vertical bars are greyed out. Operation On Screen Display Menu > Computer adjustments For computer signal input, the following 'Display' adjustment procedures, follow a slightly different sequence of the picture; - Audio Settings off Digital Zoom.
User Manual
Page 25
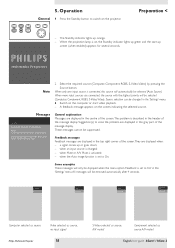
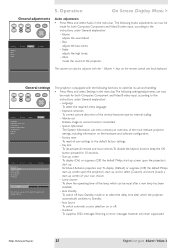
... or off Auto Standby mode or to the default factory settings; - Key lock To de-activate all user settings to select the delay time after a new lamp has been installed; - Start-up screen To display (On) or suppress (Off) the default Philips start-up screen upon the projector's start up and to the instructions under 'General explanation': - Warning or error messages however are never suppressed. Factory reset Key lock (more) Audio Settings Display Picture (previous) Start-up screen Lamp counter Auto Standby Auto Source Feedback Audio Settings Off On The Start-up screen can...
... or off Auto Standby mode or to the default factory settings; - Key lock To de-activate all user settings to select the delay time after a new lamp has been installed; - Start-up screen To display (On) or suppress (Off) the default Philips start-up screen upon the projector's start up and to the instructions under 'General explanation': - Warning or error messages however are never suppressed. Factory reset Key lock (more) Audio Settings Display Picture (previous) Start-up screen Lamp counter Auto Standby Auto Source Feedback Audio Settings Off On The Start-up screen can...

User Manual
Page 26
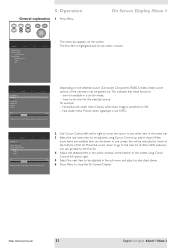
... 'On Screen Display Menu - Factory reset Key lock (more detailed the image is shown. 5 Press OK to reset the projector. When the image is dependent on the screen. The menu bar appears on the size of (new) Custom image. Display Picture (previous) Start-up screen by Source Lamp Temp Menu OK Display Picture Language Keystone correction Monitor out System information... Press Ok to confirm capture of the image and may take up to Settings. 3 Select Start-up screen Lamp counter Auto Standby Auto Source Feedback Audio Settings Default Off...
... 'On Screen Display Menu - Factory reset Key lock (more detailed the image is shown. 5 Press OK to reset the projector. When the image is dependent on the screen. The menu bar appears on the size of (new) Custom image. Display Picture (previous) Start-up screen by Source Lamp Temp Menu OK Display Picture Language Keystone correction Monitor out System information... Press Ok to confirm capture of the image and may take up to Settings. 3 Select Start-up screen Lamp counter Auto Standby Auto Source Feedback Audio Settings Default Off...
User Manual
Page 28
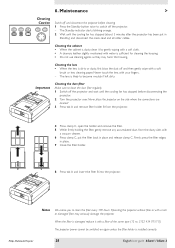
... left dirty. Philips Multimedia Projector 28 English User guide bSure1 / bSure 2 Never place the projector on again unless the filter holder is sufficient for cleaning the housing. • Do not use cleaning agents as they may seriously damage the projector. The Standby indicator starts blinking orange. 2 Wait until the cooling fan has stopped before cleaning. 1 Press the Standby button twice to clean the dust filter regularly. 1 Switch off the projector. - Operating the projector without filter or with...
... left dirty. Philips Multimedia Projector 28 English User guide bSure1 / bSure 2 Never place the projector on again unless the filter holder is sufficient for cleaning the housing. • Do not use cleaning agents as they may seriously damage the projector. The Standby indicator starts blinking orange. 2 Wait until the cooling fan has stopped before cleaning. 1 Press the Standby button twice to clean the dust filter regularly. 1 Switch off the projector. - Operating the projector without filter or with...
User Manual
Page 29
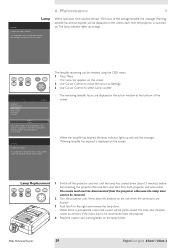
... 'Settings'. 3 Use Cursor Control to improve overall picture quality. Warning: Lamplife has expired It is pressed the mains inlet socket will be checked using the OSD menu. 1 Press Menu. - Never place the projector on .The lamp indicator lights up screen Lamp counter Auto standby Auto source Feedback Audio Settings Lamp 5 Hours Lamp counter shows the operating hours of the screen. - To reset keep OK key pressed for 3 seconds. When tab A is suggested to reset when a new lamp is switched on the side where the connections are displayed...
... 'Settings'. 3 Use Cursor Control to improve overall picture quality. Warning: Lamplife has expired It is pressed the mains inlet socket will be checked using the OSD menu. 1 Press Menu. - Never place the projector on .The lamp indicator lights up screen Lamp counter Auto standby Auto source Feedback Audio Settings Lamp 5 Hours Lamp counter shows the operating hours of the screen. - To reset keep OK key pressed for 3 seconds. When tab A is suggested to reset when a new lamp is switched on the side where the connections are displayed...
User Manual
Page 30
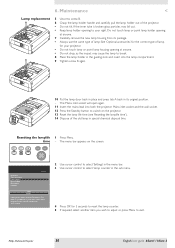
... lead into the lamp compartment. 9 Tighten screw B again. time - The menu bar appears on the projector. AV Mute Stand by Source Lamp Temp Menu OK Display Picture (previous) Start-up screen Lamp counter Auto standby Auto source Feedback Audio Settings Lamp 0 hours Lamp counter shows the operating hours of the projector. • Do not tilt. Do not touch lamp or point lamp holder opening at anyone . • Do not drop, as the impact may cause the lamp to switch on the screen. It is...
... lead into the lamp compartment. 9 Tighten screw B again. time - The menu bar appears on the projector. AV Mute Stand by Source Lamp Temp Menu OK Display Picture (previous) Start-up screen Lamp counter Auto standby Auto source Feedback Audio Settings Lamp 0 hours Lamp counter shows the operating hours of the projector. • Do not tilt. Do not touch lamp or point lamp holder opening at anyone . • Do not drop, as the impact may cause the lamp to switch on the screen. It is...
User Manual
Page 31
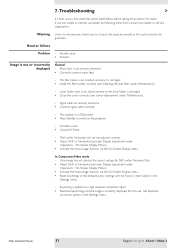
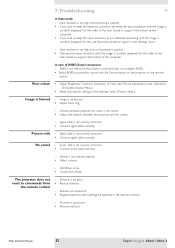
... Screen Display Menu'). • Activate the 'Auto-image' function via the On Screen Display menu. • Reset all settings to switch on a high resolution component signal. • Decrease keystoning until the image is not or incorrectly displayed General - 7.Troubleshooting > If a fault occurs, first check the points listed below before taking the projector for 'Shift' and/or 'Horizontal Size'. • Adjust 'Shift' or 'Horizontal size' (see 'Cleaning the dust filter' under 'Maintenance'). - Philips Multimedia Projector 31 English User guide bSure1 / bSure 2 Warning...
... Screen Display Menu'). • Activate the 'Auto-image' function via the On Screen Display menu. • Reset all settings to switch on a high resolution component signal. • Decrease keystoning until the image is not or incorrectly displayed General - 7.Troubleshooting > If a fault occurs, first check the points listed below before taking the projector for 'Shift' and/or 'Horizontal Size'. • Adjust 'Shift' or 'Horizontal size' (see 'Cleaning the dust filter' under 'Maintenance'). - Philips Multimedia Projector 31 English User guide bSure1 / bSure 2 Warning...
User Manual
Page 32
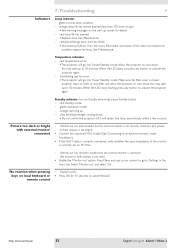
...Reset all projector settings in the remote control'). - Philips Multimedia Projector 32 English User guide bSure1 / bSure 2 Input resolution is too high (and keystoning is correctly displayed. RGBS is not selected or Auto Source is not focused. • Adjust focus ring. - 7.Troubleshooting > In Data mode - For this , refer to the User Guide or support information of the computer. • If you wish to commands from the remote control - Audio cable is obstructed. • Remove obstacle. The projector does not react to keep the input resolution as projection source...
...Reset all projector settings in the remote control'). - Philips Multimedia Projector 32 English User guide bSure1 / bSure 2 Input resolution is too high (and keystoning is correctly displayed. RGBS is not selected or Auto Source is not focused. • Adjust focus ring. - 7.Troubleshooting > In Data mode - For this , refer to the User Guide or support information of the computer. • If you wish to commands from the remote control - Audio cable is obstructed. • Remove obstacle. The projector does not react to keep the input resolution as projection source...
User Manual
Page 33
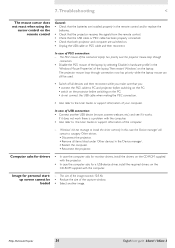
... the LED goes out press any button to 'Settings' in the menu bar. red (fast blinking): lamp start up to cool down; this does not resolve the problem, replace the lamp. Select 'Monitor out' and select 'On'. Standby indicator (text on both displays is connected (the picture on Standby button/ring around Standby button) - it will go into Power/Standby mode. See 'Maintenance'. - fast blinking red: fan error. • The projector will go into Power Standby mode. Philips Multimedia Projector 33 English User guide bSure1 / bSure 2 red: standby mode. -
... the LED goes out press any button to 'Settings' in the menu bar. red (fast blinking): lamp start up to cool down; this does not resolve the problem, replace the lamp. Select 'Monitor out' and select 'On'. Standby indicator (text on both displays is connected (the picture on Standby button/ring around Standby button) - it will go into Power/Standby mode. See 'Maintenance'. - fast blinking red: fan error. • The projector will go into Power Standby mode. Philips Multimedia Projector 33 English User guide bSure1 / bSure 2 red: standby mode. -
User Manual
Page 34
... computer asks for personal startup screen cannot be used. • Switch off all items listed under 'Other devices' in the remote control and/or replace the batteries. • Check that the projector receives the signals from the remote control. • Check that the USB cable or PS/2 cable has been properly connected. • Check that you: • connect the PS/2 cable to install the driver correctly. 7.Troubleshooting < The mouse cursor does not...
... computer asks for personal startup screen cannot be used. • Switch off all items listed under 'Other devices' in the remote control and/or replace the batteries. • Check that the projector receives the signals from the remote control. • Check that the USB cable or PS/2 cable has been properly connected. • Check that you: • connect the PS/2 cable to install the driver correctly. 7.Troubleshooting < The mouse cursor does not...
Brochure
Page 2
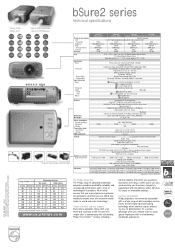
...;F) Class B 255W Package Optional accessories replacement lamp Compact remote control Laser pointer compact remote control Power cord Combined VGA-USB cable (1.5m) Audio/Video cable (2m) Scart adapter (scart to make an extra special impression with a whole range of advanced multimedia projectors combines portability, reliability and unsurpassed performance with free delivery, within 48 hours. p h i l i p s . c o m The Philips Guarantee The Philips range of data and video sources, thanks to their highly advanced scaling technology, which ensures that...
...;F) Class B 255W Package Optional accessories replacement lamp Compact remote control Laser pointer compact remote control Power cord Combined VGA-USB cable (1.5m) Audio/Video cable (2m) Scart adapter (scart to make an extra special impression with a whole range of advanced multimedia projectors combines portability, reliability and unsurpassed performance with free delivery, within 48 hours. p h i l i p s . c o m The Philips Guarantee The Philips range of data and video sources, thanks to their highly advanced scaling technology, which ensures that...


