
User Manual
Page 3
Index < 5. Maintenance 28-30 Cleaning 28 Cleaning the cabinet 28 Cleaning the lens 28 Cleaning the dust filter 28 Lamp 29 Lamp replacement 29-30 Resetting the lamplife time 30 7.Troubleshooting 31-34 Philips Multimedia Projector 3 English User guide bSure1 / bSure 2 Operation 18-27 Preparation 18 General 18 Messages 18 General explanation 18 Feedback messages... Display adjustments 24 Picture adjustments 24 General adjustments 25 Audio adjustments 25 General settings 25-27 Loading your own personal start-up screen Resetting the projector 27 26-27 6.
Index < 5. Maintenance 28-30 Cleaning 28 Cleaning the cabinet 28 Cleaning the lens 28 Cleaning the dust filter 28 Lamp 29 Lamp replacement 29-30 Resetting the lamplife time 30 7.Troubleshooting 31-34 Philips Multimedia Projector 3 English User guide bSure1 / bSure 2 Operation 18-27 Preparation 18 General 18 Messages 18 General explanation 18 Feedback messages... Display adjustments 24 Picture adjustments 24 General adjustments 25 Audio adjustments 25 General settings 25-27 Loading your own personal start-up screen Resetting the projector 27 26-27 6.
User Manual
Page 6
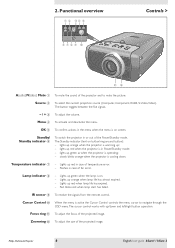
...; - IR sensor 9 To receive the signals from the remote control. Focus ring ! Lights up /down . Lamp indicator 8 - Philips Multimedia Projector 6 English User guide bSure1 / bSure 2 lights up ; - slowly blinks orange when the projector is warming up orange when the projector is cooling down and left/right button operation. Zoomring @ To adjust the size of the...
...; - IR sensor 9 To receive the signals from the remote control. Focus ring ! Lights up /down . Lamp indicator 8 - Philips Multimedia Projector 6 English User guide bSure1 / bSure 2 lights up ; - slowly blinks orange when the projector is warming up orange when the projector is cooling down and left/right button operation. Zoomring @ To adjust the size of the...
User Manual
Page 7
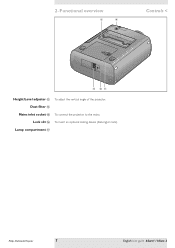
Lamp compartment & Philips Multimedia Projector 7 English User guide bSure1 / bSure 2 Lock slit ^ To insert an optional locking device (Kensington lock). Functional overview # $ Controls < % ^& Height/Level adjuster # To adjust the vertical angle of the projector. Dust filter $ Mains inlet socket % To connect the projector to the mains. 2.
Lamp compartment & Philips Multimedia Projector 7 English User guide bSure1 / bSure 2 Lock slit ^ To insert an optional locking device (Kensington lock). Functional overview # $ Controls < % ^& Height/Level adjuster # To adjust the vertical angle of the projector. Dust filter $ Mains inlet socket % To connect the projector to the mains. 2.
User Manual
Page 10
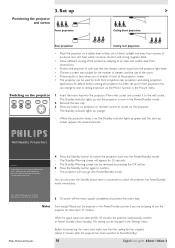
... The Standby Warning screen will now go into the projectors Mains inlet socket and connect it to confirm. - Philips Multimedia Projector 10 English User guide bSure1 / bSure 2 Set up screen appears for 30 minutes, the projector automatically switches to Power/Standby). You can change to... time for more than 15 minutes. PHILIPS Multimedia Projectors Warning If the projector is on the projector again to switch the projector into Power/Standby mode immediately. When no signal inputs are not going to use the projector for the lamp to cool down. 4 Press the ...
... The Standby Warning screen will now go into the projectors Mains inlet socket and connect it to confirm. - Philips Multimedia Projector 10 English User guide bSure1 / bSure 2 Set up screen appears for 30 minutes, the projector automatically switches to Power/Standby). You can change to... time for more than 15 minutes. PHILIPS Multimedia Projectors Warning If the projector is on the projector again to switch the projector into Power/Standby mode immediately. When no signal inputs are not going to use the projector for the lamp to cool down. 4 Press the ...
User Manual
Page 14
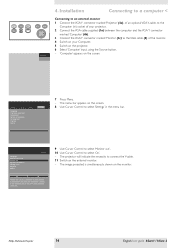
... indicate the necessity to select 'Settings' in ) socket of your Computer. 5 Switch on the projector. 6 Select 'Computer' input, using the Source button. - 'Computer' appears on the monitor. Philips Multimedia Projector 14 English User guide bSure1 / bSure 2 The menu bar appears on the screen. 8 Use Cursor ...Otherwise it should be de-activated and no special Y-cable should be activated if an extra monitor is connected to the projector. AV Mute Stand by Source Lamp Temp Menu OK Computer 4. The image projected is to be connected. 9 Use Cursor Control to select 'Monitor out'....
... indicate the necessity to select 'Settings' in ) socket of your Computer. 5 Switch on the projector. 6 Select 'Computer' input, using the Source button. - 'Computer' appears on the monitor. Philips Multimedia Projector 14 English User guide bSure1 / bSure 2 The menu bar appears on the screen. 8 Use Cursor ...Otherwise it should be de-activated and no special Y-cable should be activated if an extra monitor is connected to the projector. AV Mute Stand by Source Lamp Temp Menu OK Computer 4. The image projected is to be connected. 9 Use Cursor Control to select 'Monitor out'....
User Manual
Page 18
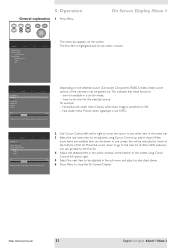
PHILIPS Multimedia Projectors Note 2 Select the required source (Computer, Component, RGBS, S-Video,Video) by Source Lamp Temp pj 5. When only one input source is properly closed If the problem persists in spite of the above, please contact... display. when the Auto image function is described in the 'Settings' menu. 3 Switch on the projector. Computer Video No signal S-Video A/V Muted Component video A/V Muted Computer selected as source Philips Multimedia Projector Video selected as source, no input signal 18 S-Video selected as source, A/V muted Component selected as...
PHILIPS Multimedia Projectors Note 2 Select the required source (Computer, Component, RGBS, S-Video,Video) by Source Lamp Temp pj 5. When only one input source is properly closed If the problem persists in spite of the above, please contact... display. when the Auto image function is described in the 'Settings' menu. 3 Switch on the projector. Computer Video No signal S-Video A/V Muted Component video A/V Muted Computer selected as source Philips Multimedia Projector Video selected as source, no input signal 18 S-Video selected as source, A/V muted Component selected as...
User Manual
Page 19
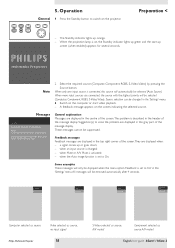
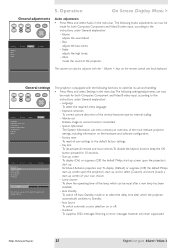
Operation On Screen Display Menu > AV Mute Stand by Source Lamp Temp Menu tree Menu OK All video and data adjustments and ...Mirror (more) Audio Settings min max Move pointer left or right to standard settings at the factory. The projector menu screens allow you can adjust these settings to adjust the position of Menu, OK and Cursor Control ...on a 4:3 screen vivid natural warm cool min max min max min max Philips Multimedia Projector 19 English User guide bSure1 / bSure 2 Audio Settings Shift is set to adjust the Red level. Display ...
Operation On Screen Display Menu > AV Mute Stand by Source Lamp Temp Menu tree Menu OK All video and data adjustments and ...Mirror (more) Audio Settings min max Move pointer left or right to standard settings at the factory. The projector menu screens allow you can adjust these settings to adjust the position of Menu, OK and Cursor Control ...on a 4:3 screen vivid natural warm cool min max min max min max Philips Multimedia Projector 19 English User guide bSure1 / bSure 2 Audio Settings Shift is set to adjust the Red level. Display ...
User Manual
Page 20
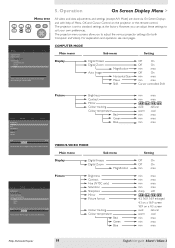
Fra. Por. Philips Multimedia Projector 20 English User guide bSure1 / bSure 2 Deu. Esp. Off On OK OK OK (3 sec.) Off On Default, Off, Custom, Load OK (3 sec.) Off 15 30 45 60 120 Off On Off On Display Picture (previous) Start-up screen Lamp counter Auto Standby Auto Source ...Feedback Audio Settings Off On The Start-up screen can be shown or suppressed during start-up screen For bSure2 Brilliance projectors only Lamp counter Auto Standby Auto Source Feedback Min Max Min Max Min Max Off On Eng. 5. Factory reset Key lock (more) Audio...
Fra. Por. Philips Multimedia Projector 20 English User guide bSure1 / bSure 2 Deu. Esp. Off On OK OK OK (3 sec.) Off On Default, Off, Custom, Load OK (3 sec.) Off 15 30 45 60 120 Off On Off On Display Picture (previous) Start-up screen Lamp counter Auto Standby Auto Source ...Feedback Audio Settings Off On The Start-up screen can be shown or suppressed during start-up screen For bSure2 Brilliance projectors only Lamp counter Auto Standby Auto Source Feedback Min Max Min Max Min Max Off On Eng. 5. Factory reset Key lock (more) Audio...
User Manual
Page 21
... Hue Saturation Sharpness Mirror (more) Audio Settings min max Move pointer left and/or right. 5 Select the next item to be indicated by Source Lamp Temp Menu OK On Screen Display Menu > Display Picture Digital Freeze Digital Zoom Magnification Auto Image Horizontal size Phase Shift . . . When more '... selected source (Computer, Component, RGBS, S-Video,Video) some options of the list. Hue under menu 'Display' when Auto image is shown. Philips Multimedia Projector 21 English User guide bSure1 / bSure 2 Audio Settings - have no function for the selected source.
... Hue Saturation Sharpness Mirror (more) Audio Settings min max Move pointer left and/or right. 5 Select the next item to be indicated by Source Lamp Temp Menu OK On Screen Display Menu > Display Picture Digital Freeze Digital Zoom Magnification Auto Image Horizontal size Phase Shift . . . When more '... selected source (Computer, Component, RGBS, S-Video,Video) some options of the list. Hue under menu 'Display' when Auto image is shown. Philips Multimedia Projector 21 English User guide bSure1 / bSure 2 Audio Settings - have no function for the selected source.
User Manual
Page 22
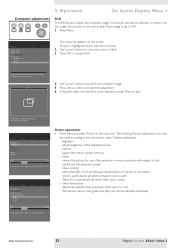
...and exit the menu. 6 Use Cursor Control to On, the Horizontal size, Shift and Phase options are visible. 3 Now adjust the projectors phase control for Windows users To adjust size and phase correctly 1 Select 'Start' and then 'Shut down' from the Windows Taskbar. 2 Adjust the... image to enlarge part of actions, or may need some further explanation. Audio Settings off Digital Zoom. Philips Multimedia Projector 22 English User guide bSure1 / bSure 2 AV Mute Stand by Source Lamp Temp Menu OK Tip for maximum brightness of the picture; - It does not affect the selected picture ...
...and exit the menu. 6 Use Cursor Control to On, the Horizontal size, Shift and Phase options are visible. 3 Now adjust the projectors phase control for Windows users To adjust size and phase correctly 1 Select 'Start' and then 'Shut down' from the Windows Taskbar. 2 Adjust the... image to enlarge part of actions, or may need some further explanation. Audio Settings off Digital Zoom. Philips Multimedia Projector 22 English User guide bSure1 / bSure 2 AV Mute Stand by Source Lamp Temp Menu OK Tip for maximum brightness of the picture; - It does not affect the selected picture ...
User Manual
Page 23
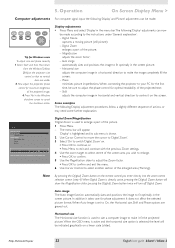
...'Picture' adjustments can also be made according to the instructions under 'General explanation': - Mirror mirrors the picture for use of the image. Philips Multimedia Projector 23 English User guide bSure1 / bSure 2 5. The menu bar appears on the screen.This function is only active when 'Auto image' is...or right to the user(s) and the projection screen; - Operation On Screen Display Menu > Computer adjustments AV Mute Stand by Source Lamp Temp Menu OK Shift The Shift function adjusts the computer image in various positions with respect to adjust the contrast level. Press OK ...
...'Picture' adjustments can also be made according to the instructions under 'General explanation': - Mirror mirrors the picture for use of the image. Philips Multimedia Projector 23 English User guide bSure1 / bSure 2 5. The menu bar appears on the screen.This function is only active when 'Auto image' is...or right to the user(s) and the projection screen; - Operation On Screen Display Menu > Computer adjustments AV Mute Stand by Source Lamp Temp Menu OK Shift The Shift function adjusts the computer image in various positions with respect to adjust the contrast level. Press OK ...
User Manual
Page 24
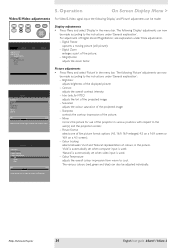
.... The following 'Display' adjustments can now be made : AV Mute Stand by Source Lamp Temp Menu OK Display Picture Digital Freeze Digital Zoom Magnification Auto Image Horizontal size Phase Shift . . . Hue (only for use of the projected image; - Philips Multimedia Projector 24 English User guide bSure1 / bSure 2 5. Display adjustments • Press Menu and...
.... The following 'Display' adjustments can now be made : AV Mute Stand by Source Lamp Temp Menu OK Display Picture Digital Freeze Digital Zoom Magnification Auto Image Horizontal size Phase Shift . . . Hue (only for use of the projected image; - Philips Multimedia Projector 24 English User guide bSure1 / bSure 2 5. Display adjustments • Press Menu and...
User Manual
Page 25
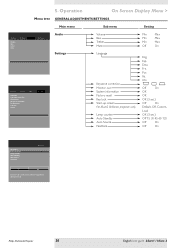
... (Load) a start-up . Start-up screen To display (On) or suppress (Off) the default Philips start-up screen upon the projector's start up and to select the delay time after a new lamp has been installed; - Auto Standby To switch off ; - 5. Bass adjusts the bass tones; - ... of the vertical keystone type by Source Lamp Temp Menu OK Display Picture Language Keystone correction Monitor out System information... For bSure2 Brilliance projectors only: To display (Default) or suppress (Off) the default Philips start-up screen upon the projector's start -up screen of the...
... (Load) a start-up . Start-up screen To display (On) or suppress (Off) the default Philips start-up screen upon the projector's start up and to select the delay time after a new lamp has been installed; - Auto Standby To switch off ; - 5. Bass adjusts the bass tones; - ... of the vertical keystone type by Source Lamp Temp Menu OK Display Picture Language Keystone correction Monitor out System information... For bSure2 Brilliance projectors only: To display (Default) or suppress (Off) the default Philips start-up screen upon the projector's start -up screen of the...

User Manual
Page 26
... its size will be loaded. 6 With Cursor Control you can move the cursor to Settings. 3 Select Start-up to a few minutes. - Philips Multimedia Projector 26 English User guide bSure1 / bSure 2 AV Mute Stand by using Cursor Control. 4 Select Load if you what part of the image will ... can load any image as long as start -up screen. - Operation On Screen Display Menu > Loading your own personal start-up screen Lamp counter Auto Standby Auto Source Feedback Audio Settings Default Off DefCauuslttom Load... The capture window (red oblong) shows you wish to confirm capture of...
... its size will be loaded. 6 With Cursor Control you can move the cursor to Settings. 3 Select Start-up to a few minutes. - Philips Multimedia Projector 26 English User guide bSure1 / bSure 2 AV Mute Stand by using Cursor Control. 4 Select Load if you what part of the image will ... can load any image as long as start -up screen. - Operation On Screen Display Menu > Loading your own personal start-up screen Lamp counter Auto Standby Auto Source Feedback Audio Settings Default Off DefCauuslttom Load... The capture window (red oblong) shows you wish to confirm capture of...
User Manual
Page 27
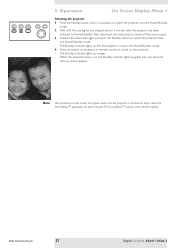
AV Mute Stand by Source Lamp Temp Menu OK 5. When the projection lamp is switched on exept when the SecurityMax™ application has been activated.The SecurityMax™ start-up screen will appear each time the projector is on the projector. - Note Your personal start -up screen ...projector has been switched to Power/Standby).Then disconnect the mains lead to switch off the mains supply. 3 Connect the mains lead again and press the Standby button to switch on , the Standby indicator lights up green and your personal start -up screen appears. Philips Multimedia Projector...
AV Mute Stand by Source Lamp Temp Menu OK 5. When the projection lamp is switched on exept when the SecurityMax™ application has been activated.The SecurityMax™ start-up screen will appear each time the projector is on the projector. - Note Your personal start -up screen ...projector has been switched to Power/Standby).Then disconnect the mains lead to switch off the mains supply. 3 Connect the mains lead again and press the Standby button to switch on , the Standby indicator lights up green and your personal start -up screen appears. Philips Multimedia Projector...
User Manual
Page 28
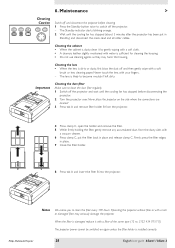
...When the lens is sufficient for cleaning the housing. • Do not use cleaning agents as they may seriously damage the projector. Philips Multimedia Projector 28 English User guide bSure1 / bSure 2 Never touch the lens with a torn or damaged filter may harm the housing... B Notes We advise you to switch off and disconnect the projector before disconnecting the projector. 2 Turn the projector over. Operating the projector without filter or with your fingers. - The lens is damaged replace it by Source Lamp Temp 6. Firmly press the filter edges in place and release...
...When the lens is sufficient for cleaning the housing. • Do not use cleaning agents as they may seriously damage the projector. Philips Multimedia Projector 28 English User guide bSure1 / bSure 2 Never touch the lens with a torn or damaged filter may harm the housing... B Notes We advise you to switch off and disconnect the projector before disconnecting the projector. 2 Turn the projector over. Operating the projector without filter or with your fingers. - The lens is damaged replace it by Source Lamp Temp 6. Firmly press the filter edges in place and release...
User Manual
Page 29
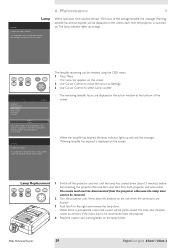
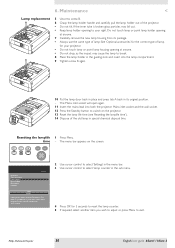
... the OSD menu. 1 Press Menu. - The remaining lamplife hours are located! 3 Push tab A to improve overall picture quality. A Philips Multimedia Projector 29 English User guide bSure1 / bSure 2 The lamp type is not disconnected from the projector. 4 Read the caution and warning labels on the screen. 2 Use Cursor Control to move the cursor to 'Settings...
... the OSD menu. 1 Press Menu. - The remaining lamplife hours are located! 3 Push tab A to improve overall picture quality. A Philips Multimedia Projector 29 English User guide bSure1 / bSure 2 The lamp type is not disconnected from the projector. 4 Read the caution and warning labels on the screen. 2 Use Cursor Control to move the cursor to 'Settings...
User Manual
Page 30
... disposal bins. The Mains inlet socket will open again. 11 Insert the mains lead into the lamp compartment. 9 Tighten screw B again. Philips Multimedia Projector 30 English User guide bSure1 / bSure 2 If the inner tube is suggested to break. 8 Place the lamp holder in the sub menu. 4 Press OK for your right. A 13 Reset the...
... disposal bins. The Mains inlet socket will open again. 11 Insert the mains lead into the lamp compartment. 9 Tighten screw B again. Philips Multimedia Projector 30 English User guide bSure1 / bSure 2 If the inner tube is suggested to break. 8 Place the lamp holder in the sub menu. 4 Press OK for your right. A 13 Reset the...
User Manual
Page 31
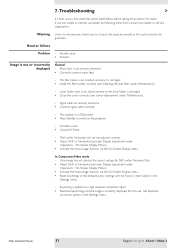
...- 'Shift' and/or 'Horizontal size' are unable to repair the projector yourself as follows Problem - Possible cause • Solution Image is damaged. • Close the cover correctly (see 'Lamp replacement' under 'Maintenance'). - Lamp holder cover is not closed correctly or the lamp holder is not or incorrectly displayed General - 7.Troubleshooting > If a ...'Auto Image' has not selected the correct settings for repair. Read as this use the 'Keystone correction' option in the 'Settings' menu. - Philips Multimedia Projector 31 English User guide bSure1 / bSure 2
...- 'Shift' and/or 'Horizontal size' are unable to repair the projector yourself as follows Problem - Possible cause • Solution Image is damaged. • Close the cover correctly (see 'Lamp replacement' under 'Maintenance'). - Lamp holder cover is not closed correctly or the lamp holder is not or incorrectly displayed General - 7.Troubleshooting > If a ...'Auto Image' has not selected the correct settings for repair. Read as this use the 'Keystone correction' option in the 'Settings' menu. - Philips Multimedia Projector 31 English User guide bSure1 / bSure 2
User Manual
Page 33
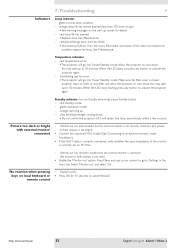
...Lamp indicator - red: lamp life has expired. • Replace lamp. red: temperature error. • The projector will go into Power Standby mode. this may take up . - Press Menu and use cursor control to cancel 'Keylock.' No reaction when pressing keys on the start has failed. • Disconnect projector from the mains. Philips Multimedia Projector...down. • Do not switch the projector off; this does not resolve the problem, replace the lamp. red: standby mode. - green: normal lamp condition. - red (fast blinking): lamp start up to 30 minutes. See '...
...Lamp indicator - red: lamp life has expired. • Replace lamp. red: temperature error. • The projector will go into Power Standby mode. this may take up . - Press Menu and use cursor control to cancel 'Keylock.' No reaction when pressing keys on the start has failed. • Disconnect projector from the mains. Philips Multimedia Projector...down. • Do not switch the projector off; this does not resolve the problem, replace the lamp. red: standby mode. - green: normal lamp condition. - red (fast blinking): lamp start up to 30 minutes. See '...


