User Guide
Page 1
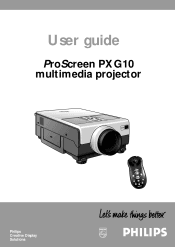
User guide ProScreen PXG10 multimedia projector ) nu Menu Me D-Zoom c Auto syn OK Lens Input te A/V Mu Philips Creative Display Solutions
User guide ProScreen PXG10 multimedia projector ) nu Menu Me D-Zoom c Auto syn OK Lens Input te A/V Mu Philips Creative Display Solutions

User Guide
Page 2
... not remove product covering. IMPORTANT NOTE FOR USERS IN THE U.S.A. CAUTION RISK OF ELECTRIC SHOCK. For the safety of this multi media projector is the following: Philips Consumer Electronics Company One Philips Drive Knoxville, TN 37914 Telephone (1888) 873-4672 English WARNING: TO REDUCE THE RISK OF FIRE OR ELECTRIC SHOCK, DO NOT...
... not remove product covering. IMPORTANT NOTE FOR USERS IN THE U.S.A. CAUTION RISK OF ELECTRIC SHOCK. For the safety of this multi media projector is the following: Philips Consumer Electronics Company One Philips Drive Knoxville, TN 37914 Telephone (1888) 873-4672 English WARNING: TO REDUCE THE RISK OF FIRE OR ELECTRIC SHOCK, DO NOT...

User Guide
Page 3
...on . 11. Do not use the projector near a swimming pool, etc. Never spill liquid into the projector. Use only with a cart or stand recommended by wiping with a projector and should not be sure the service technician has used replacement parts specified by PHILIPS, as they may become too hot if... the filter is left unattended or not in chapter 'ADDITIONAL INFORMATION/Maintenance'. To ensure reliable operation of any cable systems. This will be blocked or covered. Do not allow anything to clean the projector unit. Do ...
...on . 11. Do not use the projector near a swimming pool, etc. Never spill liquid into the projector. Use only with a cart or stand recommended by wiping with a projector and should not be sure the service technician has used replacement parts specified by PHILIPS, as they may become too hot if... the filter is left unattended or not in chapter 'ADDITIONAL INFORMATION/Maintenance'. To ensure reliable operation of any cable systems. This will be blocked or covered. Do not allow anything to clean the projector unit. Do ...

User Guide
Page 4
......11 Connecting to video equipment ...12 Connecting to audio equipment ...13 Connecting to help you use or set up your projector. • ProScreen PXG 10 • Lens cap • Power cord (2x); ADDITIONAL INFORMATION...25-27 Connecting RS-232C Port...25 Maintenance...projector 8 Lens adjustment...9 Moving the projector ...9 Inserting the batteries in English, German, French, Spanish, Portuguese, Italian and Dutch. CD-ROM plus Quick Reference Card • Extra air filter • Registration card 2 Carefully read through the operation instructions before operating the LCD-projector...
......11 Connecting to video equipment ...12 Connecting to audio equipment ...13 Connecting to help you use or set up your projector. • ProScreen PXG 10 • Lens cap • Power cord (2x); ADDITIONAL INFORMATION...25-27 Connecting RS-232C Port...25 Maintenance...projector 8 Lens adjustment...9 Moving the projector ...9 Inserting the batteries in English, German, French, Spanish, Portuguese, Italian and Dutch. CD-ROM plus Quick Reference Card • Extra air filter • Registration card 2 Carefully read through the operation instructions before operating the LCD-projector...

User Guide
Page 5
... and receiver. - This equipment generates, uses, and can be required to radio communications. FCC WARNING: To assure continued compliance, use the projector for more of the FCC Rules as well as the European CE marking. 3. If this equipment in accordance with the limits for help.... an outlet on , the user is likely to the following measures: - Note: SAVE ENERGY! To save energy, please put the projector in the STANDBY position if you are designed to provide reasonable protection against harmful interference when the equipment is subject to cause harmful interference ...
... and receiver. - This equipment generates, uses, and can be required to radio communications. FCC WARNING: To assure continued compliance, use the projector for more of the FCC Rules as well as the European CE marking. 3. If this equipment in accordance with the limits for help.... an outlet on , the user is likely to the following measures: - Note: SAVE ENERGY! To save energy, please put the projector in the STANDBY position if you are designed to provide reasonable protection against harmful interference when the equipment is subject to cause harmful interference ...

User Guide
Page 7
... USER-FRIENDLY DESIGN The two-colour design along with BNC terminals for connection to "Lamp / Maintenance Indicators " on the power by a Philips Authorised LCD Projector Dealer or Service Centre. 104 F ('40 C) 41 F ('5 C) NOTES ON OPERATION •The exhaust vent,the lamp cage cover ...presentations. * DTV is regularly cleaned,use with minimal dot crawl and cross colour noise. 5. 4. XGA RESOLUTION FOR HIGH RESOLUTION PRESENTATIONS With XGA (1,024 x 768) resolution, this projector very easy to setup problems or a dirty air filter,"TEMP." Then turn off . TEMPERATURE MONITOR ...
... USER-FRIENDLY DESIGN The two-colour design along with BNC terminals for connection to "Lamp / Maintenance Indicators " on the power by a Philips Authorised LCD Projector Dealer or Service Centre. 104 F ('40 C) 41 F ('5 C) NOTES ON OPERATION •The exhaust vent,the lamp cage cover ...presentations. * DTV is regularly cleaned,use with minimal dot crawl and cross colour noise. 5. 4. XGA RESOLUTION FOR HIGH RESOLUTION PRESENTATIONS With XGA (1,024 x 768) resolution, this projector very easy to setup problems or a dirty air filter,"TEMP." Then turn off . TEMPERATURE MONITOR ...

User Guide
Page 8
...an optional locking device (Kensington lock). ¡ Carrying handle ™ Foot releases/height adjustment For adjusting the height and vertical angle of the projector. £ Remote control sensors Receive the signals from the remote control. ≤ Speakers ∞ Cooling fan Exhaust of the local keyboard,...moving image. ! 5. The cursor control, by means of air for muting the picture. * Power indicator y I Lights up red when the projector enters standby mode. Mute For muting the sound of the lamp; Green: lamp is active the Cursor Control buttons control the menu cursor. The button...
...an optional locking device (Kensington lock). ¡ Carrying handle ™ Foot releases/height adjustment For adjusting the height and vertical angle of the projector. £ Remote control sensors Receive the signals from the remote control. ≤ Speakers ∞ Cooling fan Exhaust of the local keyboard,...moving image. ! 5. The cursor control, by means of air for muting the picture. * Power indicator y I Lights up red when the projector enters standby mode. Mute For muting the sound of the lamp; Green: lamp is active the Cursor Control buttons control the menu cursor. The button...
User Guide
Page 9
.... The button toggles between the Zoom-, Focus- 5. Notes: The Tracking Ball only functions when the provided USB Mouse Receiver is connected to the projector with a RS-232C cable (optional). K Video in (3.5 mm stereo minijack) Input socket for connecting to the Data out terminal of a PC... socket for connecting to any other Audio Video equipment equipped with a Video output socket. (PAL, NTSC, SECAM). H AC socket For connecting the projector to the Audio out terminal of a video recorder (S-VHS, PAL, NTSC, SECAM). B Audio 1 in case the provided USB Mouse receiver properly is...
.... The button toggles between the Zoom-, Focus- 5. Notes: The Tracking Ball only functions when the provided USB Mouse Receiver is connected to the projector with a RS-232C cable (optional). K Video in (3.5 mm stereo minijack) Input socket for connecting to the Data out terminal of a PC... socket for connecting to any other Audio Video equipment equipped with a Video output socket. (PAL, NTSC, SECAM). H AC socket For connecting the projector to the Audio out terminal of a video recorder (S-VHS, PAL, NTSC, SECAM). B Audio 1 in case the provided USB Mouse receiver properly is...

User Guide
Page 10
.... Values with all feet flat and level to the screen, the image will soon disappear with this projector. Place the projector at the required distance from foot releases. • Rotate feet to get your local Philips Authorised LCD Projector Dealer for details on the relative positions of image cm inch -5,00 -1,97 -7,50 -2,95 -9,00...
.... Values with all feet flat and level to the screen, the image will soon disappear with this projector. Place the projector at the required distance from foot releases. • Rotate feet to get your local Philips Authorised LCD Projector Dealer for details on the relative positions of image cm inch -5,00 -1,97 -7,50 -2,95 -9,00...

User Guide
Page 11
...the cooling fan has stopped (about 2 minutes after the projector has been switched off) and disconnect the mains lead and all required adjustments have been made , switch off the projector. MOVING THE PROJECTOR 1. When transporting the projector, carry it is pressed, the screen changes in and ... When all other contamination from harming or damaging the front of the projector lens when moving the projector. 4. CAUTION! KEYSTONE END OK ADJUST EXIT TEST PTRN 3. Press 1, 2, 3 or 4 to switch off the projector before making sure their slots and press the cover in place to ...
...the cooling fan has stopped (about 2 minutes after the projector has been switched off) and disconnect the mains lead and all required adjustments have been made , switch off the projector. MOVING THE PROJECTOR 1. When transporting the projector, carry it is pressed, the screen changes in and ... When all other contamination from harming or damaging the front of the projector lens when moving the projector. 4. CAUTION! KEYSTONE END OK ADJUST EXIT TEST PTRN 3. Press 1, 2, 3 or 4 to switch off the projector before making sure their slots and press the cover in place to ...

User Guide
Page 12
INSTALLATION VIDEO/COMPUTER CABLES AND ADAPTER Video/computer cables and adapter English These accessories are supplied for external projector control: Mini D sub (9 pin female on the following pages. No. The numbers in the left-hand column correspond with the ...numbers in the connection diagrams on both sides) Computer audio cable 3,5 mm stereo minijack to computer/Audiovisual equipment. CABLE/ADAPTER Projector side 1 Computer VGA Cable Mini D-Sub 15P (male) RCA pin (male) x 3 3.5 mm stereo minijack CONNECTIONS Computer/AV products side Mini D-Sub ...
INSTALLATION VIDEO/COMPUTER CABLES AND ADAPTER Video/computer cables and adapter English These accessories are supplied for external projector control: Mini D sub (9 pin female on the following pages. No. The numbers in the left-hand column correspond with the ...numbers in the connection diagrams on both sides) Computer audio cable 3,5 mm stereo minijack to computer/Audiovisual equipment. CABLE/ADAPTER Projector side 1 Computer VGA Cable Mini D-Sub 15P (male) RCA pin (male) x 3 3.5 mm stereo minijack CONNECTIONS Computer/AV products side Mini D-Sub ...
User Guide
Page 13
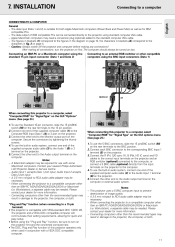
...) as well as for use the Standard 15-pin connector, slide the 15 pin/BNC switch (M) on page 4. - Please contact your nearest Philips Authorised LCD Projector Dealer or Service Centre. - INSTALLATION CONNECTING TO A COMPUTER Connecting to the Monitor output port on the GUI "Options" menu. (See page 23...fig. 3 on the rear terminals to the characters in conjunction with some Macintosh computers. Connect the other than an IBM-PC (VGA/SVGA/XGA/SXGA/UXGA) or Macintosh (i.e. To use with a VESA DDC compatible computer. The figures in brackets (1) correspond to the figures in the ...
...) as well as for use the Standard 15-pin connector, slide the 15 pin/BNC switch (M) on page 4. - Please contact your nearest Philips Authorised LCD Projector Dealer or Service Centre. - INSTALLATION CONNECTING TO A COMPUTER Connecting to the Monitor output port on the GUI "Options" menu. (See page 23...fig. 3 on the rear terminals to the characters in conjunction with some Macintosh computers. Connect the other than an IBM-PC (VGA/SVGA/XGA/SXGA/UXGA) or Macintosh (i.e. To use with a VESA DDC compatible computer. The figures in brackets (1) correspond to the figures in the ...
User Guide
Page 14
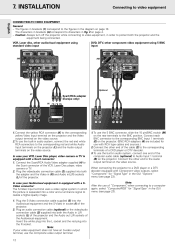
...diagram on page 4. - Connect the yellow RCA connector (K) to the figures in brackets (1) correspond to the corresponding yellow Video Input terminal on the projector and the Video output terminal on the video source. 2. Audio in L R Video in Optional (2) Scart/RCA adapter (Europe only) (4) (2) ... TO VIDEO EQUIPMENT Connecting to the Scart connector of the cable (2) to characters in order to the Audio output terminal on the projector. Connect each BNC connector to a computer again, select "Computer/RGB" for use with Component video outputs, select "Component" for...
...diagram on page 4. - Connect the yellow RCA connector (K) to the figures in brackets (1) correspond to the corresponding yellow Video Input terminal on the projector and the Video output terminal on the video source. 2. Audio in L R Video in Optional (2) Scart/RCA adapter (Europe only) (4) (2) ... TO VIDEO EQUIPMENT Connecting to the Scart connector of the cable (2) to characters in order to the Audio output terminal on the projector. Connect each BNC connector to a computer again, select "Computer/RGB" for use with Component video outputs, select "Component" for...

User Guide
Page 15
...INSTALLATION Connecting to the figures in brackets (A) correspond to the corresponding USB terminal on page 10. - 7. The figures in L/R sockets of the projector. The minimum system requirements for details. Audio in L R Video in Data out Audio out (G) 110-120V / 220-240V~ RS-232C S-Video... USB L Audio R in • Connect the Audio in brackets (1) correspond to audio equipment/remote control mouse receiver General - Always turn off the projector while connecting to audio components, in (BNC) 15pin BNC R (Pr) G/G sync (Y) B (Pb) HD (C sync) VD APPARATEN SKALL ANSLUTAS ...
...INSTALLATION Connecting to the figures in brackets (A) correspond to the corresponding USB terminal on page 10. - 7. The figures in L/R sockets of the projector. The minimum system requirements for details. Audio in L R Video in Data out Audio out (G) 110-120V / 220-240V~ RS-232C S-Video... USB L Audio R in • Connect the Audio in brackets (1) correspond to audio equipment/remote control mouse receiver General - Always turn off the projector while connecting to audio components, in (BNC) 15pin BNC R (Pr) G/G sync (Y) B (Pb) HD (C sync) VD APPARATEN SKALL ANSLUTAS ...

User Guide
Page 16
... ON. Press Volume to receive is being received, "NOT REG. For one-button mouse systems, use . Press Standby/OFF for switching the projector and the Remote Control unit to control the mouse functions of a connected computer within the ranges shown below . 7m (23'8) D1 Remarks: ...Power indicator and the Lamp indicator light green. USING THE REMOTE CONTROL (FIG 2) The remote control has the following two functions: • Projector control • Wireless mouse • Slide the remote control power ON/OFF switch into the ON position for switching off ) before the lamp...
... ON. Press Volume to receive is being received, "NOT REG. For one-button mouse systems, use . Press Standby/OFF for switching the projector and the Remote Control unit to control the mouse functions of a connected computer within the ranges shown below . 7m (23'8) D1 Remarks: ...Power indicator and the Lamp indicator light green. USING THE REMOTE CONTROL (FIG 2) The remote control has the following two functions: • Projector control • Wireless mouse • Slide the remote control power ON/OFF switch into the ON position for switching off ) before the lamp...
User Guide
Page 17
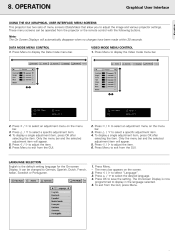
...item will appear. 5. Press Menu to select an adjustment menu on the screen. Press OK to adjust the image and various projector settings. To exit from the projector or the remote control with the following buttons. OPERATION USING THE GUI (GRAPHICAL USER INTERFACE) MENU SCREENS Graphical User Interface This... projector has two sets of menu screens (Data/Video) that allow you to save the setting. DATA MODE MENU CONTROL 1. It can ...
...item will appear. 5. Press Menu to select an adjustment menu on the screen. Press OK to adjust the image and various projector settings. To exit from the projector or the remote control with the following buttons. OPERATION USING THE GUI (GRAPHICAL USER INTERFACE) MENU SCREENS Graphical User Interface This... projector has two sets of menu screens (Data/Video) that allow you to save the setting. DATA MODE MENU CONTROL 1. It can ...

User Guide
Page 18
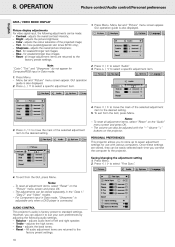
...menu screen may occur, making the image hard to be recalled. - To exit from the GUI, press Menu. 4. 5. 6. 7. The projector's picture is preset to standard specifications at the factory. Press Menu. 2. Press OK to select "Options". 3. OPERATION PICTURE CONTROL Picture control English... - When the projector is automatically selected. However, for every source. VIDEO MODE INPUT SIGNAL Video mode system selection The video input system mode is set...
...menu screen may occur, making the image hard to be recalled. - To exit from the GUI, press Menu. 4. 5. 6. 7. The projector's picture is preset to standard specifications at the factory. Press Menu. 2. Press OK to select "Options". 3. OPERATION PICTURE CONTROL Picture control English... - When the projector is automatically selected. However, for every source. VIDEO MODE INPUT SIGNAL Video mode system selection The video input system mode is set...

User Guide
Page 19
...to select " " to superimpose a background image or " " to "ON": - Select the desired computer input mode by setting "Auto Sync" to the projector. When "Auto Sync" is turned on while connected to select "Fine Sync" . 4. Press 3 / 4 to select a specific adjustment item. Menu bar... adjustment, the On-Screen Display changes: 3. Note: Auto Sync adjustment may occur between the LCD pixels, causing flickering, vertical stripes, or contrast irregularities in the projector's GUI menu. Auto Sync Adjustment - Auto Sync adjustment can be achieved with Auto Sync adjustment...
...to select " " to superimpose a background image or " " to "ON": - Select the desired computer input mode by setting "Auto Sync" to the projector. When "Auto Sync" is turned on while connected to select "Fine Sync" . 4. Press 3 / 4 to select a specific adjustment item. Menu bar... adjustment, the On-Screen Display changes: 3. Note: Auto Sync adjustment may occur between the LCD pixels, causing flickering, vertical stripes, or contrast irregularities in the projector's GUI menu. Auto Sync Adjustment - Auto Sync adjustment can be achieved with Auto Sync adjustment...
User Guide
Page 20
...; - To exit from the GUI, press Menu. AUDIO CONTROL This projector's audio is also displayed. 2. Reset - Press Menu. Menu bar and "Picture" menu screen appear. Reset - PERSONAL PREFERENCES This projector allows you to store up to standard settings. Once these settings are ...preferences English 1. Color - Press Menu. - Press 1 / 2 to move the mark of the selected adjustment item to the projector. To reset all adjustment items, select "Reset" on the projector. Press 3 / 4 to select "Fine Sync" . 3. adjusts the colour saturation of left and right speaker; - The...
...; - To exit from the GUI, press Menu. AUDIO CONTROL This projector's audio is also displayed. 2. Reset - Press Menu. Menu bar and "Picture" menu screen appear. Reset - PERSONAL PREFERENCES This projector allows you to store up to standard settings. Once these settings are ...preferences English 1. Color - Press Menu. - Press 1 / 2 to move the mark of the selected adjustment item to the projector. To reset all adjustment items, select "Reset" on the projector. Press 3 / 4 to select "Fine Sync" . 3. adjusts the colour saturation of left and right speaker; - The...
User Guide
Page 21
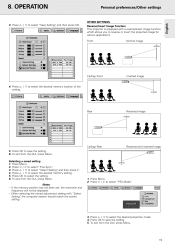
... save the setting. 6. Press 1 / 2 to select the desired memory setting. 5. Press OK to save the setting. 5. Personal preferences/Other settings Reverse/Invert Image Function This projector is equipped with "Select Setting" , the computer system should match the stored setting. 3. To exit from the GUI, press Menu. To exit from the GUI...
... save the setting. 6. Press 1 / 2 to select the desired memory setting. 5. Press OK to save the setting. 5. Personal preferences/Other settings Reverse/Invert Image Function This projector is equipped with "Select Setting" , the computer system should match the stored setting. 3. To exit from the GUI, press Menu. To exit from the GUI...


