User manual
Page 7
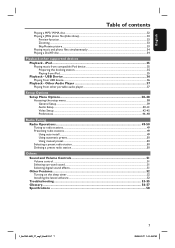
...-48 Radio Tuning Radio Operations...49-50 Tuning to radio stations...49 Presetting radio stations ...49 Using auto install ...49 Using automatic preset...50 Using manual preset ...50 Selecting a preset radio station...50 Deleting a preset radio station...50 Others Sound and Volume Controls 51 Volume control ...51 Selecting surround sound...51...
...-48 Radio Tuning Radio Operations...49-50 Tuning to radio stations...49 Presetting radio stations ...49 Using auto install ...49 Using automatic preset...50 Using manual preset ...50 Selecting a preset radio station...50 Deleting a preset radio station...50 Others Sound and Volume Controls 51 Volume control ...51 Selecting surround sound...51...

User manual
Page 11
.... 1_hts3565-66D_37_eng2_final813.i11 11 11 2008-03-27 3:11:57 PM RADIO: selects a preset radio station. p % (Mute) - RADIO: press and hold this button to start manual preset programming. - VCD/SVCD: During playback (PBC ON mode only) return to title menu. - DISC: press left or right to start auto search. n MENU (BACK...
.... 1_hts3565-66D_37_eng2_final813.i11 11 11 2008-03-27 3:11:57 PM RADIO: selects a preset radio station. p % (Mute) - RADIO: press and hold this button to start manual preset programming. - VCD/SVCD: During playback (PBC ON mode only) return to title menu. - DISC: press left or right to start auto search. n MENU (BACK...
User manual
Page 20
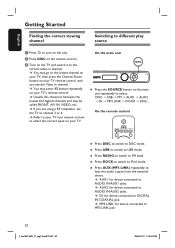
... to turn on the unit. Usually this channel is between the lowest and highest channels and may press ° button repeatedly on your TV user manual on how to channel 3 or 4. Refer to your TV remote control until you are using a RF modulator, set the TV to select the correct input...
... to turn on the unit. Usually this channel is between the lowest and highest channels and may press ° button repeatedly on your TV user manual on how to channel 3 or 4. Refer to your TV remote control until you are using a RF modulator, set the TV to select the correct input...

User manual
Page 21
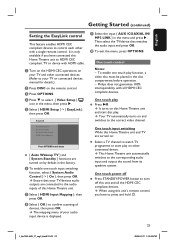
A In disc mode, press OPTIONS on the user manual. C Use keys to the DVD disc language. Audio, Subtitle and Disc Menu language for DVD playback You can select your country or region. B Press repeatedly ...
A In disc mode, press OPTIONS on the user manual. C Use keys to the DVD disc language. Audio, Subtitle and Disc Menu language for DVD playback You can select your country or region. B Press repeatedly ...

User manual
Page 23
... some progressive scan TV that the TV progressive scan mode is turned off the progressive scan feature on the TV and confirm your TV user manual. Before you have turned on the progressive scan mode on your action by selecting the { OK } in the menu and press OK to select {... Video Setup } icon, then press . Make sure that are not fully compatible with this unit. B Turn on this unit and your TV user manual. C Press OPTIONS on the TV. Video Setup TV Type TV Display Progressive Off Picture Setting On HDMI Setup Closed Caption F Read the notification message on...
... some progressive scan TV that the TV progressive scan mode is turned off the progressive scan feature on the TV and confirm your TV user manual. Before you have turned on the progressive scan mode on your action by selecting the { OK } in the menu and press OK to select {... Video Setup } icon, then press . Make sure that are not fully compatible with this unit. B Turn on this unit and your TV user manual. C Press OPTIONS on the TV. Video Setup TV Type TV Display Progressive Off Picture Setting On HDMI Setup Closed Caption F Read the notification message on...
User manual
Page 25
...: - E Select { HDMI Setup } > { EasyLink }, then press OK. Then select the TV/device that your TV or connected devices manual for details.) B Press DISC on by default in the disc compartment before operation. - Philips does not guarantee 100% interoperability with a single remote control. This Home Theatre unit automatically switches to confirm scanning of...
...: - E Select { HDMI Setup } > { EasyLink }, then press OK. Then select the TV/device that your TV or connected devices manual for details.) B Press DISC on by default in the disc compartment before operation. - Philips does not guarantee 100% interoperability with a single remote control. This Home Theatre unit automatically switches to confirm scanning of...
User manual
Page 43
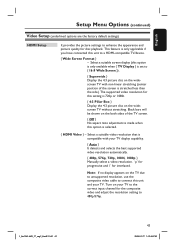
...: If no display appears on your TV display capability. { Auto } It detects and selects the best supported video resolution automatically. { 480p, 576p, 720p, 1080i, 1080p } Manually select a video resolution. 'p' for progressive and 'i' for interlaced. Turn on the TV due to unsupported resolution, use the composite video cable to a HDMI-compatible TV...
...: If no display appears on your TV display capability. { Auto } It detects and selects the best supported video resolution automatically. { 480p, 576p, 720p, 1080i, 1080p } Manually select a video resolution. 'p' for progressive and 'i' for interlaced. Turn on the TV due to unsupported resolution, use the composite video cable to a HDMI-compatible TV...

User manual
Page 44
... Your TV automatically switches to turn on your TV/ devices before you can still turn on the HDMI CEC operations on (both your TVs/ devices manual for details. - To disable this feature, select { Off }. { System Standby } Press STANDBY/POWER button to the correct video channel. Note: However, press and ... disable this feature, select { Decline }. English Setup Menu Options (continued) Video Setup (underlined options are the factory default settings) HDMI Setup Continued... { EasyLink } - Philips does not guarantee 100% interoperability with HDMI CEC. - Notes: -
... Your TV automatically switches to turn on your TV/ devices before you can still turn on the HDMI CEC operations on (both your TVs/ devices manual for details. - To disable this feature, select { Off }. { System Standby } Press STANDBY/POWER button to the correct video channel. Note: However, press and ... disable this feature, select { Decline }. English Setup Menu Options (continued) Video Setup (underlined options are the factory default settings) HDMI Setup Continued... { EasyLink } - Philips does not guarantee 100% interoperability with HDMI CEC. - Notes: -
User manual
Page 49
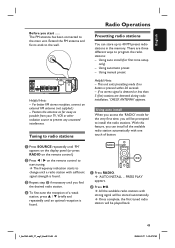
...' appears. Using auto install (for the very first time, you will be prompted to change until you can store up to the main unit. Using manual preset Helpful Hints: - A Press RADIO. 'AUTO INSTALL ... B Press u. This unit exits presetting mode if no stereo signal is pressed within 20 seconds. - If no button...
...' appears. Using auto install (for the very first time, you will be prompted to change until you can store up to the main unit. Using manual preset Helpful Hints: - A Press RADIO. 'AUTO INSTALL ... B Press u. This unit exits presetting mode if no stereo signal is pressed within 20 seconds. - If no button...

User manual
Page 50
... radio stations remain unchanged. 50 1_hts3565-66D_37_eng2_final813.i50 50 2008-03-27 3:12:08 PM All previously stored radio stations will be replaced. Using manual preset Use manual presetting to store. C Press í / ë or use the numeric keypad 0-9 to store the current radio station. B Press í / ë or use the numeric...
... radio stations remain unchanged. 50 1_hts3565-66D_37_eng2_final813.i50 50 2008-03-27 3:12:08 PM All previously stored radio stations will be replaced. Using manual preset Use manual presetting to store. C Press í / ë or use the numeric keypad 0-9 to store the current radio station. B Press í / ë or use the numeric...

User manual
Page 53
.../ ë). - The remote control does not function properly. - Batteries are unable to solve a problem by following these instructions, consult your TV manual for example, AUX (MP3 LINK)) to choose the device that the source you are connected and press the correct source button (for correct Video In... points listed below : 1) Press ç to open the system as there is not a malfunction. - Solution - Refer to your dealer or Philips for HDMI video) on the progressive scan feature or change the HDMI video setting, wait for 15 seconds for repair. Sometimes a small amount of electric...
.../ ë). - The remote control does not function properly. - Batteries are unable to solve a problem by following these instructions, consult your TV manual for example, AUX (MP3 LINK)) to choose the device that the source you are connected and press the correct source button (for correct Video In... points listed below : 1) Press ç to open the system as there is not a malfunction. - Solution - Refer to your dealer or Philips for HDMI video) on the progressive scan feature or change the HDMI video setting, wait for 15 seconds for repair. Sometimes a small amount of electric...
User manual
Page 59
...product that requires modification or adaptation to enable it was designed, manufactured, approved and/or authorized, or repair of the product. Philips, P.O. Non-Philips manufacturers, suppliers, or publishers may not apply to the original purchaser or the person receiving the product as a gift against ... ON THIS PRODUCT. This Limited Warranty does not cover: • Shipping charges to return defective product to operate per Owner's Manual. EXCEPT TO THE EXTENT PROHIBITED BY APPLICABLE LAW, ANY IMPLIED WARRANTY OF MERCHANTABILITY OR FITNESS FOR A PARTICULAR PURPOSE ON THIS PRODUCT...
...product that requires modification or adaptation to enable it was designed, manufactured, approved and/or authorized, or repair of the product. Philips, P.O. Non-Philips manufacturers, suppliers, or publishers may not apply to the original purchaser or the person receiving the product as a gift against ... ON THIS PRODUCT. This Limited Warranty does not cover: • Shipping charges to return defective product to operate per Owner's Manual. EXCEPT TO THE EXTENT PROHIBITED BY APPLICABLE LAW, ANY IMPLIED WARRANTY OF MERCHANTABILITY OR FITNESS FOR A PARTICULAR PURPOSE ON THIS PRODUCT...
Quick start guide
Page 1
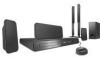
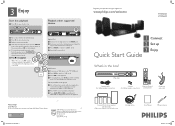
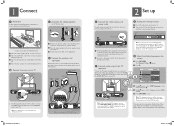
... u to close the disc tray. User Manual See the user manual that came with the disc label facing up 3 Enjoy Quick Start Guide What's in the menu and press OK to 'USB' mode. D Press PLAY on your product and get support at www.philips.com/welcome HTS3565D HTS3566D 1 Connect 2 Set up . C Press ç ... speakers connection) 2 Screws (for tallboy speakers connection) Remote Control and 2 batteries Composite video cable 1 center, 2 front, 2 rear speakers and subwoofer (Tallboy rear speakers for HTS3566D model) Docking station User Manual FM wire antenna 2008-03-27 11:21:41 AM
... u to close the disc tray. User Manual See the user manual that came with the disc label facing up 3 Enjoy Quick Start Guide What's in the menu and press OK to 'USB' mode. D Press PLAY on your product and get support at www.philips.com/welcome HTS3565D HTS3566D 1 Connect 2 Set up . C Press ç ... speakers connection) 2 Screws (for tallboy speakers connection) Remote Control and 2 batteries Composite video cable 1 center, 2 front, 2 rear speakers and subwoofer (Tallboy rear speakers for HTS3566D model) Docking station User Manual FM wire antenna 2008-03-27 11:21:41 AM
Quick start guide
Page 2
... Preferences) available on this Home Theater System. Use the TVs remote control to get the sound output from the TV. E Press OPTIONS to the user manual for HTS3566D only) B C A A Connect the speaker cables to channel 3 or 4. Refer to exit. B Connect the main unit to TV VIDEO IN ...ensure optimum sound performance. F Connect audio output from TV (optional) To hear the TV audio through this Home Theater system, not for HTS3566D model. 1_hts3565-66D_37_qsg_eng2_final82 2 2 Set up E Connect the radio antenna and power cable Keep the antenna away from the electronic devices to...
... Preferences) available on this Home Theater System. Use the TVs remote control to get the sound output from the TV. E Press OPTIONS to the user manual for HTS3566D only) B C A A Connect the speaker cables to channel 3 or 4. Refer to exit. B Connect the main unit to TV VIDEO IN ...ensure optimum sound performance. F Connect audio output from TV (optional) To hear the TV audio through this Home Theater system, not for HTS3566D model. 1_hts3565-66D_37_qsg_eng2_final82 2 2 Set up E Connect the radio antenna and power cable Keep the antenna away from the electronic devices to...
Leaflet
Page 3
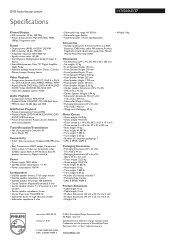
... standing pillars Accessories • Included accessories: Remote Control, 2 x AAA Batteries, CVBS video cable, FM antenna, Product Registration Card, Quick start guide, User Manual, World Wide Warranty leaflet Dimensions • Set dimensions (W x H x D): 435 x 58 x 360 mm • Set weight: 3.7 kg •... Picture Playback • Picture Compression Format: JPEG • Playback Media: DVD+R/+RW, CD-R/RW, DVD- www.philips.com DVD home theater system Specifications HTS3566D/37 Picture/Display • D/A converter: 12 bit, 108 MHz • Picture enhancement: High Def (720p, 1080i...
... standing pillars Accessories • Included accessories: Remote Control, 2 x AAA Batteries, CVBS video cable, FM antenna, Product Registration Card, Quick start guide, User Manual, World Wide Warranty leaflet Dimensions • Set dimensions (W x H x D): 435 x 58 x 360 mm • Set weight: 3.7 kg •... Picture Playback • Picture Compression Format: JPEG • Playback Media: DVD+R/+RW, CD-R/RW, DVD- www.philips.com DVD home theater system Specifications HTS3566D/37 Picture/Display • D/A converter: 12 bit, 108 MHz • Picture enhancement: High Def (720p, 1080i...


