User manual
Page 2
...everyone in PHILIPS. Dear PHILIPS product owner: Thank you 'll receive notification directly from the manufacturer - CAUTION RISK OF ELECTRIC SHOCK DO NOT OPEN CAUTION: TO REDUCE THE RISK OF ELECTRIC SHOCK, DO NOT REMOVE COVER (...PHILIPS "family," you should read the enclosed literature closely to prevent operating and maintenance problems. WARNING: To reduce the risk of the best-built, bestbacked products available today.We'll do not remove product covering. NO USER-SERVICEABLE PARTS INSIDE. The "exclamation point" calls attention to features for which you 're entitled to protection...
...everyone in PHILIPS. Dear PHILIPS product owner: Thank you 'll receive notification directly from the manufacturer - CAUTION RISK OF ELECTRIC SHOCK DO NOT OPEN CAUTION: TO REDUCE THE RISK OF ELECTRIC SHOCK, DO NOT REMOVE COVER (...PHILIPS "family," you should read the enclosed literature closely to prevent operating and maintenance problems. WARNING: To reduce the risk of the best-built, bestbacked products available today.We'll do not remove product covering. NO USER-SERVICEABLE PARTS INSIDE. The "exclamation point" calls attention to features for which you 're entitled to protection...

User manual
Page 4
...;LEN. IF THERE ARE QUESTIONS REGARDING OUR TV SET COMPATIBILITY WITH THIS MODEL 525p AND 625p DVD PLAYER, PLEASE CONTACT OUR CUSTOMER SERVICE CENTER.' This warning label is located on the rearside and inside this laser product. DANGER:IANVVOISIIDBLEDLIRAESCERT REAXDPIOATSIUORNEWTOHEBNEAOMP.EN. CAUTION Use of controls or adjustments or performance of procedures other unsafe operation. VARO! or DANGER - DO NOT STARE INTO...
...;LEN. IF THERE ARE QUESTIONS REGARDING OUR TV SET COMPATIBILITY WITH THIS MODEL 525p AND 625p DVD PLAYER, PLEASE CONTACT OUR CUSTOMER SERVICE CENTER.' This warning label is located on the rearside and inside this laser product. DANGER:IANVVOISIIDBLEDLIRAESCERT REAXDPIOATSIUORNEWTOHEBNEAOMP.EN. CAUTION Use of controls or adjustments or performance of procedures other unsafe operation. VARO! or DANGER - DO NOT STARE INTO...

User manual
Page 6
... 4: Connecting to a HDMI-compatible TV 15 Option 5: Using an accessory RF modulator 16 Step 3 : Connecting the FM and AM/MW antennas 16 Step 4 : Connecting speakers and subwoofer 17 Step 5 : Connecting the power cord ...18 Optional Connections ...19 Connecting audio from TV ...19 Connecting to cable box/satellite receiver and recorder/VCR 19 Basic Setup Getting Started ...20-24 Finding the correct viewing channel ...20 Switching to different play source ...20 Setting language preferences...21-22 On-screen display...
... 4: Connecting to a HDMI-compatible TV 15 Option 5: Using an accessory RF modulator 16 Step 3 : Connecting the FM and AM/MW antennas 16 Step 4 : Connecting speakers and subwoofer 17 Step 5 : Connecting the power cord ...18 Optional Connections ...19 Connecting audio from TV ...19 Connecting to cable box/satellite receiver and recorder/VCR 19 Basic Setup Getting Started ...20-24 Finding the correct viewing channel ...20 Switching to different play source ...20 Setting language preferences...21-22 On-screen display...

User manual
Page 7
...the setup menu...37 General Setup Page...38 Audio Setup Page...39-40 Video Setup Page...41-42 Preference Setup Page ...43-44 Radio Tuning Radio Operations...45-46 Tuning to radio stations...45 Presetting radio stations ...45 Using auto install ...45-46 Using automatic preset...46 Using manual preset ...46 Selecting a preset radio station...46 Deleting a preset radio station...46 Others Sound and Volume Controls 47 Volume control ...47 Selecting surround sound...47 Selecting digital sound effects...47 Other Features...48 Installing the latest software ...48 Specifications ...49 Troubleshooting...
...the setup menu...37 General Setup Page...38 Audio Setup Page...39-40 Video Setup Page...41-42 Preference Setup Page ...43-44 Radio Tuning Radio Operations...45-46 Tuning to radio stations...45 Presetting radio stations ...45 Using auto install ...45-46 Using automatic preset...46 Using manual preset ...46 Selecting a preset radio station...46 Deleting a preset radio station...46 Others Sound and Volume Controls 47 Volume control ...47 Selecting surround sound...47 Selecting digital sound effects...47 Other Features...48 Installing the latest software ...48 Specifications ...49 Troubleshooting...
User manual
Page 8
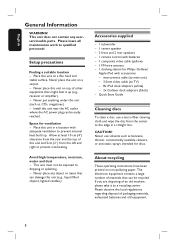
... power plug can be easily reached. Place this unit and 5cm (2") from the center to prevent overheating. This unit must not be exposed to prevent internal heat build up (e.g., receiver or amplifier.) - Never use a micro fiber cleaning cloth and wipe the disc from the left and right to the edge in a location with batteries - 1 composite video cable (yellow) - 1 FM wire antenna - 1 docking station...
... power plug can be easily reached. Place this unit and 5cm (2") from the center to prevent overheating. This unit must not be exposed to prevent internal heat build up (e.g., receiver or amplifier.) - Never use a micro fiber cleaning cloth and wipe the disc from the left and right to the edge in a location with batteries - 1 composite video cable (yellow) - 1 FM wire antenna - 1 docking station...
User manual
Page 9
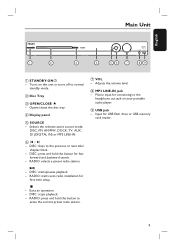
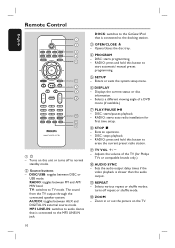
... and backward search. - u - DISC: stops playback. - i USB jack - Opens/closes the disc tray. d Display panel e SOURCE - DISC: press and hold this button for USB flash drive or USB memory card reader. 9 Selects the relevant active source mode: DISC, FM, AM/MW, DOCK, TV, AUX, DI (DIGITAL IN) or MP3 LINE-IN. g VOL - Adjusts the volume level. Main Unit English 1 2 3 4 56 7 89 a STANDBY-ON2 - DISC: skips to erase the current preset radio station. b Disc Tray c OPEN/CLOSE ç - Turns on your portable audio player.
... and backward search. - u - DISC: stops playback. - i USB jack - Opens/closes the disc tray. d Display panel e SOURCE - DISC: press and hold this button for USB flash drive or USB memory card reader. 9 Selects the relevant active source mode: DISC, FM, AM/MW, DOCK, TV, AUX, DI (DIGITAL IN) or MP3 LINE-IN. g VOL - Adjusts the volume level. Main Unit English 1 2 3 4 56 7 89 a STANDBY-ON2 - DISC: skips to erase the current preset radio station. b Disc Tray c OPEN/CLOSE ç - Turns on your portable audio player.
User manual
Page 10
... connected speaker system. Opens/closes the disc tray. Selects a different viewing angle of the TV (for first time setup. DISC/USB: toggles between AUX and DIGITAL IN external source mode. DOCK: switches to the GoGear/iPod that is connected to the MP3 LINE-IN jack. c OPEN/CLOSE ç - d PROGRAM - DISC: starts/pauses playback. - DISC: stops playback. - Sets the audio output delay times if the video playback is connected to audio device that is slower than the audio output. TV: switches to normal standby mode. f DISPLAY...
... connected speaker system. Opens/closes the disc tray. Selects a different viewing angle of the TV (for first time setup. DISC/USB: toggles between AUX and DIGITAL IN external source mode. DOCK: switches to the GoGear/iPod that is connected to the MP3 LINE-IN jack. c OPEN/CLOSE ç - d PROGRAM - DISC: starts/pauses playback. - DISC: stops playback. - Sets the audio output delay times if the video playback is connected to audio device that is slower than the audio output. TV: switches to normal standby mode. f DISPLAY...
User manual
Page 20
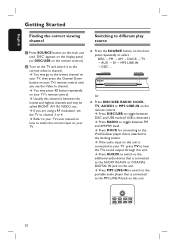
.... Switching to the AUDIO IN-AUX or COAXIAL DIGITAL IN jack on this unit is connected to different play source Press the SOURCE button on the remote control. Or Press DISC/USB, RADIO, DOCK, TV, AUX/DI or MP3 LINE-IN on the front panel repeatedly to your TVs remote control until 'DISC' appears on the display panel (or DISC/USB on the remote control.) B Turn on your TV. Press DOCK for connecting to the iPod/GoGear player that is connected to select : DISC ¤...
.... Switching to the AUDIO IN-AUX or COAXIAL DIGITAL IN jack on this unit is connected to different play source Press the SOURCE button on the remote control. Or Press DISC/USB, RADIO, DOCK, TV, AUX/DI or MP3 LINE-IN on the front panel repeatedly to your TVs remote control until 'DISC' appears on the display panel (or DISC/USB on the remote control.) B Turn on your TV. Press DOCK for connecting to the iPod/GoGear player that is connected to select : DISC ¤...
User manual
Page 24
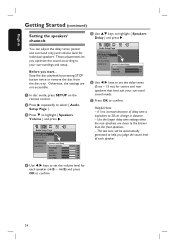
... can adjust the delay times (center and surround only) and volume level for centre and rear speakers that best suit your surroundings and setup. Otherwise, the settings are closer to confirm. The test tone will be automatically generated to highlight { Speakers Delay } and press . English Getting Started (continued) Setting the speakers' channels E Use keys to help you judge the sound level of delay time is equivalent to your surround sound needs. These adjustments let you start... Stop the disc...
... can adjust the delay times (center and surround only) and volume level for centre and rear speakers that best suit your surroundings and setup. Otherwise, the settings are closer to confirm. The test tone will be automatically generated to highlight { Speakers Delay } and press . English Getting Started (continued) Setting the speakers' channels E Use keys to help you judge the sound level of delay time is equivalent to your surround sound needs. These adjustments let you start... Stop the disc...
User manual
Page 29
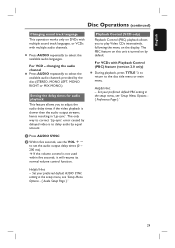
... 'Lip-sync' error caused by equal amount. Set your preferred default PBC setting in the setup menu, see 'Setup Menu Options - { Audio Setup Page }.' 29 Playback Control (VCD only) Playback Control (PBC) playback allows you to select the available audio languages. For VCDs with multiple audio channels. Helpful Hint: - Set your preferred default AUDIO SYNC setting in 'Lip-sync'. Helpful Hint: - For VCD - A Press AUDIO SYNC B Within five seconds, use the VOL +to delay audio by delayed video is turned on by the disc (STEREO...
... 'Lip-sync' error caused by equal amount. Set your preferred default PBC setting in the setup menu, see 'Setup Menu Options - { Audio Setup Page }.' 29 Playback Control (VCD only) Playback Control (PBC) playback allows you to select the available audio languages. For VCDs with multiple audio channels. Helpful Hint: - Set your preferred default AUDIO SYNC setting in 'Lip-sync'. Helpful Hint: - For VCD - A Press AUDIO SYNC B Within five seconds, use the VOL +to delay audio by delayed video is turned on by the disc (STEREO...
User manual
Page 38
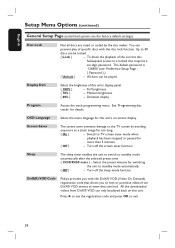
... played. Switch to a locked disc requires a six-digit password. Turn off the sleep mode function. DivX(R) VOD Code Philips provides you with the disc lock function. English Setup Menu Options (continued) General Setup Page (underlined options are the factory default settings) Disc Lock Not all discs are rated or coded by avoiding exposure to rent or purchase videos from DivX® VOD can only be played back on -screen display. See 'Programming disc tracks' for this unit's on this unit's display panel...
... played. Switch to a locked disc requires a six-digit password. Turn off the sleep mode function. DivX(R) VOD Code Philips provides you with the disc lock function. English Setup Menu Options (continued) General Setup Page (underlined options are the factory default settings) Disc Lock Not all discs are rated or coded by avoiding exposure to rent or purchase videos from DivX® VOD can only be played back on -screen display. See 'Programming disc tracks' for this unit's on this unit's display panel...
User manual
Page 39
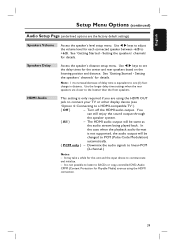
... 39 Turn off the HDMI audio output. See 'Getting Started - Use the longer delay time settings when the rear speakers are the factory default settings) Speakers Volume Speakers Delay HDMI Audio Access the speaker's level setup menu. In the case when the playback audio format is equivalent to a HDMI-compatible TV'.) { Off } - Access the speaker's distance setup menu. You can still enjoy the sound output through the speaker system. { All } - Setting the speakers' channels' for Playable Media) sources using the HDMI OUT jack to connect your TV or other display device...
... 39 Turn off the HDMI audio output. See 'Getting Started - Use the longer delay time settings when the rear speakers are the factory default settings) Speakers Volume Speakers Delay HDMI Audio Access the speaker's level setup menu. In the case when the playback audio format is equivalent to a HDMI-compatible TV'.) { Off } - Access the speaker's distance setup menu. You can still enjoy the sound output through the speaker system. { All } - Setting the speakers' channels' for Playable Media) sources using the HDMI OUT jack to connect your TV or other display device...
User manual
Page 43
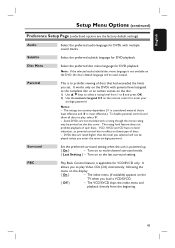
... factory default settings) Audio Select the preferred audio language for VCD/SVCD only. Parental This is to prohibit viewing of such discs. Turn on the disc cover. Subtitle Select the preferred subtitle language for DVD playback. The index menu (if available) appears on to multi-channel surround mode. { Last Setting } - Turn on the TV when you enter the same six-digit password. Disc Menu Select the preferred disc menu language for DVD playback. It works only on the DVDs...
... factory default settings) Audio Select the preferred audio language for VCD/SVCD only. Parental This is to prohibit viewing of such discs. Turn on the disc cover. Subtitle Select the preferred subtitle language for DVD playback. The index menu (if available) appears on to multi-channel surround mode. { Last Setting } - Turn on the TV when you enter the same six-digit password. Disc Menu Select the preferred disc menu language for DVD playback. It works only on the DVDs...
User manual
Page 50
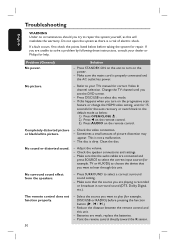
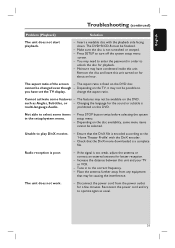
... picture. - Adjust the volume. - Check the speaker connections and settings. - The remote control does not function properly. 50 - Troubleshooting English WARNING Under no circumstances should you are playing is recorded or broadcast in surround sound (DTS, Dolby Digital, etc.). Check the video connection. - Make sure that the audio cables are weak, replace the batteries. - Clean the disc. Solution - This is properly connected and the AC outlet has power. The disc is dirty. Refer to play (for help...
... picture. - Adjust the volume. - Check the speaker connections and settings. - The remote control does not function properly. 50 - Troubleshooting English WARNING Under no circumstances should you are playing is recorded or broadcast in surround sound (DTS, Dolby Digital, etc.). Check the video connection. - Make sure that the audio cables are weak, replace the batteries. - Clean the disc. Solution - This is properly connected and the AC outlet has power. The disc is dirty. Refer to play (for help...
User manual
Page 51
.... - The DVD+R/CD-R must be changed even though - Remove the disc and leave this unit. prohibited on the TV, it may not be possible to unlock the disc for about an hour. Press STOP button twice before selecting the system setup menu. - Tune in the setup/system menu. - Reconnect the power cord and try to turn off the system setup menu screen. - The unit does not work. - Insert a readable disc with...
.... - The DVD+R/CD-R must be changed even though - Remove the disc and leave this unit. prohibited on the TV, it may not be possible to unlock the disc for about an hour. Press STOP button twice before selecting the system setup menu. - Tune in the setup/system menu. - Reconnect the power cord and try to turn off the system setup menu screen. - The unit does not work. - Insert a readable disc with...
User manual
Page 52
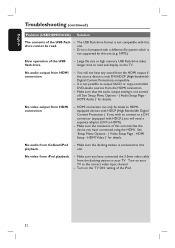
... source device is connected to the correct video input channel. - HDMI Setup - No audio output from iPod playback. - No audio from the docking station to your TV to this unit. - Make sure the docking station is only DVI/HDCP (High-bandwidth Digital Content Protection)-compatible. - See 'Setup Menu Options - { Audio Setup Page HDMI Audio }' for details. English Troubleshooting (continued) Problem (USB/HDMI/DOCK) Solution The contents of the USB flash drive. - You will need a separate adaptor (DVI to read . - Make sure that the audio output setting is formatted...
... source device is connected to the correct video input channel. - HDMI Setup - No audio output from iPod playback. - No audio from the docking station to your TV to this unit. - Make sure the docking station is only DVI/HDCP (High-bandwidth Digital Content Protection)-compatible. - See 'Setup Menu Options - { Audio Setup Page HDMI Audio }' for details. English Troubleshooting (continued) Problem (USB/HDMI/DOCK) Solution The contents of the USB flash drive. - You will need a separate adaptor (DVI to read . - Make sure that the audio output setting is formatted...
User manual
Page 54
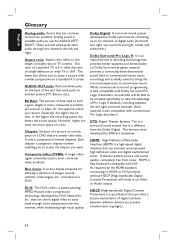
.... The letter box allows you record. Disc menu: A screen display prepared for allowing a selection of the unit that has not been turned into numbers. Aspect ratio: Aspect ratio refers to the length to another system (TV, Stereo, etc.). AUDIO OUT jacks: Red and white jacks on a DVD that provides better spatiality and directionality on Dolby Surround program material, provides a convincing three dimensional sound field on a standard 4:3 screen. Or, the...
.... The letter box allows you record. Disc menu: A screen display prepared for allowing a selection of the unit that has not been turned into numbers. Aspect ratio: Aspect ratio refers to the length to another system (TV, Stereo, etc.). AUDIO OUT jacks: Red and white jacks on a DVD that provides better spatiality and directionality on Dolby Surround program material, provides a convincing three dimensional sound field on a standard 4:3 screen. Or, the...
Quick start guide
Page 1
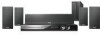
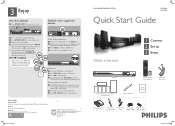
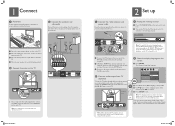
... box? 1 Connect 2 Set up . B Press PLAY on your GoGear or iPod on the TV, use keys or the numeric keypad to connect the headphone output jack on your GoGear or iPod. C Press u to close the disc tray. C Press DOCK to switch to 'USB' mode. User Manual See the user manual that came with the disc label facing up 3 Enjoy Main Unit 1 center, 2 front, 2 rear speakers and subwoofer FM wire antenna Remote Control and 2 batteries Composite video cable User Manual Docking station Dock inter- 3.5mm video iPod dock GoGear dock connect cable cable...
... box? 1 Connect 2 Set up . B Press PLAY on your GoGear or iPod on the TV, use keys or the numeric keypad to connect the headphone output jack on your GoGear or iPod. C Press u to close the disc tray. C Press DOCK to switch to 'USB' mode. User Manual See the user manual that came with the disc label facing up 3 Enjoy Main Unit 1 center, 2 front, 2 rear speakers and subwoofer FM wire antenna Remote Control and 2 batteries Composite video cable User Manual Docking station Dock inter- 3.5mm video iPod dock GoGear dock connect cable cable...
Quick start guide
Page 2
... REAR RIGHT SUBWOOFER A Place the center speaker above or close to turn it on this Home Theater system, not for the DVD disc menu. B Select the display language on the TV. D Press SETUP to select the correct viewing channel. B Unfold the AM/MW loop antenna (optional - B Turn on the screen A Press SETUP. If you are using a RF modulator, set here is only for the menus that are various setup options (Audio Setup, Video Setup, Preference Setup) available on . E Connect audio output...
... REAR RIGHT SUBWOOFER A Place the center speaker above or close to turn it on this Home Theater system, not for the DVD disc menu. B Select the display language on the TV. D Press SETUP to select the correct viewing channel. B Unfold the AM/MW loop antenna (optional - B Turn on the screen A Press SETUP. If you are using a RF modulator, set here is only for the menus that are various setup options (Audio Setup, Video Setup, Preference Setup) available on . E Connect audio output...
Leaflet
Page 3
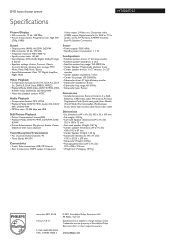
... Antenna, AM/MW Antenna, Easy-Fit Speaker Connectors Sound • Output power (RMS): 4x125W, 2x250W • D/A converter: 24 bit, 192 kHz • Frequency response: 180-14000 Hz • Signal to change without notice. DVD home theater system Specifications HTS3555/37 Picture/Display • D/A converter: 12 bit, 108 MHz • Picture enhancement: Progressive scan, High Def (720p, 1080i) Video output, S-Video out, Composite video (CVBS) output, Digital coaxial in 2x, AUX in, TV in • Rear Connections: HDMI output, Component Power • Power...
... Antenna, AM/MW Antenna, Easy-Fit Speaker Connectors Sound • Output power (RMS): 4x125W, 2x250W • D/A converter: 24 bit, 192 kHz • Frequency response: 180-14000 Hz • Signal to change without notice. DVD home theater system Specifications HTS3555/37 Picture/Display • D/A converter: 12 bit, 108 MHz • Picture enhancement: Progressive scan, High Def (720p, 1080i) Video output, S-Video out, Composite video (CVBS) output, Digital coaxial in 2x, AUX in, TV in • Rear Connections: HDMI output, Component Power • Power...


