User manual
Page 3
...Home Theater System 11 Update software 45 Connect video cables 11 Care 45 Connect speakers and subwoofer 14 Connect radio antenna 14 10 SpeciÀcations 46 Connect audio cables/other devices 15 Connect power cord 17 11 Troubleshooting 48 4 Get started 18 12 Glossary 50 Insert the remote control batteries 18 Find the correct viewing channel 19 Select menu display language 19 Turn on Progressive Scan 20 Change speaker settings 21 Use Philips EasyLink 22 Select a play source 24 5 Play 25 Play a disc 25 Play video 25 Play music 28 Play photo 29 Play...
...Home Theater System 11 Update software 45 Connect video cables 11 Care 45 Connect speakers and subwoofer 14 Connect radio antenna 14 10 SpeciÀcations 46 Connect audio cables/other devices 15 Connect power cord 17 11 Troubleshooting 48 4 Get started 18 12 Glossary 50 Insert the remote control batteries 18 Find the correct viewing channel 19 Select menu display language 19 Turn on Progressive Scan 20 Change speaker settings 21 Use Philips EasyLink 22 Select a play source 24 5 Play 25 Play a disc 25 Play video 25 Play music 28 Play photo 29 Play...
User manual
Page 5
... protection against harmful interference in accordance with Canadian ICES-003. This Class B digital apparatus complies with the instruction manual, may void user authority to radio or television reception, which the receiver is intended for help. Always leave a space of at least 4 inches around the Home Theater System for radio noise emissions from that can radiate radio frequency energy and, if not installed and used as set...
... protection against harmful interference in accordance with Canadian ICES-003. This Class B digital apparatus complies with the instruction manual, may void user authority to radio or television reception, which the receiver is intended for help. Always leave a space of at least 4 inches around the Home Theater System for radio noise emissions from that can radiate radio frequency energy and, if not installed and used as set...
User manual
Page 6
.... and are fully compatible with safety and regulatory standards. Plays all high deÀnition television sets are used under license of Koninklijke Electronics NV. Windows Media and the Windows logo are used under license from Dolby Laboratories. Philips and Philips Shield are trademarks, or registered trademarks of this model 525p and 625p DVD player, please contact our customer service center. Dolby, Pro Logic...
.... and are fully compatible with safety and regulatory standards. Plays all high deÀnition television sets are used under license of Koninklijke Electronics NV. Windows Media and the Windows logo are used under license from Dolby Laboratories. Philips and Philips Shield are trademarks, or registered trademarks of this model 525p and 625p DVD player, please contact our customer service center. Dolby, Pro Logic...
User manual
Page 7
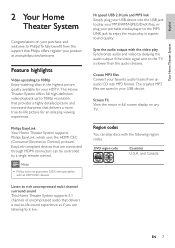
... saved in the highest picture quality available for an amazing viewing experience. Sync the audio output with the following region codes. Listen to rich uncompressed multi-channel surround sound This Home Theater System supports 5.1 channels of uncompressed audio that delivers a more true-to-life picture for your portable media player to the MP3 LINK jack to Philips! Philips EasyLink Your Home Theater System supports Philips EasyLink, which uses the HDMI CEC (Consumer Electronics Control) protocol. and Canada EN...
... saved in the highest picture quality available for an amazing viewing experience. Sync the audio output with the following region codes. Listen to rich uncompressed multi-channel surround sound This Home Theater System supports 5.1 channels of uncompressed audio that delivers a more true-to-life picture for your portable media player to the MP3 LINK jack to Philips! Philips EasyLink Your Home Theater System supports Philips EasyLink, which uses the HDMI CEC (Consumer Electronics Control) protocol. and Canada EN...

User manual
Page 9
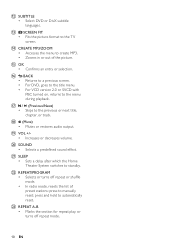
...; USB: Switches to the USB source. • DOCK: Switches to the iPod in the dock. • DISC: Switches to start auto search. In radio mode, press left and right for audio sync, then press VOL +/- to tune the radio frequency. k Numeric buttons • Selects an item to play . d SETUP • Accesses or exits the setup menu. e • • • • (Navigation buttons) Navigates through the menus. English Your Home Theater System Remote control a b c d o e p f q g r h s t i j k u l v m w n a (Standby-On) • Turns on the Home Theater...
...; USB: Switches to the USB source. • DOCK: Switches to the iPod in the dock. • DISC: Switches to start auto search. In radio mode, press left and right for audio sync, then press VOL +/- to tune the radio frequency. k Numeric buttons • Selects an item to play . d SETUP • Accesses or exits the setup menu. e • • • • (Navigation buttons) Navigates through the menus. English Your Home Theater System Remote control a b c d o e p f q g r h s t i j k u l v m w n a (Standby-On) • Turns on the Home Theater...
User manual
Page 10
.../Next) • Skips to automatically reset. u SLEEP • Sets a delay after which the Home Theater System switches to the menu during playback. o OK • ConÀrms an entry or selection. p BACK • Returns to a previous screen. • For DVD, goes to the title menu. • For VCD version 2.0 or SVCD with PBC turned on, returns to standby. m SCREEN FIT • Fits the picture format to manually reset;
.../Next) • Skips to automatically reset. u SLEEP • Sets a delay after which the Home Theater System switches to the menu during playback. o OK • ConÀrms an entry or selection. p BACK • Returns to a previous screen. • For DVD, goes to the title menu. • For VCD version 2.0 or SVCD with PBC turned on, returns to standby. m SCREEN FIT • Fits the picture format to manually reset;
User manual
Page 11
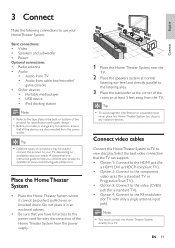
... connect this Home Theater System near the TV. 2 Place the speakers system at normal listening ear-level and directly parallel to the type plate at least 3 feet away from the power supply. Basic connections: • Video • Speakers and subwoofer • Power Optional connections: • Radio antenna • Audio • Audio from TV • Audio from cable box/recorder/ game console • Other devices • Portable media player • USB device • iPod docking station...
... connect this Home Theater System near the TV. 2 Place the speakers system at normal listening ear-level and directly parallel to the type plate at least 3 feet away from the power supply. Basic connections: • Video • Speakers and subwoofer • Power Optional connections: • Radio antenna • Audio • Audio from TV • Audio from cable box/recorder/ game console • Other devices • Portable media player • USB device • iPod docking station...
User manual
Page 12
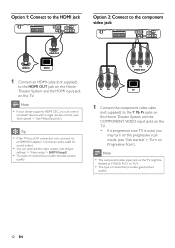
... can optimize the video output. (see 'Adjust settings' > 'Video setup' > [HDMI Setup]). • This type of connection provides good picture quality. 12 EN Option 1: Connect to the HDMI jack Option 2: Connect to the component video jack HDMI OUT HDMI IN 1 Connect an HDMI cable (not supplied) to the Y Pb Pr jacks on this Home Theater System and the HDMI input jack on the TV. Connect an audio cable for sound output. • You can control compliant devices with a single remote control. (see 'Get started ' > 'Use Philips EasyLink'). Tip...
... can optimize the video output. (see 'Adjust settings' > 'Video setup' > [HDMI Setup]). • This type of connection provides good picture quality. 12 EN Option 1: Connect to the HDMI jack Option 2: Connect to the component video jack HDMI OUT HDMI IN 1 Connect an HDMI cable (not supplied) to the Y Pb Pr jacks on this Home Theater System and the HDMI input jack on the TV. Connect an audio cable for sound output. • You can control compliant devices with a single remote control. (see 'Get started ' > 'Use Philips EasyLink'). Tip...
User manual
Page 19
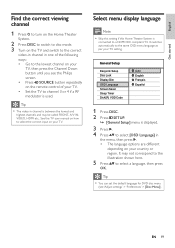
Select menu display language Note • Skip this setting if this Home Theater System is connected to channel 3 or 4 if a RF modulator is used. It switches automatically to the same OSD menu language as per your country or region. It may be called FRONT, A/V IN, VIDEO, HDMI etc.. EN 19 General Setup EasyLink Setup Disc Lock Display Dim OSD Language Screen Saver Sleep Timer DivX(R) VOD Code Auto English Français Espa...
Select menu display language Note • Skip this setting if this Home Theater System is connected to channel 3 or 4 if a RF modulator is used. It switches automatically to the same OSD menu language as per your country or region. It may be called FRONT, A/V IN, VIDEO, HDMI etc.. EN 19 General Setup EasyLink Setup Disc Lock Display Dim OSD Language Screen Saver Sleep Timer DivX(R) VOD Code Auto English Français Espa...

User manual
Page 20
... Home Theater System and the TV. 20 EN Turn off the progressive scan mode as follows: 1) Press to open the disc compartment. 2) Press . 3) Press AUDIO SYNC. 8 Press SETUP to exit the menu. 9 You can connect this Home Theater System and the TV using component video connection. (see the TV user manual). 2 Switch the TV to the correct viewing channel for this Home Theater System. 3 Press DISC. 4 Press SETUP. 5 Press to the component video jack'). Note • If a blank/distorted screen...
... Home Theater System and the TV. 20 EN Turn off the progressive scan mode as follows: 1) Press to open the disc compartment. 2) Press . 3) Press AUDIO SYNC. 8 Press SETUP to exit the menu. 9 You can connect this Home Theater System and the TV using component video connection. (see the TV user manual). 2 Switch the TV to the correct viewing channel for this Home Theater System. 3 Press DISC. 4 Press SETUP. 5 Press to the component video jack'). Note • If a blank/distorted screen...
User manual
Page 22
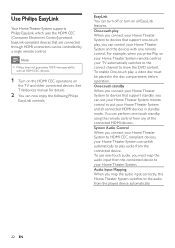
... all HDMI CEC devices. 1 Turn on the HDMI CEC operations on all connected HDMI devices in the disc compartment before operation. Audio Input Mapping When you must be controlled by a single remote control. Use Philips EasyLink Your Home Theater System supports Philips EasyLink, which uses the HDMI CEC (Consumer Electronics Control) protocol. See TVs/devices manual for details. 2 You can use one -touch standby using the remote control from the connected device. To use your Home Theater System remote control to play When you connect your Home Theater...
... all HDMI CEC devices. 1 Turn on the HDMI CEC operations on all connected HDMI devices in the disc compartment before operation. Audio Input Mapping When you must be controlled by a single remote control. Use Philips EasyLink Your Home Theater System supports Philips EasyLink, which uses the HDMI CEC (Consumer Electronics Control) protocol. See TVs/devices manual for details. 2 You can use one -touch standby using the remote control from the connected device. To use your Home Theater System remote control to play When you connect your Home Theater...
User manual
Page 23
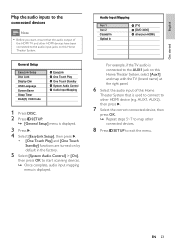
... connected to the audio input jacks on by default in the factory. 5 Select [System Audio Control] > [On], then press OK to exit the menu. General Setup EasyLink Setup Disc Lock Display Dim OSD Language Screen Saver Sleep Timer DivX(R) VOD Code EasyLink One Touch Play One Touch Standby System Audio Control Audio Input Mapping 1 Press DISC. 2 Press SETUP. » [General Setup] menu is displayed. 3 Press . 4 Select [EasyLink Setup], then press . • [One Touch Play] and [One Touch Standby] functions are turned on this Home Theater System, select...
... connected to the audio input jacks on by default in the factory. 5 Select [System Audio Control] > [On], then press OK to exit the menu. General Setup EasyLink Setup Disc Lock Display Dim OSD Language Screen Saver Sleep Timer DivX(R) VOD Code EasyLink One Touch Play One Touch Standby System Audio Control Audio Input Mapping 1 Press DISC. 2 Press SETUP. » [General Setup] menu is displayed. 3 Press . 4 Select [EasyLink Setup], then press . • [One Touch Play] and [One Touch Standby] functions are turned on this Home Theater System, select...
User manual
Page 25
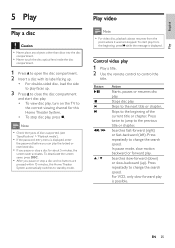
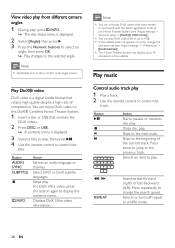
... or stop disc play , turn on the TV to the correct viewing channel for about 5 minutes, the screen saver activates. Play video Note • For video disc, playback always resumes from the beginning, press while the message is displayed. Press twice to jump to the next title or chapter. In pause mode, slow motion backward or forward play 1 Play a title. 2 Use the remote control to change the search...
... or stop disc play , turn on the TV to the correct viewing channel for about 5 minutes, the screen saver activates. Play video Note • For video disc, playback always resumes from the beginning, press while the message is displayed. Press twice to jump to the next title or chapter. In pause mode, slow motion backward or forward play 1 Play a title. 2 Use the remote control to change the search...
User manual
Page 28
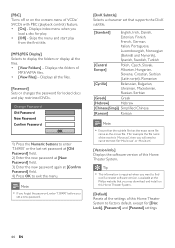
.... Play DivX® video DivX video is a digital media format that contains the DivX videos. 2 Press DISC or USB. » A contents menu is displayed. 2 Select [Angle], then press . 3 Press the Numeric buttons to select an angle, then press OK. » Play changes to play. / REPEAT Searches fast-forward (right) or fast-backward (left). Button AUDIO SYNC SUBTITLE INFO Action Selects an audio language or channel. Select DVD or DivX subtitle languages. Displays DivX Ultra video information. Selects...
.... Play DivX® video DivX video is a digital media format that contains the DivX videos. 2 Press DISC or USB. » A contents menu is displayed. 2 Select [Angle], then press . 3 Press the Numeric buttons to select an angle, then press OK. » Play changes to play. / REPEAT Searches fast-forward (right) or fast-backward (left). Button AUDIO SYNC SUBTITLE INFO Action Selects an audio language or channel. Select DVD or DivX subtitle languages. Displays DivX Ultra video information. Selects...
User manual
Page 44
... menu and start play restricted DVDs. Displays index menu when you will need to name the text Àle 'Movie.sub' or 'Movie.srt'. [Version Info.] Displays the software version of this Home Theater System. If for [Disc Lock], [Password] and [Parental] settings. 44 EN Displays all the Àles. • [View Folders] - Change Password Old Password New Password Confirm Password OK 1) Press the Numeric buttons to enter '136900' or the last set that supports...
... menu and start play restricted DVDs. Displays index menu when you will need to name the text Àle 'Movie.sub' or 'Movie.srt'. [Version Info.] Displays the software version of this Home Theater System. If for [Disc Lock], [Password] and [Parental] settings. 44 EN Displays all the Àles. • [View Folders] - Change Password Old Password New Password Confirm Password OK 1) Press the Numeric buttons to enter '136900' or the last set that supports...

User manual
Page 46
...-RW, Audio CD, Video CD/SVCD, Picture CD, MP3-CD, WMA-CD, DivX-CD, USB Áash drive AmpliÀer • Total output power: • Home Theater mode: 1000 W RMS (6 X 167) • FTC mode (1%THD): 520 W RMS * (Main Ch @ 1kHz Sub Ch 60Hz within 1% THD) • Frequency response: 40 Hz ~ 20 kHz • Signal-to-noise ratio: > 60 dB (A-weighted) • Input sensitivity...
...-RW, Audio CD, Video CD/SVCD, Picture CD, MP3-CD, WMA-CD, DivX-CD, USB Áash drive AmpliÀer • Total output power: • Home Theater mode: 1000 W RMS (6 X 167) • FTC mode (1%THD): 520 W RMS * (Main Ch @ 1kHz Sub Ch 60Hz within 1% THD) • Frequency response: 40 Hz ~ 20 kHz • Signal-to-noise ratio: > 60 dB (A-weighted) • Input sensitivity...
User manual
Page 48
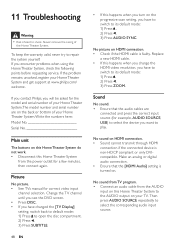
... audio cable from the power outlet for correct video input channel selection. If you have changed the [TV Display] setting, switch back to default mode: 1) Press to open the disc compartment. 2) Press . 3) Press SUBTITLE. 48 EN • If this Home Theater System from the AUDIO input on . If the problem remains unsolved, register your Home Theater System.The model number and serial number are connected and press the correct input source (for example, AUDIO SOURCE, USB) to select the device you turn on HDMI connection...
... audio cable from the power outlet for correct video input channel selection. If you have changed the [TV Display] setting, switch back to default mode: 1) Press to open the disc compartment. 2) Press . 3) Press SUBTITLE. 48 EN • If this Home Theater System from the AUDIO input on . If the problem remains unsolved, register your Home Theater System.The model number and serial number are connected and press the correct input source (for example, AUDIO SOURCE, USB) to select the device you turn on HDMI connection...
User manual
Page 49
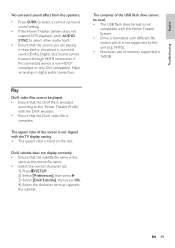
... set that supports the subtitle. DivX subtitle does not display correctly. • Ensure that the DivX video Àle is not supported by this Home Theater System. • Drive is formatted with different Àle system which is complete. The contents of memory supported is Àxed on the disc. EN 49 Make an analog or digital audio connection. The aspect ratio of the screen...
... set that supports the subtitle. DivX subtitle does not display correctly. • Ensure that the DivX video Àle is not supported by this Home Theater System. • Drive is formatted with different Àle system which is complete. The contents of memory supported is Àxed on the disc. EN 49 Make an analog or digital audio connection. The aspect ratio of the screen...

Brochure
Page 1
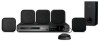
..., WMA, MP3 and JPEG digital camera photos • Plays CD, (S)VCD, DVD, DVD+R/RW, DVD-R/RW, DVD+R DL Easy to set up and use • EasyLink controls all EasyLink products with 1080p HDMI upconversion, as well as convenient iPod playback via the dock included. Philips DVD home theater system HTS3372D Spectacular surround sound with superb clarity Just like in the movies High definition pictures and powerful surround sound delivered by this elegant...
..., WMA, MP3 and JPEG digital camera photos • Plays CD, (S)VCD, DVD, DVD+R/RW, DVD-R/RW, DVD+R DL Easy to set up and use • EasyLink controls all EasyLink products with 1080p HDMI upconversion, as well as convenient iPod playback via the dock included. Philips DVD home theater system HTS3372D Spectacular surround sound with superb clarity Just like in the movies High definition pictures and powerful surround sound delivered by this elegant...

Brochure
Page 3
... music playback Tuner/Reception/Transmission • Tuner Bands: FM Connectivity • Front / Side connections: Hi-Speed USB, MP3 Line-in • Rear Connections: HDMI output, Component Video output, Composite video (CVBS) output, Dock connector, AUX in, FM Antenna, Easy-Fit Speaker Connectors, Digital coaxial in, Digital optical in • Dock for iPod compatibility: iPod 5th gen, iPod classic, iPod mini, iPod mini 2nd gen, iPod nano 1st gen, iPod nano 2nd gen, iPod nano 3rd gen, iPod touch, iPod with color display Power • Power supply: 120V, 60Hz • Standby power...
... music playback Tuner/Reception/Transmission • Tuner Bands: FM Connectivity • Front / Side connections: Hi-Speed USB, MP3 Line-in • Rear Connections: HDMI output, Component Video output, Composite video (CVBS) output, Dock connector, AUX in, FM Antenna, Easy-Fit Speaker Connectors, Digital coaxial in, Digital optical in • Dock for iPod compatibility: iPod 5th gen, iPod classic, iPod mini, iPod mini 2nd gen, iPod nano 1st gen, iPod nano 2nd gen, iPod nano 3rd gen, iPod touch, iPod with color display Power • Power supply: 120V, 60Hz • Standby power...


