
Leaflet
Page 1
Connect and enjoy multiple sources • Dock included for iPod • USB Direct plays photos and music from USB flash drives • MP3 Line-in for music playback from Portable Media Players Brings audio and video to set up and use • Easy-fit™ connectors with color-coding for a simple set-up Able to play practically any disc, it provides captivating home entertainment for the enjoyment of DivX videos • Plays CD, (S)VCD, DVD, DVD+R/RW...
Connect and enjoy multiple sources • Dock included for iPod • USB Direct plays photos and music from USB flash drives • MP3 Line-in for music playback from Portable Media Players Brings audio and video to set up and use • Easy-fit™ connectors with color-coding for a simple set-up Able to play practically any disc, it provides captivating home entertainment for the enjoyment of DivX videos • Plays CD, (S)VCD, DVD, DVD+R/RW...
Leaflet
Page 2
...-coded connectors provide a simple and user-friendly solution to connect the speakers and subwoofer to enjoy DivX encoded videos in particular apparent while using large screens and projectors. DVD home theater system Highlights Dock included for iPod HTS3151D/37 languages, multiple tracks and menus into one device. MP3 line-in MP3 Line-in uses Plug and Play technology that enables you want whether they be played directly from any media format...
...-coded connectors provide a simple and user-friendly solution to connect the speakers and subwoofer to enjoy DivX encoded videos in particular apparent while using large screens and projectors. DVD home theater system Highlights Dock included for iPod HTS3151D/37 languages, multiple tracks and menus into one device. MP3 line-in MP3 Line-in uses Plug and Play technology that enables you want whether they be played directly from any media format...
Leaflet
Page 3
... preset Audio Channels: 40 Connectivity • Rear Connections: Component Video output, Composite video (CVBS) output, TV in (audio, cinch), AUX in, FM Antenna, Easy-Fit speaker connectors • Front / Side connections: MP3 Line-in, USB Power • Power supply: 120V, 60Hz • Standby power consumption: < 1 W Loudspeakers • Satellite speaker drivers: 3" full range woofer • Satellite speaker impedance: 4 ohm • Satellite speaker freq range: 150-20000 Hz • Center Speaker: Magnetically shielded • Center speaker drivers: 3" full range woofer • Center...
... preset Audio Channels: 40 Connectivity • Rear Connections: Component Video output, Composite video (CVBS) output, TV in (audio, cinch), AUX in, FM Antenna, Easy-Fit speaker connectors • Front / Side connections: MP3 Line-in, USB Power • Power supply: 120V, 60Hz • Standby power consumption: < 1 W Loudspeakers • Satellite speaker drivers: 3" full range woofer • Satellite speaker impedance: 4 ohm • Satellite speaker freq range: 150-20000 Hz • Center Speaker: Magnetically shielded • Center speaker drivers: 3" full range woofer • Center...
User manual
Page 4
... SET COMPATIBILITY WITH THIS MODEL 525p AND 625p DVD PLAYER, PLEASE CONTACT OUR CUSTOMER SERVICE CENTER.' or DANGER - OSYNLIG LASERSTRÅLNING NÄR DENNA DEL ÄR ÖPPNAD. DANGER:IANVVOISIIDBLEDLIRAESCERT REAXDPIOATSIUORNEWTOHEBNEAOMP.EN. VARO! P. CAUTION Use of controls or adjustments or performance of Philips Electronics North America Corp. CAUTION: INVISIBLE LASER RADIATION WHEN OPEN. Invisible laser radiation when open. English LASER Type Wave length Output Power...
... SET COMPATIBILITY WITH THIS MODEL 525p AND 625p DVD PLAYER, PLEASE CONTACT OUR CUSTOMER SERVICE CENTER.' or DANGER - OSYNLIG LASERSTRÅLNING NÄR DENNA DEL ÄR ÖPPNAD. DANGER:IANVVOISIIDBLEDLIRAESCERT REAXDPIOATSIUORNEWTOHEBNEAOMP.EN. VARO! P. CAUTION Use of controls or adjustments or performance of Philips Electronics North America Corp. CAUTION: INVISIBLE LASER RADIATION WHEN OPEN. Invisible laser radiation when open. English LASER Type Wave length Output Power...

User manual
Page 6
... or component video input 14 Option 3: Using an accessory RF modulator 15 Step 3 : Connecting the FM antenna...15 Step 4 : Connecting speakers and subwoofer 16 Step 5 : Connecting the power cord ...17 Optional Connections ...18 Connecting audio from TV ...18 Connecting audio from cable box/ recorder/ game console 18 Basic Setup Getting Started ...19-23 Finding the correct viewing channel ...19 Switching to different play source ...19 Setting language preferences...20-21 On-screen display (OSD) language ...20 Audio, Subtitle and Menu...
... or component video input 14 Option 3: Using an accessory RF modulator 15 Step 3 : Connecting the FM antenna...15 Step 4 : Connecting speakers and subwoofer 16 Step 5 : Connecting the power cord ...17 Optional Connections ...18 Connecting audio from TV ...18 Connecting audio from cable box/ recorder/ game console 18 Basic Setup Getting Started ...19-23 Finding the correct viewing channel ...19 Switching to different play source ...19 Setting language preferences...20-21 On-screen display (OSD) language ...20 Audio, Subtitle and Menu...

User manual
Page 7
...32 Playing a DivX disc ...32 Playback other portable audio player...35 Setup Options Setup Menu Options 36-41 Accessing the setup menu...36 General Setup Page...37 Audio Setup Page...38 Video Setup Page...39 Preference Page ...40-41 Radio Tuning Radio Operations...42-43 Tuning to radio stations...42 Presetting radio stations ...42 Using auto install ...42 Using automatic preset...43 Using manual preset ...43 Selecting a preset radio station...43 Deleting a preset radio station...43 Others Sound and Volume Controls 44 Volume control ...44 Selecting surround sound...44 Selecting digital sound...
...32 Playing a DivX disc ...32 Playback other portable audio player...35 Setup Options Setup Menu Options 36-41 Accessing the setup menu...36 General Setup Page...37 Audio Setup Page...38 Video Setup Page...39 Preference Page ...40-41 Radio Tuning Radio Operations...42-43 Tuning to radio stations...42 Presetting radio stations ...42 Using auto install ...42 Using automatic preset...43 Using manual preset ...43 Selecting a preset radio station...43 Deleting a preset radio station...43 Others Sound and Volume Controls 44 Volume control ...44 Selecting surround sound...44 Selecting digital sound...
User manual
Page 8
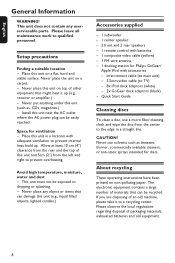
... objects, lighted candles.) Accessories supplied - 1 subwoofer - 1 center speaker - 2 front and 2 rear speakers - 1 remote control with batteries - 1 composite video cable (yellow) - 1 FM wire antenna - 1 docking station for ventilation - Please leave all maintenance work to TV) - 8x iPod dock adaptors (white) - 2x GoGear dock adaptors (black) - Space for Philips GoGear/ Apple iPod with adequate ventilation to the edge in a location with accessories - Never place any userserviceable parts. Quick Start Guide Cleaning discs To clean a disc, use solvents such...
... objects, lighted candles.) Accessories supplied - 1 subwoofer - 1 center speaker - 2 front and 2 rear speakers - 1 remote control with batteries - 1 composite video cable (yellow) - 1 FM wire antenna - 1 docking station for ventilation - Please leave all maintenance work to TV) - 8x iPod dock adaptors (white) - 2x GoGear dock adaptors (black) - Space for Philips GoGear/ Apple iPod with adequate ventilation to the edge in a location with accessories - Never place any userserviceable parts. Quick Start Guide Cleaning discs To clean a disc, use solvents such...
User manual
Page 9
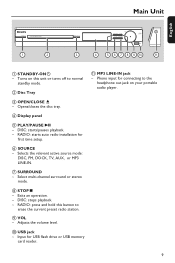
... active source mode: DISC, FM, DOCK, TV, AUX, or MP3 LINE-IN. Exits an operation. - RADIO: press and hold this button to the headphone out jack on this unit or turns off to normal standby mode. Main Unit English 1 2 3 4 5 6 7 8 9 10 11 a STANDBY-ON2 - Adjusts the volume level. d Display panel e PLAY/PAUSE u - g SURROUND - i VOL - j USB jack - h STOPÇ - DISC: stops playback. - Input for rst time setup. f SOURCE - Select multi-channel surround or stereo mode. Opens/closes the disc tray. Turns on your portable audio player. b Disc Tray...
... active source mode: DISC, FM, DOCK, TV, AUX, or MP3 LINE-IN. Exits an operation. - RADIO: press and hold this button to the headphone out jack on this unit or turns off to normal standby mode. Main Unit English 1 2 3 4 5 6 7 8 9 10 11 a STANDBY-ON2 - Adjusts the volume level. d Display panel e PLAY/PAUSE u - g SURROUND - i VOL - j USB jack - h STOPÇ - DISC: stops playback. - Input for rst time setup. f SOURCE - Select multi-channel surround or stereo mode. Opens/closes the disc tray. Turns on your portable audio player. b Disc Tray...
User manual
Page 10
...rst time setup. RADIO: starts auto radio installation for Philips TVs or compatible brands only.) j AUDIO SYNC - h STOP Ç - Adjusts the volume of a DVD movie (if available.) g PLAY/PAUSE u - RADIO: switches to TV mode. TV: switches to FM band. DOCK: switches to the GoGear/iPod that is connected to start automatic/ manual preset programming. Opens/closes the disc tray. Exits an operation. - k REPEAT - DISC/USB: toggles between DISC or USB mode. The sound from the TV output through the connected speaker system. c OPEN/CLOSEç - e SETUP - DISC: stops playback...
...rst time setup. RADIO: starts auto radio installation for Philips TVs or compatible brands only.) j AUDIO SYNC - h STOP Ç - Adjusts the volume of a DVD movie (if available.) g PLAY/PAUSE u - RADIO: switches to TV mode. TV: switches to FM band. DOCK: switches to the GoGear/iPod that is connected to start automatic/ manual preset programming. Opens/closes the disc tray. Exits an operation. - k REPEAT - DISC/USB: toggles between DISC or USB mode. The sound from the TV output through the connected speaker system. c OPEN/CLOSEç - e SETUP - DISC: stops playback...
User manual
Page 18
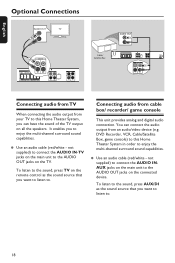
... supplied) to connect the AUDIO IN-TV jacks on the TV. DVD Recorder, VCR, Cable/Satellite Box, game console) to this Home Theater System, you to enjoy the multi-channel surround sound capabilities. It enables you can connect the audio output from cable box/ recorder/ game console This unit provides analog and digital audio connection. You can have the sound of the TV output on all the speakers. Connecting audio from an audio/video device (e.g. Use an audio cable (red/white -
... supplied) to connect the AUDIO IN-TV jacks on the TV. DVD Recorder, VCR, Cable/Satellite Box, game console) to this Home Theater System, you to enjoy the multi-channel surround sound capabilities. It enables you can connect the audio output from cable box/ recorder/ game console This unit provides analog and digital audio connection. You can have the sound of the TV output on all the speakers. Connecting audio from an audio/video device (e.g. Use an audio cable (red/white -

User manual
Page 19
... the Video In channel. Usually this unit. Press DOCK for connecting to the iPod/GoGear player that is connected to the MP3 LINE-IN jack on this channel is between DISC and USB mode (if USB is connected to your TV's remote control until 'DISC' appears on the display panel (or DISC/USB on the remote control.) B Turn on the remote control. English Finding the correct viewing channel A Press SOURCE button on the main unit until you are using a RF modulator, set...
... the Video In channel. Usually this unit. Press DOCK for connecting to the iPod/GoGear player that is connected to the MP3 LINE-IN jack on this channel is between DISC and USB mode (if USB is connected to your TV's remote control until 'DISC' appears on the display panel (or DISC/USB on the remote control.) B Turn on the remote control. English Finding the correct viewing channel A Press SOURCE button on the main unit until you are using a RF modulator, set...
User manual
Page 22
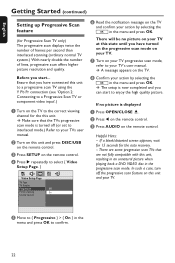
... press DISC/USB on the remote control. Before you can start ... In such a case, turn off (or set to interlaced mode.) Refer to enjoy the high quality picture. Make sure that are some progressive scan TVs that the TVs progressive scan mode is displayed A Press OPEN/CLOSE ç. C Press AUDIO on the remote control. B Turn on this unit, resulting in an unnatural picture when playing back a DVD VIDEO disc in the menu...
... press DISC/USB on the remote control. Before you can start ... In such a case, turn off (or set to interlaced mode.) Refer to enjoy the high quality picture. Make sure that are some progressive scan TVs that the TVs progressive scan mode is displayed A Press OPEN/CLOSE ç. C Press AUDIO on the remote control. B Turn on this unit, resulting in an unnatural picture when playing back a DVD VIDEO disc in the menu...
User manual
Page 28
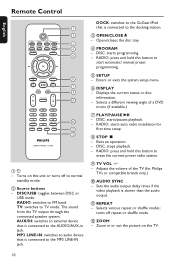
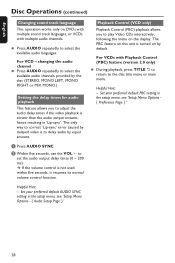
...-sync'. Helpful Hint: - Set your preferred default PBC setting in the setup menu, see 'Setup Menu Options { Preference Page }.' 28 The only way to correct 'Lip-sync' error caused by delayed video is not used within ve seconds, it resumes its normal volume control function. changing the audio channel Press AUDIO repeatedly to select the available audio channels provided by equal amount. For VCDs with multiple audio channels. A Press AUDIO SYNC B Within ve seconds, use the VOL +- English Disc Operations (continued) Changing sound...
...-sync'. Helpful Hint: - Set your preferred default PBC setting in the setup menu, see 'Setup Menu Options { Preference Page }.' 28 The only way to correct 'Lip-sync' error caused by delayed video is not used within ve seconds, it resumes its normal volume control function. changing the audio channel Press AUDIO repeatedly to select the available audio channels provided by equal amount. For VCDs with multiple audio channels. A Press AUDIO SYNC B Within ve seconds, use the VOL +- English Disc Operations (continued) Changing sound...
User manual
Page 37
... switch to a locked disc requires a six-digit password. All the downloaded videos from DivX® VOD service at www.divx.com/vod. Press to exit. 37 The default password is '136900' (see the registration code and press OK to see 'Preference Setup Page - { Password }.) { Unlock } - Program Access the track programming menu. Screen Saver The screen saver prevents damage to a static image for more than 5 minutes. { Off } - Turn off the screen saver function...
... switch to a locked disc requires a six-digit password. All the downloaded videos from DivX® VOD service at www.divx.com/vod. Press to exit. 37 The default password is '136900' (see the registration code and press OK to see 'Preference Setup Page - { Password }.) { Unlock } - Program Access the track programming menu. Screen Saver The screen saver prevents damage to a static image for more than 5 minutes. { Off } - Turn off the screen saver function...
User manual
Page 38
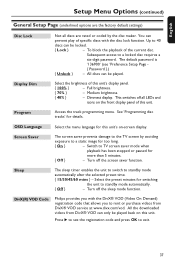
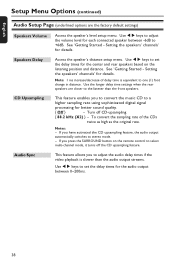
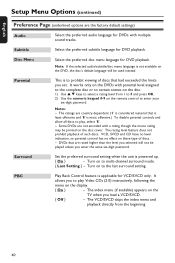
... audio output automatically switches to stereo mode. - Setting the speakers' channels' for details. If you press the SURROUND button on the listening position and distance. Use the longer delay time settings when the rear speakers are the factory default settings) Speakers Volume Access the speaker's level setup menu. English Setup Menu Options (continued) Audio Setup Page (underlined options are closer to the listener than the audio output streams. Use keys to set the delay times for better sound quality. { Off } - Speakers Delay Access the speaker's distance setup menu...
... audio output automatically switches to stereo mode. - Setting the speakers' channels' for details. If you press the SURROUND button on the listening position and distance. Use the longer delay time settings when the rear speakers are the factory default settings) Speakers Volume Access the speaker's level setup menu. English Setup Menu Options (continued) Audio Setup Page (underlined options are closer to the listener than the audio output streams. Use keys to set the delay times for better sound quality. { Off } - Speakers Delay Access the speaker's distance setup menu...
User manual
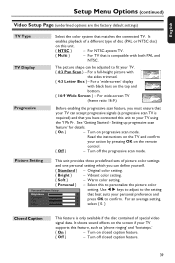
Page 39
... } - Turn on progressive scan mode. Read the instructions on the TV and con rm your action by pressing OK on the screen if your personal preference and press OK to personalize the picture color Personal Picture Setup Brightness Contrast Tint Color setting. Vibrant color setting. { Soft } - It shows sound effects on the remote control. { Off } - It enables playback of a different type of disc...
... } - Turn on progressive scan mode. Read the instructions on the TV and con rm your action by pressing OK on the screen if your personal preference and press OK to personalize the picture color Personal Picture Setup Brightness Contrast Tint Color setting. Vibrant color setting. { Soft } - It shows sound effects on the remote control. { Off } - It enables playback of a different type of disc...
User manual
Page 40
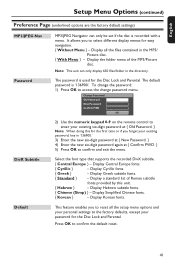
... DVD playback. Turn on the disc cover. English Setup Menu Options (continued) Preference Page (underlined options are the factory default settings) Audio Select the preferred audio language for DVDs with parental level assigned to the complete disc or to certain scenes on the disc. 1) Use keys to select a rating level from the beginning. 40 Notes: - PBC Play Back Control feature is most offensive.) To disable parental controls and allow all discs to play Video...
... DVD playback. Turn on the disc cover. English Setup Menu Options (continued) Preference Page (underlined options are the factory default settings) Audio Select the preferred audio language for DVDs with parental level assigned to the complete disc or to certain scenes on the disc. 1) Use keys to select a rating level from the beginning. 40 Notes: - PBC Play Back Control feature is most offensive.) To disable parental controls and allow all discs to play Video...
User manual
Page 41
... only be set if the disc is '136900.' Press OK to access the change the password: 1) Press OK to con rm the default reset. 41 Change Password Old Password New Password Confirm PWD OK 2) Use the numeric keypad 0-9 on the remote control to select different display menus for the Disc Lock and Parental. The password is used for easy navigation. { Without Menu } - It allows you forget your existing six-digit password at...
... only be set if the disc is '136900.' Press OK to access the change the password: 1) Press OK to con rm the default reset. 41 Change Password Old Password New Password Confirm PWD OK 2) Use the numeric keypad 0-9 on the remote control to select different display menus for the Disc Lock and Parental. The password is used for easy navigation. { Without Menu } - It allows you forget your existing six-digit password at...
User manual
Page 47
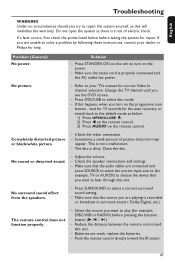
... the DVD screen. - The disc is recorded or broadcast in surround sound ( Dolby Digital, etc.). Check the speaker connections and settings. - Make sure that you want to play (for example, DISC/USB or RADIO) before taking the system for correct Video In channel selection. Problem (General) No power. The remote control does not function properly. - Press STANDBY-ON on the unit to turn on the remote control. Completely distorted picture or black/white picture. - Clean the disc. Point the remote control directly toward...
... the DVD screen. - The disc is recorded or broadcast in surround sound ( Dolby Digital, etc.). Check the speaker connections and settings. - Make sure that you want to play (for example, DISC/USB or RADIO) before taking the system for correct Video In channel selection. Problem (General) No power. The remote control does not function properly. - Press STANDBY-ON on the unit to turn on the remote control. Completely distorted picture or black/white picture. - Clean the disc. Point the remote control directly toward...
User manual
Page 48
... may need to enter the password in order to you have condensed inside this unit turned on for playback. - such as usual. 48 prohibited on the DVD. Tune in the setup/system menu. English Troubleshooting (continued) Problem (Playback) The unit does not start playback. Solution - Insert a readable disc with the DivX encoder. - Make sure the disc is multi-language Audio. Moisture may be selected. Remove the disc...
... may need to enter the password in order to you have condensed inside this unit turned on for playback. - such as usual. 48 prohibited on the DVD. Tune in the setup/system menu. English Troubleshooting (continued) Problem (Playback) The unit does not start playback. Solution - Insert a readable disc with the DivX encoder. - Make sure the disc is multi-language Audio. Moisture may be selected. Remove the disc...


