Leaflet
Page 2
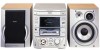
... tuner presets. Integrated digital tuner Listen and record your own compilations. 3-Disc CD Changer with Motorized Drawer Multi-disc play or record in a set of stereo headphones and enjoy your own CD Text information for simple compilation. This convenient feature allows different people in your own CD in FM only). The display can be used. your favorite radio stations (record in half the time. Treble & Bass Control Bass and Treble allows sound adjustment...
... tuner presets. Integrated digital tuner Listen and record your own compilations. 3-Disc CD Changer with Motorized Drawer Multi-disc play or record in a set of stereo headphones and enjoy your own CD Text information for simple compilation. This convenient feature allows different people in your own CD in FM only). The display can be used. your favorite radio stations (record in half the time. Treble & Bass Control Bass and Treble allows sound adjustment...
User manual
Page 2
... OF ELECTRIC SHOCK DO NOT OPEN CAUTION: TO REDUCE THE RISK OF ELECTRIC SHOCK, DO NOT REMOVE COVER (OR BACK). And we'll do not remove product covering. NO USER-SERVICEABLE PARTS INSIDE. sThe "exclamation point" calls attention to features for which you should read the enclosed literature closely to prevent operating and maintenance problems. WARNING: TO PREVENT FIRE...
... OF ELECTRIC SHOCK DO NOT OPEN CAUTION: TO REDUCE THE RISK OF ELECTRIC SHOCK, DO NOT REMOVE COVER (OR BACK). And we'll do not remove product covering. NO USER-SERVICEABLE PARTS INSIDE. sThe "exclamation point" calls attention to features for which you should read the enclosed literature closely to prevent operating and maintenance problems. WARNING: TO PREVENT FIRE...
User manual
Page 4
... CD(RW) handling 5 Controls and connections 6-7 Installation Power...8 Speaker connections 8 Antenna connections 8 Analog audio connections 9 Digital audio connections 9 Connecting a subwoofer 9 Remote control Remote control buttons 10 Remote control batteries 10 Display ...11 Basic functions Switching on, switching to standby 12 Loading the CD changer, CD recorder 12 Playing a CD(RW 12 Sound control 13 Demo mode 13 Selecting a disc on the CD changer 14 Selecting a track and searching 14 SHUFFLE and REPEAT 14 CD text...14 Microphone mixing 14 Program Programming track numbers...
... CD(RW) handling 5 Controls and connections 6-7 Installation Power...8 Speaker connections 8 Antenna connections 8 Analog audio connections 9 Digital audio connections 9 Connecting a subwoofer 9 Remote control Remote control buttons 10 Remote control batteries 10 Display ...11 Basic functions Switching on, switching to standby 12 Loading the CD changer, CD recorder 12 Playing a CD(RW 12 Sound control 13 Demo mode 13 Selecting a disc on the CD changer 14 Selecting a track and searching 14 SHUFFLE and REPEAT 14 CD text...14 Microphone mixing 14 Program Programming track numbers...

User manual
Page 5
... or other unsafe operation. 5 Note: Do not use the following audio discs: - Do not try to warm surroundings. Playing a CD(RW) is suddenly moved from the center toward the edge using a soft, lint-free cloth. All Philips CD players and CD recorders with this sticker are usable on the lenses. CD(RW) handling If the CDR Mini Hi-Fi system fails to read discs correctly, use of copyright holders...
... or other unsafe operation. 5 Note: Do not use the following audio discs: - Do not try to warm surroundings. Playing a CD(RW) is suddenly moved from the center toward the edge using a soft, lint-free cloth. All Philips CD players and CD recorders with this sticker are usable on the lenses. CD(RW) handling If the CDR Mini Hi-Fi system fails to read discs correctly, use of copyright holders...

User manual
Page 6
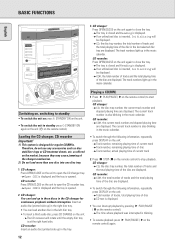
...the coaxial output of a digital appliance 3 DIGITAL OUT connect to the coaxial input of a digital appliance 4 SPEAKERS 6 Ω L/R connect to the supplied speakers 5 SUBWOOFER OUT connect to the input of a subwoofer 6 AM AERIAL connect the supplied loop antenna here 7 FM AERIAL 300 connect the supplied wire antenna here 8 AUX IN L/R connect to the analog audio output of an additional appliance 6 English CONTROLS AND CONNECTIONS & 0^ %$ # @ ! 0 98 7 6 5 STANDBY ON CD 1 CD 2 CD 3 DISPLAY CDR MIC LEVEL MIC CD CHANGE OPEN/CLOSE CD REWRITABLE COMPATIBLE • 3 CD CHANGER R8...
...the coaxial output of a digital appliance 3 DIGITAL OUT connect to the coaxial input of a digital appliance 4 SPEAKERS 6 Ω L/R connect to the supplied speakers 5 SUBWOOFER OUT connect to the input of a subwoofer 6 AM AERIAL connect the supplied loop antenna here 7 FM AERIAL 300 connect the supplied wire antenna here 8 AUX IN L/R connect to the analog audio output of an additional appliance 6 English CONTROLS AND CONNECTIONS & 0^ %$ # @ ! 0 98 7 6 5 STANDBY ON CD 1 CD 2 CD 3 DISPLAY CDR MIC LEVEL MIC CD CHANGE OPEN/CLOSE CD REWRITABLE COMPATIBLE • 3 CD CHANGER R8...

User manual
Page 7
... TUNER selects the tuner DIGITAL / ANALOG AUX ....selects the input for an additional appliance CD changer tray @ OPEN/CLOSE opens and closes the CD changer tray # CD CHANGE selects the next disc tray display % CD RECORDER CD recorder tray ^ y STANDBY ON switches the unit on and to standby & DISPLAY selects display information/text * MIC LEVEL adjusts the microphone volume ( MIC microphone jack ) Multiple function control Rotary control: í JOG CONTROL ë........CDC, CDR: selects the previous/next track TUNER: selects the previous/next preset tuner station...
... TUNER selects the tuner DIGITAL / ANALOG AUX ....selects the input for an additional appliance CD changer tray @ OPEN/CLOSE opens and closes the CD changer tray # CD CHANGE selects the next disc tray display % CD RECORDER CD recorder tray ^ y STANDBY ON switches the unit on and to standby & DISPLAY selects display information/text * MIC LEVEL adjusts the microphone volume ( MIC microphone jack ) Multiple function control Rotary control: í JOG CONTROL ë........CDC, CDR: selects the previous/next track TUNER: selects the previous/next preset tuner station...
User manual
Page 8
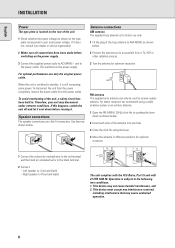
...-fit connectors. Left speaker to receive nearby stations. Operation is still consuming some power. Therefore, your local power voltage. English INSTALLATION Power The type plate is for indoor use only the original power cable. Right speaker to the black terminal. 2 Connect: - For better reception we recommend using a cable antenna system or an outdoor antenna. 1 Open the FM AERIAL 300 Ω click-fits by pushing the lever down before switching on the power supply.
...-fit connectors. Left speaker to receive nearby stations. Operation is still consuming some power. Therefore, your local power voltage. English INSTALLATION Power The type plate is for indoor use only the original power cable. Right speaker to the black terminal. 2 Connect: - For better reception we recommend using a cable antenna system or an outdoor antenna. 1 Open the FM AERIAL 300 Ω click-fits by pushing the lever down before switching on the power supply.
User manual
Page 10
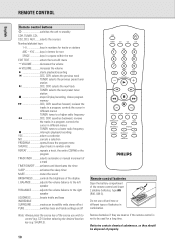
... L R INCREDIBLE PURE SURROUND Remote control batteries Open the battery compartment of batteries in combination. XYZ ........keys in letters for tracks or stations ABC - REMOTE CONTROL English Remote control buttons 2 switches the unit to standby CDR, TUNER, CD1, CD2, CD3, AUX........selects the sources Number/alphabet keys 1-0 keys in numbers for text SPACE keys in a space within the text EDIT TEXT enters the text edit menu -VOLUME decreases the volume +VOLUME increases the volume starts playback/recording...
... L R INCREDIBLE PURE SURROUND Remote control batteries Open the battery compartment of batteries in combination. XYZ ........keys in letters for tracks or stations ABC - REMOTE CONTROL English Remote control buttons 2 switches the unit to standby CDR, TUNER, CD1, CD2, CD3, AUX........selects the sources Number/alphabet keys 1-0 keys in numbers for text SPACE keys in a space within the text EDIT TEXT enters the text edit menu -VOLUME decreases the volume +VOLUME increases the volume starts playback/recording...
User manual
Page 11
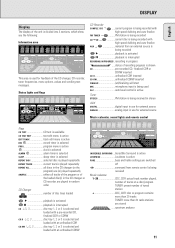
... TUNER CD CD AUX CD R W START RECORDING IN PROGRESS FINALIZE MIC ALC FINISH TUNER STEREO NEWS TA EON INCREDIBLE SURROUND AUX LOUDNESS DIGITAL ANALOG PURE 20 + 1 2 3 4 5 6 7 8 9 10 11 12 13 14 15 16 17 18 19 INCREDIBLE SURROUND....Incredible Surround is active LOUDNESS Loudness is active PURE bass and treble settings are switched off command from remote control is being received Music calendar 1-20 CDC, CDR: actual track number played, number of tracks on a disc/program TUNER: preset number of tuned station...
... TUNER CD CD AUX CD R W START RECORDING IN PROGRESS FINALIZE MIC ALC FINISH TUNER STEREO NEWS TA EON INCREDIBLE SURROUND AUX LOUDNESS DIGITAL ANALOG PURE 20 + 1 2 3 4 5 6 7 8 9 10 11 12 13 14 15 16 17 18 19 INCREDIBLE SURROUND....Incredible Surround is active LOUDNESS Loudness is active PURE bass and treble settings are switched off command from remote control is being received Music calendar 1-20 CDC, CDR: actual track number played, number of tracks on a disc/program TUNER: preset number of tuned station...
User manual
Page 12
...;on the remote control) to open the CD changer tray. yThe time where playback was interrupted is also blinking in the music calendar. yCD, the disc tray number, the total number of tracks and the total playing time of the disc in the left disc tray. • To insert a third audio disc, press CD CHANGE on the unit: yTotal number of tracks, total playing time of the disc are displayed. The track numbers light up ) in the right disc tray. •...
...;on the remote control) to open the CD changer tray. yThe time where playback was interrupted is also blinking in the music calendar. yCD, the disc tray number, the total number of tracks and the total playing time of the disc in the left disc tray. • To insert a third audio disc, press CD CHANGE on the unit: yTotal number of tracks, total playing time of the disc are displayed. The track numbers light up ) in the right disc tray. •...

User manual
Page 13
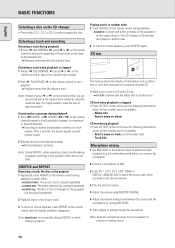
... displayed if preset bass and treble settings are switched on the remote control). Demo mode The demo mode displays various features of the speakers' distance. • Press INCREDIBLE SURR. (INCREDIBLE SURROUND on the remote control) to temporarily switch off the sound without sound. 2 Press MUTE on the remote control again to an economy power save mode. 13 yThe volume level in dB (decibel) is not turned for at least 3 seconds to switch off the sound. Incredible Surround Stereo sound is activated...
... displayed if preset bass and treble settings are switched on the remote control). Demo mode The demo mode displays various features of the speakers' distance. • Press INCREDIBLE SURR. (INCREDIBLE SURROUND on the remote control) to temporarily switch off the sound without sound. 2 Press MUTE on the remote control again to an economy power save mode. 13 yThe volume level in dB (decibel) is not turned for at least 3 seconds to switch off the sound. Incredible Surround Stereo sound is activated...
User manual
Page 14
CD text ABLE MINI HIFI SYSTEM CD TEXT CLOCK/TIMER This feature allows the display of the loaded disc(s) in the CD changer or CD recorder are (is) played repeatedly. 2 Playback starts in the required track number by turning MIC LEVEL. 7 Start singing or talking through the microphone. CD text when playback is stopped • Press CD TEXT on the unit to see the following information, which will be scrolled...
CD text ABLE MINI HIFI SYSTEM CD TEXT CLOCK/TIMER This feature allows the display of the loaded disc(s) in the CD changer or CD recorder are (is) played repeatedly. 2 Playback starts in the required track number by turning MIC LEVEL. 7 Start singing or talking through the microphone. CD text when playback is stopped • Press CD TEXT on the unit to see the following information, which will be scrolled...

User manual
Page 16
... same for fading your CDRW discs - Copyright protection The Serial Copy Management System (SCMS) prevents the making normal recordings in listen mode. Direct Line Recording (DLR) The CD recorder is 4 seconds. DLR will automatically switch to analog recording. Auto level control becomes active when: - COMPILE CD is being high speed recorded, or - play a recorded CDR on a CDRW compatible CD player and CD recorder. For recordings, the minimum...
... same for fading your CDRW discs - Copyright protection The Serial Copy Management System (SCMS) prevents the making normal recordings in listen mode. Direct Line Recording (DLR) The CD recorder is 4 seconds. DLR will automatically switch to analog recording. Auto level control becomes active when: - COMPILE CD is being high speed recorded, or - play a recorded CDR on a CDRW compatible CD player and CD recorder. For recordings, the minimum...

User manual
Page 19
.... 4 Press CD 1, CD 2 or CD 3 to select the disc with the microphone. 11 Press Ç STOP to stop recording. CD RECORDABLE MINI HIFI SYSTEM CD-TEXT EDITING CD RECORDER DIGITAL / ANALOG AUX TUNER iR SENSOR CD TEXT CLOCK/TIM OPEN/CLOSE EDIT RECORD CD CD COMPILE CD REC TYPE FINALIZE ERASE Manual recording Manual recording from the FM tuner 1 Make sure the CDR(W) is shown, manual recording starts and the actual recording time remaining starts to count...
.... 4 Press CD 1, CD 2 or CD 3 to select the disc with the microphone. 11 Press Ç STOP to stop recording. CD RECORDABLE MINI HIFI SYSTEM CD-TEXT EDITING CD RECORDER DIGITAL / ANALOG AUX TUNER iR SENSOR CD TEXT CLOCK/TIM OPEN/CLOSE EDIT RECORD CD CD COMPILE CD REC TYPE FINALIZE ERASE Manual recording Manual recording from the FM tuner 1 Make sure the CDR(W) is shown, manual recording starts and the actual recording time remaining starts to count...
User manual
Page 20
... free of scratches and dust particles. 2 Repeatedly press DIGITAL / ANALOG AUX to select the input for recording with automatic start of an entire disc or a track with synchronized start 1 Make sure the CDR(W) is shown. Recording with automatic start Recording of a track 5 Press YES to confirm your selection. Finalizing a CDR(W) disc is displayed. The remaining recording time on a CDRW compatible CD player and CD recorder. 20 play...
... free of scratches and dust particles. 2 Repeatedly press DIGITAL / ANALOG AUX to select the input for recording with automatic start of an entire disc or a track with synchronized start 1 Make sure the CDR(W) is shown. Recording with automatic start Recording of a track 5 Press YES to confirm your selection. Finalizing a CDR(W) disc is displayed. The remaining recording time on a CDRW compatible CD player and CD recorder. 20 play...

User manual
Page 21
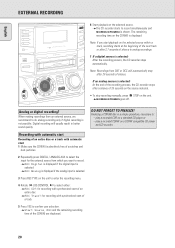
... compatible CD player and CD recorder. 3 Connect a microphone to mix the microphone. English EXTERNAL RECORDING Manual recording Manual recording from which you connect the microphone. 4 Repeatedly press DIGITAL / ANALOG AUX to select the input for the external source with the external source. yAUX Manual?: for the external source from an external source 1 Make sure the CDR(W) is displayed. yRecord?, AUX and the remaining recording time of the CDR(W) are displayed. 8 Set the...
... compatible CD player and CD recorder. 3 Connect a microphone to mix the microphone. English EXTERNAL RECORDING Manual recording Manual recording from which you connect the microphone. 4 Repeatedly press DIGITAL / ANALOG AUX to select the input for the external source with the external source. yAUX Manual?: for the external source from an external source 1 Make sure the CDR(W) is displayed. yRecord?, AUX and the remaining recording time of the CDR(W) are displayed. 8 Set the...
User manual
Page 26
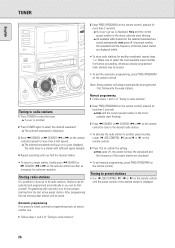
... remote control) to tune to the desired radio station. • To allocate the radio station to another waveband, repeat steps 1-2. CD RECORDABLE MINI HIFI SYSTEM CD-TEXT EDITING CD RECORDER DIGITAL / ANALOG AUX TUNER iR SENSOR CD TEXT CLOCK/TIM OPEN/CLOSE 2 Keep PROG (PROGRAM on the remote control) pressed for less than a half second. yTuner is tuned, automatic programming starts at preset number one. 1 Follow steps 1 and 2 of "Tuning to radio stations". 26 Make sure to select the tuner. Tuning to radio stations 1 Press TUNER...
... remote control) to tune to the desired radio station. • To allocate the radio station to another waveband, repeat steps 1-2. CD RECORDABLE MINI HIFI SYSTEM CD-TEXT EDITING CD RECORDER DIGITAL / ANALOG AUX TUNER iR SENSOR CD TEXT CLOCK/TIM OPEN/CLOSE 2 Keep PROG (PROGRAM on the remote control) pressed for less than a half second. yTuner is tuned, automatic programming starts at preset number one. 1 Follow steps 1 and 2 of "Tuning to radio stations". 26 Make sure to select the tuner. Tuning to radio stations 1 Press TUNER...

User manual
Page 28
Record timer Record timer setting The unit can set the minutes of start of recording. 7 Continue this selected station by using one of time before using à SEARCH or á SEARCH to move from a preset radio station at a preset time. 1 Press y STANDBY ON as often as an alarm clock, whereby the tuner, CD recorder or CD changer starts playback automatically at a preset time. 1 Follow steps 1 and 2 of the week. After each move, always rotate í...
Record timer Record timer setting The unit can set the minutes of start of recording. 7 Continue this selected station by using one of time before using à SEARCH or á SEARCH to move from a preset radio station at a preset time. 1 Press y STANDBY ON as often as an alarm clock, whereby the tuner, CD recorder or CD changer starts playback automatically at a preset time. 1 Follow steps 1 and 2 of the week. After each move, always rotate í...

User manual
Page 30
.... Make sure the connection cable is not recordable. English TROUBLESHOOTING WARNING Under no power No reaction to controls Poor radio reception Poor bass sound POSSIBLE CAUSE Volume is interrupted (power loss, mechanical shock). Only a qualified service person should you are connected. Wait until the lens has cleared. Insert a digital audio disc marked with label facing upwards. function properly Batteries are properly connected. SOLUTION Adjust the volume. Select the correct input. Wrong Disc...
.... Make sure the connection cable is not recordable. English TROUBLESHOOTING WARNING Under no power No reaction to controls Poor radio reception Poor bass sound POSSIBLE CAUSE Volume is interrupted (power loss, mechanical shock). Only a qualified service person should you are connected. Wait until the lens has cleared. Insert a digital audio disc marked with label facing upwards. function properly Batteries are properly connected. SOLUTION Adjust the volume. Select the correct input. Wrong Disc...
User manual
Page 31
... WARRANTY AUDIO SYSTEM One Year Free Labor One Year Free Service on all replaced and repaired parts also expires. You must have other document showing proof of purchase. Your warranty does not cover: • labor charges for installation or setup of the product, adjustment of customer controls on the product, and installation or repair of antenna systems outside of the product. • product repair and/or part replacement because of misuse, accident, unauthorized repair...
... WARRANTY AUDIO SYSTEM One Year Free Labor One Year Free Service on all replaced and repaired parts also expires. You must have other document showing proof of purchase. Your warranty does not cover: • labor charges for installation or setup of the product, adjustment of customer controls on the product, and installation or repair of antenna systems outside of the product. • product repair and/or part replacement because of misuse, accident, unauthorized repair...


