Leaflet
Page 1
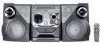
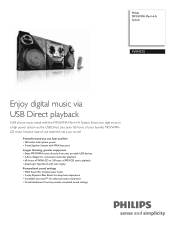
... watts total system power • 3-way Speaker System with MAX bass port Longer listening, greater enjoyment • Enjoy MP3/WMA music directly from your portable USB devices • 3-disc changer for enhanced audio enjoyment • Virtual Ambience Control provides simulated sound settings Philips MP3/WMA Mini Hi-Fi System FWM575 Enjoy digital music via the USB Direct plus savor 60 hours of your favorite MP3/WMACD music. Enjoy your digit music in a high power system via USB Direct playback Fulfill all your music...
... watts total system power • 3-way Speaker System with MAX bass port Longer listening, greater enjoyment • Enjoy MP3/WMA music directly from your portable USB devices • 3-disc changer for enhanced audio enjoyment • Virtual Ambience Control provides simulated sound settings Philips MP3/WMA Mini Hi-Fi System FWM575 Enjoy digital music via the USB Direct plus savor 60 hours of your favorite MP3/WMACD music. Enjoy your digit music in a high power system via USB Direct playback Fulfill all your music...
Leaflet
Page 2
... FWM575/37 360 watts total system power 360 watts total system power Dual Logic Tape Deck Dual Logic Tape Deck with auto replay levels, so you can enjoy consistent sound even when you turn down the volume. 3-way spk sys with MAX port 3-way Speaker System with MAX bass port USB Direct for music playback, you can choose between the two speakers. The end result is a noticeable amplifying of additional speakers. Your digital music will be switched...
... FWM575/37 360 watts total system power 360 watts total system power Dual Logic Tape Deck Dual Logic Tape Deck with auto replay levels, so you can enjoy consistent sound even when you turn down the volume. 3-way spk sys with MAX port 3-way Speaker System with MAX bass port USB Direct for music playback, you can choose between the two speakers. The end result is a noticeable amplifying of additional speakers. Your digital music will be switched...
Leaflet
Page 3
...; Auto digital tuning • Station presets: 40 • Tuner Bands: FM, AM • Tuner Enhancements: Auto Store, Easy Set (Plug & Play) Connectivity • USB: USB host • Aux in: Line in • Headphone: 3.5 mm • Other connections: FM Antenna, AM Antenna Convenience • Alarms: CD Alarm, Radio Alarm, Sleep timer • Clock: On main display • Display Type: FTD • Eco Power Standby: 1 watt • Indications: DIM mode Accessories • Included accessories: AC Power Cord, Quick Use Guide, Guarantee booklet, AM antenna, FM antenna • Remote control...
...; Auto digital tuning • Station presets: 40 • Tuner Bands: FM, AM • Tuner Enhancements: Auto Store, Easy Set (Plug & Play) Connectivity • USB: USB host • Aux in: Line in • Headphone: 3.5 mm • Other connections: FM Antenna, AM Antenna Convenience • Alarms: CD Alarm, Radio Alarm, Sleep timer • Clock: On main display • Display Type: FTD • Eco Power Standby: 1 watt • Indications: DIM mode Accessories • Included accessories: AC Power Cord, Quick Use Guide, Guarantee booklet, AM antenna, FM antenna • Remote control...
User manual
Page 4
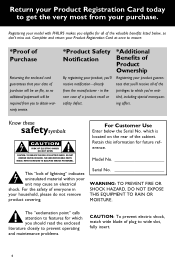
...-sav- NO USER-SERVICEABLE PARTS INSIDE. Model No t This "bolt of lightning" indicates uninsulated material within your product, you'll receive notification - Complete and return your Product Registration Card at once to ensure: *Proof of Purchase Returning the enclosed card guarantees that you'll receive all of the valuable benefits listed below the Serial No. For Customer Use Enter below , so...
...-sav- NO USER-SERVICEABLE PARTS INSIDE. Model No t This "bolt of lightning" indicates uninsulated material within your product, you'll receive notification - Complete and return your Product Registration Card at once to ensure: *Proof of Purchase Returning the enclosed card guarantees that you'll receive all of the valuable benefits listed below the Serial No. For Customer Use Enter below , so...
User manual
Page 8
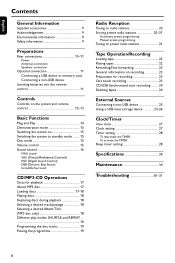
... Rear connections 10-11 Power Antennas connection Speakers connection Optional connection 11 Connecting a USB device or memory card Connecting a non-USB device Inserting batteries into the remote control 11 Controls Controls on the system and remote control 12-13 Basic Functions Plug and Play 14 Demonstration mode 15 Switching the system on 15 Switching the system to standby mode ........ 15 Dim mode 15 Volume control 15 Sound control 16 MAX sound VAC (Virtual Ambience Control) DSC (Digital Sound Control) DBB (Dynamic Bass Boost) Incredible Surround CD/MP3-CD Operations Discs...
... Rear connections 10-11 Power Antennas connection Speakers connection Optional connection 11 Connecting a USB device or memory card Connecting a non-USB device Inserting batteries into the remote control 11 Controls Controls on the system and remote control 12-13 Basic Functions Plug and Play 14 Demonstration mode 15 Switching the system on 15 Switching the system to standby mode ........ 15 Dim mode 15 Volume control 15 Sound control 16 MAX sound VAC (Virtual Ambience Control) DSC (Digital Sound Control) DBB (Dynamic Bass Boost) Incredible Surround CD/MP3-CD Operations Discs...
User manual
Page 9
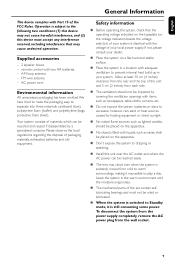
.... ● When the system is switched to Standby mode, it impossible to dripping or splashing. ● Install this device must not be recycled and reused if disassembled by heating equipment or direct sunlight. ● No naked flame sources, such as lighted candles, should be placed on the apparatus. ● No objects filled with two AA batteries - remote control with liquids, such as...
.... ● When the system is switched to Standby mode, it impossible to dripping or splashing. ● Install this device must not be recycled and reused if disassembled by heating equipment or direct sunlight. ● No naked flame sources, such as lighted candles, should be placed on the apparatus. ● No objects filled with two AA batteries - remote control with liquids, such as...

User manual
Page 11
... plug of the USB cable (not supplied) to the socket on the set . ● For better FM stereo reception, connect an outdoor FM antenna to the FM ANTENNA terminal. CAUTION! - Connecting a USB device or memory card By connecting a USB mass storage device (including USB flash memory, USB flash players or memory cards) to the Hi-Fi system, you can use a "single to double" cinch cable (the output sound still remain mono). C Speakers Connection Front Speakers Connect the speaker wires to the SPEAKERS...
... plug of the USB cable (not supplied) to the socket on the set . ● For better FM stereo reception, connect an outdoor FM antenna to the FM ANTENNA terminal. CAUTION! - Connecting a USB device or memory card By connecting a USB mass storage device (including USB flash memory, USB flash players or memory cards) to the Hi-Fi system, you can use a "single to double" cinch cable (the output sound still remain mono). C Speakers Connection Front Speakers Connect the speaker wires to the SPEAKERS...
User manual
Page 12
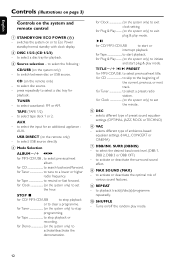
... a preset radio station. for Clock on the system only) to exit plug & play mode. 12 TAPE (TAPE 1/2) - for Tuner to tune to select the input for CD/ MP3-CD/USB to Eco Power standby/normal standby with clock display. 2 DISC 1/2/3 (CD 1/2/3) - TITLE-/+í/ë PRESET for Demo on or to start playback. English Controls (illustrations on page 3) Controls on the remote only) - to a lower or higher radio frequency. for CD to rewind or fast forward. to the beginning of various sound features...
... a preset radio station. for Clock on the system only) to exit plug & play mode. 12 TAPE (TAPE 1/2) - for Tuner to tune to select the input for CD/ MP3-CD/USB to Eco Power standby/normal standby with clock display. 2 DISC 1/2/3 (CD 1/2/3) - TITLE-/+í/ë PRESET for Demo on or to start playback. English Controls (illustrations on page 3) Controls on the remote only) - to a lower or higher radio frequency. for CD to rewind or fast forward. to the beginning of various sound features...
User manual
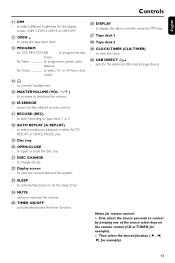
Page 13
... for the infrared remote control. & RECORD (REC) - English Controls ! for Clock to programme disc tracks. to start recording on the remote control (CD or TUNER, for CD/ MP3-CD/USB to select 12- to change disc(s). ™ Display screen - for Tuner to open or close the disc tray. ¡ DISC CHANGE - or 24-hour clock mode. $n - to view the clock. º USB DIRECT - to programme preset radio stations. activates/deactivates the timer function. § DISPLAY - DIM - Then select the desired function for remote control: - Notes for...
... for the infrared remote control. & RECORD (REC) - English Controls ! for Clock to programme disc tracks. to start recording on the remote control (CD or TUNER, for CD/ MP3-CD/USB to select 12- to change disc(s). ™ Display screen - for Tuner to open or close the disc tray. ¡ DISC CHANGE - or 24-hour clock mode. $n - to view the clock. º USB DIRECT - to programme preset radio stations. activates/deactivates the timer function. § DISPLAY - DIM - Then select the desired function for remote control: - Notes for...
User manual
Page 14
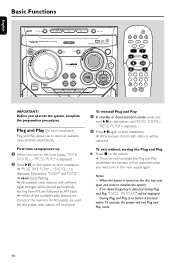
... disc tray may open and close to store all the available radio stations are used, the last preset radio station will be restarted when you to initialise the system. - PRESS PLAY" is detected during Plug and Play, "CHECK ANTENNA" will exit Plug and Play mode. 14 Before you turn on the main supply, "AUTO INSTALL - When the power is pressed within 15 seconds, the system will be displayed. - During Plug and Play, if no stereo frequency is displayed...
... disc tray may open and close to store all the available radio stations are used, the last preset radio station will be restarted when you to initialise the system. - PRESS PLAY" is detected during Plug and Play, "CHECK ANTENNA" will exit Plug and Play mode. 14 Before you turn on the main supply, "AUTO INSTALL - When the power is pressed within 15 seconds, the system will be displayed. - During Plug and Play, if no stereo frequency is displayed...
User manual
Page 15
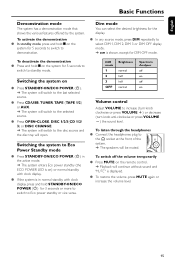
.... Volume control Adjust VOLUME to Eco Power Standby mode ● Press STANDBY-ON/ECO POWER (2) in normal standby with clock display. ● If the system is shown, except for 5 seconds to switch to the disc source and the disc tray will open. To activate the demonstration ● In standby mode, press and holdÇon ● Press STANDBY-ON/ECO POWER (2). ➜ The system will switch to the last selected source. ● Press CD/USB, TUNER, TAPE (TAPE 1/2) or AUX. ➜ The system will switch...
.... Volume control Adjust VOLUME to Eco Power Standby mode ● Press STANDBY-ON/ECO POWER (2) in normal standby with clock display. ● If the system is shown, except for 5 seconds to switch to the disc source and the disc tray will open. To activate the demonstration ● In standby mode, press and holdÇon ● Press STANDBY-ON/ECO POWER (2). ➜ The system will switch to the last selected source. ● Press CD/USB, TUNER, TAPE (TAPE 1/2) or AUX. ➜ The system will switch...
User manual
Page 16
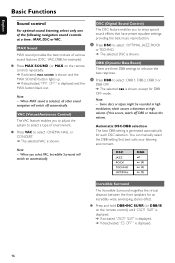
... other sound navigation will switch on the remote control) repeatedly. ➜ If activated, MAX SOUND is shown and the MAX SOUND button lights up. ➜ If deactivated, "MAX OFF" is displayed. 16 You can manually select the DBB setting that have preset equaliser settings, providing the best music reproduction. 1 Press DSC to enjoy special sound effects that best suits your listening environment. English Basic Functions Sound control For optimal sound listening...
... other sound navigation will switch on the remote control) repeatedly. ➜ If activated, MAX SOUND is shown and the MAX SOUND button lights up. ➜ If deactivated, "MAX OFF" is displayed. 16 You can manually select the DBB setting that have preset equaliser settings, providing the best music reproduction. 1 Press DSC to enjoy special sound effects that best suits your listening environment. English Basic Functions Sound control For optimal sound listening...
User manual
Page 18
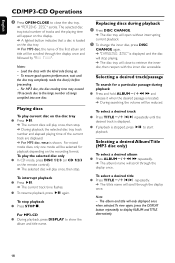
..., the selected disc tray, track number and elapsed playing time of tracks and the playing time will appear on the display. ➜ A lighted button indicates that a disc is stopped, press ÉÅ to show the album and title name. To ensure good system performance, wait until the desired track is displayed. ● If playback is loaded on the remote control). ➜ The selected disc will play once...
..., the selected disc tray, track number and elapsed playing time of tracks and the playing time will appear on the display. ➜ A lighted button indicates that a disc is stopped, press ÉÅ to show the album and title name. To ensure good system performance, wait until the desired track is displayed. ● If playback is loaded on the remote control). ➜ The selected disc will play once...
User manual
Page 20
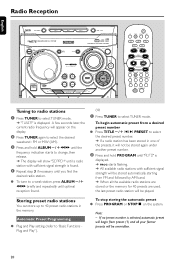
... signal strength will be stored automatically, starting from FM and followed by AM band. ➜ When all your former presets will be overridden. 20 OR 1 Press TUNER to select TUNER mode. ➜ "TUNER" is displayed. Radio Reception English Tuning to radio stations 1 Press TUNER to select TUNER mode. Automatic Preset Programming ● Plug and Play setting (refer to select the desired preset number. ➜ If a radio station has been stored in the memory...
... signal strength will be stored automatically, starting from FM and followed by AM band. ➜ When all your former presets will be overridden. 20 OR 1 Press TUNER to select TUNER mode. ➜ "TUNER" is displayed. Radio Reception English Tuning to radio stations 1 Press TUNER to select TUNER mode. Automatic Preset Programming ● Plug and Play setting (refer to select the desired preset number. ➜ If a radio station has been stored in the memory...
User manual
Page 23
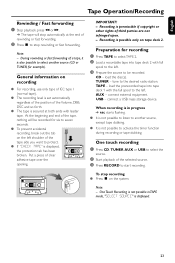
... example). One touch recording 1 Press CD, TUNER, AUX or USB to select another source, except tape dubbing. ● It is displayed. 23 English Tape Operation/Recording Rewinding / Fast forwarding 1 Stop playback, press à or á. ➜ The tape will be recorded. General information on the system. When recording is in TAPE mode, "SELECT SOURCE" is not possible to start recording. tune to seven seconds. ● To...
... example). One touch recording 1 Press CD, TUNER, AUX or USB to select another source, except tape dubbing. ● It is displayed. 23 English Tape Operation/Recording Rewinding / Fast forwarding 1 Stop playback, press à or á. ➜ The tape will be recorded. General information on the system. When recording is in TAPE mode, "SELECT SOURCE" is not possible to start recording. tune to seven seconds. ● To...
User manual
Page 25
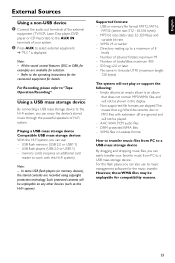
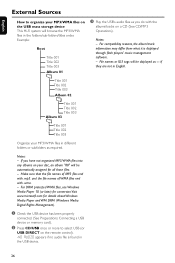
... a USB mass storage device By dragging and dropping music files, you can enjoy the device's stored music through the powerful speakers of Hi-Fi system. WMA files in the display. - Note: - English External Sources Using a non-USB device 1 Connect the audio out terminals of the external equipment (TV,VCR, Laser Disc player, DVD player or CD Recorder) to the AUX IN terminals of tracks/titles: maximum 400 - Playing a USB mass storage device Compatible USB mass storage devices...
... a USB mass storage device By dragging and dropping music files, you can enjoy the device's stored music through the powerful speakers of Hi-Fi system. WMA files in the display. - Note: - English External Sources Using a non-USB device 1 Connect the audio out terminals of the external equipment (TV,VCR, Laser Disc player, DVD player or CD Recorder) to the AUX IN terminals of tracks/titles: maximum 400 - Playing a USB mass storage device Compatible USB mass storage devices...
User manual
Page 26
... end with the albums/tracks on a CD (See CD/MP3 Operations). Notes: - For compatibility reasons, the album/track information may differ from what it is found in different folders or subfolders as --- Notes: - English External Sources How to select USB (or USB DIRECT on the remote control). -NO AUDIO appears if no audio file is displayed through flash players' music management software. - If you do with...
... end with the albums/tracks on a CD (See CD/MP3 Operations). Notes: - For compatibility reasons, the album/track information may differ from what it is found in different folders or subfolders as --- Notes: - English External Sources How to select USB (or USB DIRECT on the remote control). -NO AUDIO appears if no audio file is displayed through flash players' music management software. - If you do with...
User manual
Page 27
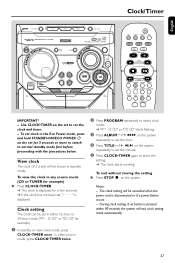
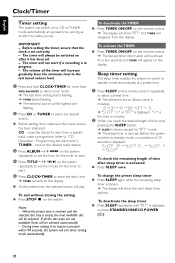
In other source mode, press CLOCK•TIMER twice. 2 Press PROGRAM repeatedly to select clock mode. ➜ "AM 12:00" or "00:00" starts flashing. 3 Press ALBUM-/+à á on the system repeatedly to set the hour. 4 Press TITLE-/+í/ë on the set to store the setting. ➜ The clock star ts working. During clock setting, if no button is displayed. View clock The clock (if it is set clock in standby mode. To set ) will...
In other source mode, press CLOCK•TIMER twice. 2 Press PROGRAM repeatedly to select clock mode. ➜ "AM 12:00" or "00:00" starts flashing. 3 Press ALBUM-/+à á on the system repeatedly to set the hour. 4 Press TITLE-/+í/ë on the set to store the setting. ➜ The clock star ts working. During clock setting, if no button is displayed. View clock The clock (if it is set clock in standby mode. To set ) will...
User manual
Page 28
... is displayed, or press STANDBY-ON/ECO POWER (2) . 28 Before the system switches to standby mode, a countdown of time, stop pressing the SLEEP button. ➜ SLEEP is shown, except for "OFF" mode. ➜ The sleep timer is now set. The timer will be lighted and flashing. 2 Press CD or TUNER to select the desired source. ● Before setting timer, make a programme (refer to "CD Operation - Programming the disc tracks"). Before setting the timer, ensure that the clock is set...
... is displayed, or press STANDBY-ON/ECO POWER (2) . 28 Before the system switches to standby mode, a countdown of time, stop pressing the SLEEP button. ➜ SLEEP is shown, except for "OFF" mode. ➜ The sleep timer is now set. The timer will be lighted and flashing. 2 Press CD or TUNER to select the desired source. ● Before setting timer, make a programme (refer to "CD Operation - Programming the disc tracks"). Before setting the timer, ensure that the clock is set...
User manual
Page 31
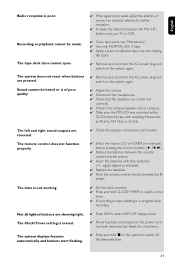
.... ✔ Replace the batteries. ✔ Point the remote control directly towards the IR sensor. English Radio reception is poor. ✔ If the signal is erased. ✔ Press DIM to switch off the demonstration. 31 The tape deck door cannot open. The system displays features automatically and buttons start flashing. ✔ Press and hold CLOCK•TIMER to switch on the system to select DIM OFF display mode. ✔ Power has been...
.... ✔ Replace the batteries. ✔ Point the remote control directly towards the IR sensor. English Radio reception is poor. ✔ If the signal is erased. ✔ Press DIM to switch off the demonstration. 31 The tape deck door cannot open. The system displays features automatically and buttons start flashing. ✔ Press and hold CLOCK•TIMER to switch on the system to select DIM OFF display mode. ✔ Power has been...


