Leaflet
Page 1
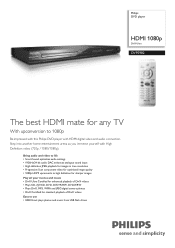
Step into another home entertainment arena as you immerse yourself with HDMI digital video and audio connection. Bring audio and video to life • Smart Sound optimizes audio settings • 192kHz/24 bit audio DAC enhances analogue sound input • High definition JPEG playback for images in true resolution • Progressive Scan component video for optimized image quality • 1080p HDMI upconverts to high definition for sharper images Play all your movies and...
Step into another home entertainment arena as you immerse yourself with HDMI digital video and audio connection. Bring audio and video to life • Smart Sound optimizes audio settings • 192kHz/24 bit audio DAC enhances analogue sound input • High definition JPEG playback for images in true resolution • Progressive Scan component video for optimized image quality • 1080p HDMI upconverts to high definition for sharper images Play all your movies and...
Leaflet
Page 3
... connections: USB memory class device • Playback Formats: DivX, MP3, JPEG Still pictures Connectivity • Rear Connections: Analog audio Left/Right out, Composite video (CVBS) output, HDMI output, Digital coaxial out, ComponentVideo out Progressive Convenience • Child Protection: Parental Control, Child Lock • On-Screen Display languages: English, Mexican Spanish, Canadian French Accessories • Included accessories: 2 x AAA Batteries, Audio/ Video cable, Quick start guide, Remote Control, User Manual, Product Registration Card, Warranty Leaflet Dimensions • Set...
... connections: USB memory class device • Playback Formats: DivX, MP3, JPEG Still pictures Connectivity • Rear Connections: Analog audio Left/Right out, Composite video (CVBS) output, HDMI output, Digital coaxial out, ComponentVideo out Progressive Convenience • Child Protection: Parental Control, Child Lock • On-Screen Display languages: English, Mexican Spanish, Canadian French Accessories • Included accessories: 2 x AAA Batteries, Audio/ Video cable, Quick start guide, Remote Control, User Manual, Product Registration Card, Warranty Leaflet Dimensions • Set...

User manual
Page 6
.... Your DVD player consists of your DVD Video player and enter below the Serial No. Manufactured under license. Trademarks are trademarks or registered trademarks of Koninklijke Philips Electronics N.V. English General Information Environmental Information All unnecessary packaging has been omitted. Retain this device. DVP 5982 Serial No LASER Type Semiconductor laser InGaAlP (DVD) AIGaAs (CD) Wave length 658 nm (DVD) 790 nm (CD) Output Power 7.0 mW (DVD) 10...
.... Your DVD player consists of your DVD Video player and enter below the Serial No. Manufactured under license. Trademarks are trademarks or registered trademarks of Koninklijke Philips Electronics N.V. English General Information Environmental Information All unnecessary packaging has been omitted. Retain this device. DVP 5982 Serial No LASER Type Semiconductor laser InGaAlP (DVD) AIGaAs (CD) Wave length 658 nm (DVD) 790 nm (CD) Output Power 7.0 mW (DVD) 10...

User manual
Page 8
... Receiver 18 Connecting to a HDMI/DVI TV via a HDMI Repeater 18 Product Overview Front and Rear Panels ...19 Remote Control...20 Getting Started Step 1: Inserting Batteries ...21 Using the remote control to operate the system 21 Step 2: Finding your viewing channel 21 Step 3: Setting up Progressive Scan feature 22 Step 4: TV color system ...23 Step 5: Setting the language 24 On-screen display (OSD) language ...24 Audio, Subtitle and Disc menu languages 24 Playback from Disc Playable discs ...25 Supported formats...25 Playback Features Starting disc playback...26 Basic playback controls...
... Receiver 18 Connecting to a HDMI/DVI TV via a HDMI Repeater 18 Product Overview Front and Rear Panels ...19 Remote Control...20 Getting Started Step 1: Inserting Batteries ...21 Using the remote control to operate the system 21 Step 2: Finding your viewing channel 21 Step 3: Setting up Progressive Scan feature 22 Step 4: TV color system ...23 Step 5: Setting the language 24 On-screen display (OSD) language ...24 Audio, Subtitle and Disc menu languages 24 Playback from Disc Playable discs ...25 Supported formats...25 Playback Features Starting disc playback...26 Basic playback controls...

User manual
Page 9
... Locking / Unlocking the disc for viewing ...37 OSD Language...37 Sleep ...38 Lip Sync ...38 DivX® VOD Registration Code...38 Using the Audio setup menu 39~41 Analog Output ...39 Digital Audio Setup...39~40 HDMI Audio Setup ...40 Sound Mode ...41 CD Upsampling...41 Night Mode ...41 Using the Video setup menu 42~46 TV Type...42 Setting the TV Display ...42 Progressive ...43 Picture Setting...43~44 Closed Captions ...44 HD JPEG ...45 HDMI Video Setup...45~46 Using the Preference setup menu 47~49 Subtitle / Audio / Disc Menu...
... Locking / Unlocking the disc for viewing ...37 OSD Language...37 Sleep ...38 Lip Sync ...38 DivX® VOD Registration Code...38 Using the Audio setup menu 39~41 Analog Output ...39 Digital Audio Setup...39~40 HDMI Audio Setup ...40 Sound Mode ...41 CD Upsampling...41 Night Mode ...41 Using the Video setup menu 42~46 TV Type...42 Setting the TV Display ...42 Progressive ...43 Picture Setting...43~44 Closed Captions ...44 HD JPEG ...45 HDMI Video Setup...45~46 Using the Preference setup menu 47~49 Subtitle / Audio / Disc Menu...
User manual
Page 16
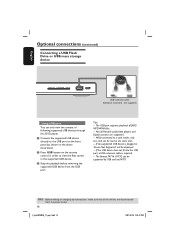
...all Portable audio/video players and Digital cameras are disconnected from the USB port. English Optional connections (continued) Connecting a USB Flash Drive or USB mass storage device USB extension cable (Optional accessory - B Press USB button on the above illustration). If the USB device does not fit into the USB port, a USB extension cable is plugged in the supported USB device. If non-supported USB device is required. - While connected to view the files stored in , 'Device Not Supported' will be displayed. - C Stop the playback before removing the supported USB...
...all Portable audio/video players and Digital cameras are disconnected from the USB port. English Optional connections (continued) Connecting a USB Flash Drive or USB mass storage device USB extension cable (Optional accessory - B Press USB button on the above illustration). If the USB device does not fit into the USB port, a USB extension cable is plugged in the supported USB device. If non-supported USB device is required. - While connected to view the files stored in , 'Device Not Supported' will be displayed. - C Stop the playback before removing the supported USB...
User manual
Page 18
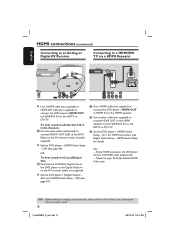
... receiver (cable not supplied). Set the DVD player's {HDMI Audio Setup - Set the DVD player's {Digital Output - Tips: - Proceed to page 45-46 for detail). To hear sound via Audio Out L/R or multi-channels, A Use the audio cables (white/red) to connect AUDIO OUT (L/R) of the HDMI repeater to HDMI IN on the HDTV or DVI TV. Off} (see page 40). Off} (see page 40). On } for HDMI connection (see Digital Audio Setup - During HDMI connection, the DVD player will turn into HDMI mode automatically. - A Use a HDMI cable (not supplied) to connect...
... receiver (cable not supplied). Set the DVD player's {HDMI Audio Setup - Set the DVD player's {Digital Output - Tips: - Proceed to page 45-46 for detail). To hear sound via Audio Out L/R or multi-channels, A Use the audio cables (white/red) to connect AUDIO OUT (L/R) of the HDMI repeater to HDMI IN on the HDTV or DVI TV. Off} (see page 40). Off} (see page 40). On } for HDMI connection (see Digital Audio Setup - During HDMI connection, the DVD player will turn into HDMI mode automatically. - A Use a HDMI cable (not supplied) to connect...
User manual
Page 19
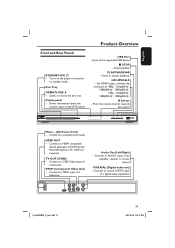
... the DVD player. Point the remote control towards this sensor Mains ~ (AC Power Cord) - Turns on the player or switches to '480p', '720p(60Hz)', '1080i(60Hz)', '1080p(60Hz)', '576p', '720p(50Hz)', '1080i(50Hz)', '1080p(50Hz)'. Set HDMI output, switches the resolution to standby mode Disc Tray OPEN/CLOSE ç - Connect to YPbPr input of a digital audio equipment TV OUT DIGITAL OUT HDMI OUT COMPONENT VIDEO OUT COAXIAL AUDIO OUT 1_dvp5982MKII_37_eng 2.indd 19 19 2007-08-20 5:02:53 PM Stops playback PLAY...
... the DVD player. Point the remote control towards this sensor Mains ~ (AC Power Cord) - Turns on the player or switches to '480p', '720p(60Hz)', '1080i(60Hz)', '1080p(60Hz)', '576p', '720p(50Hz)', '1080i(50Hz)', '1080p(50Hz)'. Set HDMI output, switches the resolution to standby mode Disc Tray OPEN/CLOSE ç - Connect to YPbPr input of a digital audio equipment TV OUT DIGITAL OUT HDMI OUT COMPONENT VIDEO OUT COAXIAL AUDIO OUT 1_dvp5982MKII_37_eng 2.indd 19 19 2007-08-20 5:02:53 PM Stops playback PLAY...
User manual
Page 20
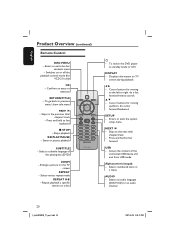
... W X - Selects a subtitle language of the connected USB device and exit from USB mode Alphanumeric keypad - To switch the DVD player to the next title/ chapter/track - S T - Skips to fast backward STOP - Access the content of the playing disc (DVD) ZOOM - Press and hold to fast forward USB - Enlarge a picture on a disc 2 - Repeat playback a specific section on the TV screen REPEAT - Stops playback u PLAY/PAUSE - Starts or pauses playback SUBTITLE - Enters or exits the system setup menu NEXT ë - English Product Overview (continued) Remote Control DISC MENU - To...
... W X - Selects a subtitle language of the connected USB device and exit from USB mode Alphanumeric keypad - To switch the DVD player to the next title/ chapter/track - S T - Skips to fast backward STOP - Access the content of the playing disc (DVD) ZOOM - Press and hold to fast forward USB - Enlarge a picture on a disc 2 - Repeat playback a specific section on the TV screen REPEAT - Stops playback u PLAY/PAUSE - Starts or pauses playback SUBTITLE - Enters or exits the system setup menu NEXT ë - English Product Overview (continued) Remote Control DISC MENU - To...
User manual
Page 22
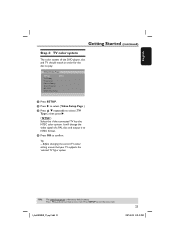
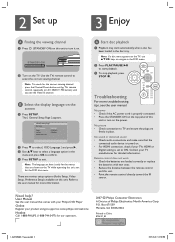
... setup is the factory default setting. OR A Press OPEN/CLOSE ç on the DVD player. Ensure that you have completed the basic installation and setup. C Select the correct video-in the progressive scan mode. The DVD background menu appears. IF PICTURE IS GOOD, PRESS OK BUTTON ON REMOTE. Press W to go back to select { Video Setup Page }. English Getting Started (continued) Step 3: Setting up Progressive Scan feature (for Progressive Scan TV only) The progressive scan displays twice the number of lines, progressive scan offers higher picture resolution...
... setup is the factory default setting. OR A Press OPEN/CLOSE ç on the DVD player. Ensure that you have completed the basic installation and setup. C Select the correct video-in the progressive scan mode. The DVD background menu appears. IF PICTURE IS GOOD, PRESS OK BUTTON ON REMOTE. Press W to go back to select { Video Setup Page }. English Getting Started (continued) Step 3: Setting up Progressive Scan feature (for Progressive Scan TV only) The progressive scan displays twice the number of lines, progressive scan offers higher picture resolution...
User manual
Page 23
... TV Type NTSC TV Display Progressive Picture Setting Closed Caption HD JPEG HDMI Video Setup A Press SETUP. C Press S T repeatedly to exit the menu item. 1_dvp5982MKII_37_eng 2.indd 23 23 2007-08-20 5:02:55 PM Before changing the current TV colour setting, ensure that your TV supports the 'selected TV Type' system. TIPS: The underlined option is the factory default setting. English Getting Started (continued) Step 4: TV color system The color system of a PAL disc and output...
... TV Type NTSC TV Display Progressive Picture Setting Closed Caption HD JPEG HDMI Video Setup A Press SETUP. C Press S T repeatedly to exit the menu item. 1_dvp5982MKII_37_eng 2.indd 23 23 2007-08-20 5:02:55 PM Before changing the current TV colour setting, ensure that your TV supports the 'selected TV Type' system. TIPS: The underlined option is the factory default setting. English Getting Started (continued) Step 4: TV color system The color system of a PAL disc and output...
User manual
Page 24
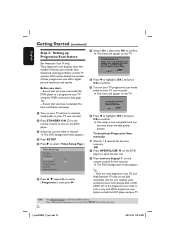
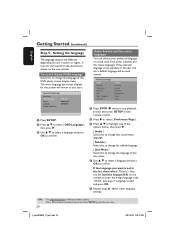
... stop playback, (if any), then press SETUP on your preferred language or sound track from audio, subtitles and disc menu languages. D for the system will be used instead. General Setup Page Disc Lock OSD Language ENGLISH Sleep FRANÇAIS Ḥ Lip Sync DivX(r) VOD Code A Press SETUP. Preference Page Audio Subtitle Disc Menu Parental PBC Mp3 / Jpeg Nav Password English Chinese French Spanish Portuguess Polish Italian A Press STOP Ç twice to change the subtitle language. { Disc Menu } Select this DVD player screen display menu. If the language you set...
... stop playback, (if any), then press SETUP on your preferred language or sound track from audio, subtitles and disc menu languages. D for the system will be used instead. General Setup Page Disc Lock OSD Language ENGLISH Sleep FRANÇAIS Ḥ Lip Sync DivX(r) VOD Code A Press SETUP. Preference Page Audio Subtitle Disc Menu Parental PBC Mp3 / Jpeg Nav Password English Chinese French Spanish Portuguess Polish Italian A Press STOP Ç twice to change the subtitle language. { Disc Menu } Select this DVD player screen display menu. If the language you set...

User manual
Page 26
... Disc Menu'. The playback skips to pause playback and display a still picture. C Press OPEN/CLOSE ç on Remote Control use. For double-sided discs, load the side which you do not press any buttons for about 15 minutes after the disc has stopped playing. E Playback may start automatically if the disc playback is stopped/paused for about 5 minutes. - If a disc menu appears on the DVD player. Do not close the disc tray. Pausing playback A During playback, press PLAY/PAUSE u to the selected...
... Disc Menu'. The playback skips to pause playback and display a still picture. C Press OPEN/CLOSE ç on Remote Control use. For double-sided discs, load the side which you do not press any buttons for about 15 minutes after the disc has stopped playing. E Playback may start automatically if the disc playback is stopped/paused for about 5 minutes. - If a disc menu appears on the DVD player. Do not close the disc tray. Pausing playback A During playback, press PLAY/PAUSE u to the selected...
User manual
Page 37
.... D Use S T to select a setting and press OK to select { General Setup Page }. The default password is the factory default setting. For details, see page 49 'Changing the password'). { Unlock } Select this to previous menu item. Using the General setup menu A Press SETUP on the screen. Example: { OSD Language } The options for the language displayed on the remote control. General Setup Page Disc Lock OSD Language Sleep Lip Sync DivX(r) VOD Code B Press W X to confirm. A In 'General Setup Page', press S T to select { Disc Lock }, then press X. { Lock } Select...
.... D Use S T to select a setting and press OK to select { General Setup Page }. The default password is the factory default setting. For details, see page 49 'Changing the password'). { Unlock } Select this to previous menu item. Using the General setup menu A Press SETUP on the screen. Example: { OSD Language } The options for the language displayed on the remote control. General Setup Page Disc Lock OSD Language Sleep Lip Sync DivX(r) VOD Code B Press W X to confirm. A In 'General Setup Page', press S T to select { Disc Lock }, then press X. { Lock } Select...

User manual
Page 46
..., the picture will be available when a HDMI cable is connected and the DVD player will be chosen, including the resolution that are not supported by the TV. The menu will not be in HDMI mode. - OR A Press OPEN/CLOSE ç on the TV screen due to unsupported resolution, reconnect any available video output to open the disc tray. When changing the resolution of a 4:3 video picture will turn to HDMI mode automatically. - {HD JPEG} and {HDMI Video Setup} are not supported by...
..., the picture will be available when a HDMI cable is connected and the DVD player will be chosen, including the resolution that are not supported by the TV. The menu will not be in HDMI mode. - OR A Press OPEN/CLOSE ç on the TV screen due to unsupported resolution, reconnect any available video output to open the disc tray. When changing the resolution of a 4:3 video picture will turn to HDMI mode automatically. - {HD JPEG} and {HDMI Video Setup} are not supported by...

User manual
Page 49
The same default password is the factory default setting. When doing this unit. D Enter the new six-digit password. Setting the DivX® subtitle font You can set the font type that supports the recorded DivX® subtitle. All settings will reset all options and your personal settings to the factory defaults, except your Parental and Disc Lock. Press SETUP to select { Change }. A In 'Preference Page', press S T to select { Password }, then press X to exit the menu item. 1_dvp5982MKII_37_eng 2.indd 49 49...
The same default password is the factory default setting. When doing this unit. D Enter the new six-digit password. Setting the DivX® subtitle font You can set the font type that supports the recorded DivX® subtitle. All settings will reset all options and your personal settings to the factory defaults, except your Parental and Disc Lock. Press SETUP to select { Change }. A In 'Preference Page', press S T to select { Password }, then press X to exit the menu item. 1_dvp5982MKII_37_eng 2.indd 49 49...
User manual
Page 52
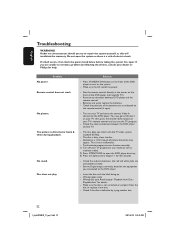
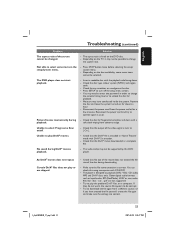
No sound. Set the Digital output correctly, based on your TV progressive scan mode (or set to the correct Video In channel for the DVD player. Read chapter "Playback from Disc - Check if the disc is not scratched or warped. Problem Remote control does not work. Disc does not play. Press STANDBY-ON button on the front of the DVD player to turn on the front of electric shock. Batteries are connected correctly. - The disc does not match with the label...
No sound. Set the Digital output correctly, based on your TV progressive scan mode (or set to the correct Video In channel for the DVD player. Read chapter "Playback from Disc - Check if the disc is not scratched or warped. Problem Remote control does not work. Disc does not play. Press STANDBY-ON button on the front of the DVD player to turn on the front of electric shock. Batteries are connected correctly. - The disc does not match with the label...
User manual
Page 53
... DVD player does not start playback. - Disconnect the power cord from center to play DivX® movies. - Remove the disc and leave the system turned on a computer. Check that file size of the movie does not exceed the file size of the video signal is fixed on the disc. - No sound during - Press STOP button twice before selecting the setup/ system menu. - Check that the output of the disc during downloading. - Try to edge. Other digital audio formats...
... DVD player does not start playback. - Disconnect the power cord from center to play DivX® movies. - Remove the disc and leave the system turned on a computer. Check that file size of the movie does not exceed the file size of the video signal is fixed on the disc. - No sound during - Press STOP button twice before selecting the setup/ system menu. - Check that the output of the disc during downloading. - Try to edge. Other digital audio formats...
User manual
Page 56
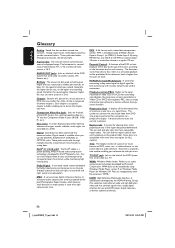
... use the DIGITAL AUDIO OUT COAXIAL or OPTICAL jacks. Or, the speed at one CD-R or CD-RW can . Component Video Out Jacks: Jacks on a DVD. Disc menu: A screen display prepared for converting analog sound signal to be played back only in each country. when it is available when you record. PCM (Pulse Code Modulation): A system for allowing selection of images, sounds, subtitles, multi-angles, etc recorded on the back of a picture...
... use the DIGITAL AUDIO OUT COAXIAL or OPTICAL jacks. Or, the speed at one CD-R or CD-RW can . Component Video Out Jacks: Jacks on a DVD. Disc menu: A screen display prepared for converting analog sound signal to be played back only in each country. when it is available when you record. PCM (Pulse Code Modulation): A system for allowing selection of images, sounds, subtitles, multi-angles, etc recorded on the back of a picture...
Quick start guide
Page 2
... Corp P.O. Need help? User Manual See the user manual that are loaded correctly or replace the batteries with your Philips DVD Player Online Register your TV manufacturer for the menus that cames with new ones. • Reduce the distance between the remote control and this unit. • Point the remote control directly toward the IR sensor. General Setup Page Disc Lock OSD Language ENGLISH Sleep FRANÇAIS Ḥ Lip Sync DivX(r) VOD Code B Press...
... Corp P.O. Need help? User Manual See the user manual that are loaded correctly or replace the batteries with your Philips DVD Player Online Register your TV manufacturer for the menus that cames with new ones. • Reduce the distance between the remote control and this unit. • Point the remote control directly toward the IR sensor. General Setup Page Disc Lock OSD Language ENGLISH Sleep FRANÇAIS Ḥ Lip Sync DivX(r) VOD Code B Press...


