Quick start guide
Page 2
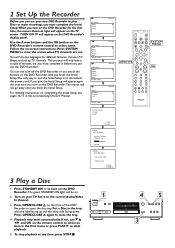
... turn on -screen instructions. If you quit, the Initial Setup will appear again the next time you turn off the DVD Recorder or use any time, press STOP C. 1 DVDR985 DVD RECORDER 45 RECORD 3 search complete 024 Channels found Please wait Installation Auto Ch. Press STANDBY-ON y to open the disc tray. Programming Auto ch...
... turn on -screen instructions. If you quit, the Initial Setup will appear again the next time you turn off the DVD Recorder or use any time, press STOP C. 1 DVDR985 DVD RECORDER 45 RECORD 3 search complete 024 Channels found Please wait Installation Auto Ch. Press STANDBY-ON y to open the disc tray. Programming Auto ch...

Quick start guide
Page 3
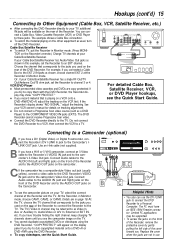
... IN jacks LEFT AUDIO IN VIDEO IN EXT 2 EXT 3 COMPONENT VIDEO Y Y PB PB PR PR EXT 1 PROG SCAN Y L PB EXT 3 L L PR R R R EXT 1/2 REAR OF DVD RECORDER DVDR985 DVD RECORDER RECORD S-VIDEO VIDEO L AUDIO R DV Audio and Video cables to the VCR's AUDIO and VIDEO OUT jacks and to the DVD... Recorder's AUDIO and VIDEO IN jacks (You can record TV programming onto a DVDR985 DVD+RW or DVD+R. Press CH+/- Connect the DVD Recorder and TV as shown at the end of the Disc. 3. Connect the power cords of...
... IN jacks LEFT AUDIO IN VIDEO IN EXT 2 EXT 3 COMPONENT VIDEO Y Y PB PB PR PR EXT 1 PROG SCAN Y L PB EXT 3 L L PR R R R EXT 1/2 REAR OF DVD RECORDER DVDR985 DVD RECORDER RECORD S-VIDEO VIDEO L AUDIO R DV Audio and Video cables to the VCR's AUDIO and VIDEO OUT jacks and to the DVD... Recorder's AUDIO and VIDEO IN jacks (You can record TV programming onto a DVDR985 DVD+RW or DVD+R. Press CH+/- Connect the DVD Recorder and TV as shown at the end of the Disc. 3. Connect the power cords of...

User manual
Page 1
Digital Video Disc Recorder Owner's Manual ® DVDR985 Important! We've included everything you for making Philips a part of your home! Read this product to the store. Do not attempt to get the most from your Warranty Registration Card within 10 ... by explaining: • Hookups, • First Time Setup, and • Feature Operation. Congratulations on purchasing this Philips product. For fast help you get started. See why inside. If you have any problems, Philips Representatives can help , call us first! 1-800-531-0039 Thank you need to return this manual first!
Digital Video Disc Recorder Owner's Manual ® DVDR985 Important! We've included everything you for making Philips a part of your home! Read this product to the store. Do not attempt to get the most from your Warranty Registration Card within 10 ... by explaining: • Hookups, • First Time Setup, and • Feature Operation. Congratulations on purchasing this Philips product. For fast help you get started. See why inside. If you have any problems, Philips Representatives can help , call us first! 1-800-531-0039 Thank you need to return this manual first!
User manual
Page 15
... the TV. Use an i-link cable (not supplied). S-VIDEO VIDEO L AUDIO R DV B If you have a Hi-8 or S-VHS camcorder, connect an S-Video cable to the Recorder's S-VIDEO IN jack and to the camcorder's S-Video Out jack. Connect Audio cables to the AUDIO IN (Left and Right) jacks on the front of... 1/2 VIDEO OUT RIGHT AUDIO OUT LEFT AUDIO OUT 24 For detailed Cable Box, Satellite Receiver, VCR, or DVD Player hookups, see the Quick Start Guide. DVDR985 DVD RECORDER RECORD LINK OUT jack. Connect Audio cables to dub copyrighted material onto a DVD+R or DVD+RW using the DVD...
... the TV. Use an i-link cable (not supplied). S-VIDEO VIDEO L AUDIO R DV B If you have a Hi-8 or S-VHS camcorder, connect an S-Video cable to the Recorder's S-VIDEO IN jack and to the camcorder's S-Video Out jack. Connect Audio cables to the AUDIO IN (Left and Right) jacks on the front of... 1/2 VIDEO OUT RIGHT AUDIO OUT LEFT AUDIO OUT 24 For detailed Cable Box, Satellite Receiver, VCR, or DVD Player hookups, see the Quick Start Guide. DVDR985 DVD RECORDER RECORD LINK OUT jack. Connect Audio cables to dub copyrighted material onto a DVD+R or DVD+RW using the DVD...

User manual
Page 18
...Resume : will resume at which you can turn on pages 20-27, see the blue Philips DVD background picture on the front of the Disc. However, you last stopped it On or Off. The Recorder's region code is On, play , then press OK. If the Title or Chapter selections... code. Load your TV. Or, follow the on-screen instructions as described on the DVD Recorder. If the Disc is On. 18 Quick Disc Playback DVD+RW DVD+R DVD AUDIO CD VIDEO CD DVDR985 DVD RECORDER RECORD 1 2,3 There are many playback features and options available on pages 9-14. After familiarizing yourself...
...Resume : will resume at which you can turn on pages 20-27, see the blue Philips DVD background picture on the front of the Disc. However, you last stopped it On or Off. The Recorder's region code is On, play , then press OK. If the Title or Chapter selections... code. Load your TV. Or, follow the on-screen instructions as described on the DVD Recorder. If the Disc is On. 18 Quick Disc Playback DVD+RW DVD+R DVD AUDIO CD VIDEO CD DVDR985 DVD RECORDER RECORD 1 2,3 There are many playback features and options available on pages 9-14. After familiarizing yourself...

User manual
Page 19
...seconds to select an empty Title box on the display panel. POWER ON/OFF 3 Press 9 to open the disc tray. RECORD will take a minute. More recording options are on the remote control. 7 Press STOP C to the S-VIDEO CAM1 jack on a new DVD+RW, formatting ...DVD+R on the display panel. On a brief recording on the front of the DVD Recorder to choose CAM1. You cannot record one channel while watching a different TV channel. DVD+RW DVD+R DVDR985 DVD RECORDER RECORD Quick Recording 19 1,2 The DVD Recorder can not overwrite recordings on page 27. to open or close the disc...
...seconds to select an empty Title box on the display panel. POWER ON/OFF 3 Press 9 to open the disc tray. RECORD will take a minute. More recording options are on the remote control. 7 Press STOP C to the S-VIDEO CAM1 jack on a new DVD+RW, formatting ...DVD+R on the display panel. On a brief recording on the front of the DVD Recorder to choose CAM1. You cannot record one channel while watching a different TV channel. DVD+RW DVD+R DVDR985 DVD RECORDER RECORD Quick Recording 19 1,2 The DVD Recorder can not overwrite recordings on page 27. to open or close the disc...
User manual
Page 22
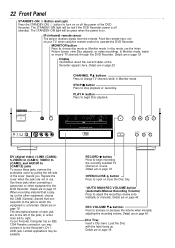
... a Disc here. Details are on page 19. The STANDBY-ON light will be available. MONITOR button Press to adjust the recording volume automatically or manually. Details are on page 45. DVDR985 DVD RECORDER RECORD S-VIDEO VIDEO L AUDIO R DV DV (digital video) i-LINK (CAM3); Replace the cover when the jacks are on page 19. In...
... a Disc here. Details are on page 19. The STANDBY-ON light will be available. MONITOR button Press to adjust the recording volume automatically or manually. Details are on page 45. DVDR985 DVD RECORDER RECORD S-VIDEO VIDEO L AUDIO R DV DV (digital video) i-LINK (CAM3); Replace the cover when the jacks are on page 19. In...

User manual
Page 45
...you want to add a recording. 2 Press PLAY :. 3 When you reach the point at which always record at the end of the Recorder. Manual Recording Volume, Append Recording 45 DVD+RW DVD+R Manual Recording Volume DVDR985 You can not adjust the volume manually when recording from the display. This feature...Link jack on DVD+Rs, which you selected and overwrite the video material beyond this point, including later Titles. 6 Press STOP C to stop recording. 4 MONITOR 5 ON/OFF PREVIOUS REC/OTR NEXT REVERSE PAUSE SLOW FORWARD 2 STOP FSS PLAY 6 3 1 CLEAR VOL TIMER SELECT CH MUTE...
...you want to add a recording. 2 Press PLAY :. 3 When you reach the point at which always record at the end of the Recorder. Manual Recording Volume, Append Recording 45 DVD+RW DVD+R Manual Recording Volume DVDR985 You can not adjust the volume manually when recording from the display. This feature...Link jack on DVD+Rs, which you selected and overwrite the video material beyond this point, including later Titles. 6 Press STOP C to stop recording. 4 MONITOR 5 ON/OFF PREVIOUS REC/OTR NEXT REVERSE PAUSE SLOW FORWARD 2 STOP FSS PLAY 6 3 1 CLEAR VOL TIMER SELECT CH MUTE...


