Quick start guide
Page 2
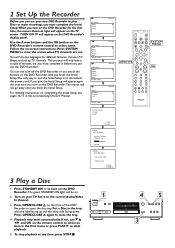
Use the Arrow buttons and the OK button on completing the Initial Setup, see pages 16-17 in the accompanying Owner's Manual. ~ Menu Language English Español Français Press OK to continue ~ Audio Language English Español Français Português Italiano ... Setup.The only way to quit the Initial Setup is to open the disc tray. Set it before you can use any time, press STOP C. 1 DVDR985 DVD RECORDER 45 RECORD 3 Playback may start playback. 5. TURN ON TV will only take a couple of the buttons on the TV screen. search complete 024...
Use the Arrow buttons and the OK button on completing the Initial Setup, see pages 16-17 in the accompanying Owner's Manual. ~ Menu Language English Español Français Press OK to continue ~ Audio Language English Español Français Português Italiano ... Setup.The only way to quit the Initial Setup is to open the disc tray. Set it before you can use any time, press STOP C. 1 DVDR985 DVD RECORDER 45 RECORD 3 Playback may start playback. 5. TURN ON TV will only take a couple of the buttons on the TV screen. search complete 024...

Quick start guide
Page 3
... IN VIDEO IN EXT 2 EXT 3 COMPONENT VIDEO Y Y PB PB PR PR EXT 1 PROG SCAN Y L PB EXT 3 L L PR R R R EXT 1/2 REAR OF DVD RECORDER DVDR985 DVD RECORDER RECORD S-VIDEO VIDEO L AUDIO R DV Audio and Video cables to the VCR's AUDIO and VIDEO OUT jacks and to select the channel you... .) 3. See the Owner's Manual for recording details. 1. On a DVD+R, the DVD Recorder automatically starts recording at the end of the Disc automatically. 7. or the Number buttons to the...
... IN VIDEO IN EXT 2 EXT 3 COMPONENT VIDEO Y Y PB PB PR PR EXT 1 PROG SCAN Y L PB EXT 3 L L PR R R R EXT 1/2 REAR OF DVD RECORDER DVDR985 DVD RECORDER RECORD S-VIDEO VIDEO L AUDIO R DV Audio and Video cables to the VCR's AUDIO and VIDEO OUT jacks and to select the channel you... .) 3. See the Owner's Manual for recording details. 1. On a DVD+R, the DVD Recorder automatically starts recording at the end of the Disc automatically. 7. or the Number buttons to the...

User manual
Page 1
Congratulations on purchasing this manual first! Read this Philips product. If you have any problems, Philips Representatives can help , call us first! 1-800-531-0039 Thank you for making Philips a part of your Warranty Registration Card within 10 days. Return your home! Do not attempt to return this product to get the most from your...; Feature Operation. See why inside. We've included everything you get started. For fast help you need to the store. Digital Video Disc Recorder Owner's Manual ® DVDR985 Important!
Congratulations on purchasing this manual first! Read this Philips product. If you have any problems, Philips Representatives can help , call us first! 1-800-531-0039 Thank you for making Philips a part of your Warranty Registration Card within 10 days. Return your home! Do not attempt to return this product to get the most from your...; Feature Operation. See why inside. We've included everything you get started. For fast help you need to the store. Digital Video Disc Recorder Owner's Manual ® DVDR985 Important!
User manual
Page 15
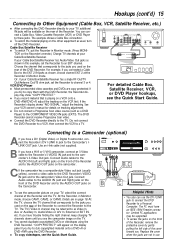
.... Replace the cover when the jacks are not in this example, set the Recorder to the camcorder's S-Video Out jack. Or, if your VCR owner's manual for details on the front of the DVD Recorder. Connecting to an EXT channel. If you have trouble finding the right channel, keep changing TV...Monitor mode, choose CAM1, CAM2, or CAM3. Connect Audio cables to the jacks you . q If you connected a Cable Box to the camcorder's Video Out jack. DVDR985 DVD RECORDER RECORD LINK OUT jack. If the Recorder's display shows "NO SIGNAL," adjust the tracking. You can use .
.... Replace the cover when the jacks are not in this example, set the Recorder to the camcorder's S-Video Out jack. Or, if your VCR owner's manual for details on the front of the DVD Recorder. Connecting to an EXT channel. If you have trouble finding the right channel, keep changing TV...Monitor mode, choose CAM1, CAM2, or CAM3. Connect Audio cables to the jacks you . q If you connected a Cable Box to the camcorder's Video Out jack. DVDR985 DVD RECORDER RECORD LINK OUT jack. If the Recorder's display shows "NO SIGNAL," adjust the tracking. You can use .
User manual
Page 22
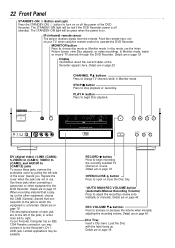
...19. OPEN/CLOSE A button Press to open or close the Disc tray. *AUTO MAN REC VOLUME button (Automatic/Manual Recording Volume) Press to increase or decrease the volume when manually adjusting the recording volume. REC VOLUME 98 buttons Press to adjust the recording volume automatically or...on page 19. IR (infrared) remote sensor The sensor receives signals from left of the Recorder appears here. PLAY : button Press to right. DVDR985 DVD RECORDER RECORD S-VIDEO VIDEO L AUDIO R DV DV (digital video) i-LINK (CAM3); Details are on . MONITOR button Press to begin Disc...
...19. OPEN/CLOSE A button Press to open or close the Disc tray. *AUTO MAN REC VOLUME button (Automatic/Manual Recording Volume) Press to increase or decrease the volume when manually adjusting the recording volume. REC VOLUME 98 buttons Press to adjust the recording volume automatically or...on page 19. IR (infrared) remote sensor The sensor receives signals from left of the Recorder appears here. PLAY : button Press to right. DVDR985 DVD RECORDER RECORD S-VIDEO VIDEO L AUDIO R DV DV (digital video) i-LINK (CAM3); Details are on . MONITOR button Press to begin Disc...

User manual
Page 45
... Volume, Append Recording 45 DVD+RW DVD+R Manual Recording Volume DVDR985 You can not adjust the volume manually when recording from the display. The new recording will start the new recording, press PAUSE k. 4 Press MONITOR, then press CH+/- DVD+RW Append recording To ... the DV i-Link jack on the front of the Recorder. The display will disappear 1,3 2 from equipment that is only effective when recording in Monitor mode. MANUAL appears on the display. 2 Press REC VOLUME 89 on the front of the DVD Recorder to adjust the volume level. 3 To return to stop recording...
... Volume, Append Recording 45 DVD+RW DVD+R Manual Recording Volume DVDR985 You can not adjust the volume manually when recording from the display. The new recording will start the new recording, press PAUSE k. 4 Press MONITOR, then press CH+/- DVD+RW Append recording To ... the DV i-Link jack on the front of the Recorder. The display will disappear 1,3 2 from equipment that is only effective when recording in Monitor mode. MANUAL appears on the display. 2 Press REC VOLUME 89 on the front of the DVD Recorder to adjust the volume level. 3 To return to stop recording...

