Leaflet
Page 2
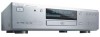
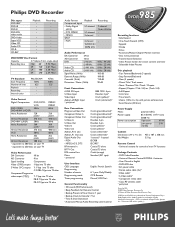
... of events Programming mode Timer programming English, French, Spanish 6; 1 year; Philips DVD Recorder Disc types DVD+RW DVD+R DVD-R DVD-RW, video mode DVD-Video Super VCD Video CD Audio CD CD-R CD-RW Playback Recording • • - - Daily/Weekly OTR, Remote Manual,VCR Plus+ General Functionality • 3D sound (SRS TruSurround) • Beep Feedback for Remote Control • Backup Presets & Timer Events: 1 year • Backup Clock & Calendar: 7 hrs • Time & Date Download • Automatic/Manual Audio Recording Level Control 985 DDVVDDRR Recording functions...
... of events Programming mode Timer programming English, French, Spanish 6; 1 year; Philips DVD Recorder Disc types DVD+RW DVD+R DVD-R DVD-RW, video mode DVD-Video Super VCD Video CD Audio CD CD-R CD-RW Playback Recording • • - - Daily/Weekly OTR, Remote Manual,VCR Plus+ General Functionality • 3D sound (SRS TruSurround) • Beep Feedback for Remote Control • Backup Presets & Timer Events: 1 year • Backup Clock & Calendar: 7 hrs • Time & Date Download • Automatic/Manual Audio Recording Level Control 985 DDVVDDRR Recording functions...
Quick start guide
Page 1
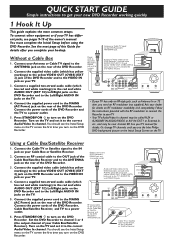
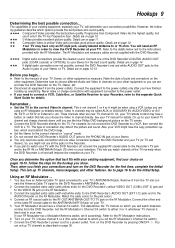
... correct Audio/Video In channel. Turn on the TV and set it to turn on the DVD Recorder. Set the DVD Recorder to the ANTENNA jack on the DVD Recorder. ent jacks, see the blue Philips DVD background picture or the Initial Setup Screen on the rear of the owner's manual. Connect your new DVD Recorder working quickly 1 Hook It Up This guide explains the most common setups. Or, change TV channels until you need an RF modulator (not supplied). Power cord to...
... correct Audio/Video In channel. Turn on the TV and set it to turn on the DVD Recorder. Set the DVD Recorder to the ANTENNA jack on the DVD Recorder. ent jacks, see the blue Philips DVD background picture or the Initial Setup Screen on the rear of the owner's manual. Connect your new DVD Recorder working quickly 1 Hook It Up This guide explains the most common setups. Or, change TV channels until you need an RF modulator (not supplied). Power cord to...
Quick start guide
Page 2
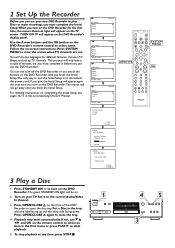
... ANGLE SUBTITLE AUDIO DIM REPEAT REPEAT SCAN If you can use the DVD Recorder. Put a Disc in the Disc menu or press PLAY : to open the disc tray. Use the Arrow buttons and the OK button on the DVD Recorder's remote control to select items. Follow the on the front of the buttons on the DVD Recorder. You can not turn off the DVD Recorder or use any time, press STOP C. 1 DVDR985 DVD RECORDER 45 RECORD 3 You will be on the DVD Recorder's display panel. Programming Auto ch. 2 Set Up the Recorder Before...
... ANGLE SUBTITLE AUDIO DIM REPEAT REPEAT SCAN If you can use the DVD Recorder. Put a Disc in the Disc menu or press PLAY : to open the disc tray. Use the Arrow buttons and the OK button on the DVD Recorder's remote control to select items. Follow the on the front of the buttons on the DVD Recorder. You can not turn off the DVD Recorder or use any time, press STOP C. 1 DVDR985 DVD RECORDER 45 RECORD 3 You will be on the DVD Recorder's display panel. Programming Auto ch. 2 Set Up the Recorder Before...

Quick start guide
Page 3
... DVD Recorder's display panel. 10.Press STOP C on the DVD Recorder to stop recording. Press OPEN/CLOSE A to select CAM2 at the end of the Disc. 3. On a DVD+R, the DVD Recorder automatically starts recording at the DVD Recorder. to open the disc tray. RECORD will flash briefly on the DVD Recorder's remote. Press CH+/- Insert a recordable DVD+RW or DVD+R with the label facing up. Connect audio cables to the VCR's AUDIO Out jacks and to a power outlet after a few seconds. RECORD will appear. 6. Set the TV to start tape playback. 9. Connect the power cords...
... DVD Recorder's display panel. 10.Press STOP C on the DVD Recorder to stop recording. Press OPEN/CLOSE A to select CAM2 at the end of the Disc. 3. On a DVD+R, the DVD Recorder automatically starts recording at the DVD Recorder. to open the disc tray. RECORD will flash briefly on the DVD Recorder's remote. Press CH+/- Insert a recordable DVD+RW or DVD+R with the label facing up. Connect audio cables to the VCR's AUDIO Out jacks and to a power outlet after a few seconds. RECORD will appear. 6. Set the TV to start tape playback. 9. Connect the power cords...
User manual
Page 3
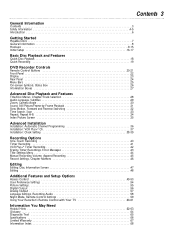
...DVD Recorder Controls Remote Control Buttons 20-21 Front Panel 22 Display 23 Rear Panel 24 Menu Bars 25 On-screen Symbols, Status Box 26 Information Boxes 27 Advanced Disc Playback and Features Title/Disc Menus, Chapter/Track Selection 28 Audio Language, Subtitles 29 Zoom, Camera Angle 30 Sound, Still Picture/Frame-by-Frame Playback 31 Slow Motion, Forward and Reverse Searching 32 Time Search, Scan 33 Repeat, Repeat A-B 34 Index Picture Screen 35 Advanced Installation Installation: Automatic Channel Programming 36 Installation: VCR Plus+® Ch 37 Installation: Clock Setting...
...DVD Recorder Controls Remote Control Buttons 20-21 Front Panel 22 Display 23 Rear Panel 24 Menu Bars 25 On-screen Symbols, Status Box 26 Information Boxes 27 Advanced Disc Playback and Features Title/Disc Menus, Chapter/Track Selection 28 Audio Language, Subtitles 29 Zoom, Camera Angle 30 Sound, Still Picture/Frame-by-Frame Playback 31 Slow Motion, Forward and Reverse Searching 32 Time Search, Scan 33 Repeat, Repeat A-B 34 Index Picture Screen 35 Advanced Installation Installation: Automatic Channel Programming 36 Installation: VCR Plus+® Ch 37 Installation: Clock Setting...

User manual
Page 5
... a qualified technician to restore the product to the unit: • Install all the safety and operating instructions before cleaning. When installing an outside antenna or cable system is connected to your home, consult your obsolete outlet. Opening or removing covers may result in fire, electric shock, or other hazards. An improper adjustment of power supply to the product, be sure the antenna or...
... a qualified technician to restore the product to the unit: • Install all the safety and operating instructions before cleaning. When installing an outside antenna or cable system is connected to your home, consult your obsolete outlet. Opening or removing covers may result in fire, electric shock, or other hazards. An improper adjustment of power supply to the product, be sure the antenna or...
User manual
Page 6
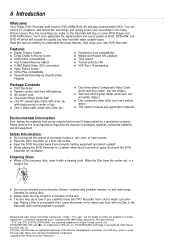
... move the DVD Recorder from Gemstar Development Corporation. Features q Digital Theater System q Dolby Digital Surround Sound q DVD-Video Compatibility q Fast Forward/Reverse Search q i.LINK Digital Video (DV) connection q Index Picture Screen q NTSC/PAL compatibility q Paused/Fast/Slow/Step-by-Step/Zoomed Playback q Progressive Scan compatibility q Repeat and Repeat A-B playback q Time Search q TruSurround by SRS q VCR Plus+ Programming Package Contents q DVD Recorder q Remote control with two AA batteries q AC power cord q One blank Philips DVD+RW q One RF coaxial cable (black with silver...
... move the DVD Recorder from Gemstar Development Corporation. Features q Digital Theater System q Dolby Digital Surround Sound q DVD-Video Compatibility q Fast Forward/Reverse Search q i.LINK Digital Video (DV) connection q Index Picture Screen q NTSC/PAL compatibility q Paused/Fast/Slow/Step-by-Step/Zoomed Playback q Progressive Scan compatibility q Repeat and Repeat A-B playback q Time Search q TruSurround by SRS q VCR Plus+ Programming Package Contents q DVD Recorder q Remote control with two AA batteries q AC power cord q One blank Philips DVD+RW q One RF coaxial cable (black with silver...
User manual
Page 9
... has Progressive Scan. See your TV manual for the first time, complete the Initial Setup. This type of connection may have finished hooking up everything. q You only need one audio connection and one of your Stereo for the best sound quality. q If you determine the option that lets you watch channels at the TV normally when the DVD Recorder is off , connect the supplied RF coaxial cable...
... has Progressive Scan. See your TV manual for the first time, complete the Initial Setup. This type of connection may have finished hooking up everything. q You only need one audio connection and one of your Stereo for the best sound quality. q If you determine the option that lets you watch channels at the TV normally when the DVD Recorder is off , connect the supplied RF coaxial cable...
User manual
Page 15
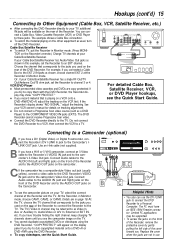
... "COPY PROTECT." Cable Box/Satellite Receiver q To watch the material playing on the camcorder. See your TV, select the correct channel at the Recorder in Monitor mode. (Press MONI- q Connect the DVD Recorder directly to the EXT 2 IN jacks as usual, turn off the DVD Recorder. Use an i-link cable (not supplied). q To copy videotapes, see the Quick Start Guide. Replace the cover when the jacks are copy protected. q If you connected a Cable Box to the TV. DV S-VIDEO VIDEO AUDIO LEFT...
... "COPY PROTECT." Cable Box/Satellite Receiver q To watch the material playing on the camcorder. See your TV, select the correct channel at the Recorder in Monitor mode. (Press MONI- q Connect the DVD Recorder directly to the EXT 2 IN jacks as usual, turn off the DVD Recorder. Use an i-link cable (not supplied). q To copy videotapes, see the Quick Start Guide. Replace the cover when the jacks are copy protected. q If you connected a Cable Box to the TV. DV S-VIDEO VIDEO AUDIO LEFT...

User manual
Page 18
... Philips DVD background picture on the TV screen (if no Disc is On. 18 Quick Disc Playback DVD+RW DVD+R DVD AUDIO CD VIDEO CD DVDR985 DVD RECORDER RECORD 1 2,3 There are on page seven. After familiarizing yourself with the label facing up . 5 MONITOR ON/OFF PREVIOUS REC/OTR NEXT REVERSE PAUSE SLOW FORWARD STOP FSS PLAY 4 4 4 CLEAR TIMER SELECT VOL CH MUTE POWER ON/OFF 3 Press OPEN/CLOSE A again to play will appear. Turn on your Disc...
... Philips DVD background picture on the TV screen (if no Disc is On. 18 Quick Disc Playback DVD+RW DVD+R DVD AUDIO CD VIDEO CD DVDR985 DVD RECORDER RECORD 1 2,3 There are on page seven. After familiarizing yourself with the label facing up . 5 MONITOR ON/OFF PREVIOUS REC/OTR NEXT REVERSE PAUSE SLOW FORWARD STOP FSS PLAY 4 4 4 CLEAR TIMER SELECT VOL CH MUTE POWER ON/OFF 3 Press OPEN/CLOSE A again to play will appear. Turn on your Disc...

User manual
Page 19
... DVD Recorder to select an Empty Title box. The Index Picture Screen will appear on the remote control. 7 Press STOP C to select the channel you finalize it. To edit your Cable Box/Satellite Receiver.) Then, change channels during recording. More recording options are using the Recorder. If the Disc is empty and has no recordings, "EMPTY DISC" will reappear after a few seconds. or the Number buttons to stop recording. You cannot change TV channels at step 4. Follow the steps on the Recorder's display panel. "COPY PROTECT...
... DVD Recorder to select an Empty Title box. The Index Picture Screen will appear on the remote control. 7 Press STOP C to select the channel you finalize it. To edit your Cable Box/Satellite Receiver.) Then, change channels during recording. More recording options are using the Recorder. If the Disc is empty and has no recordings, "EMPTY DISC" will reappear after a few seconds. or the Number buttons to stop recording. You cannot change TV channels at step 4. Follow the steps on the Recorder's display panel. "COPY PROTECT...
User manual
Page 20
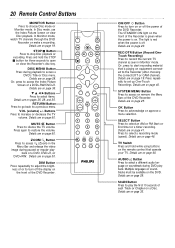
... FORWARD STOP FSS PLAY CLEAR VOL TIMER SELECT CH MUTE T/C A/CH ZOOM ANGLE SUBTITLE AUDIO DIM REPEAT REPEAT SCAN ON/OFF y Button Press to access a DVD's Title or Disc menu. Details are on page 41. Details are on page 46. AUDIO Y Button Press to select a different audio language or soundtrack during playback to turn off the power of the DVD Recorder. Details are on page 19. VOL (volume) +/- ZOOM a Button Press to record the current TV channel...
... FORWARD STOP FSS PLAY CLEAR VOL TIMER SELECT CH MUTE T/C A/CH ZOOM ANGLE SUBTITLE AUDIO DIM REPEAT REPEAT SCAN ON/OFF y Button Press to access a DVD's Title or Disc menu. Details are on page 41. Details are on page 46. AUDIO Y Button Press to select a different audio language or soundtrack during playback to turn off the power of the DVD Recorder. Details are on page 19. VOL (volume) +/- ZOOM a Button Press to record the current TV channel...
User manual
Page 25
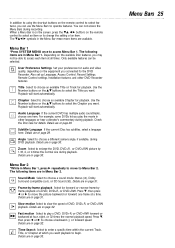
... using the shortcut buttons on the remote control to slow the speed of DVD, DVD+R, or DVD+RW playback. For example, some DVDs let you want playback to change the setting of an item. Press 9, then press ; You can be able to choose an available Title or Track for audio and video quality, depending on the equipment you want . a Zoom Select to play the movie in Menu Bar 1. Menu Bars 25 Check...
... using the shortcut buttons on the remote control to slow the speed of DVD, DVD+R, or DVD+RW playback. For example, some DVDs let you want playback to change the setting of an item. Press 9, then press ; You can be able to choose an available Title or Track for audio and video quality, depending on the equipment you want . a Zoom Select to play the movie in Menu Bar 1. Menu Bars 25 Check...

User manual
Page 34
... appear briefly on the type of a Title, Chapter, or Track repeatedly. Depending on the TV screen. ed playback to start Disc playback. 2 When the Disc reaches the point at which you want repeat- CLEAR VOL TIMER SELECT CH MUTE T/C 1,2A/CH ZOOM ANGLE SUBTITLE AUDIO DIM REPEAT REPEAT SCAN DVD+RW DVD+R DVD VIDEO CD AUDIO CD Repeat A-B You also may choose to play only a specific portion of Disc, you may set the DVD Recorder to choose a Repeat option. Details are on...
... appear briefly on the type of a Title, Chapter, or Track repeatedly. Depending on the TV screen. ed playback to start Disc playback. 2 When the Disc reaches the point at which you want repeat- CLEAR VOL TIMER SELECT CH MUTE T/C 1,2A/CH ZOOM ANGLE SUBTITLE AUDIO DIM REPEAT REPEAT SCAN DVD+RW DVD+R DVD VIDEO CD AUDIO CD Repeat A-B You also may choose to play only a specific portion of Disc, you may set the DVD Recorder to choose a Repeat option. Details are on...

User manual
Page 40
... recording. A power failure or unit failure/system crash also may be accessible when you play a DVD+R on another DVD Player, finalize the Disc. You can only record the channel you may cause unstable recording results. Recording will appear. Details are watching. Press REC/OTR repeatedly to record longer timed recordings, up to four hours long in Monitor mode. (Choose the output channel of your Cable Box/Satellite Receiver.) If your Cable Box/Satellite Receiver has Audio/Video...
... recording. A power failure or unit failure/system crash also may be accessible when you play a DVD+R on another DVD Player, finalize the Disc. You can only record the channel you may cause unstable recording results. Recording will appear. Details are watching. Press REC/OTR repeatedly to record longer timed recordings, up to four hours long in Monitor mode. (Choose the output channel of your Cable Box/Satellite Receiver.) If your Cable Box/Satellite Receiver has Audio/Video...
User manual
Page 54
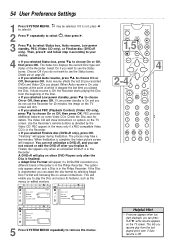
... no off G Access control Status box r Auto resume Low power standby s On Off Features L 5 Press SYSTEM MENU repeatedly to see the Status boxes. MONITOR ON/OFF PREVIOUS REC/OTR NEXT 1,5 REVERSE PAUSE SLOW STOP FSS FORWARD PLAY 4 2-4CLEAR SELECT TIMER VOL CH MUTE T/C A/CH ZOOM ANGLE SUBTITLE AUDIO DIM REPEAT REPEAT SCAN Helpful Hint • If resume appears when you start playback, you played the Disc. 54 User Preference Settings 1 Press SYSTEM MENU. Then, press...
... no off G Access control Status box r Auto resume Low power standby s On Off Features L 5 Press SYSTEM MENU repeatedly to see the Status boxes. MONITOR ON/OFF PREVIOUS REC/OTR NEXT 1,5 REVERSE PAUSE SLOW STOP FSS FORWARD PLAY 4 2-4CLEAR SELECT TIMER VOL CH MUTE T/C A/CH ZOOM ANGLE SUBTITLE AUDIO DIM REPEAT REPEAT SCAN Helpful Hint • If resume appears when you start playback, you played the Disc. 54 User Preference Settings 1 Press SYSTEM MENU. Then, press...
User manual
Page 62
... product, check this DVD Recorder will not play on the DVD Recorder. • Some Audio CDs available on the other DVD Players. The sound is in LP; See page 9 to see the Recorder's background picture on the rear of your lowest TV channel and change channels down until the Recorder's tray closes. Or, just continue selecting the different sound sources or modes on the TV remote control that are on the TV screen. This...
... product, check this DVD Recorder will not play on the DVD Recorder. • Some Audio CDs available on the other DVD Players. The sound is in LP; See page 9 to see the Recorder's background picture on the rear of your lowest TV channel and change channels down until the Recorder's tray closes. Or, just continue selecting the different sound sources or modes on the TV remote control that are on the TV screen. This...
User manual
Page 63
...; If you adjust the clock after you can play on the Recorder's display. • Remove and reinsert the Disc. • Clean the Disc. • Disconnect the power cord from the Recorder again. This resets the DVD Recorder to the factory mode, or to select , then press :. Even though your TV manual for service reasons. • Press SYSTEM MENU. Details are on page 16.) "TURN ON TV" indicates you try playback as the Remote control used. Details...
...; If you adjust the clock after you can play on the Recorder's display. • Remove and reinsert the Disc. • Clean the Disc. • Disconnect the power cord from the Recorder again. This resets the DVD Recorder to the factory mode, or to select , then press :. Even though your TV manual for service reasons. • Press SYSTEM MENU. Details are on page 16.) "TURN ON TV" indicates you try playback as the Remote control used. Details...
User manual
Page 67
... problems caused by Philips. All parts, including repaired and replaced parts, are limited in any country other than the country for the replacement or repair of such damages.) REMEMBER... Please keep both nearby. Attach it to receive warranty service. You may have proof of the controls discussed there may not apply to a Philips factory service center (see enclosed list) or authorized service center for installation or setup...
... problems caused by Philips. All parts, including repaired and replaced parts, are limited in any country other than the country for the replacement or repair of such damages.) REMEMBER... Please keep both nearby. Attach it to receive warranty service. You may have proof of the controls discussed there may not apply to a Philips factory service center (see enclosed list) or authorized service center for installation or setup...

User manual
Page 68
...-22 play full title 44 play once 51 playable discs 7 playback control 54 playing a disc 18 PlusCode 42 power cord 10-14, 24 previous button 21 prog scan out (Y, Pb, Pr) jacks 10, 24 progressive scan 10 protection 47 rear panel 24 rec volume buttons ...........22, 45 rec/otr button 20 record button 22 record mode 46 record settings 46 recording audio 58 region codes 7 remote control, buttons ...20-21 remote control, settings..........59 remote control, tv operation 60-61 remote sensor 22 repeat a-b 26, 34 repeat a-b button 21, 34 repeat button 21, 34 repeat playback 34...
...-22 play full title 44 play once 51 playable discs 7 playback control 54 playing a disc 18 PlusCode 42 power cord 10-14, 24 previous button 21 prog scan out (Y, Pb, Pr) jacks 10, 24 progressive scan 10 protection 47 rear panel 24 rec volume buttons ...........22, 45 rec/otr button 20 record button 22 record mode 46 record settings 46 recording audio 58 region codes 7 remote control, buttons ...20-21 remote control, settings..........59 remote control, tv operation 60-61 remote sensor 22 repeat a-b 26, 34 repeat a-b button 21, 34 repeat button 21, 34 repeat playback 34...


