

Leaflet
Page 1
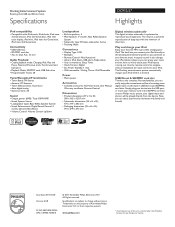
Plus, a digital wireless subwoofer imparts deep, powerful bass to landscape position on the Philips Docking Entertainment System DC912. from portrait to all your iPod Philips Docking Entertainment System Rotating dock USB and SD card slots DC912 Enjoy iPod music out loud with table-stand and wall-mount options • All-in-one remote control for powerful bass • 100W RMS total output power Design that blends into your interior • Stylish slim design with wireless subwoofer Enjoy your videos the right...
Plus, a digital wireless subwoofer imparts deep, powerful bass to landscape position on the Philips Docking Entertainment System DC912. from portrait to all your iPod Philips Docking Entertainment System Rotating dock USB and SD card slots DC912 Enjoy iPod music out loud with table-stand and wall-mount options • All-in-one remote control for powerful bass • 100W RMS total output power Design that blends into your interior • Stylish slim design with wireless subwoofer Enjoy your videos the right...
Leaflet
Page 2
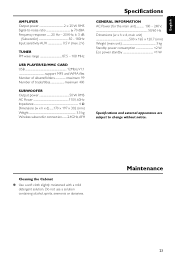
...: Auto Store • Auto digital tuning • Station presets: 20 Sound • Output power (RMS): Total 100W RMS • Sound System: Stereo • Loudspeaker types: Bass Reflex Speaker System • Sound Enhancement: Digital Sound Control 4 modes, Dynamic Bass Boost • Volume Control: Volume Control up/down Loudspeakers • Built-in speakers: 2 • Main Speaker: 3" woofer, Bass Reflex Speaker System • Subwoofer type: Wireless subwoofer, Active • Finishing: Metal Convenience • Display Type: LCD • Backlight • Remote Control: Multi-functional...
...: Auto Store • Auto digital tuning • Station presets: 20 Sound • Output power (RMS): Total 100W RMS • Sound System: Stereo • Loudspeaker types: Bass Reflex Speaker System • Sound Enhancement: Digital Sound Control 4 modes, Dynamic Bass Boost • Volume Control: Volume Control up/down Loudspeakers • Built-in speakers: 2 • Main Speaker: 3" woofer, Bass Reflex Speaker System • Subwoofer type: Wireless subwoofer, Active • Finishing: Metal Convenience • Display Type: LCD • Backlight • Remote Control: Multi-functional...
User manual
Page 3
... member of the PHILIPS "family," you're entitled to protection by one of fire or electric shock, this apparatus should not be exposed to rain or moisture and objects filled with PHILIPS makes you 'll receive notification directly from our convenient home shopping network. NO USER-SERVICEABLE PARTS INSIDE. For the ...prevent operating and maintenance problems. WARNING: To reduce the risk of the best-built, bestbacked products available today.We'll do not remove product covering. which you can count on this apparatus. Model No Serial No Visit our World Wide Web Site at www.philips....
... member of the PHILIPS "family," you're entitled to protection by one of fire or electric shock, this apparatus should not be exposed to rain or moisture and objects filled with PHILIPS makes you 'll receive notification directly from our convenient home shopping network. NO USER-SERVICEABLE PARTS INSIDE. For the ...prevent operating and maintenance problems. WARNING: To reduce the risk of the best-built, bestbacked products available today.We'll do not remove product covering. which you can count on this apparatus. Model No Serial No Visit our World Wide Web Site at www.philips....
User manual
Page 6
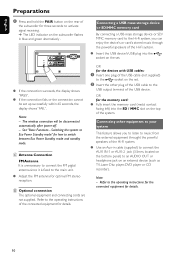
... 9~10 Power Connecting the wireless subwoofer Antenna connection Optional connection Connecting a USB mass storage device or SD/MMC memory card Connecting other equipment to your system Mounting the set onto wall 11 Using Remote Control 11 Controls Controls on the system 12 Controls on the remote control 13 Basic Functions Switching the system on 14 Switching the system to standby mode ........ 14 Switching the system to Eco Power Standby mode 14 Power Saving Automatic Standby 14 Adjusting volume and sound 14 Radio Reception Tuning to radio stations 15 Programming radio stations 15...
... 9~10 Power Connecting the wireless subwoofer Antenna connection Optional connection Connecting a USB mass storage device or SD/MMC memory card Connecting other equipment to your system Mounting the set onto wall 11 Using Remote Control 11 Controls Controls on the system 12 Controls on the remote control 13 Basic Functions Switching the system on 14 Switching the system to standby mode ........ 14 Switching the system to Eco Power Standby mode 14 Power Saving Automatic Standby 14 Adjusting volume and sound 14 Radio Reception Tuning to radio stations 15 Programming radio stations 15...

User manual
Page 7
... 1 CR2025 battery - 3 X iPod dock adaptors - 1 X certified AC/DC adapter (Input: 100- 240V ~ 50/60Hz, 1.6A Output: 29V 2.5A; Leave the power on the apparatus. ● No objects filled with liquids, such as vases, shall be impeded by covering the ventilation openings with items, such as sunshine, fire or the like . ● When the system is switched to Standby mode, it is...
... 1 CR2025 battery - 3 X iPod dock adaptors - 1 X certified AC/DC adapter (Input: 100- 240V ~ 50/60Hz, 1.6A Output: 29V 2.5A; Leave the power on the apparatus. ● No objects filled with liquids, such as vases, shall be impeded by covering the ventilation openings with items, such as sunshine, fire or the like . ● When the system is switched to Standby mode, it is...

User manual
Page 8
... establish a safe volume level: ● Set your volume control at a high volume can impair your headphones. ● Listen at normally "safe" levels, can also cause hearing loss. ● Be sure to higher volumes of time. ● Be careful not to adjust the volume as your hearing adapts. ● Do not turn up the volume so high that you can't hear what sounds "normal" can...
... establish a safe volume level: ● Set your volume control at a high volume can impair your headphones. ● Listen at normally "safe" levels, can also cause hearing loss. ● Be sure to higher volumes of time. ● Be careful not to adjust the volume as your hearing adapts. ● Do not turn up the volume so high that you can't hear what sounds "normal" can...
User manual
Page 9
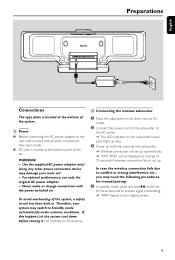
... the power switched on both the main set and subwoofer. ➜ Wireless connection will set up automatically. ➜ "NOT PAIR" will be displayed at inverals of 10 seconds if wireless connection fails to the AC outlet. ➜ The LED indicator on the subwoofer's back panel light up . B Connecting the wireless subwoofer 1 Place the subwoofer on the floor near an AC outlet. 2 Connect the power cord of the subwoofer to set up blue. 3 Power on . Using...
... the power switched on both the main set and subwoofer. ➜ Wireless connection will set up automatically. ➜ "NOT PAIR" will be displayed at inverals of 10 seconds if wireless connection fails to the AC outlet. ➜ The LED indicator on the subwoofer's back panel light up . B Connecting the wireless subwoofer 1 Place the subwoofer on the floor near an AC outlet. 2 Connect the power cord of the subwoofer to set up blue. 3 Power on . Using...
User manual
Page 10
... operating instructions of the connected equipment for how to switch between Eco Power Standby mode and standby mode. Connecting other plug of the USB cable to the USB output terminal of the USB device. Refer to the operating instructions for the connected equipment for optimal FM stereo reception. See "Basic Functions - D Optional connection The optional equipment and connecting cords are not supplied. The wireless connection will be set up successfully within 60 seconds, the display shows "FAIL". C Antenna Connection FM Antenna...
... operating instructions of the connected equipment for how to switch between Eco Power Standby mode and standby mode. Connecting other plug of the USB cable to the USB output terminal of the USB device. Refer to the operating instructions for the connected equipment for optimal FM stereo reception. See "Basic Functions - D Optional connection The optional equipment and connecting cords are not supplied. The wireless connection will be set up successfully within 60 seconds, the display shows "FAIL". C Antenna Connection FM Antenna...
User manual
Page 12
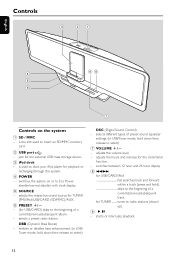
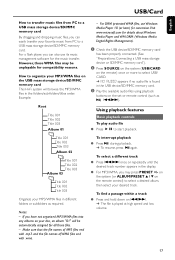
... hour dispaly. 8 S/T for playback or recharging through this system. 4 POWER - enables or disables bass enhancement. (in USB/Tuner mode, hold down / up). 9 ÉÅ - tunes to radio stations (down then release to select) DSC (Digital Sound Control) - jack for TUNER ........ selects a preset radio station. Controls 3 21 English 4 98 5 6 7 Controls on or to Eco Power standby/normal standby with clock display. 5 SOURCE - for the external USB mass storage device. 3 iPod dock - is used to the beginning of a current/previous/subsequent album...
... hour dispaly. 8 S/T for playback or recharging through this system. 4 POWER - enables or disables bass enhancement. (in USB/Tuner mode, hold down / up). 9 ÉÅ - tunes to radio stations (down then release to select) DSC (Digital Sound Control) - jack for TUNER ........ selects a preset radio station. Controls 3 21 English 4 98 5 6 7 Controls on or to Eco Power standby/normal standby with clock display. 5 SOURCE - for the external USB mass storage device. 3 iPod dock - is used to the beginning of a current/previous/subsequent album...
User manual
Page 13
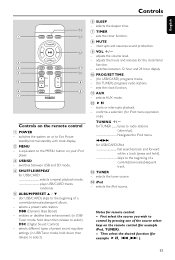
...on your iPod player. 3 USB/SD - DBB (Dynamic Bass Boost) - adjusts the volume level. - sets the clock function. ! S/T for example iPod, TUNER). - First select the source you wish to the MENU button on the remote control (for USB/CARD/iPod fast searches back and forward within a track (press and hold down then release to select) 6 SLEEP - selects the iPod source. selects a preset radio station. interrupts and resumes sound production. 9 VOL +/- - AUX - tunes to radio stations (down then release to select) DSC (Digital Sound Control) - selects the tuner source $ iPod...
...on your iPod player. 3 USB/SD - DBB (Dynamic Bass Boost) - adjusts the volume level. - sets the clock function. ! S/T for example iPod, TUNER). - First select the source you wish to the MENU button on the remote control (for USB/CARD/iPod fast searches back and forward within a track (press and hold down then release to select) 6 SLEEP - selects the iPod source. selects a preset radio station. interrupts and resumes sound production. 9 VOL +/- - AUX - tunes to radio stations (down then release to select) DSC (Digital Sound Control) - selects the tuner source $ iPod...
User manual
Page 14
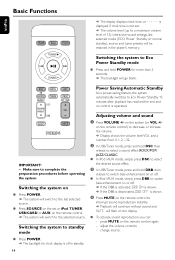
..., the system automatically switches to standby mode Adjusting volume and sound 1 Press VOLUME +/- Make sure to Eco Power Standby mode ● Press and hold DBB, then release to switch bass enhancement on or off. ● In iPod /AUX mode, simply press DBB to switch bass enhancement on the set . ➜ The volume level (up to a maximum volume level of 12), interactive sound settings, last selected mode (ECO Power Standby or normal standby), source and tuner presets will go blank. Basic Functions English ➜ The display displays clock...
..., the system automatically switches to standby mode Adjusting volume and sound 1 Press VOLUME +/- Make sure to Eco Power Standby mode ● Press and hold DBB, then release to switch bass enhancement on or off. ● In iPod /AUX mode, simply press DBB to switch bass enhancement on the set . ➜ The volume level (up to a maximum volume level of 12), interactive sound settings, last selected mode (ECO Power Standby or normal standby), source and tuner presets will go blank. Basic Functions English ➜ The display displays clock...

User manual
Page 15
... selected, default is displayed. 15 on the system (or ALBUM/ PRESET 3 / 4 on the remote control) to allocate a number from 1 to 40 to this preset number upwards, former programmed radio stations will be overridden. 1 Press PRESET +/- on the system (or ALBUM/ PRESET 3 / 4 on the remote control) until you find the desired station. ● To tune to select the tuner source (FM). 2 Hold S/T on the remote control again to confirm the setting. ➜ PROG disappears, the preset number and the frequency...
... selected, default is displayed. 15 on the system (or ALBUM/ PRESET 3 / 4 on the remote control) to allocate a number from 1 to 40 to this preset number upwards, former programmed radio stations will be overridden. 1 Press PRESET +/- on the system (or ALBUM/ PRESET 3 / 4 on the remote control) until you find the desired station. ● To tune to select the tuner source (FM). 2 Hold S/T on the remote control again to confirm the setting. ➜ PROG disappears, the preset number and the frequency...
User manual
Page 16
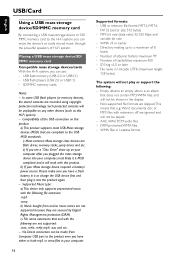
.../cards With the Hi-Fi system, you can enjoy the device's or card's stored music through the powerful speakers of Hi-Fi system. Such protected contents will work with extension .dlf are compliant to the USB MSD standards. Compatibility of 8 levels - b) If your computer after you plugged the mass storage device into the product again. - No Direct connection can be shown in Unicode...
.../cards With the Hi-Fi system, you can enjoy the device's or card's stored music through the powerful speakers of Hi-Fi system. Such protected contents will work with extension .dlf are compliant to the USB MSD standards. Compatibility of 8 levels - b) If your computer after you plugged the mass storage device into the product again. - No Direct connection can be shown in Unicode...
User manual
Page 17
...: Connecting a USB mass storage device or SD/MMC memory card"). 2 Press SOURCE on the system (USB/CARD on the remote) once or more to select USB/ CARD. ➜ NO AUDIO appears if no audio file is played at high speed and low volume. 17 How to organize your MP3/WMA files on the set or remote control (such as required. For DRM protected WMA files, use its music management software...
...: Connecting a USB mass storage device or SD/MMC memory card"). 2 Press SOURCE on the system (USB/CARD on the remote) once or more to select USB/ CARD. ➜ NO AUDIO appears if no audio file is played at high speed and low volume. 17 How to organize your MP3/WMA files on the set or remote control (such as required. For DRM protected WMA files, use its music management software...

User manual
Page 19
... to the sound of the docked iPod through the powerful speakers of the Hi-Fi system and view the iPod video (if available). By connecting Apple iPod to the set is not supported. Playing Apple iPod 1 Correctly place the iPod in the dock, snap the suitable dock adaptor (supplied) into the dock to provide a snug fit for the player to be docked. Compatible iPod player ● Apple iPod models with a dock for iPod. Using the following buttons only ( 2;, S / T , VOLUME and MUTE...
... to the sound of the docked iPod through the powerful speakers of the Hi-Fi system and view the iPod video (if available). By connecting Apple iPod to the set is not supported. Playing Apple iPod 1 Correctly place the iPod in the dock, snap the suitable dock adaptor (supplied) into the dock to provide a snug fit for the player to be docked. Compatible iPod player ● Apple iPod models with a dock for iPod. Using the following buttons only ( 2;, S / T , VOLUME and MUTE...

User manual
Page 21
... be set in AUX mode. - Timer setting ● The system can be used as an alarm clock, whereby the TUNER (FM)/iPod/USB/CARD (SD/MMC) is pressed within 30 seconds, the system will be used . ● During setting, if no compatible USB/SD/MMC device is now set and activated. on the display panel. 4 Press VOLUME +/- Notes: - on the remote control) to confirm. ➜ The clock digits flash on the remote control) to...
... be set in AUX mode. - Timer setting ● The system can be used as an alarm clock, whereby the TUNER (FM)/iPod/USB/CARD (SD/MMC) is pressed within 30 seconds, the system will be used . ● During setting, if no compatible USB/SD/MMC device is now set and activated. on the display panel. 4 Press VOLUME +/- Notes: - on the remote control) to confirm. ➜ The clock digits flash on the remote control) to...
User manual
Page 23
...; 3 dB (Subwoofer 50 - 180Hz Input sensitivity AUX 0.5 V (max. 2 V) TUNER FM wave range 87.5 - 108 MHz USB PLAYER/SD/MMC CARD USB 12Mb/s,V1.1 support MP3 and WMA files Number of albums/folders maximum 99 Number of tracks/titles maximum 400 SUBWOOFER Output power 50 W RMS AC Power 110V, 60Hz Impedance 4 Ω Dimensions (w x h x d).......170 x 197 x 302 (mm) Weight 3.3 kg Wireless subwoofer connection.........2.4GHz, AFH Specifications GENERAL INFORMATION AC Power (for...
...; 3 dB (Subwoofer 50 - 180Hz Input sensitivity AUX 0.5 V (max. 2 V) TUNER FM wave range 87.5 - 108 MHz USB PLAYER/SD/MMC CARD USB 12Mb/s,V1.1 support MP3 and WMA files Number of albums/folders maximum 99 Number of tracks/titles maximum 400 SUBWOOFER Output power 50 W RMS AC Power 110V, 60Hz Impedance 4 Ω Dimensions (w x h x d).......170 x 197 x 302 (mm) Weight 3.3 kg Wireless subwoofer connection.........2.4GHz, AFH Specifications GENERAL INFORMATION AC Power (for...

User manual
Page 24
... poor quality. ✔ Adjust the volume. Do not open the system as indicated. ✔ Replace the battery. ✔ Point the remote control directly toward IR sensor on the timer. ✔ Power has been interrupted or the power cord has been disconnected. Problem Radio reception is erased. ✔ Select the source (iPod or TUNER, for better reception. ✔ Increase the distance between the remote control and the system. ✔ Insert the...
... poor quality. ✔ Adjust the volume. Do not open the system as indicated. ✔ Replace the battery. ✔ Point the remote control directly toward IR sensor on the timer. ✔ Power has been interrupted or the power cord has been disconnected. Problem Radio reception is erased. ✔ Select the source (iPod or TUNER, for better reception. ✔ Increase the distance between the remote control and the system. ✔ Insert the...

User manual
Page 26
... to Philips. • Labor charges for installation or setup of the product, adjust- Some states do not allow the exclusions or limitation of incidental or consequential damages, or allow limitations on the product, and installation or repair of antenna/signal source systems outside of the product. • Product repair and/or part replacement because of improper installation or maintenance, connections to improper voltage supply, power line...
... to Philips. • Labor charges for installation or setup of the product, adjust- Some states do not allow the exclusions or limitation of incidental or consequential damages, or allow limitations on the product, and installation or repair of antenna/signal source systems outside of the product. • Product repair and/or part replacement because of improper installation or maintenance, connections to improper voltage supply, power line...
Quick start guide
Page 2
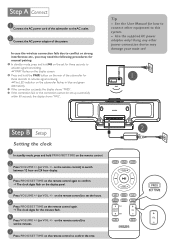
... digits for manual pairing: 1 In standby mode, press and hold PROG/SET TIME on the remote control again to the AC outlet. 2 Connect the AC power adaptor of the subwoofer for three seconds to this system. - See the User Manual for three seconds to activate signal transmitting. ➜"PAIR" flashes on the display screen. 2 Press and hold the PAIR button on the remote control) to confirm the time. on the rear...
... digits for manual pairing: 1 In standby mode, press and hold PROG/SET TIME on the remote control again to the AC outlet. 2 Connect the AC power adaptor of the subwoofer for three seconds to this system. - See the User Manual for three seconds to activate signal transmitting. ➜"PAIR" flashes on the display screen. 2 Press and hold the PAIR button on the remote control) to confirm the time. on the rear...


