Leaflet
Page 1
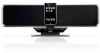
...; Play and charge your iPod • USB Direct and SD/MMC card slots for MP3/WMA music playback • FM digital tuning with presets Superb performance in -one remote control for enhanced bass experience • 30W RMS total output power Design that blends into your interior • Stylish slim design with wOOx speakers Enjoy your videos the right way simply by rotating your iPod DC910 Philips Docking Entertainment System Rotating dock USB...
...; Play and charge your iPod • USB Direct and SD/MMC card slots for MP3/WMA music playback • FM digital tuning with presets Superb performance in -one remote control for enhanced bass experience • 30W RMS total output power Design that blends into your interior • Stylish slim design with wOOx speakers Enjoy your videos the right way simply by rotating your iPod DC910 Philips Docking Entertainment System Rotating dock USB...
Leaflet
Page 2
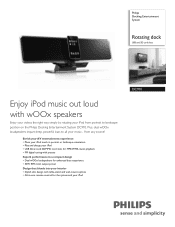
...Reception/Transmission • Tuner Bands: FM Stereo • Antenna: FM Antenna • Tuner Enhancements: Auto Store • Auto digital tuning • Station presets: 20 Sound • Output power (RMS): 2x15 W • Sound System: Stereo • Loudspeaker types: Bass Reflex Speaker System • Sound Enhancement: wOOx technology, Digital Sound Control 4 modes, Dynamic Bass Boost • Volume Control: Volume Control up/down Loudspeakers • Built-in USB Direct and SD/MMC card slots. or their respective owners. Simply plug your device into the USB port, or insert your memory...
...Reception/Transmission • Tuner Bands: FM Stereo • Antenna: FM Antenna • Tuner Enhancements: Auto Store • Auto digital tuning • Station presets: 20 Sound • Output power (RMS): 2x15 W • Sound System: Stereo • Loudspeaker types: Bass Reflex Speaker System • Sound Enhancement: wOOx technology, Digital Sound Control 4 modes, Dynamic Bass Boost • Volume Control: Volume Control up/down Loudspeakers • Built-in USB Direct and SD/MMC card slots. or their respective owners. Simply plug your device into the USB port, or insert your memory...
User manual
Page 3
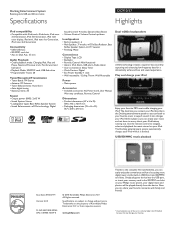
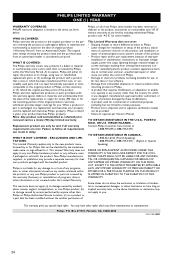
... Returning the enclosed card guarantees that you 'll receive notification directly from your PHILIPS purchase, be sure to complete and return your Product Registration Card at once, or register online at: www.philips.com/welcome For Customer Use Enter below , so don't miss out. REFER SERVICING TO QUALIFIED SERVICE PERSONNEL. P.S. Dear PHILIPS product owner: Thank you happy with your purchase for your...
... Returning the enclosed card guarantees that you 'll receive notification directly from your PHILIPS purchase, be sure to complete and return your Product Registration Card at once, or register online at: www.philips.com/welcome For Customer Use Enter below , so don't miss out. REFER SERVICING TO QUALIFIED SERVICE PERSONNEL. P.S. Dear PHILIPS product owner: Thank you happy with your purchase for your...
User manual
Page 6
... Switching the system to Eco Power Standby mode 13 Power Saving Automatic Standby 13 Adjusting volume and sound 13 Radio Reception Tuning to radio stations 14 Programming radio stations 14 Automatic programming Manual programming Tuning to preset radio stations 14 USB/Card Using a USB mass storage device/SD/MMC memory card 15~16 Using playback features 16~17 Basic playback controls Different play modes: SHUFFLE and REPEAT Programming audio files Dock for iPod Playing Apple iPod using DC910 18 Compatible iPod player Dock adaptor Playing Apple iPod Charging iPod battery using the dock...
... Switching the system to Eco Power Standby mode 13 Power Saving Automatic Standby 13 Adjusting volume and sound 13 Radio Reception Tuning to radio stations 14 Programming radio stations 14 Automatic programming Manual programming Tuning to preset radio stations 14 USB/Card Using a USB mass storage device/SD/MMC memory card 15~16 Using playback features 16~17 Basic playback controls Different play modes: SHUFFLE and REPEAT Programming audio files Dock for iPod Playing Apple iPod using DC910 18 Compatible iPod player Dock adaptor Playing Apple iPod Charging iPod battery using the dock...
User manual
Page 7
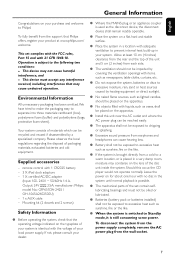
... MAINS plug or an appliance coupler is subject to prevent internal heat build-up in a location with 1 CR2025 battery - 3 X iPod dock adaptors - 1 X certified AC/DC adapter (Input: 100- 240V ~ 50/60Hz 1.4 A, Output: 24V 2.5A; Operation is used as sunshine, fire or the like . ● When the system is switched to a warm location, or is possible. ● The mechanical parts of the disc unit...
... MAINS plug or an appliance coupler is subject to prevent internal heat build-up in a location with 1 CR2025 battery - 3 X iPod dock adaptors - 1 X certified AC/DC adapter (Input: 100- 240V ~ 50/60Hz 1.4 A, Output: 24V 2.5A; Operation is used as sunshine, fire or the like . ● When the system is switched to a warm location, or is possible. ● The mechanical parts of the disc unit...
User manual
Page 9
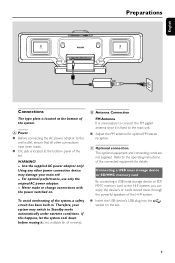
... is fixed to the operating instructions of the system, a safety circuit has been built in. Refer to the main unit. ● Adjust the FM antenna for details. WARNING! - English Preparations POWERFUL BASS POWERFUL BASS Connections The type plate is located at the bottom panel of the set. For optimal performance, use only the original AC power adaptor. - Never make or change connections with the power switched on the set. 9 Use the supplied AC power...
... is fixed to the operating instructions of the system, a safety circuit has been built in. Refer to the main unit. ● Adjust the FM antenna for details. WARNING! - English Preparations POWERFUL BASS POWERFUL BASS Connections The type plate is located at the bottom panel of the set. For optimal performance, use only the original AC power adaptor. - Never make or change connections with the power switched on the set. 9 Use the supplied AC power...
User manual
Page 10
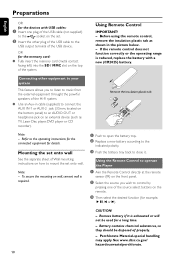
Using Remote Control IMPORTANT! - Before using the remote control, remove the insulation plastic tab as TV, Laser Disc player, DVD player or CD recorder). Using the Remote Control to operate the Player 1 Aim the Remote Control directly at the remote sensor (IR) on the front panel. 2 Select the source you to listen to music from the external equipment throught the powrful speakers of the source select buttons on the set onto wall. CAUTION! - Perchlorate Material-special handling may apply...
Using Remote Control IMPORTANT! - Before using the remote control, remove the insulation plastic tab as TV, Laser Disc player, DVD player or CD recorder). Using the Remote Control to operate the Player 1 Aim the Remote Control directly at the remote sensor (IR) on the front panel. 2 Select the source you to listen to music from the external equipment throught the powrful speakers of the source select buttons on the set onto wall. CAUTION! - Perchlorate Material-special handling may apply...
User manual
Page 11
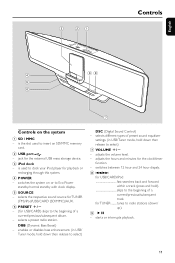
...)/AUX. 6 PRESET +/- - (for the external USB mass storage device. 3 iPod dock - enables or disables bass enhancement. (in USB/Tuner mode, hold down / up). 9 ÉÅ - is the slot used to dock your iPod player for USB/CARD/iPod fast searches back and forward within a track (press and hold down then release to select) DSC (Digital Sound Control) - DBB (Dynamic Bass Boost) - 3 21 Controls English 4 98 5 6 7 Controls on or to Eco Power standby/normal standby with clock display. 5 SOURCE - switches...
...)/AUX. 6 PRESET +/- - (for the external USB mass storage device. 3 iPod dock - enables or disables bass enhancement. (in USB/Tuner mode, hold down / up). 9 ÉÅ - is the slot used to dock your iPod player for USB/CARD/iPod fast searches back and forward within a track (press and hold down then release to select) DSC (Digital Sound Control) - DBB (Dynamic Bass Boost) - 3 21 Controls English 4 98 5 6 7 Controls on or to Eco Power standby/normal standby with clock display. 5 SOURCE - switches...
User manual
Page 12
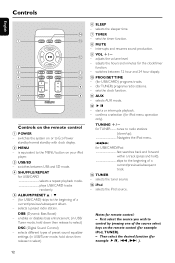
... plays USB/CARD tracks randomly. 5 ALBUM/PRESET 3 / 4 - (for TUNER) programs radio stations. - sets the clock function. ! selects AUX mode. @ ÉÅ - tunes to Eco Power standby/normal standby with clock display. 2 MENU - switches the system on the remote control 1 POWER - DBB (Dynamic Bass Boost) - enables or disables bass enhancement. (in USB/Tuner mode, hold down then release to the MENU button on the remote control (for example iPod, TUNER). - interrupts and resumes sound production. 9 VOL +/- - adjusts the volume level. - confirms a selection (for the clock/timer...
... plays USB/CARD tracks randomly. 5 ALBUM/PRESET 3 / 4 - (for TUNER) programs radio stations. - sets the clock function. ! selects AUX mode. @ ÉÅ - tunes to Eco Power standby/normal standby with clock display. 2 MENU - switches the system on the remote control 1 POWER - DBB (Dynamic Bass Boost) - enables or disables bass enhancement. (in USB/Tuner mode, hold down then release to the MENU button on the remote control (for example iPod, TUNER). - interrupts and resumes sound production. 9 VOL +/- - adjusts the volume level. - confirms a selection (for the clock/timer...
User manual
Page 13
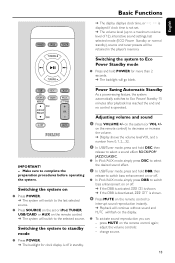
... volume level (up to a maximum volume level of 12), interactive sound settings, last selected mode (ECO Power Standby or normal standby), source and tuner presets will switch to standby mode ● Press POWER. ➜ The backlight for more than 2 seconds. ➜ The backlight will flash on the remote control. ➜ The system will be retained in standby. Switching the system to the selected source. IMPORTANT! - Basic Functions English ➜ The display displays clock time, or --: -- is displayed if clock time...
... volume level (up to a maximum volume level of 12), interactive sound settings, last selected mode (ECO Power Standby or normal standby), source and tuner presets will switch to standby mode ● Press POWER. ➜ The backlight for more than 2 seconds. ➜ The backlight will flash on the remote control. ➜ The system will be retained in standby. Switching the system to the selected source. IMPORTANT! - Basic Functions English ➜ The display displays clock time, or --: -- is displayed if clock time...
User manual
Page 14
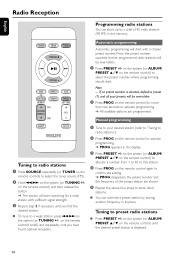
... programming will be overridden. 1 Press PRESET +/- If no preset number is selected, default is displayed. 14 Manual programming Tuning to radio stations 1 Press SOURCE repeatedly (or TUNER on the system (or TUNING +/- on the system (or ALBUM/ PRESET 3 / 4 on the remote control) until you find the desired station. ● To tune to a weak station, press S/T on the remote control) to preset radio stations ● Press PRESET +/- on the system (or ALBUM/ PRESET 3 / 4 on the remote control) to select the preset number where programming should start...
... programming will be overridden. 1 Press PRESET +/- If no preset number is selected, default is displayed. 14 Manual programming Tuning to radio stations 1 Press SOURCE repeatedly (or TUNER on the system (or TUNING +/- on the system (or ALBUM/ PRESET 3 / 4 on the remote control) until you find the desired station. ● To tune to a weak station, press S/T on the remote control) to preset radio stations ● Press PRESET +/- on the system (or ALBUM/ PRESET 3 / 4 on the remote control) to select the preset number where programming should start...
User manual
Page 15
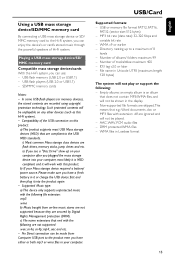
... memory cards Notes: - Compatibility of Hi-Fi system. USB/Card Supported formats: - Empty albums: an empty album is MSD compliant and it into your Mass storage device required a battery/ power source. DRM protected WMA files - USB flash memory (USB 2.0 or USB1.1) - i) Most common Mass storage class devices are compliant to the product even you plugged the mass storage device into the product again. - Number of tracks/titles...
... memory cards Notes: - Compatibility of Hi-Fi system. USB/Card Supported formats: - Empty albums: an empty album is MSD compliant and it into your Mass storage device required a battery/ power source. DRM protected WMA files - USB flash memory (USB 2.0 or USB1.1) - i) Most common Mass storage class devices are compliant to the product even you plugged the mass storage device into the product again. - Number of tracks/titles...
User manual
Page 16
... Media Player and WM DRM (Windows Media Digital Rights Management). 1 Check the USB device/SD/MMC memory card has been properly connected. (See "Preparations: Connecting a USB mass storage device or SD/MMC memory card"). 2 Press SOURCE on the system (USB/CARD on the remote) once or more to select USB/ CARD. ➜ NO AUDIO appears if no audio file is played at high speed and low volume. 16 For a flash player...
... Media Player and WM DRM (Windows Media Digital Rights Management). 1 Check the USB device/SD/MMC memory card has been properly connected. (See "Preparations: Connecting a USB mass storage device or SD/MMC memory card"). 2 Press SOURCE on the system (USB/CARD on the remote) once or more to select USB/ CARD. ➜ NO AUDIO appears if no audio file is played at high speed and low volume. 16 For a flash player...
User manual
Page 18
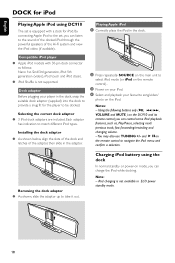
... iPod types. Dock adaptor Before plugging your favourite song/video/ photo on mode, you can charge the iPod while docking. Notes: - iPod charging is equipped with 30-pin dock connector as , Play/Pause, selecting next/ previous track, fast forwarding/rewinding and changing volume. - Each adaptor has indication to take it out. Charging iPod battery using DC910 The set , you can listen to select iPod mode (or iPod on the remote control) . 3 Power on your iPod...
... iPod types. Dock adaptor Before plugging your favourite song/video/ photo on mode, you can charge the iPod while docking. Notes: - iPod charging is equipped with 30-pin dock connector as , Play/Pause, selecting next/ previous track, fast forwarding/rewinding and changing volume. - Each adaptor has indication to take it out. Charging iPod battery using DC910 The set , you can listen to select iPod mode (or iPod on the remote control) . 3 Power on your iPod...
User manual
Page 19
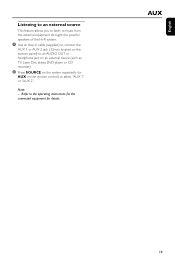
AUX 19 Refer to select "AUX 1" or "AUX 2". English Listening to an external source This feature allows you to listen to music from the external equipment throught the powrful speakers of the Hi-Fi system. 1 Use an Aux-in cable (supplied) to connect the AUX 1 or AUX 2 jack (3.5mm, located on the bottom panel) to an AUDIO OUT or headphone jack on an external device (such as TV, Laser Disc player, DVD player or CD recorder). 2 Press SOURCE on the system repeatedly (or AUX on the remote control) to the operating instructions for the connected equipment for details. Note: -
AUX 19 Refer to select "AUX 1" or "AUX 2". English Listening to an external source This feature allows you to listen to music from the external equipment throught the powrful speakers of the Hi-Fi system. 1 Use an Aux-in cable (supplied) to connect the AUX 1 or AUX 2 jack (3.5mm, located on the bottom panel) to an AUDIO OUT or headphone jack on an external device (such as TV, Laser Disc player, DVD player or CD recorder). 2 Press SOURCE on the system repeatedly (or AUX on the remote control) to the operating instructions for the connected equipment for details. Note: -
User manual
Page 20
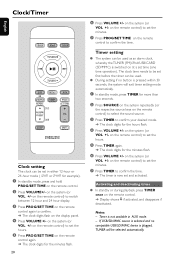
... the system (or VOL +/- Timer is plugged, TUNER will exit timer setting mode automatically. 1 In standby mode, press TIMER for more than two seconds. 2 Press SOURCE on the system repeatedly (or the respective source keys on the remote control) to select the sound source. 3 Press TIMER to confirm your desired mode. ➜ The clock digits for the minutes flash. 20 6 Press VOLUME +/- Timer setting ● The system can be used . ● During setting, if no compatible USB/SD/MMC device is...
... the system (or VOL +/- Timer is plugged, TUNER will exit timer setting mode automatically. 1 In standby mode, press TIMER for more than two seconds. 2 Press SOURCE on the system repeatedly (or the respective source keys on the remote control) to select the sound source. 3 Press TIMER to confirm your desired mode. ➜ The clock digits for the minutes flash. 20 6 Press VOLUME +/- Timer setting ● The system can be used . ● During setting, if no compatible USB/SD/MMC device is...
User manual
Page 23
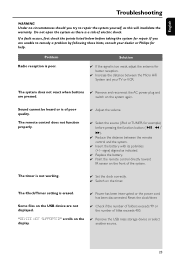
... SUPPORTED" scrolls on the system again. The Clock/Timer setting is poor. If a fault occurs, first check the points listed below before pressing the function button (ÉÅ, 5 / 6). ✔ Reduce the distance between the Micro HiFi System and your TV or VCR. switch on the ✔ Remove the USB mass storage device or select display. The remote control does not function properly. ✔ Adjust the volume. ✔ Select the source (iPod...
... SUPPORTED" scrolls on the system again. The Clock/Timer setting is poor. If a fault occurs, first check the points listed below before pressing the function button (ÉÅ, 5 / 6). ✔ Reduce the distance between the Micro HiFi System and your TV or VCR. switch on the ✔ Remove the USB mass storage device or select display. The remote control does not function properly. ✔ Adjust the volume. ✔ Select the source (iPod...
User manual
Page 24
... state/province to operate per Owner's Manual. Philips is not liable for any damage to the original purchaser or the person receiving the product as based on any media contained within the product, or any kind by including refurbished Philips product sold "AS IS" without the written permission of Philips, or (d) if any Philips serial number has been removed or defaced, or (e) product, accessories or consumables...
... state/province to operate per Owner's Manual. Philips is not liable for any damage to the original purchaser or the person receiving the product as based on any media contained within the product, or any kind by including refurbished Philips product sold "AS IS" without the written permission of Philips, or (d) if any Philips serial number has been removed or defaced, or (e) product, accessories or consumables...
Quick start guide
Page 2
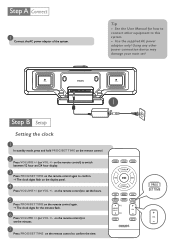
POWERFUL BASS Tip - See the User Manual for how to confirm. ➜ The clock digits flash on the remote control again. ➜ The clock digits for the minutes flash. 6 Press VOLUME +/- (or VOL +/- on the remote control) to switch between 12 hour and 24 hour display. 3 Press PROG/SET TIME on the remote control again to connect other power connection device may damage your main set the minutes. 7 Press PROG/SET TIME on the remote control. 2 Press VOLUME +/- (or VOL +/- on the...
POWERFUL BASS Tip - See the User Manual for how to confirm. ➜ The clock digits flash on the remote control again. ➜ The clock digits for the minutes flash. 6 Press VOLUME +/- (or VOL +/- on the remote control) to switch between 12 hour and 24 hour display. 3 Press PROG/SET TIME on the remote control again to connect other power connection device may damage your main set the minutes. 7 Press PROG/SET TIME on the remote control. 2 Press VOLUME +/- (or VOL +/- on the...

Quick start guide
Page 3
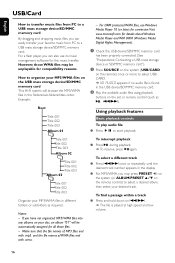
.... 3 Press PRESET +/- (or ALBUM/PRESET 3 / 4 on the set or remote control (such as 2;, S/T). Playing a USB mass storage device/SD/MMC card With the Hi-Fi system, you can use USB flash memory (USB 2.0 or USB1.1), USB flash players (USB 2.0 or USB1.1) and memory cards 1 Insert the USB device's USB plug into 2 Press SOURCE once or more than two seconds to select USB/CARD. 3 Play the available audio files using playback buttons on the remote control) until the desired preset station is displayed.
.... 3 Press PRESET +/- (or ALBUM/PRESET 3 / 4 on the set or remote control (such as 2;, S/T). Playing a USB mass storage device/SD/MMC card With the Hi-Fi system, you can use USB flash memory (USB 2.0 or USB1.1), USB flash players (USB 2.0 or USB1.1) and memory cards 1 Insert the USB device's USB plug into 2 Press SOURCE once or more than two seconds to select USB/CARD. 3 Play the available audio files using playback buttons on the remote control) until the desired preset station is displayed.


