Leaflet
Page 1
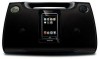
...; Play and charge your iPod simultaneously • USB Direct for MP3/WMA music playback Superb performance in a compact design • Dynamic Bass Boost for your portable MP3 music player Philips Docking Entertainment System with Dynamic Bass Boost USB Direct FM digital tuner MP3 Link DC185 Enjoy iPod & MP3 music out loud anywhere you go Free your iPod music and enjoy it out loud on the Philips DC185 with presets • Aux-in your USB device to use • FM digital tuning with powerful 2x2W sound...
...; Play and charge your iPod simultaneously • USB Direct for MP3/WMA music playback Superb performance in a compact design • Dynamic Bass Boost for your portable MP3 music player Philips Docking Entertainment System with Dynamic Bass Boost USB Direct FM digital tuner MP3 Link DC185 Enjoy iPod & MP3 music out loud anywhere you go Free your iPod music and enjoy it out loud on the Philips DC185 with presets • Aux-in your USB device to use • FM digital tuning with powerful 2x2W sound...
Leaflet
Page 2
.... Docking Entertainment System with Dynamic Bass Boost USB Direct FM digital tuner MP3 Link Specifications DC185/37 Highlights iPod compatibility • Compatible with: iPod touch, iPod classic, iPod nano 3rd Generation, iPod 5th Generation, iPod with color display, iPod mini, iPod nano 1st Generation, iPod nano 2nd Generation Connectivity • USB: USB host • Aux in • Headphone: 3.5 mm Audio Playback • Cradle playback mode: Charging iPod, Play and Pause, Next and Previous track, Fast forward and backward • Playback Media: USB flash drive...
.... Docking Entertainment System with Dynamic Bass Boost USB Direct FM digital tuner MP3 Link Specifications DC185/37 Highlights iPod compatibility • Compatible with: iPod touch, iPod classic, iPod nano 3rd Generation, iPod 5th Generation, iPod with color display, iPod mini, iPod nano 1st Generation, iPod nano 2nd Generation Connectivity • USB: USB host • Aux in • Headphone: 3.5 mm Audio Playback • Cradle playback mode: Charging iPod, Play and Pause, Next and Previous track, Fast forward and backward • Playback Media: USB flash drive...
User manual
Page 3
... have a value of plug proceed as follows: • Connect the blue wire to the terminal marked N or coloured black. • Connect the brown wire to the terminal marked L or coloured red. • Do not connect either wire to connect a plug The wires in its place. Remove fuse cover and fuse. 2. If the mains plug contains a fuse, this type of 3 Amp. If a plug without a fuse is...
... have a value of plug proceed as follows: • Connect the blue wire to the terminal marked N or coloured black. • Connect the brown wire to the terminal marked L or coloured red. • Do not connect either wire to connect a plug The wires in its place. Remove fuse cover and fuse. 2. If the mains plug contains a fuse, this type of 3 Amp. If a plug without a fuse is...
User manual
Page 4
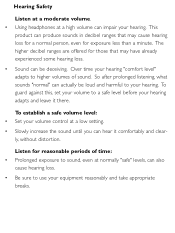
... Listen at a moderate volume. • Using headphones at a high volume can produce sounds in decibel ranges that may cause hearing loss for a normal person, even for exposure less than a minute. To establish a safe volume level: • Set your hearing. Over time your hearing "comfort level" adapts to higher volumes of time: • Prolonged exposure to use your hearing adapts and leave it...
... Listen at a moderate volume. • Using headphones at a high volume can produce sounds in decibel ranges that may cause hearing loss for a normal person, even for exposure less than a minute. To establish a safe volume level: • Set your hearing. Over time your hearing "comfort level" adapts to higher volumes of time: • Prolonged exposure to use your hearing adapts and leave it...
User manual
Page 5
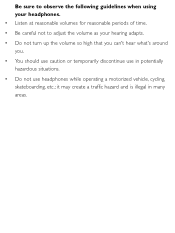
it may create a traffic hazard and is illegal in potentially hazardous situations. • Do not use in many areas. Be sure to observe the following guidelines when using your headphones. • Listen at reasonable volumes for reasonable periods of time. • Be careful not to adjust the volume as your hearing adapts. • Do not turn up the volume so high that you can't hear what's around you. • You should use caution or temporarily discontinue use headphones while operating a motorized vehicle, cycling, skateboarding, etc.;
it may create a traffic hazard and is illegal in potentially hazardous situations. • Do not use in many areas. Be sure to observe the following guidelines when using your headphones. • Listen at reasonable volumes for reasonable periods of time. • Be careful not to adjust the volume as your hearing adapts. • Do not turn up the volume so high that you can't hear what's around you. • You should use caution or temporarily discontinue use headphones while operating a motorized vehicle, cycling, skateboarding, etc.;
User manual
Page 6
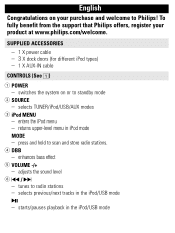
SUPPLIED ACCESSORIES - 1 X power cable - 3 X dock doors (for different iPod types) - 1 X AUX-IN cable CONTROLS (See 1) 1 POWER - press and hold to radio stations - selects previous/next tracks in the iPod/USB mode English Congratulations on or to standby mode 2 SOURCE - starts/pauses playback in the iPod/USB mode 2; - selects TUNER/iPod/USB/AUX modes 3 iPod MENU - enhances bass effect 5 VOLUME -/+ - To fully benefit from the support that Philips offers, register your purchase and welcome to Philips! tunes to scan and store radio stations. 4 DBB - switches the system on your...
SUPPLIED ACCESSORIES - 1 X power cable - 3 X dock doors (for different iPod types) - 1 X AUX-IN cable CONTROLS (See 1) 1 POWER - press and hold to radio stations - selects previous/next tracks in the iPod/USB mode English Congratulations on or to standby mode 2 SOURCE - starts/pauses playback in the iPod/USB mode 2; - selects TUNER/iPod/USB/AUX modes 3 iPod MENU - enhances bass effect 5 VOLUME -/+ - To fully benefit from the support that Philips offers, register your purchase and welcome to Philips! tunes to scan and store radio stations. 4 DBB - switches the system on your...
User manual
Page 7
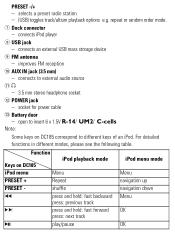
... power cable # Battery door - For detailed functions in different modes, please see the following table. repeat or random order mode. 7 Dock connector - play/pause OK improves FM reception 0 AUX IN jack (3.5 mm) - shuffle navigation down ¡1 press and hold: fast backward Menu press: previous track 2™ press and hold: fast forward OK press: next track 2; selects a preset radio station - (USB) toggles track/album playback options e.g. connects...
... power cable # Battery door - For detailed functions in different modes, please see the following table. repeat or random order mode. 7 Dock connector - play/pause OK improves FM reception 0 AUX IN jack (3.5 mm) - shuffle navigation down ¡1 press and hold: fast backward Menu press: previous track 2™ press and hold: fast forward OK press: next track 2; selects a preset radio station - (USB) toggles track/album playback options e.g. connects...
User manual
Page 8
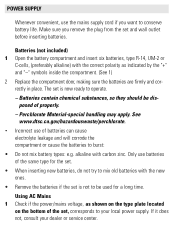
POWER SUPPLY Whenever convenient, use the mains supply cord if you remove the plug from the set and wall outlet before inserting batteries. Perchlorate Material-special handling may apply. If it does not, consult your local power supply. alkaline with the new ones. • Remove the batteries if the set , corresponds to be disposed of the set is now ready to conserve battery life. Batteries (not included) 1 Open the...
POWER SUPPLY Whenever convenient, use the mains supply cord if you remove the plug from the set and wall outlet before inserting batteries. Perchlorate Material-special handling may apply. If it does not, consult your local power supply. alkaline with the new ones. • Remove the batteries if the set , corresponds to be disposed of the set is now ready to conserve battery life. Batteries (not included) 1 Open the...
User manual
Page 9
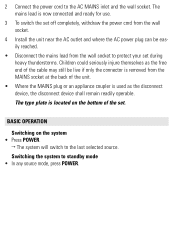
... cable may still be live if only the connector is used as the disconnect device, the disconnect device shall remain readily operable. 2 Connect the power cord to standby mode • In any source mode, press POWER. The mains lead is now connected and ready for use. 3 To switch the set off completely, withdraw the power cord from the wall socket. 4 Install the unit near the AC outlet and where the AC power plug...
... cable may still be live if only the connector is used as the disconnect device, the disconnect device shall remain readily operable. 2 Connect the power cord to standby mode • In any source mode, press POWER. The mains lead is now connected and ready for use. 3 To switch the set off completely, withdraw the power cord from the wall socket. 4 Install the unit near the AC outlet and where the AC power plug...
User manual
Page 10
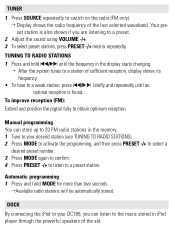
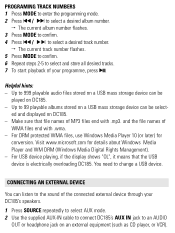
... the display starts changing. ™ After the system tunes to a station of the last selected waveband. TUNING TO RADIO STATIONS 1 Press and hold MODE for more than two seconds. ™Available radio stations will be automatically stored. DOCK By connecting the iPod to your desired station (see TUNING TO RADIO STATIONS). 2 Press MODE to activate the programming, and then press PRESET -/+ to select a desired preset number. 3 Press MODE again to confirm. 4 Press PRESET -/+ to listen to a preset. 2 Adjust the sound using VOLUME...
... the display starts changing. ™ After the system tunes to a station of the last selected waveband. TUNING TO RADIO STATIONS 1 Press and hold MODE for more than two seconds. ™Available radio stations will be automatically stored. DOCK By connecting the iPod to your desired station (see TUNING TO RADIO STATIONS). 2 Press MODE to activate the programming, and then press PRESET -/+ to select a desired preset number. 3 Press MODE again to confirm. 4 Press PRESET -/+ to listen to a preset. 2 Adjust the sound using VOLUME...
User manual
Page 11
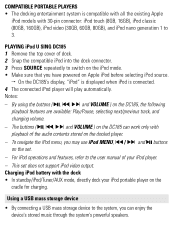
... menu, you can work only with the dock • In standby/iPod/Tuner/AUX mode, directly dock your iPod player. - For iPod operations and features, refer to the system, you may use iPod MENU, ¡1 / 2™ and 2; Notes: - Using a USB mass storage device • By connecting a USB mass storage device to the user manual of the audio contents stored on the DC185 can enjoy the device's stored music through the system's powerful speakers. By using the buttons ( 2;, ¡1, 2 ™ and VOLUME ) on the set does not support iPod video output. COMPATIBLE PORTABLE PLAYERS...
... menu, you can work only with the dock • In standby/iPod/Tuner/AUX mode, directly dock your iPod player. - For iPod operations and features, refer to the system, you may use iPod MENU, ¡1 / 2™ and 2; Notes: - Using a USB mass storage device • By connecting a USB mass storage device to the user manual of the audio contents stored on the DC185 can enjoy the device's stored music through the system's powerful speakers. By using the buttons ( 2;, ¡1, 2 ™ and VOLUME ) on the set does not support iPod video output. COMPATIBLE PORTABLE PLAYERS...
User manual
Page 12
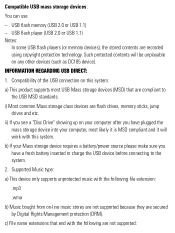
... to the system. 2. USB flash memory (USB 2.0 or USB 1.1) - b) If your Mass storage device requires a battery/power source please make sure you have plugged the mass storage device into your computer after you see a "Disc Drive" showing up on this system. Such protected contents will work with the following file extension: .mp3 .wma b) Music bought from on any other devices (such as DC185 device). Supported Music type: a) This device only supports unprotected music with...
... to the system. 2. USB flash memory (USB 2.0 or USB 1.1) - b) If your Mass storage device requires a battery/power source please make sure you have plugged the mass storage device into your computer after you see a "Disc Drive" showing up on this system. Such protected contents will work with the following file extension: .mp3 .wma b) Music bought from on any other devices (such as DC185 device). Supported Music type: a) This device only supports unprotected music with...
User manual
Page 13
... not possible if you connect directly from your DC185 is not powered on, turn on by AC mains. 2 Press SOURCE repeatedly to select the USB mode. 3 Plug a compatible USB mass storage device to DC185's USB port marked . WMA files in the display. - WMA v9 or earlier - If needed, use a suitable USB cable to connect between the device and DC185's USB port. ™ The device will not play or support the following: - AAC, WAV, PCM audio files - File name...
... not possible if you connect directly from your DC185 is not powered on, turn on by AC mains. 2 Press SOURCE repeatedly to select the USB mode. 3 Plug a compatible USB mass storage device to DC185's USB port marked . WMA files in the display. - WMA v9 or earlier - If needed, use a suitable USB cable to connect between the device and DC185's USB port. ™ The device will not play or support the following: - AAC, WAV, PCM audio files - File name...
User manual
Page 14
... the sound of your DC185's speakers. 1 Press SOURCE repeatedly to select AUX mode. 2 Use the supplied AUX-IN cable to connect DC185's AUX IN jack to an AUDIO OUT or headphone jack on an external equipment (such as CD player, or VCR). For DRM protected WMA files, use Windows Media Player 10 (or later) for details about Windows Media Player and WM DRM (Windows Media Digital Rights Management). - CONNECTING AN EXTERNAL DEVICE You can be played on DC185. - Helpful hints...
... the sound of your DC185's speakers. 1 Press SOURCE repeatedly to select AUX mode. 2 Use the supplied AUX-IN cable to connect DC185's AUX IN jack to an AUDIO OUT or headphone jack on an external equipment (such as CD player, or VCR). For DRM protected WMA files, use Windows Media Player 10 (or later) for details about Windows Media Player and WM DRM (Windows Media Digital Rights Management). - CONNECTING AN EXTERNAL DEVICE You can be played on DC185. - Helpful hints...
User manual
Page 15
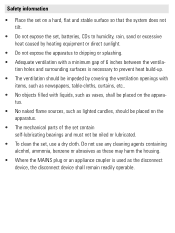
...system does not tilt. • Do not expose the set, batteries, CDs to humidity, rain, sand or excessive heat caused by heating equipment or direct sunlight. • Do not expose the apparatus to dripping or splashing. • Adequate ventilation with a minimum gap of 6 inches between the ventilation holes and surrounding surfaces is used as lighted...flame sources, such as the disconnect device, the disconnect device shall remain readily operable. Do not use any cleaning agents containing alcohol, ammonia, benzene or abrasives as these may harm the housing. • Where the MAINS plug or...
...system does not tilt. • Do not expose the set, batteries, CDs to humidity, rain, sand or excessive heat caused by heating equipment or direct sunlight. • Do not expose the apparatus to dripping or splashing. • Adequate ventilation with a minimum gap of 6 inches between the ventilation holes and surrounding surfaces is used as lighted...flame sources, such as the disconnect device, the disconnect device shall remain readily operable. Do not use any cleaning agents containing alcohol, ammonia, benzene or abrasives as these may harm the housing. • Where the MAINS plug or...
User manual
Page 16
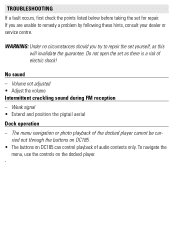
... controls on DC185 can control playback of audio contents only. Do not open the set as this will invalidate the guarantee. Volume not adjusted • Adjust the volume Intermittent crackling sound during FM reception - Weak signal • Extend and position the pigtail aerial Dock operation - The menu navigation or photo playback of the docked player cannot be carried out through the buttons on DC185. • The buttons on the docked player. - TROUBLESHOOTING...
... controls on DC185 can control playback of audio contents only. Do not open the set as this will invalidate the guarantee. Volume not adjusted • Adjust the volume Intermittent crackling sound during FM reception - Weak signal • Extend and position the pigtail aerial Dock operation - The menu navigation or photo playback of the docked player cannot be carried out through the buttons on DC185. • The buttons on the docked player. - TROUBLESHOOTING...
Quick start guide
Page 1
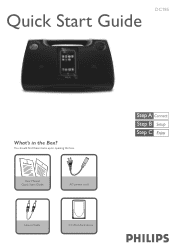
DC185 Quick Start Guide What's in Cable 3 X iPod dock doors You should find these items upon opening the box. 2 User Manual Q uick 1 Start Guide User Manual Quick Start Guide AC power cord Line-in the Box?
DC185 Quick Start Guide What's in Cable 3 X iPod dock doors You should find these items upon opening the box. 2 User Manual Q uick 1 Start Guide User Manual Quick Start Guide AC power cord Line-in the Box?
Quick start guide
Page 2
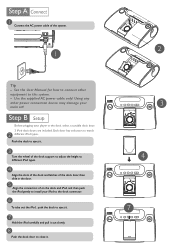
... the dock support to adjust the height to different iPod types. 4 Align the slots of the dock and latches of the system. 1 Tip - Before plugging your player in the door. 5 Align the connectors of on the dock and iPod, and then push the iPod gently to eject it . 2 3 4 7 Each door has indication to this system. - Push the dock to install your main set! Use the supplied AC power cable only! 1 Connect...
... the dock support to adjust the height to different iPod types. 4 Align the slots of the dock and latches of the system. 1 Tip - Before plugging your player in the door. 5 Align the connectors of on the dock and iPod, and then push the iPod gently to eject it . 2 3 4 7 Each door has indication to this system. - Push the dock to install your main set! Use the supplied AC power cable only! 1 Connect...
Quick start guide
Page 3
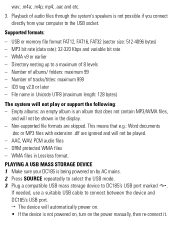
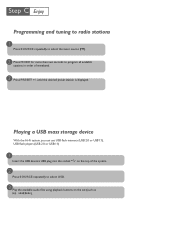
C Enjoy Programming and tuning to radio stations 1 Press SOURCE repeatedly to select the tuner source (FM). 2 Press MODE for more than two seconds to program all available stations in order of the system. 2 Press SOURCE repeatedly to select USB. 3 Play the available audio files using playback buttons on the set (such as 2;, S/T). Playing a USB mass storage device With the Hi-Fi system, you can use USB flash memory (USB 2.0 or USB1.1), USB flash players (USB 2.0 or USB1.1) 1 Insert the USB device's USB plug into the...
C Enjoy Programming and tuning to radio stations 1 Press SOURCE repeatedly to select the tuner source (FM). 2 Press MODE for more than two seconds to program all available stations in order of the system. 2 Press SOURCE repeatedly to select USB. 3 Play the available audio files using playback buttons on the set (such as 2;, S/T). Playing a USB mass storage device With the Hi-Fi system, you can use USB flash memory (USB 2.0 or USB1.1), USB flash players (USB 2.0 or USB1.1) 1 Insert the USB device's USB plug into the...
Quick start guide
Page 4
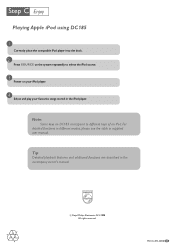
... Playing Apple iPod using DC185 1 Correctly place the compatible iPod player into the dock. 2 Press SOURCE on your iPod player. 4 Select and play your favourite songs stored in the iPod player. Note: Some keys on DC185 correspond to select the iPod source. 3 Power on the system repeatedly to different keys of an iPod. PDCC-ZYL-0810 GB For detailed functions in different modes, please see the table in the accompany owner's manual. C Royal Philips...
... Playing Apple iPod using DC185 1 Correctly place the compatible iPod player into the dock. 2 Press SOURCE on your iPod player. 4 Select and play your favourite songs stored in the iPod player. Note: Some keys on DC185 correspond to select the iPod source. 3 Power on the system repeatedly to different keys of an iPod. PDCC-ZYL-0810 GB For detailed functions in different modes, please see the table in the accompany owner's manual. C Royal Philips...


