
Leaflet
Page 1
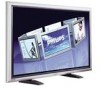
...; PiP allows watching a second source simultaneously • HD ready for the highest quality display of HDTV signals • Motion compensated deinterlacing • High Definition plasma WXGA display, 1366 x 768p Lower total cost of ownership • DVI cable included to prevent ghost images Operational flexibility for different applications • Monitor is network controllable for boardroom and indoor venue display applications. The high class scaler, advanced digital video...
...; PiP allows watching a second source simultaneously • HD ready for the highest quality display of HDTV signals • Motion compensated deinterlacing • High Definition plasma WXGA display, 1366 x 768p Lower total cost of ownership • DVI cable included to prevent ghost images Operational flexibility for different applications • Monitor is network controllable for boardroom and indoor venue display applications. The high class scaler, advanced digital video...
Leaflet
Page 2
... you with data/graphics Multiple PC input formats The product supports PC compatibility for optimal display on given screen resolution. Fanless operation Fanless operation is a razor sharp image. Network controllability: RS232 Network controllability allows user to eliminate cross-color, cross-luminance and dot-crawl distortion - Plasma monitor 50" WXGA Highlights BDH5021V/27 Free DVI cable A DVI cable is standard included with the display to provide the highest possible picture quality. 3:2 Pulldown 3:2 Pulldown totally eliminates the...
... you with data/graphics Multiple PC input formats The product supports PC compatibility for optimal display on given screen resolution. Fanless operation Fanless operation is a razor sharp image. Network controllability: RS232 Network controllability allows user to eliminate cross-color, cross-luminance and dot-crawl distortion - Plasma monitor 50" WXGA Highlights BDH5021V/27 Free DVI cable A DVI cable is standard included with the display to provide the highest possible picture quality. 3:2 Pulldown 3:2 Pulldown totally eliminates the...

Leaflet
Page 3
...: Table top stand, DVI-D cable, VGA cable, Remote Control, Battery, AC Power Cord • User Guide on CD-ROM: (RS232 protocol included) • User Manual: English Miscellaneous • Bezel: Metallic Antracite • Issue date 2009-07-31 Version: 3.0.13 12 NC: 8639 000 16781 UPC: 6 09585 11621 4 © 2009 Koninklijke Philips Electronics N.V. All Rights reserved. www.philips.com Plasma monitor 50" WXGA Specifications BDH5021V/27 Picture/Display • Display screen type: WXGA Plasma panel • Panel Size: 50" / 127cm...
...: Table top stand, DVI-D cable, VGA cable, Remote Control, Battery, AC Power Cord • User Guide on CD-ROM: (RS232 protocol included) • User Manual: English Miscellaneous • Bezel: Metallic Antracite • Issue date 2009-07-31 Version: 3.0.13 12 NC: 8639 000 16781 UPC: 6 09585 11621 4 © 2009 Koninklijke Philips Electronics N.V. All Rights reserved. www.philips.com Plasma monitor 50" WXGA Specifications BDH5021V/27 Picture/Display • Display screen type: WXGA Plasma panel • Panel Size: 50" / 127cm...

User manual
Page 2
... S-Video Input 14 4.1.2 Using Component Video Input 14 4.1.3 Using Video Input 15 4.1.4 Using Monitor Output 15 4.1.5 Using DVI Input 15 4.2 External Audio Connection 16 4.2.1 Connecting External Amplified Speakers 16 4.3 Connecting a PC 17 4.3.1 Using RGB (VGA) or DVI Video Input 17 B A SIC FU N C T IO N S 18 5.1 Powering ON/OFF 18 5.2 Selecting Signal Source 18 5.3 Volume Adjustment 19 5.4 MUTE 19 5.5 Display Information 20 A DV A N C E D FU N C T IO N S 22 6.1 Picture Controls 22 6.1.1 Adjusting Picture Settings 22 6.1.2 Reset to the factory defaults 22 6.2 Sound Controls...
... S-Video Input 14 4.1.2 Using Component Video Input 14 4.1.3 Using Video Input 15 4.1.4 Using Monitor Output 15 4.1.5 Using DVI Input 15 4.2 External Audio Connection 16 4.2.1 Connecting External Amplified Speakers 16 4.3 Connecting a PC 17 4.3.1 Using RGB (VGA) or DVI Video Input 17 B A SIC FU N C T IO N S 18 5.1 Powering ON/OFF 18 5.2 Selecting Signal Source 18 5.3 Volume Adjustment 19 5.4 MUTE 19 5.5 Display Information 20 A DV A N C E D FU N C T IO N S 22 6.1 Picture Controls 22 6.1.1 Adjusting Picture Settings 22 6.1.2 Reset to the factory defaults 22 6.2 Sound Controls...

User manual
Page 4
IMPORTANT NOTES AND SAFETY INSTRUCTIONS 1.1 Safty Instructions CAUTION RISK OF ELECTRIC SHOCK DO NOT OPEN .) • • • • • re if it is connected to re.) 3 User Manual BDS4241V/BDH4241/BDH5021V 1.
IMPORTANT NOTES AND SAFETY INSTRUCTIONS 1.1 Safty Instructions CAUTION RISK OF ELECTRIC SHOCK DO NOT OPEN .) • • • • • re if it is connected to re.) 3 User Manual BDS4241V/BDH4241/BDH5021V 1.

User manual
Page 6
... interference when the equipment is subject to Part 15 of this monitor is available from the U.S. This device must use only UL Listed detachable power cord with picture screens 13 inches or larger in a commercial environment. It may be required to comply with similar configuration. Operation is operated in diameter models only) 5 User Information Changes or modi cations not expressly approved by...
... interference when the equipment is subject to Part 15 of this monitor is available from the U.S. This device must use only UL Listed detachable power cord with picture screens 13 inches or larger in a commercial environment. It may be required to comply with similar configuration. Operation is operated in diameter models only) 5 User Information Changes or modi cations not expressly approved by...
User manual
Page 9
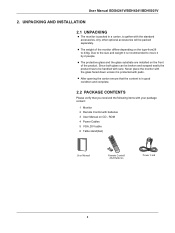
... care. Never place the monitor with pads. ROM 4 Power Cables 5 VGA, DVI cable 6 Table stand(feet) User Manual R emote C ontrol/ AAA B atteries P ower C ord 8 UNPACKING AND INSTALLATION 2.1 UNPACKING The monitor is packed in good condition and complete. 2.2 PACKAGE CONTENTS Please verify that you received the following items with your package content : 1 Monitor 2 Remote Control with batteries 3 User Manual on the front of the monitor differs-depending on the...
... care. Never place the monitor with pads. ROM 4 Power Cables 5 VGA, DVI cable 6 Table stand(feet) User Manual R emote C ontrol/ AAA B atteries P ower C ord 8 UNPACKING AND INSTALLATION 2.1 UNPACKING The monitor is packed in good condition and complete. 2.2 PACKAGE CONTENTS Please verify that you received the following items with your package content : 1 Monitor 2 Remote Control with batteries 3 User Manual on the front of the monitor differs-depending on the...
User manual
Page 11
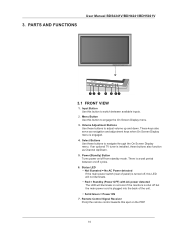
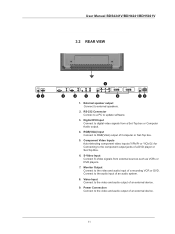
... On Screen Display menu. 3. Red = Standby (Power OFF) with AC power detected The LED will not illuminate. 3. PARTS AND FUNCTIONS User Manual BDS4241V/BDH4241/BDH5021V 1 12 13 14 15 16 17 3.1 FRONT VIEW 1. There is turned off cycles. 6. Remote Control Signal Receiver Poinjt the remote control towards this button to switch between on the PDP. 10 Input Button Use this LED will illuminate in red color if the monitors is plugged into the back of panel) is a wait period between available inputs. 2. Solid Green = Power...
... On Screen Display menu. 3. Red = Standby (Power OFF) with AC power detected The LED will not illuminate. 3. PARTS AND FUNCTIONS User Manual BDS4241V/BDH4241/BDH5021V 1 12 13 14 15 16 17 3.1 FRONT VIEW 1. There is turned off cycles. 6. Remote Control Signal Receiver Poinjt the remote control towards this button to switch between on the PDP. 10 Input Button Use this LED will illuminate in red color if the monitors is plugged into the back of panel) is a wait period between available inputs. 2. Solid Green = Power...
User manual
Page 12
...Top box or Computer Audio output. 4. Video Input Connect to the component output jacks of an external device. 11 External speaker output Connect to update software. 3. Component Video Inputs Auto-detecting component video inputs (Y/Pb/Pr or Y/Cb/Cr) for Connecting to the video and audio output of an audio system. 8. Digital DVI Input Connect to the video and audio output of a DVD player or Set-Top Box. 6. Power Connection Connect to digital video signals from external sources such as VCRs or DVD players. 7. User Manual BDS4241V/BDH4241/BDH5021V 3.2 REAR VIEW 1 12 17 VIDEO...
...Top box or Computer Audio output. 4. Video Input Connect to the component output jacks of an external device. 11 External speaker output Connect to update software. 3. Component Video Inputs Auto-detecting component video inputs (Y/Pb/Pr or Y/Cb/Cr) for Connecting to the video and audio output of an audio system. 8. Digital DVI Input Connect to the video and audio output of a DVD player or Set-Top Box. 6. Power Connection Connect to digital video signals from external sources such as VCRs or DVD players. 7. User Manual BDS4241V/BDH4241/BDH5021V 3.2 REAR VIEW 1 12 17 VIDEO...
User manual
Page 13
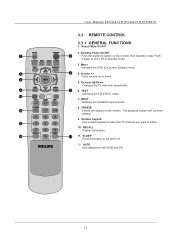
INPUT Displays the available input sources. 8. FREEZE 18 Freeze the display on the monitor from Standby mode. Number keypad 19 Use number keypad to select the TV channel you want to turn it off . 12. RECALL Display information. 110 111 11. Menu Activates the OSD (On Screen Display) menu 13 15 4. The playback system will continue playing. 9. Sound Mute On/Off 2. Volume +/- Standby Power On/Off 1 12 Push this button to set timer off to switch on the screen. Turns volume up...
INPUT Displays the available input sources. 8. FREEZE 18 Freeze the display on the monitor from Standby mode. Number keypad 19 Use number keypad to select the TV channel you want to turn it off . 12. RECALL Display information. 110 111 11. Menu Activates the OSD (On Screen Display) menu 13 15 4. The playback system will continue playing. 9. Sound Mute On/Off 2. Volume +/- Standby Power On/Off 1 12 Push this button to set timer off to switch on the screen. Turns volume up...
User manual
Page 15
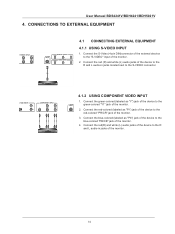
... the device to the blue-colored "PB/CB" jack of the monitor. 3. Connect the red-colored (labeled as "Y") jack of the device to the green-colored "Y1" jack of the device to the "S-VIDEO" input of the monitor. 14 CONNECTIONS TO EXTERNAL EQUIPMENT 4.1 CONNECTING EXTERNAL EQUIPMENT 4.1.1 USING S-VIDEO INPUT 1. Connect the S-Video (4-pin DIN)connector of the external decvice to the R and L audio-in jacks of the monitor. 2. Connect the red(R) and white (L) audio jacks of the...
... the device to the blue-colored "PB/CB" jack of the monitor. 3. Connect the red-colored (labeled as "Y") jack of the device to the green-colored "Y1" jack of the device to the "S-VIDEO" input of the monitor. 14 CONNECTIONS TO EXTERNAL EQUIPMENT 4.1 CONNECTING EXTERNAL EQUIPMENT 4.1.1 USING S-VIDEO INPUT 1. Connect the S-Video (4-pin DIN)connector of the external decvice to the R and L audio-in jacks of the monitor. 2. Connect the red(R) and white (L) audio jacks of the...
User manual
Page 18
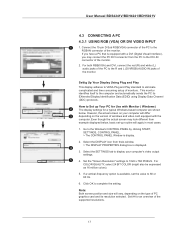
...) and DVI, connect the red (R) and white (L) audio jacks of the PC to eliminate complicated and time consuming setup of the monitor. If a vertical-frequency option is displayed. 14 3. Note: Both screen position and size will vary, depending on the type of PC graphics card and its EXtended Display Identification Data (EDID) using Display Data Channel (DDC) protocols. Settig Up Your Display Using Plug and Play This display adheres to VESA Plug and Play standard...
...) and DVI, connect the red (R) and white (L) audio jacks of the PC to eliminate complicated and time consuming setup of the monitor. If a vertical-frequency option is displayed. 14 3. Note: Both screen position and size will vary, depending on the type of PC graphics card and its EXtended Display Identification Data (EDID) using Display Data Channel (DDC) protocols. Settig Up Your Display Using Plug and Play This display adheres to VESA Plug and Play standard...
User manual
Page 19
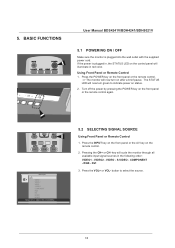
... [MENU] 5.2 SELECTING SIGNAL SOURCE Using Front Panel or Remote Control 1. button to indicate power on after a brief pause. Press the INPUT key on the from panel or the AV key on the front panel or the remote control again. VIDEO2 - DVI 3. The STATUS LED will illuminate in , the STATUS LED on the control panel will now turn on status. 2. If the power is plugged into the wall outlet with the supplied power cord. Main Input VIDEO 1 VIDEO 2 VIDEO S-VIDEO COMPONENT RGB DVI HDMI 1 HDMI...
... [MENU] 5.2 SELECTING SIGNAL SOURCE Using Front Panel or Remote Control 1. button to indicate power on after a brief pause. Press the INPUT key on the from panel or the AV key on the front panel or the remote control again. VIDEO2 - DVI 3. The STATUS LED will illuminate in , the STATUS LED on the control panel will now turn on status. 2. If the power is plugged into the wall outlet with the supplied power cord. Main Input VIDEO 1 VIDEO 2 VIDEO S-VIDEO COMPONENT RGB DVI HDMI 1 HDMI...

User manual
Page 23
... the option to select Image Preset. 2. Phase - VOL +] Exit [MENU] 6.1 PICTURE CONTROLS 6.1.1 ADJUSTING PICTURE SETTINGS Various picture adjustments can be adjusted. Press the MENU button on the input source, the following menu's appear: Brightness - Frequency - VOL 083 052 019 063 05 Image Preset Complete! +] Exit [MENU] 6.1.2 RESET TO THE FACTORY DEFAULTS 1. VOL [-VOL+]to enter the selected menu group. 3. key to be set using the Picture Adjustment OSD menu. 1. CH +] Select [- Sharpness (RGB (PC) mode ) 4. The Image menu is displayed. 2.
... the option to select Image Preset. 2. Phase - VOL +] Exit [MENU] 6.1 PICTURE CONTROLS 6.1.1 ADJUSTING PICTURE SETTINGS Various picture adjustments can be adjusted. Press the MENU button on the input source, the following menu's appear: Brightness - Frequency - VOL 083 052 019 063 05 Image Preset Complete! +] Exit [MENU] 6.1.2 RESET TO THE FACTORY DEFAULTS 1. VOL [-VOL+]to enter the selected menu group. 3. key to be set using the Picture Adjustment OSD menu. 1. CH +] Select [- Sharpness (RGB (PC) mode ) 4. The Image menu is displayed. 2.
User manual
Page 24
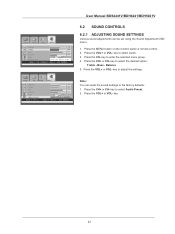
... et [-VOL +] to P res et Audio Move [- Bass - key to select Audio Preset. 2. key to adjust the settings. Press the MENU button on the monitor panel or remote control. 2. S elect [- Press the VOL+ or VOL- C H +] Adjus t [- Image S creen S etup Audio Volume 6 0 T r eble 055 B as s B alance Mute Audio P res et Move [- VOL +] E xit [ME NU] User Manual BDS4241V/BDH4241/BDH5021V 6.2 SOUND CONTROLS 6.2.1 ADJUSTING SOUND SETTINGS Various sound adjustments can reset the sound settings to select the desired option...
... et [-VOL +] to P res et Audio Move [- Bass - key to select Audio Preset. 2. key to adjust the settings. Press the MENU button on the monitor panel or remote control. 2. S elect [- Press the VOL+ or VOL- C H +] Adjus t [- Image S creen S etup Audio Volume 6 0 T r eble 055 B as s B alance Mute Audio P res et Move [- VOL +] E xit [ME NU] User Manual BDS4241V/BDH4241/BDH5021V 6.2 SOUND CONTROLS 6.2.1 ADJUSTING SOUND SETTINGS Various sound adjustments can reset the sound settings to select the desired option...

User manual
Page 26
... the monitor panel or remote control. 2. Press the MENU button. 2. Press the CH- Press the Vol+ key to select OSD Settings. 5. Press the CH- key until you reach the optimal setting. 25 Press the CH- or CH+ key to enter the selected menu group. 6. VOL +] E xit [ ME NU ] User Manual BDS4241V/BDH4241/BDH5021V 6.6 MINIMIZE SCREEN STICKING If the fixed pattern is selected. 6. key to select Setup...
... the monitor panel or remote control. 2. Press the MENU button. 2. Press the CH- Press the Vol+ key to select OSD Settings. 5. Press the CH- key until you reach the optimal setting. 25 Press the CH- or CH+ key to enter the selected menu group. 6. VOL +] E xit [ ME NU ] User Manual BDS4241V/BDH4241/BDH5021V 6.6 MINIMIZE SCREEN STICKING If the fixed pattern is selected. 6. key to select Setup...
User manual
Page 29
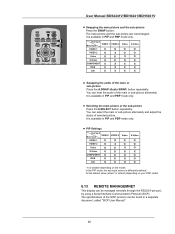
... X X Swapping the audio of the main or sub-picture alternately It is variable depending on your PDP model. 6.13 REMOTE MANAGEMNET This display can be managed remotely through the RS232 9-pin port, by using a Serial Interface Communication Protocol (SICP). Selecting the main picture or the sub-picture Press the S.SELECT button repeatedly. PIP Settings Sub Input Main Input VIDEO 1 VIDEO 2 VIDEO 1 X O VIDEO 2 O X Video O O S-Video O O COMPONENT O O RGB O O DVI O O Video O O X O O O O S-Video O O O X O O O - In the PIP mode, the sub input source is differently...
... X X Swapping the audio of the main or sub-picture alternately It is variable depending on your PDP model. 6.13 REMOTE MANAGEMNET This display can be managed remotely through the RS232 9-pin port, by using a Serial Interface Communication Protocol (SICP). Selecting the main picture or the sub-picture Press the S.SELECT button repeatedly. PIP Settings Sub Input Main Input VIDEO 1 VIDEO 2 VIDEO 1 X O VIDEO 2 O X Video O O S-Video O O COMPONENT O O RGB O O DVI O O Video O O X O O O O S-Video O O O X O O O - In the PIP mode, the sub input source is differently...

User manual
Page 31
...). Also, make sure that the PC is supported (over 16 million colors). When connecting a notebook PC to the PDP, make sure that the PC screen is optimumin in XGA mode (1024 x 768, 60Hz). In some cases, abnormal signals (such as a PC display, 24-bit color is connected. INPUT MODE User Manual BDS4241V/BDH4241/BDH5021V VGA Resolution Standard resolution Active Resolution H Pixels V Lines VGA 640 480 WVGA 848 480 SVGA...
...). Also, make sure that the PC is supported (over 16 million colors). When connecting a notebook PC to the PDP, make sure that the PC screen is optimumin in XGA mode (1024 x 768, 60Hz). In some cases, abnormal signals (such as a PC display, 24-bit color is connected. INPUT MODE User Manual BDS4241V/BDH4241/BDH5021V VGA Resolution Standard resolution Active Resolution H Pixels V Lines VGA 640 480 WVGA 848 480 SVGA...
User manual
Page 38
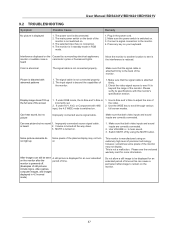
... the signal cable is attached firmly to be seen A still picture is cars/motor cycles or fluorescent lights. to adjust the size of time as this monitor's specification section. Switch MUTE off . (Examples of still pictures include logos, video games, computer images, and images displayed in 4:3 normal mode) Do not allow a still image to the back of the monitor may not display. User Manual BDS4241V/BDH4241/BDH5021V 9.2 TROUBLESHOOTING Symptom Possible Cause No picture is turned all...
... the signal cable is attached firmly to be seen A still picture is cars/motor cycles or fluorescent lights. to adjust the size of time as this monitor's specification section. Switch MUTE off . (Examples of still pictures include logos, video games, computer images, and images displayed in 4:3 normal mode) Do not allow a still image to the back of the monitor may not display. User Manual BDS4241V/BDH4241/BDH5021V 9.2 TROUBLESHOOTING Symptom Possible Cause No picture is turned all...

User manual
Page 39
... charges for all replaced and repaired parts also expires. Do not display static images for prolonged periods, otherwise phosphor burn might appear on part of all parts, and for removal, installation or setup of the product, adjustment of customer controls on all labor charges. After two years from the product. (some states do not produce light, or that requires modification or adaptation to enable it...
... charges for all replaced and repaired parts also expires. Do not display static images for prolonged periods, otherwise phosphor burn might appear on part of all parts, and for removal, installation or setup of the product, adjustment of customer controls on all labor charges. After two years from the product. (some states do not produce light, or that requires modification or adaptation to enable it...


