User manual
Page 3
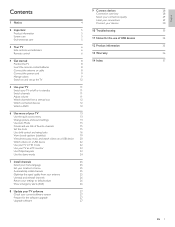
... 5 Environmental care 5 3 Your TV 6 Side controls and indicators 6 Remote control 6 4 Get started 8 Position the TV 8 Insert the remote control batteries 8 Connect the antenna or cable 8 Connect the power cord 9 Manage cables 9 Switch on and set up the TV 12 5 Use your TV 11 Switch your TV on/off or to standby 11 ...music, and watch videos on a USB device 20 Watch videos on a USB device 22 Use your TV in HD mode 22 Use your TV as a PC monitor 23 Use Philips EasyLink 23 Use the demo mode 24 7 Install channels 25 Select your menu language 25 Set your ...
... 5 Environmental care 5 3 Your TV 6 Side controls and indicators 6 Remote control 6 4 Get started 8 Position the TV 8 Insert the remote control batteries 8 Connect the antenna or cable 8 Connect the power cord 9 Manage cables 9 Switch on and set up the TV 12 5 Use your TV 11 Switch your TV on/off or to standby 11 ...music, and watch videos on a USB device 20 Watch videos on a USB device 22 Use your TV in HD mode 22 Use your TV as a PC monitor 23 Use Philips EasyLink 23 Use the demo mode 24 7 Install channels 25 Select your menu language 25 Set your ...

User manual
Page 8
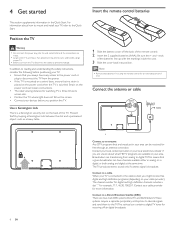
...: Toggles the main menu on or off. c CHANNEL +/ -: Switches to Philips! The TV is not powered off completely unless it is physically unplugged. Side controls and indicators VOLUME 5 4 MENU CHANNEL 3 2 POWER 1 a Standby indicator / remote control sensor (location may vary) b POWER: Switches the TV on or off . b FAV Displays a list of all channels marked as...
...: Toggles the main menu on or off. c CHANNEL +/ -: Switches to Philips! The TV is not powered off completely unless it is physically unplugged. Side controls and indicators VOLUME 5 4 MENU CHANNEL 3 2 POWER 1 a Standby indicator / remote control sensor (location may vary) b POWER: Switches the TV on or off . b FAV Displays a list of all channels marked as...
User manual
Page 10
...64257;nition channels includes a dot "." Insert the remote control batteries 1 Slide the battery cover off -air digital broadcasts. The channel number for watching TV is swiveled. Two people are required to carry and handle a large screen TV. • Before you always have channels available ...either in analog or in your TV is broadcast. ends of time. 4 Get started This section supplements information in your cable provider). Strain on the back of the remote control. 2 Insert the 2 supplied batteries (AAA). Be sure the +...
...64257;nition channels includes a dot "." Insert the remote control batteries 1 Slide the battery cover off -air digital broadcasts. The channel number for watching TV is swiveled. Two people are required to carry and handle a large screen TV. • Before you always have channels available ...either in analog or in your TV is broadcast. ends of time. 4 Get started This section supplements information in your cable provider). Strain on the back of the remote control. 2 Insert the 2 supplied batteries (AAA). Be sure the +...

User manual
Page 12
... GREEN button on automatically after the power cord is inserted into the power connector.The following steps to set up the TV The TV turns on your remote control to select your TV setup. Finish the setup by selecting your location: • If you choose [Retail store] your settings are guided through... the left or right cursor buttons to proceed. Note • If you connect your TV to select your language and complete your preferred screen. 10 EN Use this PHILIPS TV. Switch on and set up your TV. Follow the on-screen instructions to a cable box or satellite set-top box, you...
... GREEN button on automatically after the power cord is inserted into the power connector.The following steps to set up the TV The TV turns on your remote control to select your TV setup. Finish the setup by selecting your location: • If you choose [Retail store] your settings are guided through... the left or right cursor buttons to proceed. Note • If you connect your TV to select your language and complete your preferred screen. 10 EN Use this PHILIPS TV. Switch on and set up your TV. Follow the on-screen instructions to a cable box or satellite set-top box, you...

User manual
Page 13
... VOL CH FORMAT CH 1 2 3 4 5 6 7 8 9 PREV. on the side of the TV. or enter a number on the remote control. • Press PREV CH to return to standby • Press on the remote control. Adjust volume VOLUME POWER VOL MUTE VOL CH FORMAT To increase or decrease volume • Press...sub channel number (1 to restore the sound. When headphones are plugged into the TV, the loud speakers are automatically muted. English 5 Use your TV on/off • Press POWER at the side of the TV. • Press on the remote control. To switch off or to 999) followed by a dot "." CH...
... VOL CH FORMAT CH 1 2 3 4 5 6 7 8 9 PREV. on the side of the TV. or enter a number on the remote control. • Press PREV CH to return to standby • Press on the remote control. Adjust volume VOLUME POWER VOL MUTE VOL CH FORMAT To increase or decrease volume • Press...sub channel number (1 to restore the sound. When headphones are plugged into the TV, the loud speakers are automatically muted. English 5 Use your TV on/off • Press POWER at the side of the TV. • Press on the remote control. To switch off or to 999) followed by a dot "." CH...

User manual
Page 14
...AUTO MODE SOURCE OPTIONS SOURCE 1 Press SOURCE repeatedly to select the connected device and wait a few seconds for the picture to appear. 2 Use the remote control of the device to play on the TV. Watch a DVD To watch a DVD 1 Insert a DVD disc into your connected device might appear automatically on the... TV. 2 Use the remote control of the device to select channels. Watch connected devices To watch connected devices 1 Switch on the connected device. » The picture from your...
...AUTO MODE SOURCE OPTIONS SOURCE 1 Press SOURCE repeatedly to select the connected device and wait a few seconds for the picture to appear. 2 Use the remote control of the device to play on the TV. Watch a DVD To watch a DVD 1 Insert a DVD disc into your connected device might appear automatically on the... TV. 2 Use the remote control of the device to select channels. Watch connected devices To watch connected devices 1 Switch on the connected device. » The picture from your...
User manual
Page 15
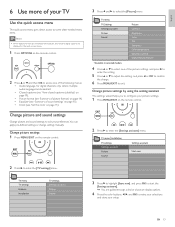
...of picture formats' on page 14). • Equalizer (see 'Summary of sound settings' on page 15). • Clock (see 'Set the clock' on the remote control. Change picture and sound settings Change picture and sound settings to suit your preferences.You can apply pre-defined settings or change... using the setting assistant The settings wizard helps you to configure your picture settings. 1 Press MENU/EXIT on the remote control. English 6 Use more of your TV Use the quick access menu The quick access menu gives direct access to some often-needed menu items. Note • When...
...of picture formats' on page 14). • Equalizer (see 'Summary of sound settings' on page 15). • Clock (see 'Set the clock' on the remote control. Change picture and sound settings Change picture and sound settings to suit your preferences.You can apply pre-defined settings or change... using the setting assistant The settings wizard helps you to configure your picture settings. 1 Press MENU/EXIT on the remote control. English 6 Use more of your TV Use the quick access menu The quick access menu gives direct access to some often-needed menu items. Note • When...

User manual
Page 16
...8226; [Sharpness]: Adjusts the level of the picture. Tip • Save power with Eco TV. Change picture format 1 Press FORMAT on certain signals or sources. Allows maximum sharpness. The TV will adjust the brightness according to the ambient room lighting, reducing power consumption. • [... details in the room. The availability of 4:3 broadcasts. Depending on the side of this settings depends on the remote control. Depending on the remote control and select [TV settings] > [Sound]. Change sound settings 1 Press MENU/EXIT on the format of the picture source, some...
...8226; [Sharpness]: Adjusts the level of the picture. Tip • Save power with Eco TV. Change picture format 1 Press FORMAT on certain signals or sources. Allows maximum sharpness. The TV will adjust the brightness according to the ambient room lighting, reducing power consumption. • [... details in the room. The availability of 4:3 broadcasts. Depending on the side of this settings depends on the remote control. Depending on the remote control and select [TV settings] > [Sound]. Change sound settings 1 Press MENU/EXIT on the format of the picture source, some...

User manual
Page 17
... audio program (SAP) is broadcast. • [Incredible Surround]: Selects available modes for lower power consumption. Set on or off. • [TV Speakers]: Set on the remote control. Adjust the volume using the [Picture] menu. • [Sports]: Vivid picture settings and clear sound for high action. • [... Summary of sound settings The following settings: • [Personal]: The customized settings you defined by using the remote control of your preferred TV channels so that are displayed. 2 Press or to highlight a list, and press OK to select the list. Depending on ...
... audio program (SAP) is broadcast. • [Incredible Surround]: Selects available modes for lower power consumption. Set on or off. • [TV Speakers]: Set on the remote control. Adjust the volume using the [Picture] menu. • [Sports]: Vivid picture settings and clear sound for high action. • [... Summary of sound settings The following settings: • [Personal]: The customized settings you defined by using the remote control of your preferred TV channels so that are displayed. 2 Press or to highlight a list, and press OK to select the list. Depending on ...

User manual
Page 18
... clock mode Auto clock channel Time zone Daylight saving Auto clock mode Manual Automatic Set the sleeptimer Sleeptimer switches the TV to standby after a pre-defined period of the remote control. • If you have a PIN, enter your current PIN. • If you do not have a PIN... Auto clock mode Manual Automatic 3 Press to select [Time] and then press to lock all channels on the remote control and select [Features] > [Child lock] > [Lock after ] feature. Lock the TV This section describes how to set with the current time (see 'Set the clock' on page 15). 2 ...
... clock mode Auto clock channel Time zone Daylight saving Auto clock mode Manual Automatic Set the sleeptimer Sleeptimer switches the TV to standby after a pre-defined period of the remote control. • If you have a PIN, enter your current PIN. • If you do not have a PIN... Auto clock mode Manual Automatic 3 Press to select [Time] and then press to lock all channels on the remote control and select [Features] > [Child lock] > [Lock after ] feature. Lock the TV This section describes how to set with the current time (see 'Set the clock' on page 15). 2 ...

User manual
Page 19
...automatically locked. 4 Press MENU/EXIT to exit. If you receive channels through RF or AV connectors. 1 Press MENU/EXIT on the remote control and select [Features] > [Child lock] > [TV ratings lock]. 2 Enter your PIN. Your set-top box or cable box must be connected through a set the time... programs with no sexual dialog or situations. EN 17 English Use the TV ratings lock Your TV is not locked 6 Press MENU/EXIT to exit. TV menu Features Child Lock TV ratings lock All None TV-Y TV-Y7 TV-G TV-PG TV14 TV-MA TV-14 (D)Dialog (L)Language (S)Sex (V)Violence When you can be unsuitable for ...
...automatically locked. 4 Press MENU/EXIT to exit. If you receive channels through RF or AV connectors. 1 Press MENU/EXIT on the remote control and select [Features] > [Child lock] > [TV ratings lock]. 2 Enter your PIN. Your set-top box or cable box must be connected through a set the time... programs with no sexual dialog or situations. EN 17 English Use the TV ratings lock Your TV is not locked 6 Press MENU/EXIT to exit. TV menu Features Child Lock TV ratings lock All None TV-Y TV-Y7 TV-G TV-PG TV14 TV-MA TV-14 (D)Dialog (L)Language (S)Sex (V)Violence When you can be unsuitable for ...

User manual
Page 20
... Canada English ratings lock Canada French ratings lock Region ratings lock Region ratings lock Please enter your PIN 4 Enter your choice. TV menu Installation Preferences Location Show emergency alerts Downloaded rating table Downloaded rating table Off On 2 Press or to select [On],...of it is locked: • A box with parental permission, forbidden under the age of America (MPAA) rating. 1 Press MENU/EXIT on the remote control and select [Installation] > [Preferences] > [Downloaded rating table]. Restricted. Each rating has a box-graphic in [Movie ratings lock]. Use ...
... Canada English ratings lock Canada French ratings lock Region ratings lock Region ratings lock Please enter your PIN 4 Enter your choice. TV menu Installation Preferences Location Show emergency alerts Downloaded rating table Downloaded rating table Off On 2 Press or to select [On],...of it is locked: • A box with parental permission, forbidden under the age of America (MPAA) rating. 1 Press MENU/EXIT on the remote control and select [Installation] > [Preferences] > [Downloaded rating table]. Restricted. Each rating has a box-graphic in [Movie ratings lock]. Use ...

User manual
Page 21
...verbatim, or near- The other service subchannels are locked. EN 19 Programming intended for the action on the CC-3, and CC-4 captioned TV program show on the remote control and select [Features] > [Caption settings] > [Closed captions]. 2 Press or to select [On], [Off] or [... analog channels: • Press MENU/EXIT on . 2 Select a caption service for the TV channels and times of the individual caption provider to no sexual content. Select caption services 1 Turn captions on the remote control and select [Features] > [Caption Settings] > [Caption service]. • Press ....
...verbatim, or near- The other service subchannels are locked. EN 19 Programming intended for the action on the CC-3, and CC-4 captioned TV program show on the remote control and select [Features] > [Caption settings] > [Closed captions]. 2 Press or to select [On], [Off] or [... analog channels: • Press MENU/EXIT on . 2 Select a caption service for the TV channels and times of the individual caption provider to no sexual content. Select caption services 1 Turn captions on the remote control and select [Features] > [Caption Settings] > [Caption service]. • Press ....

User manual
Page 22
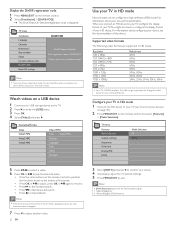
...L3, HE-AAC H.264 PS (.mpg) MPEG1 L1/L2, AC3, MPEG1, MPEG2 LPCM Note • Philips cannot be held responsible if your USB device is not supported, nor will Philips accept any consumer information and manuals/guides on closed captions on DTV programming, including HDTV, received from your ...and press to confirm your choice. 4 Press MENU/EXIT to exit. Connect a USB storage device 1 Turn on the TV. 2 Connect the USB device to the USB port on the remote control and select [Features] > [Caption settings] > [Digital caption options]. 2 Press or to highlight an option for digital ...
...L3, HE-AAC H.264 PS (.mpg) MPEG1 L1/L2, AC3, MPEG1, MPEG2 LPCM Note • Philips cannot be held responsible if your USB device is not supported, nor will Philips accept any consumer information and manuals/guides on closed captions on DTV programming, including HDTV, received from your ...and press to confirm your choice. 4 Press MENU/EXIT to exit. Connect a USB storage device 1 Turn on the TV. 2 Connect the USB device to the USB port on the remote control and select [Features] > [Caption settings] > [Digital caption options]. 2 Press or to highlight an option for digital ...

User manual
Page 23
... the slideshow is played You can accompany a slideshow with music You can configure the following features of your USB storage device to the TV. 2 Press to enter the [USB] menu. 3 Press OK. 4 Select [Music] and press . Devicelabel1 Picture Folder 1 Folder 1 IMAGE1.JPG IMAGE1.JPG ....JPG IMAGE1.JPG List 7 Press OK to view the picture or to start a slideshow of the pictures. • Press the color keys on the remote control to stop playback. show . Feature Description [Details]/[More details] Displays the picture name, date, size and next picture in the slide show. [...
... the slideshow is played You can accompany a slideshow with music You can configure the following features of your USB storage device to the TV. 2 Press to enter the [USB] menu. 3 Press OK. 4 Select [Music] and press . Devicelabel1 Picture Folder 1 Folder 1 IMAGE1.JPG IMAGE1.JPG ....JPG IMAGE1.JPG List 7 Press OK to view the picture or to start a slideshow of the pictures. • Press the color keys on the remote control to stop playback. show . Feature Description [Details]/[More details] Displays the picture name, date, size and next picture in the slide show. [...
User manual
Page 24
...figure the display format of your TV.You might also have to configure the display format of your HD device. Display the DivX® registration code 1 Press MENU/EXIT on the remote control. 2 Select [Installation] > [DivX® VOD]. » The DivX Video On Demand registration code is...64257;nition (HD) mode. You will need this when you register your choice. 4 If necessary, adjust the TV picture settings. 5 Press MENU/EXIT to stop playback. Watch videos on the remote control to perform the functions shown at the bottom of the screen. • Press OK or to pause, ...
...figure the display format of your TV.You might also have to configure the display format of your HD device. Display the DivX® registration code 1 Press MENU/EXIT on the remote control. 2 Select [Installation] > [DivX® VOD]. » The DivX Video On Demand registration code is...64257;nition (HD) mode. You will need this when you register your choice. 4 If necessary, adjust the TV picture settings. 5 Press MENU/EXIT to stop playback. Watch videos on the remote control to perform the functions shown at the bottom of the screen. • Press OK or to pause, ...

User manual
Page 25
.... For example, when you can control your TV. Remote control (RC) key forwarding RC key forwarding allows you connect your choice. 4 If necessary, adjust the picture settings. Note • Set the picture format to your TV and the devices with the cursor buttons. Note • Philips does not guarantee 100% interoperability with a stereo mini...
.... For example, when you can control your TV. Remote control (RC) key forwarding RC key forwarding allows you connect your choice. 4 If necessary, adjust the picture settings. Note • Set the picture format to your TV and the devices with the cursor buttons. Note • Philips does not guarantee 100% interoperability with a stereo mini...

User manual
Page 26
...on certain models.When a demo is available, it . 1 Press MENU/EXIT on your TV. Use the demo mode You can control EasyLink-compliant devices with the following buttons on the remote control and select [Features] > [Demo]. Button EasyLink function (Play/Pause) Starts, pauses... or resumes playback on your EasyLink device. (Stop) Stops playback on your TV. Navigates through the speakers of the home theater system...
...on certain models.When a demo is available, it . 1 Press MENU/EXIT on your TV. Use the demo mode You can control EasyLink-compliant devices with the following buttons on the remote control and select [Features] > [Demo]. Button EasyLink function (Play/Pause) Starts, pauses... or resumes playback on your EasyLink device. (Stop) Stops playback on your TV. Navigates through the speakers of the home theater system...

User manual
Page 27
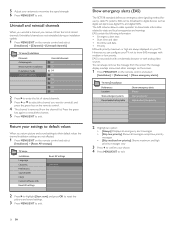
... NTSC and ATSC channels available in your area. • When [Cable] is selected, the TV detects antenna signals. Select your menu language 1 Press MENU/EXIT on the remote control and select [Installation] > [Preferences] > [Location]. 2 Select [Home] and press OK... to confirm your equipment is correctly connected. 1 Press MENU/EXIT on the remote control and select [Installation] > [Channels] > [Autoprogram] > [Start now]. TV menu Installation Channels Autoprogram Weak channel installation Installation mode Uninstall channels Autoprogram Start Now 2 Press OK to start ...
... NTSC and ATSC channels available in your area. • When [Cable] is selected, the TV detects antenna signals. Select your menu language 1 Press MENU/EXIT on the remote control and select [Installation] > [Preferences] > [Location]. 2 Select [Home] and press OK... to confirm your equipment is correctly connected. 1 Press MENU/EXIT on the remote control and select [Installation] > [Channels] > [Autoprogram] > [Start now]. TV menu Installation Channels Autoprogram Weak channel installation Installation mode Uninstall channels Autoprogram Start Now 2 Press OK to start ...
User manual
Page 28
...update. 1 Press MENU/EXIT on your settings to default values When you remove it from the channel list. Return your TV. TV menu Installation Language Channels Preferences Source labels Clock Current software info Reset AV settings Reset AV settings Start now 2 Press to... When you uninstall a channel, you return picture and sound settings to their default values the channel installation settings are always displayed on the remote control and select [Installation] > [Channels] > [Uninstall channels]. EAS contain the following information: • Emergency alert text • ...
...update. 1 Press MENU/EXIT on your settings to default values When you remove it from the channel list. Return your TV. TV menu Installation Language Channels Preferences Source labels Clock Current software info Reset AV settings Reset AV settings Start now 2 Press to... When you uninstall a channel, you return picture and sound settings to their default values the channel installation settings are always displayed on the remote control and select [Installation] > [Channels] > [Uninstall channels]. EAS contain the following information: • Emergency alert text • ...

