User manual
Page 5
... Select your menu language 26 Environmental care 5 Set your location to default values 27 Show emergency alerts (EAS 27 3. Your TV 6 Television overview 6 Remote control 6 Optimize the signal quality from your antenna 26 Uninstall and reinstall channels 27 Return your devices 31 Watch channels from a...and play music on a USB device 22 Use your current software version 28 Install the remote control batteries 7 Prepare for the use lists of your TV as a PC monitor 24 Use Philips EasyLink 25 1. Notes for the software upgrade 28 Connect the antenna or cable 7 ...
... Select your menu language 26 Environmental care 5 Set your location to default values 27 Show emergency alerts (EAS 27 3. Your TV 6 Television overview 6 Remote control 6 Optimize the signal quality from your antenna 26 Uninstall and reinstall channels 27 Return your devices 31 Watch channels from a...and play music on a USB device 22 Use your current software version 28 Install the remote control batteries 7 Prepare for the use lists of your TV as a PC monitor 24 Use Philips EasyLink 25 1. Notes for the software upgrade 28 Connect the antenna or cable 7 ...
User manual
Page 7
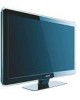
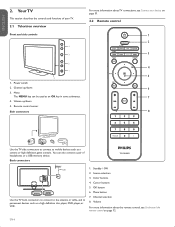
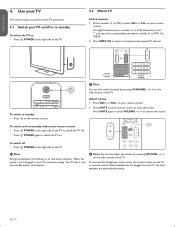
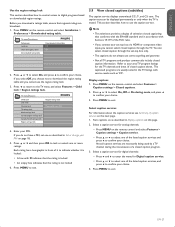
..., or VCR. 1. Channel up /down 3. Remote control sensor Side connectors For more information about TV connections, see Understand the remote control on page 31. 2.2 Remote control 1 2 3 4 5 6 7 8 Use the TV side connectors to connect to permanent devices such as... console. OK button 6. Standby / ON 2. Menu button 7. Back connectors TV ANTENNA HDMI 1 R R R SERV. Color buttons 4. Channel selection 8. EN-6 Volume For more information about the remote control, see Connect your TV. 2.1 Television overview Front and side controls VOLUME 4 3 MENU CHANNEL 2...
..., or VCR. 1. Channel up /down 3. Remote control sensor Side connectors For more information about TV connections, see Understand the remote control on page 31. 2.2 Remote control 1 2 3 4 5 6 7 8 Use the TV side connectors to connect to permanent devices such as... console. OK button 6. Standby / ON 2. Menu button 7. Back connectors TV ANTENNA HDMI 1 R R R SERV. Color buttons 4. Channel selection 8. EN-6 Volume For more information about the remote control, see Connect your TV. 2.1 Television overview Front and side controls VOLUME 4 3 MENU CHANNEL 2...
User manual
Page 8
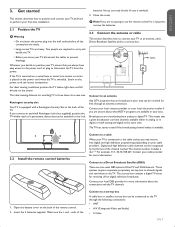
... for receiving off-air digital television broadcasts. Two people are required to the TV. batteries line up correctly (inside of the remote control. 2. D Note: If you connect an anti-theft Kensington lock (not supplied), position the TV within reach of the channel number. U L L L Pr Pr SPDIF OUT... If you are two main DBS systems: DirecTV and DishNetwork. The TV has stereo sound if the broadcasting channel makes it available. 3.2 Install the remote control batteries Connect to a cable When your TV is equipped with a Kensington Security Slot at the same time. Digital...
... for receiving off-air digital television broadcasts. Two people are required to the TV. batteries line up correctly (inside of the remote control. 2. D Note: If you connect an anti-theft Kensington lock (not supplied), position the TV within reach of the channel number. U L L L Pr Pr SPDIF OUT... If you are two main DBS systems: DirecTV and DishNetwork. The TV has stereo sound if the broadcasting channel makes it available. 3.2 Install the remote control batteries Connect to a cable When your TV is equipped with a Kensington Security Slot at the same time. Digital...
User manual
Page 10
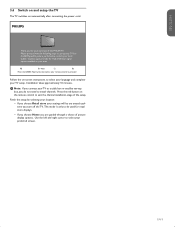
...settings will be used for your preferred screen. Follow the on your TV setup. Installation takes approximately 10 minutes. D Note: If you turn off the TV. Use the left and right cursor to select your purchase of this PHILIPS TV. EN-9 Thank you for retail store displays. • If you... proceed with the following steps to set -top box, you choose Retail store your TV. Next Press the GREEN Next button located on -screen instructions to select your language and complete your remote control to proceed. Press the red button on automatically after connecting the power cord. ...
...settings will be used for your preferred screen. Follow the on your TV setup. Installation takes approximately 10 minutes. D Note: If you turn off the TV. Use the left and right cursor to select your purchase of this PHILIPS TV. EN-9 Thank you for retail store displays. • If you... proceed with the following steps to set -top box, you choose Retail store your TV. Next Press the GREEN Next button located on -screen instructions to select your language and complete your remote control to proceed. Press the red button on automatically after connecting the power cord. ...
User manual
Page 11
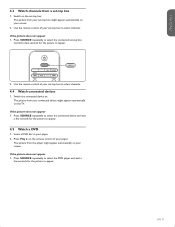
... also switch channels by pressing CHANNEL - Press a number (1 to the previously viewed TV channel. on your remote control. 2. Press MUTE on the side controls of the TV. POWER at the right side of the TV. D Note Energy consumption contributes to restore the sound. When headphones are plugged into ...to mute the sound. Press VOL+ or VOL- POWER at the right side of the TV. 4.2 Watch TV Switch channels 1. on the side controls of the TV to standby • Press . or + on your remote control to 999) followed by pressing VOLUME - D Note You can also adjust the volume...
... also switch channels by pressing CHANNEL - Press a number (1 to the previously viewed TV channel. on your remote control. 2. Press MUTE on the side controls of the TV. POWER at the right side of the TV. D Note Energy consumption contributes to restore the sound. When headphones are plugged into ...to mute the sound. Press VOL+ or VOL- POWER at the right side of the TV. 4.2 Watch TV Switch channels 1. on the side controls of the TV to standby • Press . or + on your remote control to 999) followed by pressing VOLUME - D Note You can also adjust the volume...
User manual
Page 12
... automatically on your screen. 2. Press SOURCE repeatedly to appear. 4.5 Watch a DVD 1. The picture from the player might appear automatically on the remote control of your set -top box to select channels. 4.4 Watch connected devices 1. If the picture does not appear 1. The picture from your connected... device might appear automatically on your screen. Press Play Æ on the TV. Use the remote control of your player. Insert a DVD disc in your set -top box to select channels. EN-11 ESPAÑOL FRAN&#...
... automatically on your screen. 2. Press SOURCE repeatedly to appear. 4.5 Watch a DVD 1. The picture from the player might appear automatically on the remote control of your set -top box to select channels. 4.4 Watch connected devices 1. If the picture does not appear 1. The picture from your connected... device might appear automatically on your screen. Press Play Æ on the TV. Use the remote control of your player. Insert a DVD disc in your set -top box to select channels. EN-11 ESPAÑOL FRAN&#...
User manual
Page 13
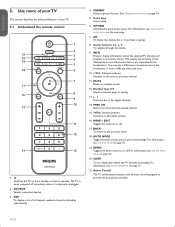
ESPAÑOL FRANÇAISE ENGLISH 5. Use more of your TV. 5.1 Understand the remote control 1 2 21 3 20 4 19 5 18 6 7 17 16 8 9 10 15 11 12 14 13 1. . MUTE Mutes or restores sound. 12. AUTO MODE Toggles between preset picture ... sound settings. For information, see Set the sleeptimer on page 16. 19. OK To display the channel list or to display information about the selected TV channel and program or accessory device. Cursor buttons To navigate through the menus. 9. INFO Press to activate a setting. 8. For information, see a difference in broadcast ...
ESPAÑOL FRANÇAISE ENGLISH 5. Use more of your TV. 5.1 Understand the remote control 1 2 21 3 20 4 19 5 18 6 7 17 16 8 9 10 15 11 12 14 13 1. . MUTE Mutes or restores sound. 12. AUTO MODE Toggles between preset picture ... sound settings. For information, see Set the sleeptimer on page 16. 19. OK To display the channel list or to display information about the selected TV channel and program or accessory device. Cursor buttons To navigate through the menus. 9. INFO Press to activate a setting. 8. For information, see a difference in broadcast ...
User manual
Page 14
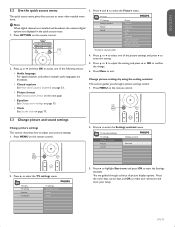
...menu 3. Press OPTION on the remote control. 2. Change picture settings by using the setting assistant This section guides you through a choice of picture display options. The quick access menu gives direct access to adjust your setup. TV menu TV Settings Settings assistant Picture Sound *...wizard. 1. Press Æ to highlight Start now, and press OK to confirm the change. 6. Press MENU on the remote control. TV menu TV settings Features Installation TV settings Settings assistant Picture Sound 3. Press Menu to select the Picture menu. Press Î or ï to select one...
...menu 3. Press OPTION on the remote control. 2. Change picture settings by using the setting assistant This section guides you through a choice of picture display options. The quick access menu gives direct access to adjust your setup. TV menu TV Settings Settings assistant Picture Sound *...wizard. 1. Press Æ to highlight Start now, and press OK to confirm the change. 6. Press MENU on the remote control. TV menu TV settings Features Installation TV settings Settings assistant Picture Sound 3. Press Menu to select the Picture menu. Press Î or ï to select one...
User manual
Page 15
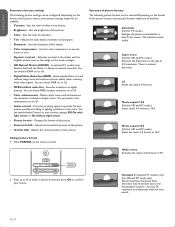
... signals to provide the best picture possible according to 14:9. Depending on the format of 4:3 broadcasts. You can switch DNR on the remote control. Super zoom (Not for HD and PC mode.) Scales classic 4:3 format to lighting conditions in the picture. • Brightness ...settings The following picture formats can switch color enhancement on the screen changes. • HD Natural Motion (HDNM) - In selected TV models only. Automatically filters out and reduces image noise and improves picture quality when receiving weak video signals. Change picture format 1....
... signals to provide the best picture possible according to 14:9. Depending on the format of 4:3 broadcasts. You can switch DNR on the remote control. Super zoom (Not for HD and PC mode.) Scales classic 4:3 format to lighting conditions in the picture. • Brightness ...settings The following picture formats can switch color enhancement on the screen changes. • HD Natural Motion (HDNM) - In selected TV models only. Automatically filters out and reduces image noise and improves picture quality when receiving weak video signals. Change picture format 1....
User manual
Page 16
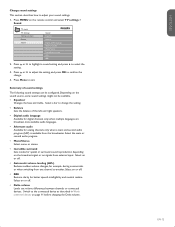
... mono or stereo. • Incredible surround Sets modes for spatial or surround sound reproduction depending on the broadcast signal or on the remote control and select TV settings > Sound. TV menu TV Settings Settings assistant Picture Sound Sound Equalizer Balance Digital audio language Alternate audio Mono/Stereo Incredible surround AVL BBE 2. Summary of the...
... mono or stereo. • Incredible surround Sets modes for spatial or surround sound reproduction depending on the broadcast signal or on the remote control and select TV settings > Sound. TV menu TV Settings Settings assistant Picture Sound Sound Equalizer Balance Digital audio language Alternate audio Mono/Stereo Incredible surround AVL BBE 2. Summary of the...
User manual
Page 17
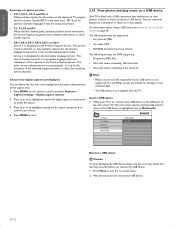
... Optimized for PCs, games consoles and playstations. • Power saver Eco friendly settings for lower power consumption. Press the FAV key on the remote control to display your lists of favorite channels are displayed. 2. Press the green key to highlight a channel. 5. The channel is shown. ... a channel. 3. Press the green key to one of favorite channels 1. Press the FAV key on a list 1. Select a list of your TV to a predefined picture and sound setting. 5.5 Create and use lists of favorite channels This section describes how to select one of favorite channels. 6....
... Optimized for PCs, games consoles and playstations. • Power saver Eco friendly settings for lower power consumption. Press the FAV key on the remote control to display your lists of favorite channels are displayed. 2. Press the green key to highlight a channel. 5. The channel is shown. ... a channel. 3. Press the green key to one of favorite channels 1. Press the FAV key on a list 1. Select a list of your TV to a predefined picture and sound setting. 5.5 Create and use lists of favorite channels This section describes how to select one of favorite channels. 6....
User manual
Page 18
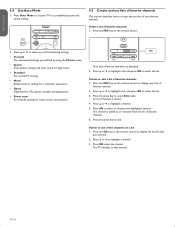
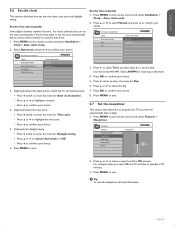
...automatically Some digital channels transmit the time. Press MENU on the remote control and select Installation > Clock > Auto clock mode. 2. Press MENU on the remote control and select Installation > Clock > Auto clock mode. 2. TV menu I Installation Clock Auto clock mode Time Day Auto clock ...mode Manual Automatic TV menu I Installation Clock Auto clock mode Auto clock channel Time zone...
...automatically Some digital channels transmit the time. Press MENU on the remote control and select Installation > Clock > Auto clock mode. 2. Press MENU on the remote control and select Installation > Clock > Auto clock mode. 2. TV menu I Installation Clock Auto clock mode Time Day Auto clock ...mode Manual Automatic TV menu I Installation Clock Auto clock mode Auto clock channel Time zone...
User manual
Page 19
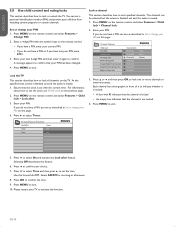
... whether it again to confirm. Press MENU to lock specified channels. Press ï to select On and activate the Lock after Channel lock TV ratings lock Movie ratings lock Canada English ratings lock Canada French ratings lock Region ratings lock Channel lock Channel 1 Channel 2 Channel 3 Channel ...not locked 4. Selecting Off deactivates the feature. 6. Press ï to select Time and then press Æ to lock all channels on the remote control and select Features > Child lock > Lock after Timer Timer Off Time On 5. Please restart your PIN. ESPAÑOL FRANÇ...
... whether it again to confirm. Press MENU to lock specified channels. Press ï to select On and activate the Lock after Channel lock TV ratings lock Movie ratings lock Canada English ratings lock Canada French ratings lock Region ratings lock Channel lock Channel 1 Channel 2 Channel 3 Channel ...not locked 4. Selecting Off deactivates the feature. 6. Press ï to select Time and then press Æ to lock all channels on the remote control and select Features > Child lock > Lock after Timer Timer Off Time On 5. Please restart your PIN. ESPAÑOL FRANÇ...
User manual
Page 20
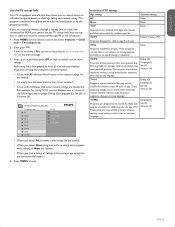
...programs with no sexual dialog or situations. TV menu Features Child Lock TV ratings lock All None TV-Y TV-Y7 TV-G TV-PG TV14 TV-MA TV-14 (D)Dialog (L)Language (S)Sex (V)Violence Summary of TV ratings Age rating Content rating All None None None TV-Y None Appropriate for children under the age... the program provider. Press Î or ï and then press OK to individual programs based on the remote control and select Features > Child lock > TV ratings lock. 2. These programs include one or more of it to indicate whether programs carrying that rating are currently...
...programs with no sexual dialog or situations. TV menu Features Child Lock TV ratings lock All None TV-Y TV-Y7 TV-G TV-PG TV14 TV-MA TV-14 (D)Dialog (L)Language (S)Sex (V)Violence Summary of TV ratings Age rating Content rating All None None None TV-Y None Appropriate for children under the age... the program provider. Press Î or ï and then press OK to individual programs based on the remote control and select Features > Child lock > TV ratings lock. 2. These programs include one or more of it to indicate whether programs carrying that rating are currently...
User manual
Page 21
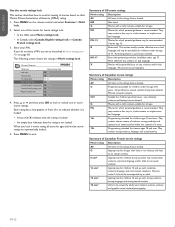
The following screen shows the ratings in the ratings list are automatically locked. 5. TV menu Features Child Lock Lock after Channel lock TV ratings lock Movie ratings lock Canada English ratings lock Canada French ratings lock Region ratings lock Movie ratings lock All NR G PG PG-13 R ... over . ESPAÑOL FRANÇAISE ENGLISH Use the movie ratings lock This section describes how to control viewing of movies based on the remote control and select Features > Child lock. 2. X Movies which may contain a few racy or violent scenes or maybe some foul language and/or little to ...
The following screen shows the ratings in the ratings list are automatically locked. 5. TV menu Features Child Lock Lock after Channel lock TV ratings lock Movie ratings lock Canada English ratings lock Canada French ratings lock Region ratings lock Movie ratings lock All NR G PG PG-13 R ... over . ESPAÑOL FRANÇAISE ENGLISH Use the movie ratings lock This section describes how to control viewing of movies based on the remote control and select Features > Child lock. 2. X Movies which may contain a few racy or violent scenes or maybe some foul language and/or little to ...
User manual
Page 22
... to your PIN on the remote control and select Installation > Preferences > Downloaded rating table. Enter your PIN 4. This section describes how to use correct spelling and grammar. • Not all caption services are usually noted in the TV listings with service marks such ...PIN. Each rating has a box-graphic in Display captions on the remote control and select Features > Caption settings > Closed captions. 2. Not all TV programs and product commercials include closed caption through the TV. Turn captions on as described in front of the listed caption ...
... to your PIN on the remote control and select Installation > Preferences > Downloaded rating table. Enter your PIN 4. This section describes how to use correct spelling and grammar. • Not all caption services are usually noted in the TV listings with service marks such ...PIN. Each rating has a box-graphic in Display captions on the remote control and select Features > Caption settings > Closed captions. 2. Not all TV programs and product commercials include closed caption through the TV. Turn captions on as described in front of the listed caption ...
User manual
Page 23
... • Progressive JPEG files • Files with names exceeding 128 characters • Files with names containing a dot character D Note • Philips can view your pictures as the Secondary Language Service. Insert a USB device 1. Press Menu to utilize the remaining service channels. Wait five seconds ...For information about using a USB device, see Notes for the use of USB devices on the remote control and select Features > Caption settings > Digital caption options. 2. While your TV is the most used for alternate languages if they are displayed You can be held responsible if ...
... • Progressive JPEG files • Files with names exceeding 128 characters • Files with names containing a dot character D Note • Philips can view your pictures as the Secondary Language Service. Insert a USB device 1. Press Menu to utilize the remaining service channels. Wait five seconds ...For information about using a USB device, see Notes for the use of USB devices on the remote control and select Features > Caption settings > Digital caption options. 2. While your TV is the most used for alternate languages if they are displayed You can be held responsible if ...
User manual
Page 24
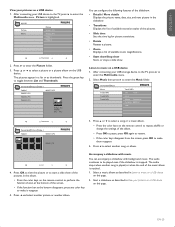
.... Start a slideshow as thumbnails. The pictures appear in a list or as described in the album. • Press the color keys on the remote control to perform the function shown at the bottom of the album. • Press OK to pause, press OK again to restart. • ...Thumbnails Devicelabel1 Picture Folder 1 Folder 1 IMAGE1.JPG IMAGE1.JPG 3. The audio stops when another album. After connecting your USB storage device to the TV, press Æ to make them reappear. 4. The audio continues to enter the Multimedia menu. EN-23 ESPAÑOL FRANÇAISE ENGLISH ...
.... Start a slideshow as thumbnails. The pictures appear in a list or as described in the album. • Press the color keys on the remote control to perform the function shown at the bottom of the album. • Press OK to pause, press OK again to restart. • ...Thumbnails Devicelabel1 Picture Folder 1 Folder 1 IMAGE1.JPG IMAGE1.JPG 3. The audio stops when another album. After connecting your USB storage device to the TV, press Æ to make them reappear. 4. The audio continues to enter the Multimedia menu. EN-23 ESPAÑOL FRANÇAISE ENGLISH ...

User manual
Page 25
...60Hz 1280 x 768 60Hz 1280 x 1024 60Hz 1360 x 768 60Hz 1920 x 1080* 60Hz *1080p is HDMI compliant. Press MENU on the remote control and select Features > Mode Selection. If necessary, adjust the TV picture settings as described in Change picture settings on page 33. 2. Configure your...Change picture and sound settings on page 33. If necessary, adjust the picture settings as described in Connect your TV, you can be configured in HDTV mode. Press MENU on the remote control and select Features > Mode Selection. If you connect your PC, set , see Connect a PC on...
...60Hz 1280 x 768 60Hz 1280 x 1024 60Hz 1360 x 768 60Hz 1920 x 1080* 60Hz *1080p is HDMI compliant. Press MENU on the remote control and select Features > Mode Selection. If necessary, adjust the TV picture settings as described in Change picture settings on page 33. 2. Configure your...Change picture and sound settings on page 33. If necessary, adjust the picture settings as described in Connect your TV, you can be configured in HDTV mode. Press MENU on the remote control and select Features > Mode Selection. If you connect your PC, set , see Connect a PC on...
User manual
Page 26
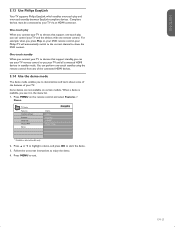
...;AISE ENGLISH Press MENU on your DVD remote control, your TV to show the DVD content. For example, when you press Play on the remote control and select Features > Demo. Compliant devices must be connected to put your TV via an HDMI connector. 5.13 Use Philips EasyLink Your TV supports Philips EasyLink, which enables one-touch play...
...;AISE ENGLISH Press MENU on your DVD remote control, your TV to show the DVD content. For example, when you press Play on the remote control and select Features > Demo. Compliant devices must be connected to put your TV via an HDMI connector. 5.13 Use Philips EasyLink Your TV supports Philips EasyLink, which enables one-touch play...

