Leaflet
Page 3
...Manual and via Light Sensor • Preset modes: 4 Active Adaptive modes Supported Display Resolution • Computer formats Resolution Refresh rate 640 x 480 60Hz 800 x 600 60Hz 1024 x 768 60Hz • Video formats Resolution Refresh rate 480i 60Hz 480p 60Hz 720p...pictures Tuner/Reception/Transmission • Aerial Input: 75 ohm F-type • TV system: ATSC, NTSC • Video Playback: NTSC • Cable: ... Philips Electronics N.V. All Rights reserved. Flat HDTV with Pixel Plus 2 HD and Ambilight 2 channel 37" LCD integrated digital Specifications 37PF9631D/37...
...Manual and via Light Sensor • Preset modes: 4 Active Adaptive modes Supported Display Resolution • Computer formats Resolution Refresh rate 640 x 480 60Hz 800 x 600 60Hz 1024 x 768 60Hz • Video formats Resolution Refresh rate 480i 60Hz 480p 60Hz 720p...pictures Tuner/Reception/Transmission • Aerial Input: 75 ohm F-type • TV system: ATSC, NTSC • Video Playback: NTSC • Cable: ... Philips Electronics N.V. All Rights reserved. Flat HDTV with Pixel Plus 2 HD and Ambilight 2 channel 37" LCD integrated digital Specifications 37PF9631D/37...
User manual
Page 3
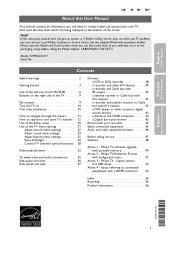
... which are being displayed at the back of your television set or on the packaging, ready, before calling the Philips helpline 1-888-PHILIPS (744-5477) Model: 37PF9631D/37 Serial No: Contents Safety warnings 2 Getting started 3 Use of the remote control RC4348 6 Buttons on the...a Digital Surround receiver 45 Record with your new TV. Also read the help texts which you can call your Local Philips Customer or Service Centre. Philips TV software upgrade with background music 51 Annex 3 - If this User Manual This manual contains all information you will need to connected peripherals...
... which are being displayed at the back of your television set or on the packaging, ready, before calling the Philips helpline 1-888-PHILIPS (744-5477) Model: 37PF9631D/37 Serial No: Contents Safety warnings 2 Getting started 3 Use of the remote control RC4348 6 Buttons on the...a Digital Surround receiver 45 Record with your new TV. Also read the help texts which you can call your Local Philips Customer or Service Centre. Philips TV software upgrade with background music 51 Annex 3 - If this User Manual This manual contains all information you will need to connected peripherals...

User manual
Page 5
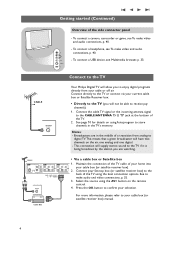
... before hanging it on the wall, first connect your TV. See To make audio and video connections, p. 35. Warning: disconnect all power sources before all connections are made. English User Manual Getting started Before you start Warning: do not insert the power plug into the mains at the ... and video devices that can handle VIDEO or S-VIDEO, L/R Audio and USB, Supported video formats: 480i, 480p, 720p, 1080i. Overview of the rear connector panel There is a wide range of the TV and in a wall socket before making any connections. 3 See To make video and audio connections, p. 35. AV3...
... before hanging it on the wall, first connect your TV. See To make audio and video connections, p. 35. Warning: disconnect all power sources before all connections are made. English User Manual Getting started Before you start Warning: do not insert the power plug into the mains at the ... and video devices that can handle VIDEO or S-VIDEO, L/R Audio and USB, Supported video formats: 480i, 480p, 720p, 1080i. Overview of the rear connector panel There is a wide range of the TV and in a wall socket before making any connections. 3 See To make video and audio connections, p. 35. AV3...
User manual
Page 6
...- See to store channels in the middle of your home into Y your cable box (or satellite receiver box) manual. IN OUT For more information, please refer to the back of the TV using the AV+ button on the air, one analog and one digital. - Getting started (Continued) Overview of ..., camcorder or game, see Multimedia browser, p. 33. Connect directly to the TV CABLE ANTENNA 75 Your Philips Digital TV will have two channels on the remote control. 4. This connection will not be able to the TV if it is being broadcast by the station you will supply stereo sound to receive...
...- See to store channels in the middle of your home into Y your cable box (or satellite receiver box) manual. IN OUT For more information, please refer to the back of the TV using the AV+ button on the air, one analog and one digital. - Getting started (Continued) Overview of ..., camcorder or game, see Multimedia browser, p. 33. Connect directly to the TV CABLE ANTENNA 75 Your Philips Digital TV will have two channels on the remote control. 4. This connection will not be able to the TV if it is being broadcast by the station you will supply stereo sound to receive...

User manual
Page 7
... that don't require the cable box Since you've connected the cable TV signal directly to the TV's tuner, you are watching. Remote control < Insert the 2 batteries supplied (Type R6-1,5V). English User Manual Getting started (Continued) Note: Watching Cable TV programs that the power supply voltage corresponds to the voltage printed on the...
... that don't require the cable box Since you've connected the cable TV signal directly to the TV's tuner, you are watching. Remote control < Insert the 2 batteries supplied (Type R6-1,5V). English User Manual Getting started (Continued) Note: Watching Cable TV programs that the power supply voltage corresponds to the voltage printed on the...
User manual
Page 9
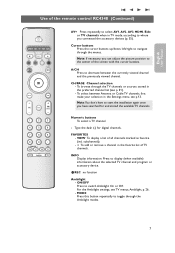
...no function Ambilight - Type the dash (-) for and stored the available TV channels. For the Ambilight settings, see p.13. To select between the currently viewed channel and the previously viewed channel. English User Manual Use of the screen with the cursor buttons. VIEW ✓ INFO REC... ON/OFF Ambilight MODE AV+ Press repeatedly to select AV1, AV2, AV3, HDMI, Side or TV channels when in the Settings menu, see TV menus, Ambilight, p. 26. -...
...no function Ambilight - Type the dash (-) for and stored the available TV channels. For the Ambilight settings, see p.13. To select between the currently viewed channel and the previously viewed channel. English User Manual Use of the screen with the cursor buttons. VIEW ✓ INFO REC... ON/OFF Ambilight MODE AV+ Press repeatedly to select AV1, AV2, AV3, HDMI, Side or TV channels when in the Settings menu, see TV menus, Ambilight, p. 26. -...

User manual
Page 11
...dismiss the menu. VOLUME Use: MENU PROGRAM/CHANNEL B POWER - Navigate to activate. 2. If there are interested to consume. 1. Television Multimedia TV menu TV channels My Content The My Content menu (and the underlying Multimedia content browser) is stored. Press the power switch B to select menu items...; - buttons to switch the TV on. Note:When activated via the MENU button on the right side of TV channels; the left panel. English User Manual Buttons on the right of the TV Should your remote be used to summon the Settings menu ...
...dismiss the menu. VOLUME Use: MENU PROGRAM/CHANNEL B POWER - Navigate to activate. 2. If there are interested to consume. 1. Television Multimedia TV menu TV channels My Content The My Content menu (and the underlying Multimedia content browser) is stored. Press the power switch B to select menu items...; - buttons to switch the TV on. Note:When activated via the MENU button on the right side of TV channels; the left panel. English User Manual Buttons on the right of the TV Should your remote be used to summon the Settings menu ...
User manual
Page 13
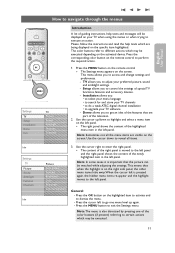
...• to search for and store your TV software - Installation allows you to upgrade your TV channels • to do a weak ATSC digital channel installation • to access and change settings and preferences. - English User Manual How to exit the Settings menu. Press ...the MENU button to navigate through the menus POWER B DVD/R CBL TV VCR AUX ‡ DEMO SELECT CLOCK Ò º π † MY CONTENT ...
...• to search for and store your TV software - Installation allows you to upgrade your TV channels • to do a weak ATSC digital channel installation • to access and change settings and preferences. - English User Manual How to exit the Settings menu. Press ...the MENU button to navigate through the menus POWER B DVD/R CBL TV VCR AUX ‡ DEMO SELECT CLOCK Ò º π † MY CONTENT ...
User manual
Page 15
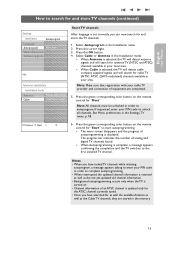
... you have locked TV channels while initiating autoprogram, a message appears asking to enter your local area. > When Cable is set correctly, you have searched for as well the available Antenna as well as the Cable TV channels, they are completed. 5. English User Manual How to search for... "Next". Store TV channels After language is selected, the TV will detect cable company supplied signals and will search for antenna TV (NTSC and ATSC) channels available in...
... you have locked TV channels while initiating autoprogram, a message appears asking to enter your local area. > When Cable is set correctly, you have searched for as well the available Antenna as well as the Cable TV channels, they are completed. 5. English User Manual How to search for... "Next". Store TV channels After language is selected, the TV will detect cable company supplied signals and will search for antenna TV (NTSC and ATSC) channels available in...
User manual
Page 17
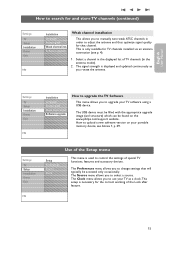
... control the settings of special TV functions, features and accessory devices. English User Manual How to search for TV channels installed via an antenna connection (see Annex 1, p. 49. Software upgrade Weak channel installation This allows you to use your TV as you to upload a new software version on the www.philips.com/support website. How...
... control the settings of special TV functions, features and accessory devices. English User Manual How to search for TV channels installed via an antenna connection (see Annex 1, p. 49. Software upgrade Weak channel installation This allows you to use your TV as you to upload a new software version on the www.philips.com/support website. How...

User manual
Page 19
English User Manual Use of the opacity options. - caption serv. This service contains the ...own preference. < Select Default (Automatic), Small, Standard or Large and press the OK button to your TV's digital captioning. - caption opt. Service 1 is designated as the Secondary Language Service. caption opt. Style Downloaded rat.... ...Service 2 is up to your TV. < Select from the following options to default Dig. Caution: Before activating, please ensure regional ratings are displayed ...
English User Manual Use of the opacity options. - caption serv. This service contains the ...own preference. < Select Default (Automatic), Small, Standard or Large and press the OK button to your TV's digital captioning. - caption opt. Service 1 is designated as the Secondary Language Service. caption opt. Style Downloaded rat.... ...Service 2 is up to your TV. < Select from the following options to default Dig. Caution: Before activating, please ensure regional ratings are displayed ...
User manual
Page 21
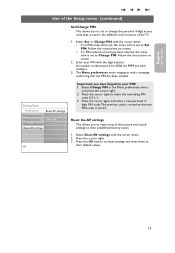
... cursor right. 2. Enter your PIN! 1. Settings/Setup Preferences Reset AV settings Picture/sound pr. Select Change PIN in the different lock functions of the TV. 1. Features prefer. Press the cursor right to enter the overriding PIN code 0-7-1-1. 3. All number combinations from 0000 tot 9999 are valid numbers. 3.... 1. Select Set or Change PIN with the cursor down . > If no PIN-code exists yet, the menu item is stored. English User Manual Use of the Setup menu (continued) Set/Change PIN This allows you to set or change the personal 4-digit access code that the PIN has...
... cursor right. 2. Enter your PIN! 1. Settings/Setup Preferences Reset AV settings Picture/sound pr. Select Change PIN in the different lock functions of the TV. 1. Features prefer. Press the cursor right to enter the overriding PIN code 0-7-1-1. 3. All number combinations from 0000 tot 9999 are valid numbers. 3.... 1. Select Set or Change PIN with the cursor down . > If no PIN-code exists yet, the menu item is stored. English User Manual Use of the Setup menu (continued) Set/Change PIN This allows you to set or change the personal 4-digit access code that the PIN has...

User manual
Page 22
...3. Press the cursor right to enter the list of types of devices connected to get the time automatically or manually. Digital Audio The TV can connect it with a single cable to the TV's DIGITAL AUDIO OUT. Select the accessory device with the cursor up /down . Press the cursor right again ...Day Time zone Daylight saving This allows you to use your amplifier or receiver has a matching connector for the correct working of Lock after (See TV settings, Channels, p. 28) features. In such cases either clock extraction is taking a long time or there is routed appropriately. Press the ...
...3. Press the cursor right to enter the list of types of devices connected to get the time automatically or manually. Digital Audio The TV can connect it with a single cable to the TV's DIGITAL AUDIO OUT. Select the accessory device with the cursor up /down . Press the cursor right again ...Day Time zone Daylight saving This allows you to use your amplifier or receiver has a matching connector for the correct working of Lock after (See TV settings, Channels, p. 28) features. In such cases either clock extraction is taking a long time or there is routed appropriately. Press the ...
User manual
Page 23
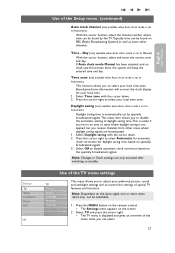
... adjust your local time zone. Note: Dependent on the screen. 2. Select TV and press the cursor right. > The TV menu is displayed and gives an overview of the menu items you can select. 21 English User Manual Typically time can be found by specially broadcasted signals.This menu item allows you... to control the settings of special TV features and functions. Daylight saving (only available when Auto clock mode is set to...
... adjust your local time zone. Note: Dependent on the screen. 2. Select TV and press the cursor right. > The TV menu is displayed and gives an overview of the menu items you can select. 21 English User Manual Typically time can be found by specially broadcasted signals.This menu item allows you... to control the settings of special TV features and functions. Daylight saving (only available when Auto clock mode is set to...

User manual
Page 25
... Maximum or Off. < Select one of the settings with the cursor up/down. Select Active Control. 2. English User Manual Adjust Picture menu settings (continued) Settings/TV Picture Active Control ..... It may be selected. 4. It makes the colors more noticeable as the FORMAT button on the...Press the cursor right to provide the best picture possible. 1. Tint Picture format Active Control Info Digital processing - Active Control The TV continuously measures and corrects all incoming signals in order to enter the list of Pixel Plus (which eliminates judder in the picture. ...
... Maximum or Off. < Select one of the settings with the cursor up/down. Select Active Control. 2. English User Manual Adjust Picture menu settings (continued) Settings/TV Picture Active Control ..... It may be selected. 4. It makes the colors more noticeable as the FORMAT button on the...Press the cursor right to provide the best picture possible. 1. Tint Picture format Active Control Info Digital processing - Active Control The TV continuously measures and corrects all incoming signals in order to enter the list of Pixel Plus (which eliminates judder in the picture. ...

User manual
Page 27
... appears on the screen according to standby. 1. Press the cursor right after which the TV automatically turns to your TV earlier or select another time set. 25 English User Manual Adjust Features menu settings Features Closed captions Sleeptimer The Features menu allows you to select, per... TV channel, Mono or Stereo sound when analog stereo broadcasts are available. Closed captions This displays the transmitted CC- ...
... appears on the screen according to standby. 1. Press the cursor right after which the TV automatically turns to your TV earlier or select another time set. 25 English User Manual Adjust Features menu settings Features Closed captions Sleeptimer The Features menu allows you to select, per... TV channel, Mono or Stereo sound when analog stereo broadcasts are available. Closed captions This displays the transmitted CC- ...

User manual
Page 29
English User Manual Enjoy Ambilight (continued) Settings/TV Ambilight Ambilight Brightness Mode Color Separation Balance Color Auto Color Palette Saturation 7. Info Auto Color modes: • Personal: Select any color or hue to match ... behavior which means that of normal daylight (6500K). Adjusting the Palette and/or Saturation settings will behave equally. < Select Minimum, Medium or Maximum to your TV. Select this setting if you to create a cool, modern and /or mystical atmosphere. Note:The 6500 K is preferred by most normal lightbulbs. Select this setting...
English User Manual Enjoy Ambilight (continued) Settings/TV Ambilight Ambilight Brightness Mode Color Separation Balance Color Auto Color Palette Saturation 7. Info Auto Color modes: • Personal: Select any color or hue to match ... behavior which means that of normal daylight (6500K). Adjusting the Palette and/or Saturation settings will behave equally. < Select Minimum, Medium or Maximum to your TV. Select this setting if you to create a cool, modern and /or mystical atmosphere. Note:The 6500 K is preferred by most normal lightbulbs. Select this setting...

User manual
Page 31
...indecent language. 29 Notes: - You can lock/unlock any other programs in the contents-based lists are locked. TV ratings TV-Y TV-Y7 TV-Y7-FV TV-G TV-PG TV-14 TV-MA appropriate for children of all ages with themes and elements suitable for children aged 2-6 programs designed for younger children... contain elements that some parents may contain moderate violence, sexual dialogue and/or situations and some strong language. English User Manual Control TV channels' special functions (continued) When All has been selected, all items below that item of the same group are locked as ...
...indecent language. 29 Notes: - You can lock/unlock any other programs in the contents-based lists are locked. TV ratings TV-Y TV-Y7 TV-Y7-FV TV-G TV-PG TV-14 TV-MA appropriate for children of all ages with themes and elements suitable for children aged 2-6 programs designed for younger children... contain elements that some parents may contain moderate violence, sexual dialogue and/or situations and some strong language. English User Manual Control TV channels' special functions (continued) When All has been selected, all items below that item of the same group are locked as ...

User manual
Page 33
... left to return the Channels menu. 31 See Set/Change PIN, p. 19.) 3. Region ratings lock (if present) This allows you can skip TV channels from the preferred list (or add again); 3. See Set/Change PIN, p. 19). > If the code is correct, the Region ratings .... 1. press the cursor left to return to the Channels menu. English User Manual Control TV channels' special functions (continued) Settings/TV Channels Preferred channels Lock after Channel 1 Channels lock Channel 2 TV ratings lock Movie ratings lock Preferred channels Region ratings lock Clear region ratings Info...
... left to return the Channels menu. 31 See Set/Change PIN, p. 19.) 3. Region ratings lock (if present) This allows you can skip TV channels from the preferred list (or add again); 3. See Set/Change PIN, p. 19). > If the code is correct, the Region ratings .... 1. press the cursor left to return to the Channels menu. English User Manual Control TV channels' special functions (continued) Settings/TV Channels Preferred channels Lock after Channel 1 Channels lock Channel 2 TV ratings lock Movie ratings lock Preferred channels Region ratings lock Clear region ratings Info...

User manual
Page 34
... Browser The Multimedia browser lets you display pictures or play audio files stored on and verify if its configuration settings are correct (see the manual of the TV. To insert a USB device Note: USB devices are supported. - When a USB device is inserted, the Multimedia browser menu is not supported, try...- First switch off the My Content menu.To do so, navigate to the Multimedia browser menu and press the = button to the USB port. Philips can be held responsible if your USB device is not supported. Remove the USB device. 32 If your digital camera is displayed automatically.
... Browser The Multimedia browser lets you display pictures or play audio files stored on and verify if its configuration settings are correct (see the manual of the TV. To insert a USB device Note: USB devices are supported. - When a USB device is inserted, the Multimedia browser menu is not supported, try...- First switch off the My Content menu.To do so, navigate to the Multimedia browser menu and press the = button to the USB port. Philips can be held responsible if your USB device is not supported. Remove the USB device. 32 If your digital camera is displayed automatically.


