Leaflet
Page 2
LCD monitor 30" WXGA 300WN5VB/27 Specifications Product highlights Picture/Display • LCD panel type: ...high quality digital display. WXGA 1280 x 768 resolution For graphics monitors, the screen resolution signifies the number of Koninklijke Philips Electronics N.V. Amber • Power supply: Built-in Picture, Progressive Scan, De-interlacer Connectivity • AV input:... DCDi enhances the quality of all images by TV systems in natural images with data/graphics Issue date 2007-11-09 Version: 2.0 © 2007 Koninklijke Philips Electronics N.V. In-box DVI cable A DVI ...
LCD monitor 30" WXGA 300WN5VB/27 Specifications Product highlights Picture/Display • LCD panel type: ...high quality digital display. WXGA 1280 x 768 resolution For graphics monitors, the screen resolution signifies the number of Koninklijke Philips Electronics N.V. Amber • Power supply: Built-in Picture, Progressive Scan, De-interlacer Connectivity • AV input:... DCDi enhances the quality of all images by TV systems in natural images with data/graphics Issue date 2007-11-09 Version: 2.0 © 2007 Koninklijke Philips Electronics N.V. In-box DVI cable A DVI ...

User manual
Page 4
..., setup, operation and other related information you may need. q Customer Care and Warranty contains a list of worldwide Philips Consumer Information Centres along with help desk phone numbers and information on your product. It includes the following subsections describe ...q Product Information gives an overview of information included, along with notation icon descriptions and other documentation for anyone who uses the Philips LCD Monitor TV. q Download and Print Option transfers this entire manual to your hard drive for this document. q Installing Your Monitor describes the...
..., setup, operation and other related information you may need. q Customer Care and Warranty contains a list of worldwide Philips Consumer Information Centres along with help desk phone numbers and information on your product. It includes the following subsections describe ...q Product Information gives an overview of information included, along with notation icon descriptions and other documentation for anyone who uses the Philips LCD Monitor TV. q Download and Print Option transfers this entire manual to your hard drive for this document. q Installing Your Monitor describes the...

User manual
Page 6
...for managing the performances, setting, etc. Product Information Product Information Product Features • Technical Specifications • Resolution & Preset Modes • Philips Pixel Defect Policy • Automatic Power Saving • Physical Specification • Pin Assignment • Product Views Product Features 300WN5 q 29....5-inch WXGA (1280x768 resolution, 170 degree viewing angle) LCD all-in TV model only) RETURN TO TOP OF THE PAGE Technical Specifications* LCD PANEL • Type • Screen size TFT LCD...
...for managing the performances, setting, etc. Product Information Product Information Product Features • Technical Specifications • Resolution & Preset Modes • Philips Pixel Defect Policy • Automatic Power Saving • Physical Specification • Pin Assignment • Product Views Product Features 300WN5 q 29....5-inch WXGA (1280x768 resolution, 170 degree viewing angle) LCD all-in TV model only) RETURN TO TOP OF THE PAGE Technical Specifications* LCD PANEL • Type • Screen size TFT LCD...

User manual
Page 7
... and negative WXGA SVGA VGA Hsync 48 kHz, Vsync 60 Hz (N.I.) Hsync 38 kHz, Vsync 60 Hz (N.I.) Hsync 31 kHz, Vsync 60 Hz (N.I.) D-sub, S-Video, TV-RF, SCART (Europe) or composite and components video (others) AUDIO • Input level for PC/SVHS/SCART 500 mV nominal • Loudspeaker 5W Stereo Audio...
... and negative WXGA SVGA VGA Hsync 48 kHz, Vsync 60 Hz (N.I.) Hsync 38 kHz, Vsync 60 Hz (N.I.) Hsync 31 kHz, Vsync 60 Hz (N.I.) D-sub, S-Video, TV-RF, SCART (Europe) or composite and components video (others) AUDIO • Input level for PC/SVHS/SCART 500 mV nominal • Loudspeaker 5W Stereo Audio...

User manual
Page 10
... Off This monitor is subject to 80% 50K hrs (excluding CCFL 40Khrs) * This data is ENERGY STAR® compliant. As an ENERGY STAR® Partner, PHILIPS has determined that this product meets the ENERGY STAR® guidelines for energy efficiency. with protective cover) 90 - 264 VAC, 50/60 Hz PC Mode...
... Off This monitor is subject to 80% 50K hrs (excluding CCFL 40Khrs) * This data is ENERGY STAR® compliant. As an ENERGY STAR® Partner, PHILIPS has determined that this product meets the ENERGY STAR® guidelines for energy efficiency. with protective cover) 90 - 264 VAC, 50/60 Hz PC Mode...

User manual
Page 15
Installing your LCD Monitor/TV Installing your LCD Monitor/TV Product Description • Connecting to Your PC, TV antenna, DVD/VCR etc. • Getting Started • Optimizing Performance Product Description Side View (Left) 1 INPUT 2 3 4 MENU 5 Selecting input source Increase or decrease the channel ...
Installing your LCD Monitor/TV Installing your LCD Monitor/TV Product Description • Connecting to Your PC, TV antenna, DVD/VCR etc. • Getting Started • Optimizing Performance Product Description Side View (Left) 1 INPUT 2 3 4 MENU 5 Selecting input source Increase or decrease the channel ...

User manual
Page 16
Installing your LCD Monitor/TV Rear View TV version 1 AC IN AC power in 2 AC Power AC power switch 3 D-Sub PC analog D-Sub input 4 PC - Audio PC Stereo input 5 DVI-D PC digital input 6 RS232 RS232 network connection 7 External/ EURO-AV SCART connection (for Europe only) 8 Composite Video Output Composite video CVBS ouput file:///D|/My%20Documents/dfu/300WN5/english/300wn5/INSTALL/INSTALL.HTM (2 of 8)2005-02-16 10:33:11 AM
Installing your LCD Monitor/TV Rear View TV version 1 AC IN AC power in 2 AC Power AC power switch 3 D-Sub PC analog D-Sub input 4 PC - Audio PC Stereo input 5 DVI-D PC digital input 6 RS232 RS232 network connection 7 External/ EURO-AV SCART connection (for Europe only) 8 Composite Video Output Composite video CVBS ouput file:///D|/My%20Documents/dfu/300WN5/english/300wn5/INSTALL/INSTALL.HTM (2 of 8)2005-02-16 10:33:11 AM

User manual
Page 17
Installing your LCD Monitor/TV 9 Audio (L) Output Audio (R) Output 10 Audio (L) Output Audio (R) Output 11 Line out Audio (L) output Audio (R) output Audio (L) output for the detachable speaker (L) Audio (R) output for the detachable speaker (R) Audio output for external speakers Audio/Video version RETURN TO TOP OF THE PAGE 1 AC IN 2 AC Power 3 D-Sub AC power in AC power switch PC analog D-Sub input file:///D|/My%20Documents/dfu/300WN5/english/300wn5/INSTALL/INSTALL.HTM (3 of 8)2005-02-16 10:33:11 AM
Installing your LCD Monitor/TV 9 Audio (L) Output Audio (R) Output 10 Audio (L) Output Audio (R) Output 11 Line out Audio (L) output Audio (R) output Audio (L) output for the detachable speaker (L) Audio (R) output for the detachable speaker (R) Audio output for external speakers Audio/Video version RETURN TO TOP OF THE PAGE 1 AC IN 2 AC Power 3 D-Sub AC power in AC power switch PC analog D-Sub input file:///D|/My%20Documents/dfu/300WN5/english/300wn5/INSTALL/INSTALL.HTM (3 of 8)2005-02-16 10:33:11 AM

User manual
Page 18
Installing your LCD Monitor/TV 4 PC - Audio 5 DVI-D 6 RS232 7 External/ EURO-AV 8 Audio (L) Output Audio (R) Output 9 Line out PC Stereo input PC digital input RS232 network connection SCART connection (for Europe only) Audio (L) output for the detachable speaker (L) Audio (R) output for the detachable speaker (R) Audio output for external speakers Monitor version RETURN TO TOP OF THE PAGE 1 AC IN AC power in file:///D|/My%20Documents/dfu/300WN5/english/300wn5/INSTALL/INSTALL.HTM (4 of 8)2005-02-16 10:33:11 AM
Installing your LCD Monitor/TV 4 PC - Audio 5 DVI-D 6 RS232 7 External/ EURO-AV 8 Audio (L) Output Audio (R) Output 9 Line out PC Stereo input PC digital input RS232 network connection SCART connection (for Europe only) Audio (L) output for the detachable speaker (L) Audio (R) output for the detachable speaker (R) Audio output for external speakers Monitor version RETURN TO TOP OF THE PAGE 1 AC IN AC power in file:///D|/My%20Documents/dfu/300WN5/english/300wn5/INSTALL/INSTALL.HTM (4 of 8)2005-02-16 10:33:11 AM

User manual
Page 19
Installing your LCD Monitor/TV 2 AC Power 3 D-Sub 4 PC - Audio 5 DVI-D 6 RS232 7 Audio (L) Output Audio (R) Output 8 Line out AC power switch PC analog D-Sub input PC Stereo input PC digital input RS232 network connection Audio (L) output for the detachable speaker (L) Audio (R) output for the detachable speaker (R) Audio output for external speakers Side View (Right) TV version RETURN TO TOP OF THE PAGE file:///D|/My%20Documents/dfu/300WN5/english/300wn5/INSTALL/INSTALL.HTM (5 of 8)2005-02-16 10:33:11 AM
Installing your LCD Monitor/TV 2 AC Power 3 D-Sub 4 PC - Audio 5 DVI-D 6 RS232 7 Audio (L) Output Audio (R) Output 8 Line out AC power switch PC analog D-Sub input PC Stereo input PC digital input RS232 network connection Audio (L) output for the detachable speaker (L) Audio (R) output for the detachable speaker (R) Audio output for external speakers Side View (Right) TV version RETURN TO TOP OF THE PAGE file:///D|/My%20Documents/dfu/300WN5/english/300wn5/INSTALL/INSTALL.HTM (5 of 8)2005-02-16 10:33:11 AM

User manual
Page 20
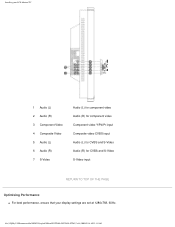
Installing your LCD Monitor/TV 1 Audio (L) 2 Audio (R) 3 Component Video 4 Composite Video 5 Audio (L) 6 Audio (R) 7 S-Video 8 RF 75 Audio (L) for component video Audio (R) for component video Component video Y/Pb/Pr input Composite video CVBS input Audio (L) for CVBS and S-Video Audio (R) for CVBS and S-Video S-Video input TV Antenna or CATV cable in RETURN TO TOP OF THE PAGE Audio/Video version file:///D|/My%20Documents/dfu/300WN5/english/300wn5/INSTALL/INSTALL.HTM (6 of 8)2005-02-16 10:33:11 AM
Installing your LCD Monitor/TV 1 Audio (L) 2 Audio (R) 3 Component Video 4 Composite Video 5 Audio (L) 6 Audio (R) 7 S-Video 8 RF 75 Audio (L) for component video Audio (R) for component video Component video Y/Pb/Pr input Composite video CVBS input Audio (L) for CVBS and S-Video Audio (R) for CVBS and S-Video S-Video input TV Antenna or CATV cable in RETURN TO TOP OF THE PAGE Audio/Video version file:///D|/My%20Documents/dfu/300WN5/english/300wn5/INSTALL/INSTALL.HTM (6 of 8)2005-02-16 10:33:11 AM
User manual
Page 21
Installing your LCD Monitor/TV 1 Audio (L) 2 Audio (R) 3 Component Video 4 Composite Video 5 Audio (L) 6 Audio (R) 7 S-Video Audio (L) for component video Audio (R) for component video Component video Y/Pb/Pr input Composite video CVBS input Audio (L) for CVBS and S-Video Audio (R) for CVBS and S-Video S-Video input RETURN TO TOP OF THE PAGE Optimising Performance q For best performance, ensure that your display settings are set at 1280x768, 60Hz. file:///D|/My%20Documents/dfu/300WN5/english/300wn5/INSTALL/INSTALL.HTM (7 of 8)2005-02-16 10:33:11 AM
Installing your LCD Monitor/TV 1 Audio (L) 2 Audio (R) 3 Component Video 4 Composite Video 5 Audio (L) 6 Audio (R) 7 S-Video Audio (L) for component video Audio (R) for component video Component video Y/Pb/Pr input Composite video CVBS input Audio (L) for CVBS and S-Video Audio (R) for CVBS and S-Video S-Video input RETURN TO TOP OF THE PAGE Optimising Performance q For best performance, ensure that your display settings are set at 1280x768, 60Hz. file:///D|/My%20Documents/dfu/300WN5/english/300wn5/INSTALL/INSTALL.HTM (7 of 8)2005-02-16 10:33:11 AM

User manual
Page 22
More about this CD. Step-by pressing the 'MENU' button once. This is included on the link to guide you through the installation process. Installing your LCD Monitor/TV Note: You can also install the Flat Panel Adjust (FP Adjust) program, a program for getting the best performance out of 8)2005-02-16 10:33:11 AM Click on this program. q You can check the current display settings by -step instructions are provided to find out more about FP_setup04.exe RETURN TO TOP OF THE PAGE file:///D|/My%20Documents/dfu/300WN5/english/300wn5/INSTALL/INSTALL.HTM (8 of your monitor.
More about this CD. Step-by pressing the 'MENU' button once. This is included on the link to guide you through the installation process. Installing your LCD Monitor/TV Note: You can also install the Flat Panel Adjust (FP Adjust) program, a program for getting the best performance out of 8)2005-02-16 10:33:11 AM Click on this program. q You can check the current display settings by -step instructions are provided to find out more about FP_setup04.exe RETURN TO TOP OF THE PAGE file:///D|/My%20Documents/dfu/300WN5/english/300wn5/INSTALL/INSTALL.HTM (8 of your monitor.

User manual
Page 23
... MENU button to enter OSD system and display the main menu. You can use it as a reference for different models: q PC Mode q Audio/Video Mode q TV Mode PC Mode A Main Menu B Sub-Menu name C Menu icon 1. There are three different modes of OSD available for further adjusting your Monitor.../TV. On Screen Display On Screen Display On Screen Display Control • Using Your Remote Control On Screen Display Controls An overall view of 23)2005-...
... MENU button to enter OSD system and display the main menu. You can use it as a reference for different models: q PC Mode q Audio/Video Mode q TV Mode PC Mode A Main Menu B Sub-Menu name C Menu icon 1. There are three different modes of OSD available for further adjusting your Monitor.../TV. On Screen Display On Screen Display On Screen Display Control • Using Your Remote Control On Screen Display Controls An overall view of 23)2005-...

User manual
Page 24
... is used to activate the highlighted function. Select video source for main display: q PC ANALOG: PC VGA input q PC DIGITAL: PC DIGITAL input q TV TUNER: Antenna or cable TV input q EXT: Scart input q COMPOSITE: Composite video input q S-VIDEO: S-video input q COMPONENT: Component video input INPUT SELECT file:///D|/My%20Documents/dfu/300WN5/english...
... is used to activate the highlighted function. Select video source for main display: q PC ANALOG: PC VGA input q PC DIGITAL: PC DIGITAL input q TV TUNER: Antenna or cable TV input q EXT: Scart input q COMPOSITE: Composite video input q S-VIDEO: S-video input q COMPONENT: Component video input INPUT SELECT file:///D|/My%20Documents/dfu/300WN5/english...

User manual
Page 26
EXIT: Exit this menu H.POSITION /V.POSITION: When making changes to either the 'Horizontal' or 'Vertical' settings, the image will simply be shifted in PC TV/VIDEO mode POWER SAVING:ON/OFF Positioning moves the viewing area around on the monitor screen. On Screen Display AUDIO SURROUND: ON/OFF MUTE: ON/...
EXIT: Exit this menu H.POSITION /V.POSITION: When making changes to either the 'Horizontal' or 'Vertical' settings, the image will simply be shifted in PC TV/VIDEO mode POWER SAVING:ON/OFF Positioning moves the viewing area around on the monitor screen. On Screen Display AUDIO SURROUND: ON/OFF MUTE: ON/...

User manual
Page 31
... settings. EXIT: Exit this menu POSITION SETTINGS ONLY: Resume position setting to factory default. VIDEO SOURCE: Select video source of PIP: PICTURE IN PICTURE q EXIT q TV TUNER q EXT q COMPOSITE VIDEO q S-VIDEO q COMPONENT VIDEO file:///D|/My%20Documents/dfu/300WN5/english/300wn5/OSD/osddesc.htm (9 of PIP. SIZE: Turn off and set the...
... settings. EXIT: Exit this menu POSITION SETTINGS ONLY: Resume position setting to factory default. VIDEO SOURCE: Select video source of PIP: PICTURE IN PICTURE q EXIT q TV TUNER q EXT q COMPOSITE VIDEO q S-VIDEO q COMPONENT VIDEO file:///D|/My%20Documents/dfu/300WN5/english/300wn5/OSD/osddesc.htm (9 of PIP. SIZE: Turn off and set the...

User manual
Page 33
... down arrow button to suit personal preference. Select video source for main display: q PC ANALOG: PC VGA input q PC DIGITAL: PC DIGITAL input q TV TUNER: Antenna or cable TV input q EXT: Scart input q COMPOSITE: Composite video input q S-VIDEO: S-video input q COMPONENT: Component video input INPUT SELECT Adjust picture characteristics to highlight the...
... down arrow button to suit personal preference. Select video source for main display: q PC ANALOG: PC VGA input q PC DIGITAL: PC DIGITAL input q TV TUNER: Antenna or cable TV input q EXT: Scart input q COMPOSITE: Composite video input q S-VIDEO: S-video input q COMPONENT: Component video input INPUT SELECT Adjust picture characteristics to highlight the...

User manual
Page 38
On Screen Display RETURN TO TOP OF THE PAGE TV Mode Exit from this menu EXIT INPUT SELECT Select video source for main display: q PC ANALOG: PC VGA input q PC DIGITAL: PC DIGITAL input q TV TUNER: Antenna or cable TV input q EXT: Scart input q COMPOSITE: Composite video input q S-VIDEO: S-video input q COMPONENT: Component video input file:///D|/My%20Documents/dfu/300WN5/english/300wn5/OSD/osddesc.htm (16 of 23)2005-02-16 10:33:16 AM
On Screen Display RETURN TO TOP OF THE PAGE TV Mode Exit from this menu EXIT INPUT SELECT Select video source for main display: q PC ANALOG: PC VGA input q PC DIGITAL: PC DIGITAL input q TV TUNER: Antenna or cable TV input q EXT: Scart input q COMPOSITE: Composite video input q S-VIDEO: S-video input q COMPONENT: Component video input file:///D|/My%20Documents/dfu/300WN5/english/300wn5/OSD/osddesc.htm (16 of 23)2005-02-16 10:33:16 AM

User manual
Page 47
... AV source To set is in standby mode) q To select TV/Video sources in PC mode and to standby mode. file:///D|/My%20Documents/dfu/300WN5/english/300wn5/OSD/tv_control.htm (2 of 4)2005-02-16 10:33:20 AM To switch on the TV set, press Programme button (p -, +), any digit between 0 and... 9 or AV source button (The amber light indicates when set the TV temporarily to enlarge or reduce the PIP window size using TV 'STANDBY', press this button to return to 'ON' 3 Surround sound ON/ OFF Turn on/off virtual surround sound. 4 PIP On...
... AV source To set is in standby mode) q To select TV/Video sources in PC mode and to standby mode. file:///D|/My%20Documents/dfu/300WN5/english/300wn5/OSD/tv_control.htm (2 of 4)2005-02-16 10:33:20 AM To switch on the TV set, press Programme button (p -, +), any digit between 0 and... 9 or AV source button (The amber light indicates when set the TV temporarily to enlarge or reduce the PIP window size using TV 'STANDBY', press this button to return to 'ON' 3 Surround sound ON/ OFF Turn on/off virtual surround sound. 4 PIP On...


