Leaflet
Page 2
... Network controllability allows user to control and adjust monitors remotely through RS232 protocol. WXGA provides the resolutions 1280 by eliminating the stair-step jagged edges so often seen on the entire screen. DCDi de-interlacing DCDi enhances the quality of display settings to correspond with the product to provide high quality digital display. All Rights reserved. Hidden control buttons Control buttons placed at the rear of Koninklijke Philips Electronics N.V. Specifications...
... Network controllability allows user to control and adjust monitors remotely through RS232 protocol. WXGA provides the resolutions 1280 by eliminating the stair-step jagged edges so often seen on the entire screen. DCDi de-interlacing DCDi enhances the quality of display settings to correspond with the product to provide high quality digital display. All Rights reserved. Hidden control buttons Control buttons placed at the rear of Koninklijke Philips Electronics N.V. Specifications...

User manual
Page 2
... positioning the monitor, make sure the power plug and outlet are not going to use alcohol, solvents or ammonia-based liquids. If a still image in high contrast remains on the screen for an extended period of time, it to rain or excessive moisture. q Consult a service technician if the monitor does not operate normally when you are easily accessible. q If turning off . q Remove any...
... positioning the monitor, make sure the power plug and outlet are not going to use alcohol, solvents or ammonia-based liquids. If a still image in high contrast remains on the screen for an extended period of time, it to rain or excessive moisture. q Consult a service technician if the monitor does not operate normally when you are easily accessible. q If turning off . q Remove any...

User manual
Page 4
... following sections: q Safety and Troubleshooting Information provides tips and solutions for common problems as well as the technical specifications for anyone who uses the Philips LCD Monitor TV. q Product Information gives an overview of worldwide Philips Consumer Information Centres along with help desk phone numbers and information on adjusting the settings for easy reference. q Installing Your Monitor describes the initial setup process and gives an overview...
... following sections: q Safety and Troubleshooting Information provides tips and solutions for common problems as well as the technical specifications for anyone who uses the Philips LCD Monitor TV. q Product Information gives an overview of worldwide Philips Consumer Information Centres along with help desk phone numbers and information on adjusting the settings for easy reference. q Installing Your Monitor describes the initial setup process and gives an overview...

User manual
Page 6
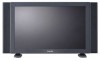
... Specifications* LCD PANEL • Type • Screen size TFT LCD 29.53 inch file:///D|/My%20Documents/dfu/300WN5/english/300wn5/PRODUCT/PRODUCT.HTM (1 of PC, TV, HDTV, VCD, DVD, Progressive DVD and Camcorder q Network controllability via RS232 interface for DVD (available in AV and TV models only) q Euroconnector (SCART) (available in Western Europe) q MultiSystem TV tuner-PAL/NTSC/SECAM (available in -one Monitor TV with excellent display performance q Multiple video input...
... Specifications* LCD PANEL • Type • Screen size TFT LCD 29.53 inch file:///D|/My%20Documents/dfu/300WN5/english/300wn5/PRODUCT/PRODUCT.HTM (1 of PC, TV, HDTV, VCD, DVD, Progressive DVD and Camcorder q Network controllability via RS232 interface for DVD (available in AV and TV models only) q Euroconnector (SCART) (available in Western Europe) q MultiSystem TV tuner-PAL/NTSC/SECAM (available in -one Monitor TV with excellent display performance q Multiple video input...
User manual
Page 21
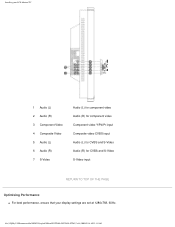
Installing your LCD Monitor/TV 1 Audio (L) 2 Audio (R) 3 Component Video 4 Composite Video 5 Audio (L) 6 Audio (R) 7 S-Video Audio (L) for component video Audio (R) for component video Component video Y/Pb/Pr input Composite video CVBS input Audio (L) for CVBS and S-Video Audio (R) for CVBS and S-Video S-Video input RETURN TO TOP OF THE PAGE Optimising Performance q For best performance, ensure that your display settings are set at 1280x768, 60Hz. file:///D|/My%20Documents/dfu/300WN5/english/300wn5/INSTALL/INSTALL.HTM (7 of 8)2005-02-16 10:33:11 AM
Installing your LCD Monitor/TV 1 Audio (L) 2 Audio (R) 3 Component Video 4 Composite Video 5 Audio (L) 6 Audio (R) 7 S-Video Audio (L) for component video Audio (R) for component video Component video Y/Pb/Pr input Composite video CVBS input Audio (L) for CVBS and S-Video Audio (R) for CVBS and S-Video S-Video input RETURN TO TOP OF THE PAGE Optimising Performance q For best performance, ensure that your display settings are set at 1280x768, 60Hz. file:///D|/My%20Documents/dfu/300WN5/english/300wn5/INSTALL/INSTALL.HTM (7 of 8)2005-02-16 10:33:11 AM

User manual
Page 31
... PIP. Adjust picture in picture preferences. SIZE: Turn off and set the size of 23)2005-02-16 10:33:16 AM EXIT: Exit this menu POSITION SETTINGS ONLY: Resume position setting to the factory default values. Users can chose your preferred size. On Screen Display FACTORY RESET Reset the settings to factory default. All SETTINGS: Load all factory default settings. VIDEO SOURCE: Select video source of PIP: PICTURE IN PICTURE q EXIT q TV TUNER q EXT q COMPOSITE VIDEO q S-VIDEO q COMPONENT VIDEO file:///D|/My%20Documents...
... PIP. Adjust picture in picture preferences. SIZE: Turn off and set the size of 23)2005-02-16 10:33:16 AM EXIT: Exit this menu POSITION SETTINGS ONLY: Resume position setting to the factory default values. Users can chose your preferred size. On Screen Display FACTORY RESET Reset the settings to factory default. All SETTINGS: Load all factory default settings. VIDEO SOURCE: Select video source of PIP: PICTURE IN PICTURE q EXIT q TV TUNER q EXT q COMPOSITE VIDEO q S-VIDEO q COMPONENT VIDEO file:///D|/My%20Documents...

User manual
Page 48
... direct access to programmes For a 2-digit programme number, the 2nd digit must be entered before the dash disappears. Remote Control 5 PIP Shift 6 Mute 7 Volume/Cursor control To change 'Picture in Picture' window position in menu. 14 PC/TV mode selection To select PC or TV mode. 15 Previous programme To access the last programme viewed. 16 Sleep timer To select the period of time after which the set will switch automatically...
... direct access to programmes For a 2-digit programme number, the 2nd digit must be entered before the dash disappears. Remote Control 5 PIP Shift 6 Mute 7 Volume/Cursor control To change 'Picture in Picture' window position in menu. 14 PC/TV mode selection To select PC or TV mode. 15 Previous programme To access the last programme viewed. 16 Sleep timer To select the period of time after which the set will switch automatically...

User manual
Page 51
... link to read the manual in .pdf format. Adobe® Acrobat Reader for PC / Adobe® Acrobat Reader for Mac. Click-and-hold your driver ".inf/.icm/.cat" at : /PC/drivers/ Read the "Driver_install02.txt" file before installing. Download and Print Download and Print Installing your LCD monitor driver • Download and Printing Instructions • Installing FPadjust Program Installing Your LCD monitor driver System requirements: q PC running Windows® 95, Windows® 98, Windows® 2000 , Windows...
... link to read the manual in .pdf format. Adobe® Acrobat Reader for PC / Adobe® Acrobat Reader for Mac. Click-and-hold your driver ".inf/.icm/.cat" at : /PC/drivers/ Read the "Driver_install02.txt" file before installing. Download and Print Download and Print Installing your LCD monitor driver • Download and Printing Instructions • Installing FPadjust Program Installing Your LCD monitor driver System requirements: q PC running Windows® 95, Windows® 98, Windows® 2000 , Windows...
User manual
Page 54
... monitor. Follow the instructions in this video mode'? file:///D|/My%20Documents/dfu/300WN5/english/300wn5/SAFETY/SAF_FAQ.HTM (1 of 9)2005-02-16 10:33:31 AM Monitor drivers (.inf and Icm files) will be installed automatically. Inside the Display Control Panel, select the 'Settings' tab. In the Control Panel Window, select the Display icon. In the Windows Start Menu, select Settings/Control Panel. Open 'Advanced Properties' and set -up disk & CD-ROM? Q: What are the driver files for monitor drivers...
... monitor. Follow the instructions in this video mode'? file:///D|/My%20Documents/dfu/300WN5/english/300wn5/SAFETY/SAF_FAQ.HTM (1 of 9)2005-02-16 10:33:31 AM Monitor drivers (.inf and Icm files) will be installed automatically. Inside the Display Control Panel, select the 'Settings' tab. In the Control Panel Window, select the Display icon. In the Windows Start Menu, select Settings/Control Panel. Open 'Advanced Properties' and set -up disk & CD-ROM? Q: What are the driver files for monitor drivers...

User manual
Page 55
... press the MENU button, then select 'Factory Reset/All Settings' to LCD technology. FAQs (Frequently Asked Questions) Q: How do ? A: Make sure the power cord is used, the screen displays both odd and even horizontal scanning lines at which the speed at the same time, thus distorting the picture. If an Interlace signal is connected to the bottom of 9)2005-02-16 10:33:31 AM file:///D|/My%20Documents...
... press the MENU button, then select 'Factory Reset/All Settings' to LCD technology. FAQs (Frequently Asked Questions) Q: How do ? A: Make sure the power cord is used, the screen displays both odd and even horizontal scanning lines at which the speed at the same time, thus distorting the picture. If an Interlace signal is connected to the bottom of 9)2005-02-16 10:33:31 AM file:///D|/My%20Documents...

User manual
Page 58
... combined to be confused with standard video (VHS and 8 mm) where the Y/C signals are recorded separately on the tape. This provides a better picture quality than is achieved with PAL or SECAM colour coding. A: Television pictures are different standards: BG, DK, I and L L'. The United States and Japan use a different system called NTSC. It provides composite video inputs and outputs, stereo audio in all countries. It is not...
... combined to be confused with standard video (VHS and 8 mm) where the Y/C signals are recorded separately on the tape. This provides a better picture quality than is achieved with PAL or SECAM colour coding. A: Television pictures are different standards: BG, DK, I and L L'. The United States and Japan use a different system called NTSC. It provides composite video inputs and outputs, stereo audio in all countries. It is not...

User manual
Page 60
... not use the scanning method. Therefore, CRT monitors basically operate with voltage or not. A TFT LCD has several advantages over a CRT, since it can be available without additional software processing. A: The TFT LCD panel is an element that comes through the top polarized panel may not be very thin and no flickering occurs because it controls the direction of inlet light and file...
... not use the scanning method. Therefore, CRT monitors basically operate with voltage or not. A TFT LCD has several advantages over a CRT, since it can be available without additional software processing. A: The TFT LCD panel is an element that comes through the top polarized panel may not be very thin and no flickering occurs because it controls the direction of inlet light and file...

User manual
Page 66
... in non-NTSC area: Does your PC or Video player. Poorly connected SCART cables or aerial sockets are firmly connected to ON. In this frequency range (UHF or VHF band)? Modify the SYSTEM setting. For Asia users in this case, try manually adjusting your the LCD Monitor TV and audio output connectors on certain TV channels you receive a picture but no sound, this means that the audio cables are often...
... in non-NTSC area: Does your PC or Video player. Poorly connected SCART cables or aerial sockets are firmly connected to ON. In this frequency range (UHF or VHF band)? Modify the SYSTEM setting. For Asia users in this case, try manually adjusting your the LCD Monitor TV and audio output connectors on certain TV channels you receive a picture but no sound, this means that the audio cables are often...

User manual
Page 72
... STAR® Partner, PHILIPS has determined that the monitor must be connected to fulfill the requirements in use for energy efficiency. We recommend you switch off the monitor when it is equipped with a function for saving energy which supports VESA DPMS to a computer which supports the VESA Display Power Management Signaling (DPMS) standard. Time settings are adjusted from the system unit by software. file:///D|/My%20Documents/dfu/300WN5...
... STAR® Partner, PHILIPS has determined that the monitor must be connected to fulfill the requirements in use for energy efficiency. We recommend you switch off the monitor when it is equipped with a function for saving energy which supports VESA DPMS to a computer which supports the VESA Display Power Management Signaling (DPMS) standard. Time settings are adjusted from the system unit by software. file:///D|/My%20Documents/dfu/300WN5...
User manual
Page 89
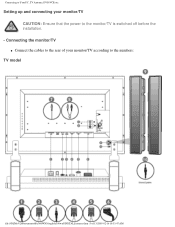
Connecting to the monitor/TV is switched off before the installation. - Setting up and connecting your monitor/TV according to the numbers: TV model file:///D|/My%20Documents/dfu/300WN5/english/300wn5/INSTALL/connect.htm (3 of 13)2005-02-16 10:33:47 AM Connecting the monitor/TV q Connect the cables to the rear of your monitor/TV CAUTION: Ensure that the power to Your PC, TV Antenna, DVD/VCR etc.
Connecting to the monitor/TV is switched off before the installation. - Setting up and connecting your monitor/TV according to the numbers: TV model file:///D|/My%20Documents/dfu/300WN5/english/300wn5/INSTALL/connect.htm (3 of 13)2005-02-16 10:33:47 AM Connecting the monitor/TV q Connect the cables to the rear of your monitor/TV CAUTION: Ensure that the power to Your PC, TV Antenna, DVD/VCR etc.

User manual
Page 90
Audio/Video model file:///D|/My%20Documents/dfu/300WN5/english/300wn5/INSTALL/connect.htm (4 of 13)2005-02-16 10:33:47 AM Connecting to Your PC, TV Antenna, DVD/VCR etc.
Audio/Video model file:///D|/My%20Documents/dfu/300WN5/english/300wn5/INSTALL/connect.htm (4 of 13)2005-02-16 10:33:47 AM Connecting to Your PC, TV Antenna, DVD/VCR etc.
User manual
Page 91
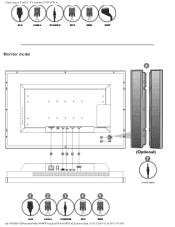
Monitor model file:///D|/My%20Documents/dfu/300WN5/english/300wn5/INSTALL/connect.htm (5 of 13)2005-02-16 10:33:47 AM Connecting to Your PC, TV Antenna, DVD/VCR etc.
Monitor model file:///D|/My%20Documents/dfu/300WN5/english/300wn5/INSTALL/connect.htm (5 of 13)2005-02-16 10:33:47 AM Connecting to Your PC, TV Antenna, DVD/VCR etc.
User manual
Page 100
... appropriate drive F: ( CD-ROM Drive) then click on the 'Next' button. 9. Click on the 'OK' button then select your Philips monitor can be enabled from the 'Monitor' dialog box in Philips Monitors supports Plug & Play requirements for Windows® 95/98/2000/Me/XP. Click on 'Control Panel'. 3. Click on the 'Start' button, point to Your PC, TV Antenna, DVD/VCR etc.• Getting Started • Optimizing Performance Getting Started Use the information file...
... appropriate drive F: ( CD-ROM Drive) then click on the 'Next' button. 9. Click on the 'OK' button then select your Philips monitor can be enabled from the 'Monitor' dialog box in Philips Monitors supports Plug & Play requirements for Windows® 95/98/2000/Me/XP. Click on 'Control Panel'. 3. Click on the 'Start' button, point to Your PC, TV Antenna, DVD/VCR etc.• Getting Started • Optimizing Performance Getting Started Use the information file...
User manual
Page 101
... device so that I can see the 'Digital Signature Not Found' window, click on 'Control Panel'. 3. For Windows® 2000 1. Click on the 'OK' button. 10. Click on the 'Open' button, then click on 'Properties' button. Please stop installation. - Click on the 'Start' button, point to 'Settings', and then click on the 'Yes' button. Click on the 'Display' Icon. 4. Double click on 'Finish' button then the 'Close' button. Click on 'Update Driver...
... device so that I can see the 'Digital Signature Not Found' window, click on 'Control Panel'. 3. For Windows® 2000 1. Click on the 'OK' button. 10. Click on the 'Open' button, then click on 'Properties' button. Please stop installation. - Click on the 'Start' button, point to 'Settings', and then click on the 'Yes' button. Click on the 'Display' Icon. 4. Double click on 'Finish' button then the 'Close' button. Click on 'Update Driver...
User manual
Page 102
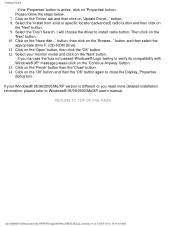
.../Me/XP user's manual. Select the 'Don't Search. I will choose the driver to close the Display_Properties dialog box. Then click on 'Update Driver...' If you need more detailed installation information, please refer to verify its compatibility with Windows® XP' message please click on 'Properties' button. If your monitor model and click on the 'Open' button, then click the 'OK' button. 12. Click on the 'Driver' tab and...
.../Me/XP user's manual. Select the 'Don't Search. I will choose the driver to close the Display_Properties dialog box. Then click on 'Update Driver...' If you need more detailed installation information, please refer to verify its compatibility with Windows® XP' message please click on 'Properties' button. If your monitor model and click on the 'Open' button, then click the 'OK' button. 12. Click on the 'Driver' tab and...

