
Owner's Manual
Page 5
...up Direct Help 3-14 Instructions on using your Machine Assistant 3-15 Instructions on using your Pfaff creative 2140 3-2 Selecting a stitch 3-3 Altering the stitch settings 3-4 Single stitch selection 3-4 Adjusting ... the feed dog Disengaging the top feed/dual feed Removing the knee lifter Attaching the embroidery foot Connecting the embroidery unit Inserting a card Embroidery hoop Attach the hoop to the embroidery unit Remove the hoop Remove the embroidery unit 1-1 1-2 1-2- 1-8 1-9-1-23 2-1 2-1 2-1 2-1 2-1 2-1 2-2 2-2 2-2 2-2 - 2-5 2-2 2-3 - 2-4 2-5 2-6 2-6 2-6 2-7 2-7 2-8 2-8 ...
...up Direct Help 3-14 Instructions on using your Machine Assistant 3-15 Instructions on using your Pfaff creative 2140 3-2 Selecting a stitch 3-3 Altering the stitch settings 3-4 Single stitch selection 3-4 Adjusting ... the feed dog Disengaging the top feed/dual feed Removing the knee lifter Attaching the embroidery foot Connecting the embroidery unit Inserting a card Embroidery hoop Attach the hoop to the embroidery unit Remove the hoop Remove the embroidery unit 1-1 1-2 1-2- 1-8 1-9-1-23 2-1 2-1 2-1 2-1 2-1 2-1 2-2 2-2 2-2 2-2 - 2-5 2-2 2-3 - 2-4 2-5 2-6 2-6 2-6 2-7 2-7 2-8 2-8 ...

Owner's Manual
Page 6
... a marked alphabet combination 4-19 Rotate an embroidery alphabet combination 4-20 Preparing a creative memory card for saving 4-20 Sewing with the embroidery unit attached 4-20 Sewing sequence 4-20 Create a...Embroidery combination Create an embroidery combination Selecting a design from the machine's memory or from a creative memory card Move the design within the hoop Embroidery Adjust an embroidery combination Save an embroidery combination Open a saved embroidery combination Embroider stitches stored in your Pfaff creative 2140 The Creative Data Manager Functions In the Creative...
... a marked alphabet combination 4-19 Rotate an embroidery alphabet combination 4-20 Preparing a creative memory card for saving 4-20 Sewing with the embroidery unit attached 4-20 Sewing sequence 4-20 Create a...Embroidery combination Create an embroidery combination Selecting a design from the machine's memory or from a creative memory card Move the design within the hoop Embroidery Adjust an embroidery combination Save an embroidery combination Open a saved embroidery combination Embroider stitches stored in your Pfaff creative 2140 The Creative Data Manager Functions In the Creative...

Owner's Manual
Page 7
...stitch 6-6 Quilting White Quilt Quilt cards Twin needle embroidery Tapering Automatic Tapering Decorative buttonhole 6-7 - 6-8 6-8 6-8 6-9 6-10- 6-11 6-10 6-11 Embroidery unit Attatch the embroidery unit Attatch the hoop on the embroidery unit Removing the hoop Removing the embroidery unit 6-12 6-12 6-12 6-13 6-13 Hooping ...fabric 6-24 Position an additional design 6-25 Combine embroidered word combinations 6-26 Creating a directory in the Creative Data Manager Embroidering the text Positioning an additional section Pattern combinations Combine designs in the hoop Embroider endless ...
...stitch 6-6 Quilting White Quilt Quilt cards Twin needle embroidery Tapering Automatic Tapering Decorative buttonhole 6-7 - 6-8 6-8 6-8 6-9 6-10- 6-11 6-10 6-11 Embroidery unit Attatch the embroidery unit Attatch the hoop on the embroidery unit Removing the hoop Removing the embroidery unit 6-12 6-12 6-12 6-13 6-13 Hooping ...fabric 6-24 Position an additional design 6-25 Combine embroidered word combinations 6-26 Creating a directory in the Creative Data Manager Embroidering the text Positioning an additional section Pattern combinations Combine designs in the hoop Embroider endless ...
Owner's Manual
Page 9
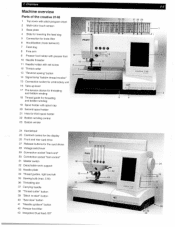
1. fl ) tip> 1' )I PFAFF -24 creative 2140 Th dII 28 9I 31129 30 Overview Machine overview Parts of the creative 2140 1 Top cover with stitch program chart 2 Multi-color touch screen 3 Base plate 4 Slide for lowering the feed dog 16 5 Connection for knee ... 1 1 Needle holder with set screw 12 Thread cutter 13 "Reverse sewing" button 14 Signal lamp "bobbin thread monitor" 15 Connection socket for embroidery unit 16 Take-up /down" button 42 Presser toot lifter 43 Integrated Dual feed /IDT ______ 1-1 1920 212223 hrk*y Lt Lti4t1T 4tIItILfhitLoiIrL:3fL 1)3U3tTIfiE...
1. fl ) tip> 1' )I PFAFF -24 creative 2140 Th dII 28 9I 31129 30 Overview Machine overview Parts of the creative 2140 1 Top cover with stitch program chart 2 Multi-color touch screen 3 Base plate 4 Slide for lowering the feed dog 16 5 Connection for knee ... 1 1 Needle holder with set screw 12 Thread cutter 13 "Reverse sewing" button 14 Signal lamp "bobbin thread monitor" 15 Connection socket for embroidery unit 16 Take-up /down" button 42 Presser toot lifter 43 Integrated Dual feed /IDT ______ 1-1 1920 212223 hrk*y Lt Lti4t1T 4tIItILfhitLoiIrL:3fL 1)3U3tTIfiE...
Owner's Manual
Page 10
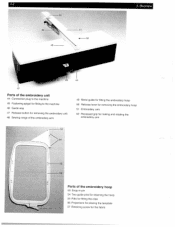
... 47 Release button for removing the embroidery unit 48 Sewing range of the embroidery arm 49 Metal guide for fitting the embroidery hoop 50 Release lever for removing the embroidery hoop 51 Embroidery arm 52 Recessed grip for raising and rotating the embroidery arm 53 V 54 - 55 56 Parts of the embroidery hoop 53 Snapin pin 54 Two...
... 47 Release button for removing the embroidery unit 48 Sewing range of the embroidery arm 49 Metal guide for fitting the embroidery hoop 50 Release lever for removing the embroidery hoop 51 Embroidery arm 52 Recessed grip for raising and rotating the embroidery arm 53 V 54 - 55 56 Parts of the embroidery hoop 53 Snapin pin 54 Two...

Owner's Manual
Page 23
... stitches are surrounded by way of information, and does not actually appear in the input field), you can move it must be marked with embroidery alphabets (using the embroidery unit). If your characters in several lines, the input field is to be used to be marked. The zone around the marked stitch or...
... stitches are surrounded by way of information, and does not actually appear in the input field), you can move it must be marked with embroidery alphabets (using the embroidery unit). If your characters in several lines, the input field is to be used to be marked. The zone around the marked stitch or...
Owner's Manual
Page 33
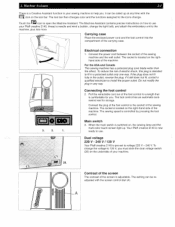
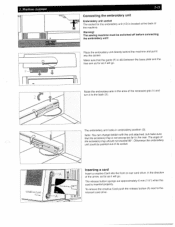
... Main switch 3. Your Pfaff creative 2140 is a Creative Assistant function in the outlel reverse the plug. To change the voltage to help you . The tool bar then changes color and the functions assigned to the icons change the light bulb, and attach the embroidery unit to a length that is...Connect the power cord between the socket of the carrying case. \/] Electrical connection 1. Dual voltage 220 V - 240 V I 120 V Your Pfaff creative 2140 is switched on the right-hand side of the foot control to use . For the USA and Canada This sewing machine has a polarized plug ...
... Main switch 3. Your Pfaff creative 2140 is a Creative Assistant function in the outlel reverse the plug. To change the voltage to help you . The tool bar then changes color and the functions assigned to the icons change the light bulb, and attach the embroidery unit to a length that is...Connect the power cord between the socket of the carrying case. \/] Electrical connection 1. Dual voltage 220 V - 240 V I 120 V Your Pfaff creative 2140 is switched on the right-hand side of the foot control to use . For the USA and Canada This sewing machine has a polarized plug ...

Owner's Manual
Page 46
... must be removed. To lower the feed dog move the slide (4) to select a creative Card Pfaff creative 2140 properly and attach if the embroidery unit is not Before hoop embroidering you Removing the knee lifter The knee lifter is not needed for embroidery work and must lower the feed dog, disengage the dual feed (IDT System), remove...
... must be removed. To lower the feed dog move the slide (4) to select a creative Card Pfaff creative 2140 properly and attach if the embroidery unit is not Before hoop embroidering you Removing the knee lifter The knee lifter is not needed for embroidery work and must lower the feed dog, disengage the dual feed (IDT System), remove...
Owner's Manual
Page 47
... sure that the guide (F) is inserted properly. To remove the creative Card push the release button (A) next to the back (2). Machine Assistant 2-15 Connecting the embroidery unit Embroidery unit socket The socket for the embroidery unit (15) is not swung too far to the rear. Make ...in the direction of the machine. Inserting a card Insert a creative Card into the socket. The angle of the accessory tray should not exceed 9O' Otherwise the embroidery unit could be switched off before connecting the embroidery unit! 2. The release button springs out approximately 6 mm (1/4') when...
... sure that the guide (F) is inserted properly. To remove the creative Card push the release button (A) next to the back (2). Machine Assistant 2-15 Connecting the embroidery unit Embroidery unit socket The socket for the embroidery unit (15) is not swung too far to the rear. Make ...in the direction of the machine. Inserting a card Insert a creative Card into the socket. The angle of the accessory tray should not exceed 9O' Otherwise the embroidery unit could be switched off before connecting the embroidery unit! 2. The release button springs out approximately 6 mm (1/4') when...
Owner's Manual
Page 48
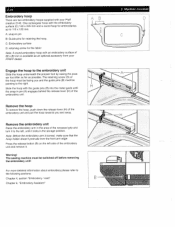
...sure that the hoop holder doesn 't protrude from your Pfaff creative 2140. Warning! Machine Assistant Remove the embroidery unit Raise the embroidery arm in the area of the recessed grip and turn it to the left side of the embroidery unit and remove it locks in the storage position. A: snap...engages behind the release lever (H) of the hoop must be facing you and away. 2-16 Embroidery hoop There are two embroidery hoops supplied with your PFAFF dealer. The retaining screw (D) of the embroidery unit. Press the release button (B) on the left , until the snap in pin B: Guide pins...
...sure that the hoop holder doesn 't protrude from your Pfaff creative 2140. Warning! Machine Assistant Remove the embroidery unit Raise the embroidery arm in the area of the recessed grip and turn it to the left side of the embroidery unit and remove it locks in the storage position. A: snap...engages behind the release lever (H) of the hoop must be facing you and away. 2-16 Embroidery hoop There are two embroidery hoops supplied with your PFAFF dealer. The retaining screw (D) of the embroidery unit. Press the release button (B) on the left , until the snap in pin B: Guide pins...
Owner's Manual
Page 59
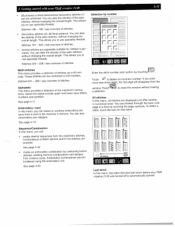
...that stitch. 3 Getting started with your Pfaff creative 2140 • 38 pictorial or three-dimensional decorative stitches (1) can alter the density of the satin stitches, without changing the overall length. This allows you can select or combine embroidery pat terns from the machine's stitches....especially suitable for that was last sewn before your Pfaff creative 2140 was turned off is automatically opened. Stitches 197 - 222 I Last stitch In this menu, all stitches are em broidered using the embroidery unit. See page 4-11 Embroidery / card In this menu, you enter more than...
...that stitch. 3 Getting started with your Pfaff creative 2140 • 38 pictorial or three-dimensional decorative stitches (1) can alter the density of the satin stitches, without changing the overall length. This allows you can select or combine embroidery pat terns from the machine's stitches....especially suitable for that was last sewn before your Pfaff creative 2140 was turned off is automatically opened. Stitches 197 - 222 I Last stitch In this menu, all stitches are em broidered using the embroidery unit. See page 4-11 Embroidery / card In this menu, you enter more than...
Owner's Manual
Page 84
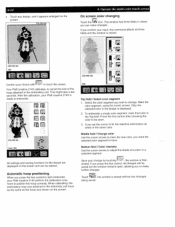
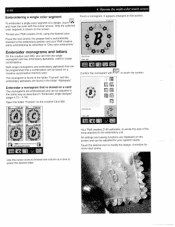
...225x140 fliT! Operate the multi-color touch screen On screen color changing Touch the icon. Select the color segment you confirm your Pfaff creative 2140 perform the calibration once more to change by touching - Mark the color segment, using the cursor arrows. Save your choice with ... the window is displayed. 2. If you wish to position the hoop correctly. Automatic hoop positioning When you to the embroidery unit. Your Pfaff creative 2140 calibrates, to sense the size of a color in the Top field. 4-14 • Touch any changes being saved.
...225x140 fliT! Operate the multi-color touch screen On screen color changing Touch the icon. Select the color segment you confirm your Pfaff creative 2140 perform the calibration once more to change by touching - Mark the color segment, using the cursor arrows. Save your choice with ... the window is displayed. 2. If you wish to position the hoop correctly. Automatic hoop positioning When you to the embroidery unit. Your Pfaff creative 2140 calibrates, to sense the size of a color in the Top field. 4-14 • Touch any changes being saved.
Owner's Manual
Page 86
... folder "Framed" on a creative card/creative memory card. Only the selected color segment is automatically lowered to create combinations. ri r 0 fl oa E iii 25 225>140 mm Card 300 I 3thePFrTIed Use the cursor icons to browse one single monogram and two embroidery alphabets, used to the embroidery position and your Pfaff creative 2140, using the desired color.
... folder "Framed" on a creative card/creative memory card. Only the selected color segment is automatically lowered to create combinations. ri r 0 fl oa E iii 25 225>140 mm Card 300 I 3thePFrTIed Use the cursor icons to browse one single monogram and two embroidery alphabets, used to the embroidery position and your Pfaff creative 2140, using the desired color.

Owner's Manual
Page 90
...can select a different stitch. Aphbe I C"erchr,ci EmbrnIder iJhIy E- To do this , the embroidery unit must be attached. However, you can combine embroidery designs from a creative memory card or a creative card and / or 9 mm stitches and maxi stitches from the machine and embroider them in a...This is only recommended for sewing. The embroidery unit moves to its right-hand position to remove the embroidery unit. 4. 4-20 Sewing with the embroidery unit attached It is possible to switch directly from the machine, a creative memory card or a creative card and sew them as a continuous ...
...can select a different stitch. Aphbe I C"erchr,ci EmbrnIder iJhIy E- To do this , the embroidery unit must be attached. However, you can combine embroidery designs from a creative memory card or a creative card and / or 9 mm stitches and maxi stitches from the machine and embroider them in a...This is only recommended for sewing. The embroidery unit moves to its right-hand position to remove the embroidery unit. 4. 4-20 Sewing with the embroidery unit attached It is possible to switch directly from the machine, a creative memory card or a creative card and sew them as a continuous ...
Owner's Manual
Page 128
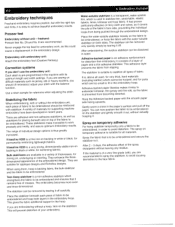
... hoop. These stabilizers make it remains free of paper and a thin adhesive stabilizer. Vlieseline H200 is pre-programmed in the machine with embroidery unit: Attach the embroidery foot (Creative Fantasy). They are recommended. Embroidery Assistant Water-soluble stabilizer is suitable to stabilize thin, stretchable, elastic fabrics, laces, knitwear and loop fabric. The stabilizer is a transparent...
... hoop. These stabilizers make it remains free of paper and a thin adhesive stabilizer. Vlieseline H200 is pre-programmed in the machine with embroidery unit: Attach the embroidery foot (Creative Fantasy). They are recommended. Embroidery Assistant Water-soluble stabilizer is suitable to stabilize thin, stretchable, elastic fabrics, laces, knitwear and loop fabric. The stabilizer is a transparent...
Owner's Manual
Page 134
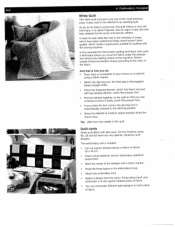
... a blanket, using a fabric marker. • Attach the darning foot, the feed dog is called Trapunto, has its origin in the embroidery hoop. • Attach the embroidery foot. • Select a design from the middle of the fabric. It also used . It is disengaged. Select needle thread and bobbin...work, On the Creative cards No. 29 and 50 there are very special, attractive quilt designs. Tip: Start from the menu "Embroidery/card" and embroider it on the square-shaped piece of fabric. • You can continue to the color of the quilt. The embroidery unit is automatically lowered ...
... a blanket, using a fabric marker. • Attach the darning foot, the feed dog is called Trapunto, has its origin in the embroidery hoop. • Attach the embroidery foot. • Select a design from the middle of the fabric. It also used . It is disengaged. Select needle thread and bobbin...work, On the Creative cards No. 29 and 50 there are very special, attractive quilt designs. Tip: Start from the menu "Embroidery/card" and embroider it on the square-shaped piece of fabric. • You can continue to the color of the quilt. The embroidery unit is automatically lowered ...

Owner's Manual
Page 138
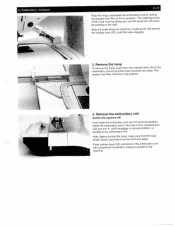
6-12 Embroidery unit 6. Attach the embroidery unit Switch the machine off. Raise the embroidery arm in the area of the sewing machine. Push the embroidery unit parallel from the back to ii 1 2. The connecting socket (15) for the embroidery unit is found on the rear side of the recessed grip (52) and turn it to the ...back. S to the front into the socket (15). Make sure that the guide (46) on the embroidery unit The embroidery arm (51) must be rotated, because it will go. The embroidery arm engages in as far as it is placed between the base plate and the free arm, and ...
6-12 Embroidery unit 6. Attach the embroidery unit Switch the machine off. Raise the embroidery arm in the area of the sewing machine. Push the embroidery unit parallel from the back to ii 1 2. The connecting socket (15) for the embroidery unit is found on the rear side of the recessed grip (52) and turn it to the ...back. S to the front into the socket (15). Make sure that the guide (46) on the embroidery unit The embroidery arm (51) must be rotated, because it will go. The embroidery arm engages in as far as it is placed between the base plate and the free arm, and ...
Owner's Manual
Page 139
... lever (50) and remove the embroidery unit with a backward movement, holding it engages in top position. 4. First rotate the embroidery arm into the previous position. The retaining screw of the embroidery unit and pull the hoop forwards and away. Embroidery Assistant 11 /•%% I 6-13... Pass the hoop underneath the embroidery foot by raising the presser foot lifter ...
... lever (50) and remove the embroidery unit with a backward movement, holding it engages in top position. 4. First rotate the embroidery arm into the previous position. The retaining screw of the embroidery unit and pull the hoop forwards and away. Embroidery Assistant 11 /•%% I 6-13... Pass the hoop underneath the embroidery foot by raising the presser foot lifter ...
Owner's Manual
Page 140
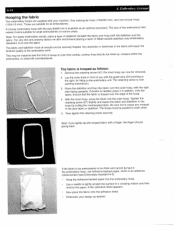
...57): the inner hoop can now be taut in addition. With the inner hoop, press the fabric into the embroidery hoop. • Use a needle to the embroidery unit. If Avalon is available as an optional accessory. Then tighten the retaining screw securely. If the fabric to the... right, for instance take the form of areas of stabilizer beneath fabric. Note: For better embroidery results. The fabric is too thick ...
...57): the inner hoop can now be taut in addition. With the inner hoop, press the fabric into the embroidery hoop. • Use a needle to the embroidery unit. If Avalon is available as an optional accessory. Then tighten the retaining screw securely. If the fabric to the... right, for instance take the form of areas of stabilizer beneath fabric. Note: For better embroidery results. The fabric is too thick ...
Owner's Manual
Page 142
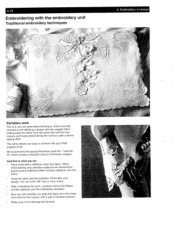
...creative 2140. You can work with one or more colors. • After completing the work This is what you can carefully cut away the fabric from the areas that will form the cutouts, with a dense zigzag stitch. Richelieu work , carefully remove the Watersoluble stabilizer and the embroidery...form the cutouts and finally embroidering the contours with a pair of Richelieu designs. Make sure not to achieve with the embroidery unit Traditional embroidery techniques - / 6. Embroidery Assistant - ; We recommend the special Richelieu cards No. 7 and No. 25, which normally consists in pre-...
...creative 2140. You can work with one or more colors. • After completing the work This is what you can carefully cut away the fabric from the areas that will form the cutouts, with a dense zigzag stitch. Richelieu work , carefully remove the Watersoluble stabilizer and the embroidery...form the cutouts and finally embroidering the contours with a pair of Richelieu designs. Make sure not to achieve with the embroidery unit Traditional embroidery techniques - / 6. Embroidery Assistant - ; We recommend the special Richelieu cards No. 7 and No. 25, which normally consists in pre-...


