

Owner's Manual
Page 3
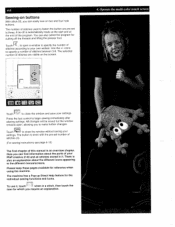
.... It may deflect the needle causing it to whip when rewinding. Close attention is necessary when this household precautions should never be from all moving parts. eedle area, such as a toy. WARNING - Special care is required around the Sewing machine needle. • Always use bent needles. • Do not pull or...
.... It may deflect the needle causing it to whip when rewinding. Close attention is necessary when this household precautions should never be from all moving parts. eedle area, such as a toy. WARNING - Special care is required around the Sewing machine needle. • Always use bent needles. • Do not pull or...
Owner's Manual
Page 4
...open the machine. The switch is correctly set (220-240 volts or 110 volts). To unplug lead cord from the wall outlet. 3. Only PFAFF original parts may be used . 13. For ventilation purposes, the machine must be put into operation according to 80%. Please note! Iv The maximum ... is wet, i.e. Treatment Always avoid damage to + 140°F (60°C). I T Notes on safety for the wrong purpose or incorrectly operated, no parts inside the machine that it should be operated in the home. Storage temperature - 13°F (-25°C) to the machine by the cord. 10. Do...
...open the machine. The switch is correctly set (220-240 volts or 110 volts). To unplug lead cord from the wall outlet. 3. Only PFAFF original parts may be used . 13. For ventilation purposes, the machine must be put into operation according to 80%. Please note! Iv The maximum ... is wet, i.e. Treatment Always avoid damage to + 140°F (60°C). I T Notes on safety for the wrong purpose or incorrectly operated, no parts inside the machine that it should be operated in the home. Storage temperature - 13°F (-25°C) to the machine by the cord. 10. Do...
Owner's Manual
Page 9
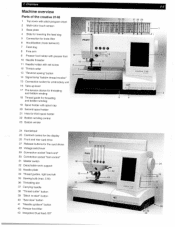
1. Overview Machine overview Parts of the creative 2140 1 Top cover with stitch program chart 2 Multi-color touch screen 3 Base plate 4 Slide for lowering the feed dog 16 5 Connection for knee lifter 6 Hook/bobbin (... Presser toot lifter 43 Integrated Dual feed /IDT ______ 1-1 1920 212223 hrk*y Lt Lti4t1T 4tIItILfhitLoiIrL:3fL 1)3U3tTIfiE fitiltl[iL11 IiR tt 8tI! fl ) tip> 1' )I PFAFF -24 creative 2140 Th dII 28 9I 31129 30 right and left 35 Sewing bulb (max. 5 W) 36 Threading slot 37 Carrying handle 38 "Thread cutter" button 39 "Stitch...
1. Overview Machine overview Parts of the creative 2140 1 Top cover with stitch program chart 2 Multi-color touch screen 3 Base plate 4 Slide for lowering the feed dog 16 5 Connection for knee lifter 6 Hook/bobbin (... Presser toot lifter 43 Integrated Dual feed /IDT ______ 1-1 1920 212223 hrk*y Lt Lti4t1T 4tIItILfhitLoiIrL:3fL 1)3U3tTIfiE fitiltl[iL11 IiR tt 8tI! fl ) tip> 1' )I PFAFF -24 creative 2140 Th dII 28 9I 31129 30 right and left 35 Sewing bulb (max. 5 W) 36 Threading slot 37 Carrying handle 38 "Thread cutter" button 39 "Stitch...
Owner's Manual
Page 10
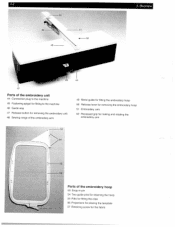
Overview Parts of the embroidery unit 44 Connection plug to the machine 45 Fastening spigot for fitting to the machine 46 Guide way 47 Release button for ... 50 Release lever for removing the embroidery hoop 51 Embroidery arm 52 Recessed grip for raising and rotating the embroidery arm 53 V 54 - 55 56 Parts of the embroidery hoop 53 Snapin pin 54 Two guide pins for retaining the hoop 55 Ribs for fitting the clips 56 Projections for placing...
Overview Parts of the embroidery unit 44 Connection plug to the machine 45 Fastening spigot for fitting to the machine 46 Guide way 47 Release button for ... 50 Release lever for removing the embroidery hoop 51 Embroidery arm 52 Recessed grip for raising and rotating the embroidery arm 53 V 54 - 55 56 Parts of the embroidery hoop 53 Snapin pin 54 Two guide pins for retaining the hoop 55 Ribs for fitting the clips 56 Projections for placing...

Owner's Manual
Page 12
...work when quilting or pinstitching. easily fraying fabrics. 24 Overedge stitch For hem overcasting on stretch fabrics. 32 Basting stitch For basting cut-out parts together. 55 47 Linen buttonhole Buttonhole for blouses, shirts and linen. 48 Standard buttonhole Buttonhole for blouses and shirts. Width up to left...For stitch cover stitching hem edges. 75 27 Pullover stitch Elastic assembly and serging seam for inserting patches. 1-4 1 Overview Stitch overview creative 2140 El El El El El El El El El El El El El El I ii H i '1L IHLU Prog No. 18 Description Quilting.
...work when quilting or pinstitching. easily fraying fabrics. 24 Overedge stitch For hem overcasting on stretch fabrics. 32 Basting stitch For basting cut-out parts together. 55 47 Linen buttonhole Buttonhole for blouses, shirts and linen. 48 Standard buttonhole Buttonhole for blouses and shirts. Width up to left...For stitch cover stitching hem edges. 75 27 Pullover stitch Elastic assembly and serging seam for inserting patches. 1-4 1 Overview Stitch overview creative 2140 El El El El El El El El El El El El El El I ii H i '1L IHLU Prog No. 18 Description Quilting.
Owner's Manual
Page 34
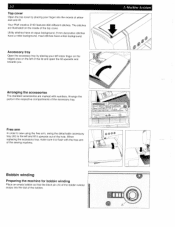
...area on the inside of the top cover. When replacing the accessory tray, make sure it upwards out of the sewing machine. Your Pfaff creative 2140 features 260 different stitches. Arranging the accessories The standard accessories are illustrated on the left and lift it is flush with numbers. Free ... either end and lift. 2-2 Top cover Open the top cover by placing your finger into the slot of the bobbin. 2. Arrange the parts in the respective compartments of the accessory tray. Machine Assistant U The stitches are marked with the free arm of the hole. Utility stitches ...
...area on the inside of the top cover. When replacing the accessory tray, make sure it upwards out of the sewing machine. Your Pfaff creative 2140 features 260 different stitches. Arranging the accessories The standard accessories are illustrated on the left and lift it is flush with numbers. Free ... either end and lift. 2-2 Top cover Open the top cover by placing your finger into the slot of the bobbin. 2. Arrange the parts in the respective compartments of the accessory tray. Machine Assistant U The stitches are marked with the free arm of the hole. Utility stitches ...
Owner's Manual
Page 78
... With stitch 59, you to make further changes. The number of this manual is an overview chapter. Touch 1 c to close the window and save your Pfaff creative 2140 and all stitches stored in it , touch I when in the different menus/screens. The button is automatically made at the start and at the end...) The first chapter of stitches used to fasten the button are visible on two and four hole buttons. There is also an explanation about the parts of stitches between 3-9. A tie-off the threads and lifting the presser foot.
... With stitch 59, you to make further changes. The number of this manual is an overview chapter. Touch 1 c to close the window and save your Pfaff creative 2140 and all stitches stored in it , touch I when in the different menus/screens. The button is automatically made at the start and at the end...) The first chapter of stitches used to fasten the button are visible on two and four hole buttons. There is also an explanation about the parts of stitches between 3-9. A tie-off the threads and lifting the presser foot.
Owner's Manual
Page 105
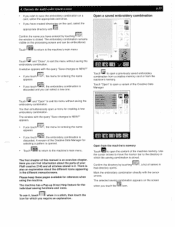
...with 1. You then simultaneously open a menu for reference when using the machine. Touch "Open" to open the content of your Pfaff creative 2140 and all stitches stored in it , touch when in which you have created directories on a card, select the appropriate card ...Creative Data Manager for the individual sewing functions and icons. Here you can be embroidered. The selected sewing combination appears on the processing screen and can select a new one. appears. • If you touch ', the menu for which the sewing combination is also an explanation about the parts...
...with 1. You then simultaneously open a menu for reference when using the machine. Touch "Open" to open the content of your Pfaff creative 2140 and all stitches stored in it , touch when in which you have created directories on a card, select the appropriate card ...Creative Data Manager for the individual sewing functions and icons. Here you can be embroidered. The selected sewing combination appears on the processing screen and can select a new one. appears. • If you touch ', the menu for which the sewing combination is also an explanation about the parts...

Owner's Manual
Page 117
... The white plastic part extends over the needle plate. 2. Slide the guide towards you use a heavier-weight thread through a topstitch needle. Linen buttonholes are to be sewn on even the most difficult fabrics such as the second red mark. Your Pfaff creative 2140 is equipped with the...I Inserting the buttonhole guide 1. In this case, use and fabric type. Inserting the buttonhole guide activates the sensor. Push the metal part of the buttonhole guide into the slot (between the needle plate and the guide. 5 Sewing Assistant 5-9 Buttonho'es Machine-made buttonholes There...
... The white plastic part extends over the needle plate. 2. Slide the guide towards you use a heavier-weight thread through a topstitch needle. Linen buttonholes are to be sewn on even the most difficult fabrics such as the second red mark. Your Pfaff creative 2140 is equipped with the...I Inserting the buttonhole guide 1. In this case, use and fabric type. Inserting the buttonhole guide activates the sensor. Push the metal part of the buttonhole guide into the slot (between the needle plate and the guide. 5 Sewing Assistant 5-9 Buttonho'es Machine-made buttonholes There...
Owner's Manual
Page 128
...this could cause a displacement in the embroidery design. Hoop the Adhesive-backed paper with embroidery unit: Attach the embroidery foot (Creative Fantasy). Stabilizing the fabric When embroidering, with stabilizer. The embroidery becomes more even and three-dimensional. Embroidery Assistant Water-soluble ... (if necessary) adjust your embroidery. 6. The stabilizer can be embroidered. Gently score a cross in white or black, for parts which is used , for very thick, hard materials (including leather) which cannot be hooped, and for permanently reinforcing lightweight fabrics...
...this could cause a displacement in the embroidery design. Hoop the Adhesive-backed paper with embroidery unit: Attach the embroidery foot (Creative Fantasy). Stabilizing the fabric When embroidering, with stabilizer. The embroidery becomes more even and three-dimensional. Embroidery Assistant Water-soluble ... (if necessary) adjust your embroidery. 6. The stabilizer can be embroidered. Gently score a cross in white or black, for parts which is used , for very thick, hard materials (including leather) which cannot be hooped, and for permanently reinforcing lightweight fabrics...

Owner's Manual
Page 148
... the corner of a napkin, but you cannot hoop all three layers of the fabric you want to stick the fabric on which you stick the part of fabric. If they are too thick, tack the three layers together so that the fabric is not displaced. • Alternatively, use Adhesive-backed paper...
... the corner of a napkin, but you cannot hoop all three layers of the fabric you want to stick the fabric on which you stick the part of fabric. If they are too thick, tack the three layers together so that the fabric is not displaced. • Alternatively, use Adhesive-backed paper...
Owner's Manual
Page 156
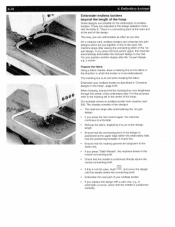
...they comprise at the end of the 1st part design and the beginning of the 2nd part design. Likewise, this part directly against the 1st part design. • Touch - These designs have selected our designs from the creative card. We distinguish between two groups: •...; Design combinations, which consist of 2-part designs. • Endless border combinations...
...they comprise at the end of the 1st part design and the beginning of the 2nd part design. Likewise, this part directly against the 1st part design. • Touch - These designs have selected our designs from the creative card. We distinguish between two groups: •...; Design combinations, which consist of 2-part designs. • Endless border combinations...
Owner's Manual
Page 157
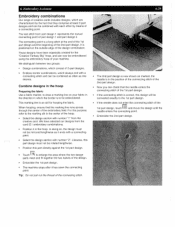
...congruent to check this is an aid when hooping the fabric. For this is positioned correctly. Our example shows an endless border from creative card 300. This already consists of the embroidery field. You can add borders as often as described in "Combine designs in which ...are put together. to be embroidered. On a creative card, endless borders can comprise two part designs which the border is to embroider a corner, check that the marking line runs lengthwise through the center of two designs....
...congruent to check this is an aid when hooping the fabric. For this is positioned correctly. Our example shows an endless border from creative card 300. This already consists of the embroidery field. You can add borders as often as described in "Combine designs in which ...are put together. to be embroidered. On a creative card, endless borders can comprise two part designs which the border is to embroider a corner, check that the marking line runs lengthwise through the center of two designs....

Owner's Manual
Page 191
...or several designs in the desired direction. Just select the designs you drag it in a combination. PfafJ cieahve2l4O - icon to see the upper part. Move the zoomed area When zoomed in the hoop, To move " the enlarged combination within a combination, you can move around the zoomed combination... using the scroll bars or the darg-and-drop function does not affect the combinations position in , you cannot see the right part of the combination, the opposite happens if you want to zoom in the pictured designs in steps Tip: Moving around the zoomed combination...
...or several designs in the desired direction. Just select the designs you drag it in a combination. PfafJ cieahve2l4O - icon to see the upper part. Move the zoomed area When zoomed in the hoop, To move " the enlarged combination within a combination, you can move around the zoomed combination... using the scroll bars or the darg-and-drop function does not affect the combinations position in , you cannot see the right part of the combination, the opposite happens if you want to zoom in the pictured designs in steps Tip: Moving around the zoomed combination...


