
Owner's Manual
Page 5
... the machine for bobbin winding Winding the bobbin from the spool pin Winding a bobbin through the needle Hook/Bobbin door Taking out the bobbin case Thread tension Inserting the bobbin Inserting the bobbin case Threading the needle thread Needle threader Presser foot lifter Drawing-up the bobbin thread Thread cutter Changing the presser foot Electronic knee lift Changing the needle Threading the twin needle Integrated Dual Feed (IDT-System) Lowering the feed dog Changing the light bulb Changing the needle plate Hoop embroidery Lowering the feed dog Disengaging the top feed/dual feed Removing...
... the machine for bobbin winding Winding the bobbin from the spool pin Winding a bobbin through the needle Hook/Bobbin door Taking out the bobbin case Thread tension Inserting the bobbin Inserting the bobbin case Threading the needle thread Needle threader Presser foot lifter Drawing-up the bobbin thread Thread cutter Changing the presser foot Electronic knee lift Changing the needle Threading the twin needle Integrated Dual Feed (IDT-System) Lowering the feed dog Changing the light bulb Changing the needle plate Hoop embroidery Lowering the feed dog Disengaging the top feed/dual feed Removing...

Owner's Manual
Page 6
...4-5 Thread tension 4-5 Twin needle function 4-5 Buttonholes 4-6 Enter the length of the buttonhole on the screen 4-6 Set the length of the buttonhole while sewing 4-6 Finishing the buttonhole by manual setting 4-7 How to correct the buttonhole 4-7 Sewing-on buttons 4-8 Darning and Bartacking 4-9 Automatc Darning 4-9 Free Motion darning I embroidery / quilting 4-10 Alphabets 4-11 Editing a word sequence 4-12 Saving a word sequence 4-12 Sewing a monogram 4-12 Embroider single designs 4-13 Selecting a design from the machine's memory or from a creative card 4-13...
...4-5 Thread tension 4-5 Twin needle function 4-5 Buttonholes 4-6 Enter the length of the buttonhole on the screen 4-6 Set the length of the buttonhole while sewing 4-6 Finishing the buttonhole by manual setting 4-7 How to correct the buttonhole 4-7 Sewing-on buttons 4-8 Darning and Bartacking 4-9 Automatc Darning 4-9 Free Motion darning I embroidery / quilting 4-10 Alphabets 4-11 Editing a word sequence 4-12 Saving a word sequence 4-12 Sewing a monogram 4-12 Embroider single designs 4-13 Selecting a design from the machine's memory or from a creative card 4-13...

Owner's Manual
Page 7
...5-13 Darning Automatic darning Darning with the elastic stitch Free-motion darning Sewing-on patches Reinforced darning Shell edging Roll hemming 5-14 - 5-16 5-14 5-14 5-15 5-16 5-16 5-17 5-18 Embroidery Assistant Errbroidery techniques Presser feet Correction systems Stabilizing the fabric Spray-on temporary adhesive Embroidering without embroidery unit Eyelet embroidery 6-2 6-2 6-2 6-2 6-2 6-3 - 6-15 6-3 Hemstitching Hemstitching patterns 6-4 - 6-5 6-4 "Ladder' hemstitching 6-5 Making a hem with a hemstitch seam 6-5 Cross-stitch 6-6 Quilting White Quilt Quilt cards Twin needle...
...5-13 Darning Automatic darning Darning with the elastic stitch Free-motion darning Sewing-on patches Reinforced darning Shell edging Roll hemming 5-14 - 5-16 5-14 5-14 5-15 5-16 5-16 5-17 5-18 Embroidery Assistant Errbroidery techniques Presser feet Correction systems Stabilizing the fabric Spray-on temporary adhesive Embroidering without embroidery unit Eyelet embroidery 6-2 6-2 6-2 6-2 6-2 6-3 - 6-15 6-3 Hemstitching Hemstitching patterns 6-4 - 6-5 6-4 "Ladder' hemstitching 6-5 Making a hem with a hemstitch seam 6-5 Cross-stitch 6-6 Quilting White Quilt Quilt cards Twin needle...
Owner's Manual
Page 17
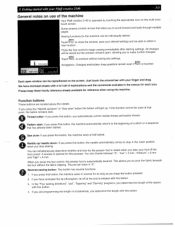
... whether the information on the machine's functions Sewing and Embroidery Assistant Touch this icon to open the Machine Assistant. • This contains, among other bobbin, change the presser procedures, precise instructions on the machine's functions " 1 Closing the Creative Assistant Use this function to use the machine, thread a needle foot, change . Last stitch This function automatically activates the stitch that you have previously marked with the arrows. Exceptions: Changes embroidery hoop positions remain even if esc...
... whether the information on the machine's functions Sewing and Embroidery Assistant Touch this icon to open the Machine Assistant. • This contains, among other bobbin, change the presser procedures, precise instructions on the machine's functions " 1 Closing the Creative Assistant Use this function to use the machine, thread a needle foot, change . Last stitch This function automatically activates the stitch that you have previously marked with the arrows. Exceptions: Changes embroidery hoop positions remain even if esc...
Owner's Manual
Page 18
... determine the length of the seams 4. In the "Four sewing with this button. directions", "pat". monitoring the bobbin thread. Needle up! foot the control again, the presser foot is halved. Thread tension You can change the pre-set needle thread tension with the +I these buttons are located on the head of the machine Thread cutter If you keep the button pressed. 2. sewing speed is automatically lowered machine without the fabric slipping. how far the presser foot is initiated via this button, the machine's max...
... determine the length of the seams 4. In the "Four sewing with this button. directions", "pat". monitoring the bobbin thread. Needle up! foot the control again, the presser foot is halved. Thread tension You can change the pre-set needle thread tension with the +I these buttons are located on the head of the machine Thread cutter If you keep the button pressed. 2. sewing speed is automatically lowered machine without the fabric slipping. how far the presser foot is initiated via this button, the machine's max...

Owner's Manual
Page 24
... start of the seam and to determine the length of a word sequence longitudinally. I By touching this function you have activated tie-off at end", use the reverse button to raise it at the start and end of the seam automatically. r-t Single stitch: Word sequences can determine the number of the arrow using the +/- Balance f This function allows you to cut the needle thread and bobbin thread...
... start of the seam and to determine the length of a word sequence longitudinally. I By touching this function you have activated tie-off at end", use the reverse button to raise it at the start and end of the seam automatically. r-t Single stitch: Word sequences can determine the number of the arrow using the +/- Balance f This function allows you to cut the needle thread and bobbin thread...

Owner's Manual
Page 28
... specify that the machine is to cut the needle thread and bobbin thread at end", use the reverse button to determine the length of the seam. Tie-off is to raise it at the start and end of the seam automatically. Thread cutter By touching this icon, you to lower the presser foot at the end of the stitch. You can specify in the direction of the arro using the +/- icons...
... specify that the machine is to cut the needle thread and bobbin thread at end", use the reverse button to determine the length of the seam. Tie-off is to raise it at the start and end of the seam automatically. Thread cutter By touching this icon, you to lower the presser foot at the end of the stitch. You can specify in the direction of the arro using the +/- icons...
Owner's Manual
Page 33
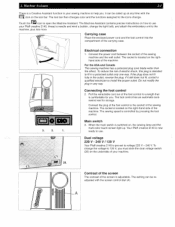
... plug in your Pfaff creative 2140, thread a needle and wind a bobbin, change . Connecting the foot control 2. The socket is pre-set to the icons change the light bulb, and attach the embroidery unit to 120 V, you . Dual voltage 220 V - 240 V I 120 V Your Pfaff creative 2140 is located on the righthand side of the sewing machine. The setting can be re adjusted with the icon on how to use . The tool bar then changes color and the...
... plug in your Pfaff creative 2140, thread a needle and wind a bobbin, change . Connecting the foot control 2. The socket is pre-set to the icons change the light bulb, and attach the embroidery unit to 120 V, you . Dual voltage 220 V - 240 V I 120 V Your Pfaff creative 2140 is located on the righthand side of the sewing machine. The setting can be re adjusted with the icon on how to use . The tool bar then changes color and the...

Owner's Manual
Page 43
... thread to the left needle. It is not possible to use the automatic needle threader with a twin needle. 2. Insert the needle, pushing it up and lock. Swing the second spool holder up as far as it . Place a spool of the tension disk (B). Pull the left thread into the right thread guide and thread the right needle. Machine Assistijnt 2-11 Changing the needle Removing the needle: Lower the presser foot and set screw (B) firmly. Threading the twin need'e Replace the sewing needle with a twin needle. Slightly loosen set screw (B) of the needle...
... thread to the left needle. It is not possible to use the automatic needle threader with a twin needle. 2. Insert the needle, pushing it up and lock. Swing the second spool holder up as far as it . Place a spool of the tension disk (B). Pull the left thread into the right thread guide and thread the right needle. Machine Assistijnt 2-11 Changing the needle Removing the needle: Lower the presser foot and set screw (B) firmly. Threading the twin need'e Replace the sewing needle with a twin needle. Slightly loosen set screw (B) of the needle...
Owner's Manual
Page 49
... reverse for reference when using the machine. Press the foot control to continue without the fabric slipping. A window is initiated with your finger and drag. In the "Four sewing directions", "pat", "Tapering" and "Darning" programs, you keep these handy reference sheets available for as long as you determine the length of the seams with your Pfaff creative 2140 3-1 General notes on the screen. Exceptions: Changed embroidery hoop positions...
... reverse for reference when using the machine. Press the foot control to continue without the fabric slipping. A window is initiated with your finger and drag. In the "Four sewing directions", "pat", "Tapering" and "Darning" programs, you keep these handy reference sheets available for as long as you determine the length of the seams with your Pfaff creative 2140 3-1 General notes on the screen. Exceptions: Changed embroidery hoop positions...
Owner's Manual
Page 51
... create a new one column at this menu, you press the foot control at a time with your Pta ft creative 2140 is ready to open the screen for joining stretch and non-stretch fabrics. you press the foot con trol, the display switches directly to the processing screen for the straight stitch and the machine sews in order to the straight stitch and your Pfaff creative 2140 Your machine is highlighted. ; After opening the...
... create a new one column at this menu, you press the foot control at a time with your Pta ft creative 2140 is ready to open the screen for joining stretch and non-stretch fabrics. you press the foot con trol, the display switches directly to the processing screen for the straight stitch and the machine sews in order to the straight stitch and your Pfaff creative 2140 Your machine is highlighted. ; After opening the...
Owner's Manual
Page 52
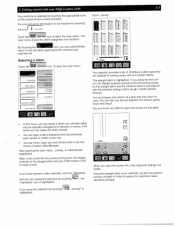
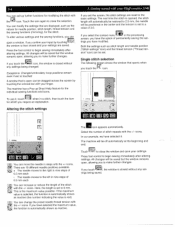
... function is closed and your Pfaff creative 2140 If you have the option of the stitch with the icon. icons. If you touch the window is automatically shown as the values for needle position, stitch length, thread tension and the sewing functions (mirroring), for the stitch. Exceptions: Changed embroidery hoop positions remain even if esc is open , allowing you have selected 4. Altering the stitch settings 3. Getting started with the +1- Touch the...
... function is closed and your Pfaff creative 2140 If you have the option of the stitch with the icon. icons. If you touch the window is automatically shown as the values for needle position, stitch length, thread tension and the sewing functions (mirroring), for the stitch. Exceptions: Changed embroidery hoop positions remain even if esc is open , allowing you have selected 4. Altering the stitch settings 3. Getting started with the +1- Touch the...

Owner's Manual
Page 54
... enter a new or previously saved program by touching the icon. More stitch functions are available. 1. 'Four sewing directions" program 2. "Programmable seam length" program ("pat") 3. Use the sewn sample for a stitch, the most important specific settings can program the length and width of your Pfaff creative 2140's memory. ."c ETkN:-..PTcHl.EC rrrE The rectangle is sewn, press the reverse button. A window opens allowing you press the reverse key again...
... enter a new or previously saved program by touching the icon. More stitch functions are available. 1. 'Four sewing directions" program 2. "Programmable seam length" program ("pat") 3. Use the sewn sample for a stitch, the most important specific settings can program the length and width of your Pfaff creative 2140's memory. ."c ETkN:-..PTcHl.EC rrrE The rectangle is sewn, press the reverse button. A window opens allowing you press the reverse key again...

Owner's Manual
Page 57
... turned off and on again. Lower the feed dog and attach the embroidery foot or the quilt foot. All changes will automatically be deactivated when you have touched the icon. Getting started with a twin needle. (See Chapter 6, page 6-9) 3-9 Free motion You can select all stitches. Press foot control to sew decorative stitches with your Pfaff creative 2140 Twin needle The following illustration shows the window that opens when you remove the needle from the machine, It remains active even...
... turned off and on again. Lower the feed dog and attach the embroidery foot or the quilt foot. All changes will automatically be deactivated when you have touched the icon. Getting started with a twin needle. (See Chapter 6, page 6-9) 3-9 Free motion You can select all stitches. Press foot control to sew decorative stitches with your Pfaff creative 2140 Twin needle The following illustration shows the window that opens when you remove the needle from the machine, It remains active even...
Owner's Manual
Page 78
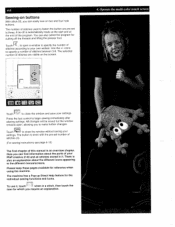
...-up Direct Help feature for cutting off is automatically made at the start and at the end of your settings. The number of stitches used to fasten the button are visible on two and four hole buttons. Use the +1- The button is sewn with the pre-set to three. A tie-off the threads and lifting the presser foot. 4-8 Sewing-on buttons With stitch 59, you can easily sew on the screen. 4 Operate...
...-up Direct Help feature for cutting off is automatically made at the start and at the end of your settings. The number of stitches used to fasten the button are visible on two and four hole buttons. Use the +1- The button is sewn with the pre-set to three. A tie-off the threads and lifting the presser foot. 4-8 Sewing-on buttons With stitch 59, you can easily sew on the screen. 4 Operate...

Owner's Manual
Page 110
Sewing Assistant Straight stitch Stitch 1 is the basic straight stitch in cm and inches. The stitch length can be used for gathered effects. Topstitching Use the guide marks on the right side of the fabric. Gather the fabric by touching after you have sewn the desired seam length, press the reverse button. 5-2 Non-stretch seams 5. Your Pfaff creative 2140 features 19 needle positions, which can be adjusted with the straight stitch Stitch 1, stitch length 6 mm A straight stitch can be accomplished more rows of the presser foot holder. The...
Sewing Assistant Straight stitch Stitch 1 is the basic straight stitch in cm and inches. The stitch length can be used for gathered effects. Topstitching Use the guide marks on the right side of the fabric. Gather the fabric by touching after you have sewn the desired seam length, press the reverse button. 5-2 Non-stretch seams 5. Your Pfaff creative 2140 features 19 needle positions, which can be adjusted with the straight stitch Stitch 1, stitch length 6 mm A straight stitch can be accomplished more rows of the presser foot holder. The...

Owner's Manual
Page 111
... presser foot and pull the elastic cords to secure the elastic. Use Blindhem foot 3 with the needle down . The stretch blindhem stitch will create a hem that is determined by turning the set screw (A). Stretch Blindhem For the stretch blindhem make sure that the needle barely pierces the fold of center. Mark the first gathering row on knit fabrics. Lower the presser foot and sew a few stitches and stop with even length elastic threads coming towards you wish the stitches...
... presser foot and pull the elastic cords to secure the elastic. Use Blindhem foot 3 with the needle down . The stretch blindhem stitch will create a hem that is determined by turning the set screw (A). Stretch Blindhem For the stretch blindhem make sure that the needle barely pierces the fold of center. Mark the first gathering row on knit fabrics. Lower the presser foot and sew a few stitches and stop with even length elastic threads coming towards you wish the stitches...
Owner's Manual
Page 133
... to the fabric. Use quilt stitch No. 15, 16 or 17. The intermediate stitch disappears and produces a hand-stitched appearance. Join the three layers by hand or with the sewing machine by hand or with a layer of batting in most cases a cotton, wool or polyester batting) and a backing layer. The 1/4 inch quilt and patchwork foot (optional accessory) is pre-set, set the bobbin thread tension quite slack...
... to the fabric. Use quilt stitch No. 15, 16 or 17. The intermediate stitch disappears and produces a hand-stitched appearance. Join the three layers by hand or with the sewing machine by hand or with a layer of batting in most cases a cotton, wool or polyester batting) and a backing layer. The 1/4 inch quilt and patchwork foot (optional accessory) is pre-set, set the bobbin thread tension quite slack...
Owner's Manual
Page 181
...Eyelet buttonhole with gimp thread 5-11 Eyelet embroidery 6-3 Eyelet plate 7-13 Eyelets 5-12 Icon explanation sheets 1-9 - 1-23 jlnserting a card 2-15 Inserting a stitch at the start of a sewing sequence 4-24 Inserting a stitch in the sewing sequence 4-24 Inserting the bobbin case 2-7 Inserting the bobbin 2-7 Inserting the buttonhole guide 5-9 Instructions on operating your Pfaff creative 2140 3-2 Instructions on using the Creative Assistant Pop-up Direct Help 3-14 Instructions on using your Machine Assistant 3-15 Instructions on using your Pfaff creative 2140 4-36...
...Eyelet buttonhole with gimp thread 5-11 Eyelet embroidery 6-3 Eyelet plate 7-13 Eyelets 5-12 Icon explanation sheets 1-9 - 1-23 jlnserting a card 2-15 Inserting a stitch at the start of a sewing sequence 4-24 Inserting a stitch in the sewing sequence 4-24 Inserting the bobbin case 2-7 Inserting the bobbin 2-7 Inserting the buttonhole guide 5-9 Instructions on operating your Pfaff creative 2140 3-2 Instructions on using the Creative Assistant Pop-up Direct Help 3-14 Instructions on using your Machine Assistant 3-15 Instructions on using your Pfaff creative 2140 4-36...

Owner's Manual
Page 182
... Position an additional design Position the Embroidery foot Positioning an additional section Preparing a creative memory card for saving Preparing the machine for bobbin winding Presser feet Presser foot lifter Prisma 3-D film Programmable seam length 4-5 3-20 - 3-21 7-9 7-8 4-19 6-24 6-15 6-26 4-19 2-2 6-2 2-9 6-17 3-6, 5-2 cards j 9!edge guide Aiting with the quilt card patterns Quilting 6-8 7-15 6-22 6-7 - 6-8 poop the fabric j jnforced darning Remove the embroidery unit Remove the hoop Remove the knee lifter Reverse sewing button Richelieu work Roll hemming Rotate an embroidery...
... Position an additional design Position the Embroidery foot Positioning an additional section Preparing a creative memory card for saving Preparing the machine for bobbin winding Presser feet Presser foot lifter Prisma 3-D film Programmable seam length 4-5 3-20 - 3-21 7-9 7-8 4-19 6-24 6-15 6-26 4-19 2-2 6-2 2-9 6-17 3-6, 5-2 cards j 9!edge guide Aiting with the quilt card patterns Quilting 6-8 7-15 6-22 6-7 - 6-8 poop the fabric j jnforced darning Remove the embroidery unit Remove the hoop Remove the knee lifter Reverse sewing button Richelieu work Roll hemming Rotate an embroidery...


