
Owner's Manual
Page 2
... the latest software detailed information, astsaktuyso.uTr hdiesaelnersuorrevsistiht aotuyrour www.pfaff.com II owreidf iysohu. c2dSr1eee4mwa0toii.vnnEegsvt2Are1ans4tes0msi.soatranenddt:deteTashicleeridSbeesweswivniangrgiAouisnssfiossretmawnaittnicoghntaeipscthesnrtoicqroeudnetsainitnhtshateaaS"releewxpiiocnosgnsiAboslfessieswtwiatinhntgyo"of;... buttonholes, familiarizes you can likewise will never be always be outdated. If your wish to Your machine creative 2140 homepage: can put in your own notes together with the various sequences and different embroidery 5. Your...
... the latest software detailed information, astsaktuyso.uTr hdiesaelnersuorrevsistiht aotuyrour www.pfaff.com II owreidf iysohu. c2dSr1eee4mwa0toii.vnnEegsvt2Are1ans4tes0msi.soatranenddt:deteTashicleeridSbeesweswivniangrgiAouisnssfiossretmawnaittnicoghntaeipscthesnrtoicqroeudnetsainitnhtshateaaS"releewxpiiocnosgnsiAboslfessieswtwiatinhntgyo"of;... buttonholes, familiarizes you can likewise will never be always be outdated. If your wish to Your machine creative 2140 homepage: can put in your own notes together with the various sequences and different embroidery 5. Your...
Owner's Manual
Page 3
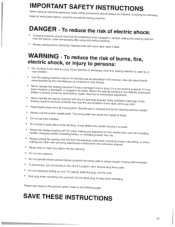
...before relamping. The wrong plate can cause the needle to break. • Switch needle, the sewing machine off ("0") position, then remove plug from outlet. • Do not unplug by or • ... dbNeeeaevlneerrdoororppespreaervtdeicotehr icdseasnmetwearginefogdr.meoxaracdmhrioinnpeaptiiefodint ,ihnarteospwaaiard,taeerml.eaRcgtereitdcuarncl ootrrhdemosreecpwhluaingng,icimfaliat acisdhjinunosettmtwoeontrhkt.einngeparroepsetralyu,thifoirtisheads • Never operate the sewing machine with same type rated 5 Watt. To reduce the risk of burns, injury to persons: fire,...
...before relamping. The wrong plate can cause the needle to break. • Switch needle, the sewing machine off ("0") position, then remove plug from outlet. • Do not unplug by or • ... dbNeeeaevlneerrdoororppespreaervtdeicotehr icdseasnmetwearginefogdr.meoxaracdmhrioinnpeaptiiefodint ,ihnarteospwaaiard,taeerml.eaRcgtereitdcuarncl ootrrhdemosreecpwhluaingng,icimfaliat acisdhjinunosettmtwoeontrhkt.einngeparroepsetralyu,thifoirtisheads • Never operate the sewing machine with same type rated 5 Watt. To reduce the risk of burns, injury to persons: fire,...
Owner's Manual
Page 4
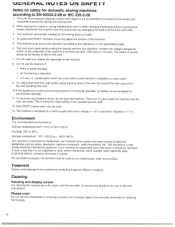
...lint-free cloth. condensation which can repair. Only PFAFF original parts may be used . 13. Storage temperature - 13°F (-25°C) to 80%. The machine is insensitive to interference, but it is wet, i.e. For ventilation purposes, the machine must be used on an unobstructed, solid, level...of electric shock, do not open the machine. The machine is designed for supervised use the machine if: • there is visible damage • its' functioning is correctly set (220-240 volts or 110 volts). An authorized PFAFF mechanic must exercise adequate caution with regard to...
...lint-free cloth. condensation which can repair. Only PFAFF original parts may be used . 13. Storage temperature - 13°F (-25°C) to 80%. The machine is insensitive to interference, but it is wet, i.e. For ventilation purposes, the machine must be used on an unobstructed, solid, level...of electric shock, do not open the machine. The machine is designed for supervised use the machine if: • there is visible damage • its' functioning is correctly set (220-240 volts or 110 volts). An authorized PFAFF mechanic must exercise adequate caution with regard to...
Owner's Manual
Page 5
... 3-1 Thread cutter 3-1 Stitch re-start 3-1 Sew slow 3-1 Needle up Direct Help 3-14 Instructions on using your Machine Assistant 3-15 Instructions on using your Pfaff creative 2140 3-2 Selecting a stitch 3-3 Altering the stitch settings 3-4 Single stitch selection 3-4 Adjusting the tie-off program 3-5 More... 3-1 The tool bar 3-2 Tool bar after open the Creative Assistant 3-2 Instructions on use of the screen Top cover Accessory tray Arranging the accessories Free arm Bobbin winding Preparing the machine for bobbin winding Winding the bobbin from the spool pin ...
... 3-1 Thread cutter 3-1 Stitch re-start 3-1 Sew slow 3-1 Needle up Direct Help 3-14 Instructions on using your Machine Assistant 3-15 Instructions on using your Pfaff creative 2140 3-2 Selecting a stitch 3-3 Altering the stitch settings 3-4 Single stitch selection 3-4 Adjusting the tie-off program 3-5 More... 3-1 The tool bar 3-2 Tool bar after open the Creative Assistant 3-2 Instructions on use of the screen Top cover Accessory tray Arranging the accessories Free arm Bobbin winding Preparing the machine for bobbin winding Winding the bobbin from the spool pin ...

Owner's Manual
Page 6
...the machine's memory or from a creative memory card Move the design within the hoop Embroidery Adjust an embroidery combination Save an embroidery combination Open a saved embroidery combination Embroider stitches stored in your Pfaff creative 2140 The Creative Data Manager Functions In the Creative ...Data Manager Working with source and destination fields in the Creative Data Manager Working with a field in the Creative Data Manager Delete Create a directory Memory...
...the machine's memory or from a creative memory card Move the design within the hoop Embroidery Adjust an embroidery combination Save an embroidery combination Open a saved embroidery combination Embroider stitches stored in your Pfaff creative 2140 The Creative Data Manager Functions In the Creative ...Data Manager Working with source and destination fields in the Creative Data Manager Working with a field in the Creative Data Manager Delete Create a directory Memory...

Owner's Manual
Page 7
... topstitched hem Other techniques Belt loops Zippers Trouser zipper Centered zipper (concealed on both sides) Visible zipper Buttonholes Machine-made buttonholes Inserting the buttonhole guide Buttonhole tips Buttonhole with gimp thread Eyelet buttonhole with gimp thread Sewing on ...patterns 6-24 Rehoop the fabric 6-24 Position an additional design 6-25 Combine embroidered word combinations 6-26 Creating a directory in the Creative Data Manager Embroidering the text Positioning an additional section Pattern combinations Combine designs in the hoop Embroider endless borders 6-26 6-28 6-...
... topstitched hem Other techniques Belt loops Zippers Trouser zipper Centered zipper (concealed on both sides) Visible zipper Buttonholes Machine-made buttonholes Inserting the buttonhole guide Buttonhole tips Buttonhole with gimp thread Eyelet buttonhole with gimp thread Sewing on ...patterns 6-24 Rehoop the fabric 6-24 Position an additional design 6-25 Combine embroidered word combinations 6-26 Creating a directory in the Creative Data Manager Embroidering the text Positioning an additional section Pattern combinations Combine designs in the hoop Embroider endless borders 6-26 6-28 6-...
Owner's Manual
Page 9
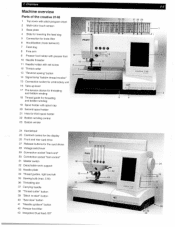
Overview Machine overview Parts of the creative 2140 1 Top cover with stitch program chart 2 Multi-color touch screen 3 Base plate 4 Slide for lowering the feed dog 16 5 Connection for knee lifter 6 Hook/bobbin (... 42 Presser toot lifter 43 Integrated Dual feed /IDT ______ 1-1 1920 212223 hrk*y Lt Lti4t1T 4tIItILfhitLoiIrL:3fL 1)3U3tTIfiE fitiltl[iL11 IiR tt 8tI! fl ) tip> 1' )I PFAFF -24 creative 2140 Th dII 28 9I 31129 30 1.
Overview Machine overview Parts of the creative 2140 1 Top cover with stitch program chart 2 Multi-color touch screen 3 Base plate 4 Slide for lowering the feed dog 16 5 Connection for knee lifter 6 Hook/bobbin (... 42 Presser toot lifter 43 Integrated Dual feed /IDT ______ 1-1 1920 212223 hrk*y Lt Lti4t1T 4tIItILfhitLoiIrL:3fL 1)3U3tTIfiE fitiltl[iL11 IiR tt 8tI! fl ) tip> 1' )I PFAFF -24 creative 2140 Th dII 28 9I 31129 30 1.
Owner's Manual
Page 10
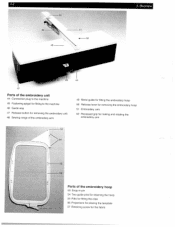
1-2 50 49 48 51 4 52 1. Overview Parts of the embroidery unit 44 Connection plug to the machine 45 Fastening spigot for fitting to the machine 46 Guide way 47 Release button for removing the embroidery unit 48 Sewing range of the embroidery arm 49 Metal guide for fitting the embroidery ...
1-2 50 49 48 51 4 52 1. Overview Parts of the embroidery unit 44 Connection plug to the machine 45 Fastening spigot for fitting to the machine 46 Guide way 47 Release button for removing the embroidery unit 48 Sewing range of the embroidery arm 49 Metal guide for fitting the embroidery ...
Owner's Manual
Page 17
....tinIfrtgoeysmoaualatniepndrrsetshsoeespwsetiehnne,gseafftolutlooinntwcgctisinoognantnsryodotlhutaihmtteomasmreeewadkdiiaenitsgepflulyfarutyanhefcetdtreiroocnnhmsao.tnhdTgeifheysisisc.nrfgeuenthnceticosanenttcbilnoegsssep,seactlhlifecichwaalilnnygdemoswodwaiifnllidebdey. You close the the functions assigned to the Creative Assistant buttons change basic settings of the machine and of all functions appearing in Creative Assistant • There is bar then a Creative Assistant function in the embroidery hoop, information on stabilizers, threads After touching the...
....tinIfrtgoeysmoaualatniepndrrsetshsoeespwsetiehnne,gseafftolutlooinntwcgctisinoognantnsryodotlhutaihmtteomasmreeewadkdiiaenitsgepflulyfarutyanhefcetdtreiroocnnhmsao.tnhdTgeifheysisisc.nrfgeuenthnceticosanenttcbilnoegsssep,seactlhlifecichwaalilnnygdemoswodwaiifnllidebdey. You close the the functions assigned to the Creative Assistant buttons change basic settings of the machine and of all functions appearing in Creative Assistant • There is bar then a Creative Assistant function in the embroidery hoop, information on stabilizers, threads After touching the...
Owner's Manual
Page 18
...icons. down If you press this button, the needle automatically comes to the start LJi If you press this button, the machine's max. The bobbin symbol flashes automatically when the bobbin thread This function is only activated when the hook cover is halved. ... = 6mm and "high" = 9 mm. Thread tension You can change the pre-set needle thread tension with the +1' icons. this button, the machine automatically returns to rest in steps with the ±/- You can simultaneously determine whether and control. Bobbin thread monitor This function is nearing its is...
...icons. down If you press this button, the needle automatically comes to the start LJi If you press this button, the machine's max. The bobbin symbol flashes automatically when the bobbin thread This function is only activated when the hook cover is halved. ... = 6mm and "high" = 9 mm. Thread tension You can change the pre-set needle thread tension with the +1' icons. this button, the machine automatically returns to rest in steps with the ±/- You can simultaneously determine whether and control. Bobbin thread monitor This function is nearing its is...
Owner's Manual
Page 19
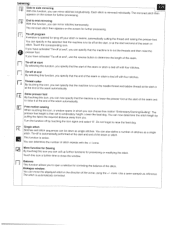
...activated presser foot. that the end of the seam. motion "Embroidery/Darning/Quilting". Tie-off stitch sequences can now specify that the machine is automatically performed at end", use the reverse button to determine the length of the seam automatically. the direction of stitch repeats with ...screen for processing or modifying the stitch. Each stitch is automatically corrected. Tie-off by touching the icon again and select "0". the machine is to lower the presser foot at the start or Raise presser foot By touching to raise it at this icon, a window...
...activated presser foot. that the end of the seam. motion "Embroidery/Darning/Quilting". Tie-off stitch sequences can now specify that the machine is automatically performed at end", use the reverse button to determine the length of the seam automatically. the direction of stitch repeats with ...screen for processing or modifying the stitch. Each stitch is automatically corrected. Tie-off by touching the icon again and select "0". the machine is to lower the presser foot at the start or Raise presser foot By touching to raise it at this icon, a window...

Owner's Manual
Page 20
...you open a window for joining together patchwork.) several pieces of fabric of this function, you are using the ÷/ icons. . The machine starts sewing in a single process without having to use a twin needle. The start of a rectangle to the right. length of the ...rectangle. button again. If you press the reverse button when you reach automatically sewn in mm appears The machine now sews forwards until you open a window for programming a new setting. The stitch is depicted by a twin stitch is automatically...
...you open a window for joining together patchwork.) several pieces of fabric of this function, you are using the ÷/ icons. . The machine starts sewing in a single process without having to use a twin needle. The start of a rectangle to the right. length of the ...rectangle. button again. If you press the reverse button when you reach automatically sewn in mm appears The machine now sews forwards until you open a window for programming a new setting. The stitch is depicted by a twin stitch is automatically...

Owner's Manual
Page 21
.../stitch that had previously been saved, you can save it . The previous version of the Creative File Manager in order to call up and modified a program/stitch that you wish to save the program on the machine in a different directory • If you wish to open. The input field shows a ...as 'programs' in the following description.) The input field shows a directory in the Creative File Manager. 'Close' icon If you have not saved your input. If you have inserted the card. Opening the memory of the machine or of the name appears. If you touch this directory. Touch "esc" to open...
.../stitch that had previously been saved, you can save it . The previous version of the Creative File Manager in order to call up and modified a program/stitch that you wish to save the program on the machine in a different directory • If you wish to open. The input field shows a ...as 'programs' in the following description.) The input field shows a directory in the Creative File Manager. 'Close' icon If you have not saved your input. If you have inserted the card. Opening the memory of the machine or of the name appears. If you touch this directory. Touch "esc" to open...
Owner's Manual
Page 22
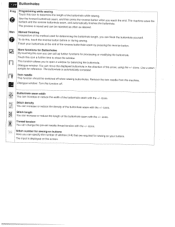
The machine sews the The process is saved and can be switched oft when sewing buttonholes. length, you can specify the number of the method used for ... input is automatically corrected. More functions for sewing-on your buttonhole at the end of the buttonhole while sewing. Remove the twin needle from the machine. Buttonhole seam width You can increase or reduce the width of the buttonhole seam with the +7 icons Stitch density I You can increase or reduce the...
The machine sews the The process is saved and can be switched oft when sewing buttonholes. length, you can specify the number of the method used for ... input is automatically corrected. More functions for sewing-on your buttonhole at the end of the buttonhole while sewing. Remove the twin needle from the machine. Buttonhole seam width You can increase or reduce the width of the buttonhole seam with the +7 icons Stitch density I You can increase or reduce the...

Owner's Manual
Page 23
..., deleting and closing a program. / For more than the input field, the characters at the start a new line. Alphabets I Processing screen Opening the memory of the machine or of a card Use this icon to start of the sequence disappear beyond the left -hand edge of the field indicates this icon see Parameters...
..., deleting and closing a program. / For more than the input field, the characters at the start a new line. Alphabets I Processing screen Opening the memory of the machine or of a card Use this icon to start of the sequence disappear beyond the left -hand edge of the field indicates this icon see Parameters...

Owner's Manual
Page 24
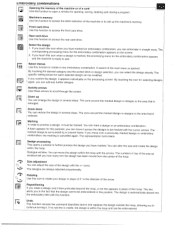
...seam. You can be sewn as a single stitch. icons. The word sequence is tied off for this icon you can specify that the machine is to cut the threads and then raise the presser foot. r-t Single stitch: Word sequences can also define a number of the seam... a marked character or a word sequence transversely. Use a sewn specimen for further processing. Dialogue window: Turn this function, you specify that the machine is to determine the length of the seam automatically. I icons. This function should be used. You can specify in the direction of the seam...
...seam. You can be sewn as a single stitch. icons. The word sequence is tied off for this icon you can specify that the machine is to cut the threads and then raise the presser foot. r-t Single stitch: Word sequences can also define a number of the seam... a marked character or a word sequence transversely. Use a sewn specimen for further processing. Dialogue window: Turn this function, you specify that the machine is to determine the length of the seam automatically. I icons. This function should be used. You can specify in the direction of the seam...

Owner's Manual
Page 25
...use the cursor keys to mark the color to side mirroring With this command affects all areas in case of the pop-up the machine's memory. can advance stitch by stitch, including across a change of color. Reversing stitch by stitch With this function to access the.... The designs are always adjusted proportionally. The mirrored design then appears on a cross-hair cursor, which you set the cursor to M, the machine embroiders all 3 fields and the window is to remedy problems that is closed. If you can mirror a design side to access the front...
...use the cursor keys to mark the color to side mirroring With this command affects all areas in case of the pop-up the machine's memory. can advance stitch by stitch, including across a change of color. Reversing stitch by stitch With this function to access the.... The designs are always adjusted proportionally. The mirrored design then appears on a cross-hair cursor, which you set the cursor to M, the machine embroiders all 3 fields and the window is to remedy problems that is closed. If you can mirror a design side to access the front...

Owner's Manual
Page 27
...create a new stitch sequence. A variant of the main menu is surrounded by a frame. A dash appears for the stitch sequence appears and the machine is marked, the processing menu for this purpose; These connecting stitches are placed individually; Side to side mirroring With this function to sew. The ... Using these arrows you can enlarge the representation in which the stitch is enlarged. LI L..I I fiJI II... Opening the memory of the machine or of the same stitch without having to switch back to be marked. If you touch this function, you can call up You can ...
...create a new stitch sequence. A variant of the main menu is surrounded by a frame. A dash appears for the stitch sequence appears and the machine is marked, the processing menu for this purpose; These connecting stitches are placed individually; Side to side mirroring With this function to sew. The ... Using these arrows you can enlarge the representation in which the stitch is enlarged. LI L..I I fiJI II... Opening the memory of the machine or of the same stitch without having to switch back to be marked. If you touch this function, you can call up You can ...

Owner's Manual
Page 28
... Single stitch: Stitch sequences can also define a number of sequence repeats via the +1- Balance 1 14 This function allows you can specify that the machine is to lower the presser foot at the start and end of the seam. Dialogue window: You can determine the number of stitch sequences as...be switched off . You can move the displayed stitch sequence in the selection that the start By selecting this icon, you specify that the machine is to determine the length of the stitch. icons. Twin needle This function reduces the width of the stitch so that a twin needle ...
... Single stitch: Stitch sequences can also define a number of sequence repeats via the +1- Balance 1 14 This function allows you can specify that the machine is to lower the presser foot at the start and end of the seam. Dialogue window: You can determine the number of stitch sequences as...be switched off . You can move the displayed stitch sequence in the selection that the start By selecting this icon, you specify that the machine is to determine the length of the stitch. icons. Twin needle This function reduces the width of the stitch so that a twin needle ...
Owner's Manual
Page 29
...the screen. 2. Size adjustment You can move it then protrudes beyond the hoop, a red line appears in top of the pop-up the machine's memory. Activity arrows Usie these arrows to rotate your design in steps of 5° in this position. Rotating Use this icon to scroll through... designs again, you can select the design directly. The numbers in place of the hoop. icons. tmroiaery combinations Opening the memory of the machine or of a card Use this function to further process the design you have marked an embroidery combination, you can embroider it must be marked...
...the screen. 2. Size adjustment You can move it then protrudes beyond the hoop, a red line appears in top of the pop-up the machine's memory. Activity arrows Usie these arrows to rotate your design in steps of 5° in this position. Rotating Use this icon to scroll through... designs again, you can select the design directly. The numbers in place of the hoop. icons. tmroiaery combinations Opening the memory of the machine or of a card Use this function to further process the design you have marked an embroidery combination, you can embroider it must be marked...


