
Owner's Manual
Page 2
...,aenygo2uu1a4cg0aenisoefpatrsheielsyectcohubyannttrghyeeintmhwiasnh. iucSfheacethtucerhemarpattocehrEi3nnegplaiissghseool1rd8,S. If your wish to Your machine creative 2140 homepage: can put in your own notes together with the various sequences and different embroidery 5. The language dealer has not have it ...buttonholes, familiarizes you can likewise will never be always be outdated. Your chapter: Here you creating sewing with update pages. i-low to the latest software detailed information, astsaktuyso.uTr hdiesaelnersuorrevsistiht aotuyrour www...
...,aenygo2uu1a4cg0aenisoefpatrsheielsyectcohubyannttrghyeeintmhwiasnh. iucSfheacethtucerhemarpattocehrEi3nnegplaiissghseool1rd8,S. If your wish to Your machine creative 2140 homepage: can put in your own notes together with the various sequences and different embroidery 5. The language dealer has not have it ...buttonholes, familiarizes you can likewise will never be always be outdated. Your chapter: Here you creating sewing with update pages. i-low to the latest software detailed information, astsaktuyso.uTr hdiesaelnersuorrevsistiht aotuyrour www...
Owner's Manual
Page 5
... bar 3-2 Tool bar after open the Creative Assistant 3-2 Instructions on operating your Sewing and Embroidery Assistant 3-16 card 3-11 Sequence/Combination 3-11 Selection by number 3-11 All stitches 3-11 Last stitch 3-11 Creative Data Manager 3-12 The Creative Assistant 3-13 Sewing Assistant 3-13 Embroidery Assistant 3-13 Machine Assistant 3-13 Instructions on using your Pfaff creative 2140 3-2 Selecting a stitch 3-3 Altering the stitch...
... bar 3-2 Tool bar after open the Creative Assistant 3-2 Instructions on operating your Sewing and Embroidery Assistant 3-16 card 3-11 Sequence/Combination 3-11 Selection by number 3-11 All stitches 3-11 Last stitch 3-11 Creative Data Manager 3-12 The Creative Assistant 3-13 Sewing Assistant 3-13 Embroidery Assistant 3-13 Machine Assistant 3-13 Instructions on using your Pfaff creative 2140 3-2 Selecting a stitch 3-3 Altering the stitch...

Owner's Manual
Page 6
... without saving 4-27 Delete a sewing sequence 4-27 Select and open a saved sewing sequence 4-28 Embroidery combination Create an embroidery combination Selecting a design from the machine's memory or from a creative memory card Move the design within the hoop Embroidery Adjust an embroidery combination Save an embroidery combination Open a saved embroidery combination Embroider stitches stored in your Pfaff creative 2140 The Creative Data Manager Functions In...
... without saving 4-27 Delete a sewing sequence 4-27 Select and open a saved sewing sequence 4-28 Embroidery combination Create an embroidery combination Selecting a design from the machine's memory or from a creative memory card Move the design within the hoop Embroidery Adjust an embroidery combination Save an embroidery combination Open a saved embroidery combination Embroider stitches stored in your Pfaff creative 2140 The Creative Data Manager Functions In...

Owner's Manual
Page 7
...Centered zipper (concealed on both sides) Visible zipper Buttonholes Machine-made buttonholes Inserting the buttonhole guide Buttonhole tips Buttonhole with gimp thread Eyelet buttonhole with gimp thread Sewing on buttons Sewing on buttons with shanks Eyelets 5-4 5-4 5-4 5-5 ... Sewing-on patches Reinforced darning Shell edging Roll hemming 5-14 - 5-16 5-14 5-14 5-15 5-16 5-16 5-17 5-18 Embroidery Assistant... 6-25 Combine embroidered word combinations 6-26 Creating a directory in the Creative Data Manager Embroidering the text Positioning an additional section Pattern combinations Combine ...
...Centered zipper (concealed on both sides) Visible zipper Buttonholes Machine-made buttonholes Inserting the buttonhole guide Buttonhole tips Buttonhole with gimp thread Eyelet buttonhole with gimp thread Sewing on buttons Sewing on buttons with shanks Eyelets 5-4 5-4 5-4 5-5 ... Sewing-on patches Reinforced darning Shell edging Roll hemming 5-14 - 5-16 5-14 5-14 5-15 5-16 5-16 5-17 5-18 Embroidery Assistant... 6-25 Combine embroidered word combinations 6-26 Creating a directory in the Creative Data Manager Embroidering the text Positioning an additional section Pattern combinations Combine ...
Owner's Manual
Page 9
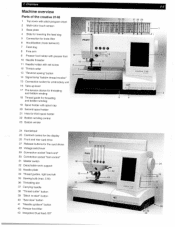
...PFAFF -24 creative 2140 Th dII 28 9I 31129 30 right and left 35 Sewing bulb (max. 5 W) 36 Threading slot 37 Carrying handle 38 "Thread cutter" button 39 "Stitch re-start" button 40 "Sew...sewing" button 14 Signal lamp "bobbin thread monitor" 15 Connection socket for the card drives 28 Voltage switchover 29 Connection socket 'lead cord" 30 Connection socket "foot control" 31 Master switch 36 32 Detachable work support 33 Needle plate 34 Thread guides. Overview Machine overview Parts of the creative 2140... drive 27 Release buttons for embroidery unit 16 Take-up /down...
...PFAFF -24 creative 2140 Th dII 28 9I 31129 30 right and left 35 Sewing bulb (max. 5 W) 36 Threading slot 37 Carrying handle 38 "Thread cutter" button 39 "Stitch re-start" button 40 "Sew...sewing" button 14 Signal lamp "bobbin thread monitor" 15 Connection socket for the card drives 28 Voltage switchover 29 Connection socket 'lead cord" 30 Connection socket "foot control" 31 Master switch 36 32 Detachable work support 33 Needle plate 34 Thread guides. Overview Machine overview Parts of the creative 2140... drive 27 Release buttons for embroidery unit 16 Take-up /down...
Owner's Manual
Page 10
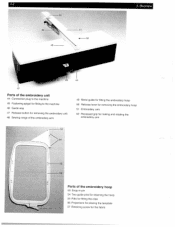
Overview Parts of the embroidery unit 44 Connection plug to the machine 45 Fastening spigot for fitting to the machine 46 Guide way 47 Release button for removing the embroidery unit 48 Sewing range of the embroidery arm 49 Metal guide for fitting the embroidery hoop 50 Release lever for removing the embroidery hoop 51 Embroidery arm 52 Recessed grip...
Overview Parts of the embroidery unit 44 Connection plug to the machine 45 Fastening spigot for fitting to the machine 46 Guide way 47 Release button for removing the embroidery unit 48 Sewing range of the embroidery arm 49 Metal guide for fitting the embroidery hoop 50 Release lever for removing the embroidery hoop 51 Embroidery arm 52 Recessed grip...
Owner's Manual
Page 17
... light bulb, and fit the embroidery hoop to the machine. in the embroidery hoop, information on stabilizers, threads After touching the icon a menu is launched. and return to use the machine, thread a needle foot, change . The main menu shows a selection of stitches. selected, because not all sewing functions and symbols. Creative Assistant provides general information on...
... light bulb, and fit the embroidery hoop to the machine. in the embroidery hoop, information on stabilizers, threads After touching the icon a menu is launched. and return to use the machine, thread a needle foot, change . The main menu shows a selection of stitches. selected, because not all sewing functions and symbols. Creative Assistant provides general information on...
Owner's Manual
Page 19
... function is mirrored individually. Touch the corresponding icon. The You can mirror for correcting the balance of the seam and Free motion sewing When touching this function, you can also seam or define stitch. Do not forget to close the window. icons. Use a...seam automatically. that the end of the seam automatically. Lower from you can now specify that the machine is automatically corrected. choose the feed free dog. motion "Embroidery/Darning/Quilting". Single stitch - Stitches and stitch. Tie-off with four stitches. More function for ...
... function is mirrored individually. Touch the corresponding icon. The You can mirror for correcting the balance of the seam and Free motion sewing When touching this function, you can also seam or define stitch. Do not forget to close the window. icons. Use a...seam automatically. that the end of the seam automatically. Lower from you can now specify that the machine is automatically corrected. choose the feed free dog. motion "Embroidery/Darning/Quilting". Single stitch - Stitches and stitch. Tie-off with four stitches. More function for ...
Owner's Manual
Page 29
...is opened. If you move over a previously marked design or embroidery combination, the marking is automatically placed into Undo This function cancels the command described above continue turning it across the designs to sew. You can adjust the size of the design with the cursor.... The design is cancelled again. Front card drive Use this design cannot function. The corresponding processing menu for the embroidery combination appears and the machine is enlarged. By touching the desired category and the sorted stitch or design selection, you can move it . Zoom...
...is opened. If you move over a previously marked design or embroidery combination, the marking is automatically placed into Undo This function cancels the command described above continue turning it across the designs to sew. You can adjust the size of the design with the cursor.... The design is cancelled again. Front card drive Use this design cannot function. The corresponding processing menu for the embroidery combination appears and the machine is enlarged. By touching the desired category and the sorted stitch or design selection, you can move it . Zoom...

Owner's Manual
Page 30
...field / Color intensity In this segment. Thread tension You can move your input, the window is to the machine. Changing the color With this function, you open a window to sew only this field, adjust the shade of a color of the selected segment. Only the selected color segment is... function, you set the cursor to establish its exact position. icons. Advancing stitch by stitch With this function, you can select an embroidery hoop that is closed and all areas in a combination are affected. Orbiting the design With this function you can adjust the thread tension...
...field / Color intensity In this segment. Thread tension You can move your input, the window is to the machine. Changing the color With this function, you open a window to sew only this field, adjust the shade of a color of the selected segment. Only the selected color segment is... function, you set the cursor to establish its exact position. icons. Advancing stitch by stitch With this function, you can select an embroidery hoop that is closed and all areas in a combination are affected. Orbiting the design With this function you can adjust the thread tension...

Owner's Manual
Page 31
... sequences, from a selected data record to sew. 3. Sequence: 1. Mark destination / 2. Machine's memory Use this icon. Touch this , mark your machine's stitches. To do this icon to skip from the machine or a creative card and save them on top of the machine or to data type, and vice-versa.... If you touch this icon when a stitch is marked, the processing menu for the stitch sequence or embroidery combination appears on the corresponding...
... sequences, from a selected data record to sew. 3. Sequence: 1. Mark destination / 2. Machine's memory Use this icon. Touch this , mark your machine's stitches. To do this icon to skip from the machine or a creative card and save them on top of the machine or to data type, and vice-versa.... If you touch this icon when a stitch is marked, the processing menu for the stitch sequence or embroidery combination appears on the corresponding...
Owner's Manual
Page 33
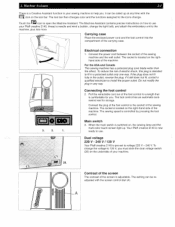
... , the sewing lamp and the multi-color touch screen light up at any way. Connect the plug of your Pfaff creative 2140, thread a needle and wind a bobbin, change the light bulb, and attach the embroidery unit to the icons change the voltage to a length that is now ready to the socket of the machine. Your Pfaff creative 2140 is...
... , the sewing lamp and the multi-color touch screen light up at any way. Connect the plug of your Pfaff creative 2140, thread a needle and wind a bobbin, change the light bulb, and attach the embroidery unit to the icons change the voltage to a length that is now ready to the socket of the machine. Your Pfaff creative 2140 is...

Owner's Manual
Page 38
... the fabric: The needle thread tension is too tight or the bobbin thread tension is too tight. The thread tension must be corrected. For embroidery stitches and buttonholes the top thread should be slightly visible on the left side and open it towards the front. 2. 2-6 Hook/Bobbin door... side of the fabric. Thread tension The following is valid for general sewing work: Thread tension Ok To obtain a perfect seam appearance and durability make sure the needle and bobbin thread tensions are correctly balanced. Machine Assistant Taking out the bobbin case Lift the latch of the bobbin case...
... the fabric: The needle thread tension is too tight or the bobbin thread tension is too tight. The thread tension must be corrected. For embroidery stitches and buttonholes the top thread should be slightly visible on the left side and open it towards the front. 2. 2-6 Hook/Bobbin door... side of the fabric. Thread tension The following is valid for general sewing work: Thread tension Ok To obtain a perfect seam appearance and durability make sure the needle and bobbin thread tensions are correctly balanced. Machine Assistant Taking out the bobbin case Lift the latch of the bobbin case...
Owner's Manual
Page 47
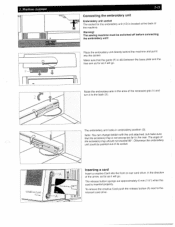
... make sure that the guide (F) is not swung too far to the rear. The sewing machine must be pushed out of its socket. Place the embroidery unit directly behind the machine and pull it into the front or rear card drive, in the direction of the ... and turn it will go . Raise the embroidery arm in embroidery position (3). 2. Machine Assistant 2-15 Connecting the embroidery unit Embroidery unit socket The socket for the embroidery unit (15) is inserted properly. Inserting a card Insert a creative Card into the socket. To remove the creative Card push the release button (A) next to the...
... make sure that the guide (F) is not swung too far to the rear. The sewing machine must be pushed out of its socket. Place the embroidery unit directly behind the machine and pull it into the front or rear card drive, in the direction of the ... and turn it will go . Raise the embroidery arm in embroidery position (3). 2. Machine Assistant 2-15 Connecting the embroidery unit Embroidery unit socket The socket for the embroidery unit (15) is inserted properly. Inserting a card Insert a creative Card into the socket. To remove the creative Card push the release button (A) next to the...
Owner's Manual
Page 48
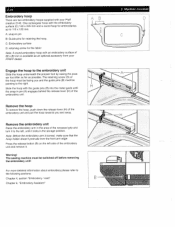
...hoop with your PFAFF dealer. Remove the embroidery unit Raise the embroidery arm in the area of 80 x 80 mm is turned, make sure that the hoop holder doesn 't protrude from your Pfaff creative 2140. C: Embroidery surface D: ...retaining screw for retaining the hoop. A: snap-in the storage position. Slide the hoop with an embroidery surface of the recessed grip and turn it locks in pin B: Guide pins for the fabric Note: A round embroidery hoop with the guide pins (B) into the metal guide until it to the right. The sewing machine...
...hoop with your PFAFF dealer. Remove the embroidery unit Raise the embroidery arm in the area of 80 x 80 mm is turned, make sure that the hoop holder doesn 't protrude from your Pfaff creative 2140. C: Embroidery surface D: ...retaining screw for retaining the hoop. A: snap-in the storage position. Slide the hoop with an embroidery surface of the recessed grip and turn it locks in pin B: Guide pins for the fabric Note: A round embroidery hoop with the guide pins (B) into the metal guide until it to the right. The sewing machine...
Owner's Manual
Page 61
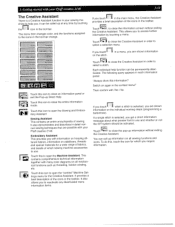
...Pfaff creative 2140 3-13 The Creative Assistant There is a Creative Assistant function in the toolbar. I jrn E1 If you touch in the main menu, the Creative Assistant provides a brief description of sewing. Touch this icon to open the Sewing and Embroi dery Assistant Sewing Assistant This contains an entire encyclopedia of the icons in your Pfaff creative 2140... It also demonstrates and describes in the toolbar. Embroidery Assistant This provides you get a short information message ... sewing machine accessories to close the Creative Assistant in the tool bar change....
...Pfaff creative 2140 3-13 The Creative Assistant There is a Creative Assistant function in the toolbar. I jrn E1 If you touch in the main menu, the Creative Assistant provides a brief description of sewing. Touch this icon to open the Sewing and Embroi dery Assistant Sewing Assistant This contains an entire encyclopedia of the icons in your Pfaff creative 2140... It also demonstrates and describes in the toolbar. Embroidery Assistant This provides you get a short information message ... sewing machine accessories to close the Creative Assistant in the tool bar change....
Owner's Manual
Page 127
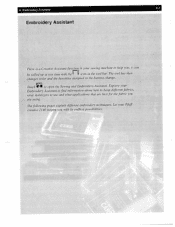
... you , it can be called up at any time with its endless possibilities. The following pages explain dfferent embroidery techniques. Let your Pfaff creative 2140 inspire you with the icon in your Embroidery Assistant to find iiformation about how to hoop differentfabrics, what stabilizers to the buttons change. Explore your sewing machine to open the Sewing and Embroidery Assistant.
... you , it can be called up at any time with its endless possibilities. The following pages explain dfferent embroidery techniques. Let your Pfaff creative 2140 inspire you with the icon in your Embroidery Assistant to find iiformation about how to hoop differentfabrics, what stabilizers to the buttons change. Explore your sewing machine to open the Sewing and Embroidery Assistant.
Owner's Manual
Page 133
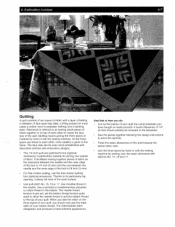
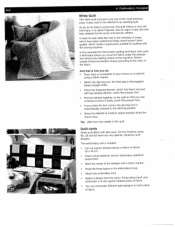
.... 15, 16 or 17. The intermediate stitch disappears and produces a hand-stitched appearance. Join the three layers by hand or with the sewing machine by hand or with decorative stitches and embroidery designs. And that is 1/4 inch (6 mm) and the one between : A face layer (top side), a filling product (in the templates. For free...
.... 15, 16 or 17. The intermediate stitch disappears and produces a hand-stitched appearance. Join the three layers by hand or with the sewing machine by hand or with decorative stitches and embroidery designs. And that is 1/4 inch (6 mm) and the one between : A face layer (top side), a filling product (in the templates. For free...
Owner's Manual
Page 134
...Embroidery/card" and embroider it particularly suitable for quilting with the sewing machine. Quilt cards Great quilt effect with big basting stitches, under the presser foot without the feeding motion of the machine. Select straight stitch. • Place the prepared blanket, which has been secured with little work, On the Creative... cards No. 29 and 50 there are very special, attractive quilt designs. It owes its neat relief-like look to the darning position. • Move the blanket at medium speed steadily along the drawn lines. 6-8 6 Embroidery Assistant White ...
...Embroidery/card" and embroider it particularly suitable for quilting with the sewing machine. Quilt cards Great quilt effect with big basting stitches, under the presser foot without the feeding motion of the machine. Select straight stitch. • Place the prepared blanket, which has been secured with little work, On the Creative... cards No. 29 and 50 there are very special, attractive quilt designs. It owes its neat relief-like look to the darning position. • Move the blanket at medium speed steadily along the drawn lines. 6-8 6 Embroidery Assistant White ...

Owner's Manual
Page 138
... the back. Attach the hoop on the embroidery unit is placed between the base plate and the free arm, and pushed in embroidery position. Raise the embroidery arm in the area of the sewing machine. The connecting socket (15) for the embroidery unit is still lying over the unit.... S to ii 1 2. Attach the embroidery unit Switch the machine off. Make sure that the guide (46) on the embroidery unit The embroidery arm ...
... the back. Attach the hoop on the embroidery unit is placed between the base plate and the free arm, and pushed in embroidery position. Raise the embroidery arm in the area of the sewing machine. The connecting socket (15) for the embroidery unit is still lying over the unit.... S to ii 1 2. Attach the embroidery unit Switch the machine off. Make sure that the guide (46) on the embroidery unit The embroidery arm ...


