
Owner's Manual
Page 5
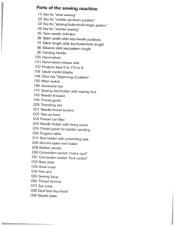
Parts of the sewing machine (1) Key for "slow sewing" (2) Key for "needle up/down position" (3) Key for "tacking/buttonhole/single pattern" (4) Key for "reverse sewing" (5) Twin ...
Parts of the sewing machine (1) Key for "slow sewing" (2) Key for "needle up/down position" (3) Key for "tacking/buttonhole/single pattern" (4) Key for "reverse sewing" (5) Twin ...
Owner's Manual
Page 6
... its function is . If this appliance is used on the specification plate. 6. When leaving the machine, during work or when changing mechanical parts or accessories, always disconnect the machine from the mains by a Ptaff mechanic. 5 The machine must only be adjusted by pulling out the ...is solely the responsibility of electric shock, do not open the machine. Do not use a soft cloth with regard to use only original PFAFF parts. Notes on safety Notes on the machine 7. It should be used for domestic sewing machines according to : dust, severe dampness, direct sunlight...
... its function is . If this appliance is used on the specification plate. 6. When leaving the machine, during work or when changing mechanical parts or accessories, always disconnect the machine from the mains by a Ptaff mechanic. 5 The machine must only be adjusted by pulling out the ...is solely the responsibility of electric shock, do not open the machine. Do not use a soft cloth with regard to use only original PFAFF parts. Notes on safety Notes on the machine 7. It should be used for domestic sewing machines according to : dust, severe dampness, direct sunlight...

Owner's Manual
Page 57
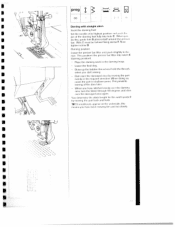
... the fabr c with elastic stitch. Honeycomb stitch Honeycomb stitch is used for sewing elastic, eg. on with elastic stitches. - Sew it stitcl ms - Push the part prepared in place. - Fold the edge of tIm elastic tape overlapping a little and sew over them with elastic stitch Leave the ends of the hem...
... the fabr c with elastic stitch. Honeycomb stitch Honeycomb stitch is used for sewing elastic, eg. on with elastic stitches. - Sew it stitcl ms - Push the part prepared in place. - Fold the edge of tIm elastic tape overlapping a little and sew over them with elastic stitch Leave the ends of the hem...
Owner's Manual
Page 75
... - 50. Now embroider the niarked lines with proqi in it with the magic pen to the part - Do not forget to be made dense. Lower the feed dog and insert the darning foot - - TIP: If ou sew fast but move the material ...
... - 50. Now embroider the niarked lines with proqi in it with the magic pen to the part - Do not forget to be made dense. Lower the feed dog and insert the darning foot - - TIP: If ou sew fast but move the material ...

Owner's Manual
Page 82
... the utfier sear i is al sewing- Leave about four or five inches a ti read protruding at a stitch length of gather Ii SUIt. Now gather the part by pulling the bottom ihii ,nls. You determine the amount of 6 mm you should sew two or three gathering a Mark the tirst line on the...
... the utfier sear i is al sewing- Leave about four or five inches a ti read protruding at a stitch length of gather Ii SUIt. Now gather the part by pulling the bottom ihii ,nls. You determine the amount of 6 mm you should sew two or three gathering a Mark the tirst line on the...
Owner's Manual
Page 85
... prevents tearing of the darning foot fully into notch E (darning position>. When you have stitched evenly over the damaged area by inovin ig thin part back aid forth. Draw up the bobbin thread and hold the threads - WIsii ycic do iees and dan ii üver the damaged area again ... tighten screw D. Darning position: Lower the presser bar hitter and push it lightly to the rear. Lower the feed dog - When doing so, move the part iii shallow curves. when you hive been iiir)vilig tire bt -° too slowly. TIP: If small knots appear on the underside, this , guide fork...
... prevents tearing of the darning foot fully into notch E (darning position>. When you have stitched evenly over the damaged area by inovin ig thin part back aid forth. Draw up the bobbin thread and hold the threads - WIsii ycic do iees and dan ii üver the damaged area again ... tighten screw D. Darning position: Lower the presser bar hitter and push it lightly to the rear. Lower the feed dog - When doing so, move the part iii shallow curves. when you hive been iiir)vilig tire bt -° too slowly. TIP: If small knots appear on the underside, this , guide fork...
Owner's Manual
Page 93
... bed- Embroider your pattern with your sewing machine. Knot the threads on fabric backing or use the single pattern" and "needle down" keys for this part of the I work with much more variants are created with a dense zigzag stitch. and eyelet embroidery is ready. It is dissolve the stabilizer I in water...
... bed- Embroider your pattern with your sewing machine. Knot the threads on fabric backing or use the single pattern" and "needle down" keys for this part of the I work with much more variants are created with a dense zigzag stitch. and eyelet embroidery is ready. It is dissolve the stabilizer I in water...
Owner's Manual
Page 102
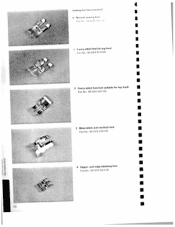
wnq (a () .4 t1 4 1 I a' and edge-stitching foot Part No: 98-694 884 00 I I I I I I I a I a a I a I a I a a S I I I I I I I I I Fancy-stitch foot for top feed Rr1 No. 98694 814-00 2 Fancy-stitch foot (not suitable for top feed> Part No.: 98 694 89 7-00 3 Blind stitch and overlock foot Part No. 98-694 89000 4 Zipper-
wnq (a () .4 t1 4 1 I a' and edge-stitching foot Part No: 98-694 884 00 I I I I I I I a I a a I a I a I a a S I I I I I I I I I Fancy-stitch foot for top feed Rr1 No. 98694 814-00 2 Fancy-stitch foot (not suitable for top feed> Part No.: 98 694 89 7-00 3 Blind stitch and overlock foot Part No. 98-694 89000 4 Zipper-
Owner's Manual
Page 104
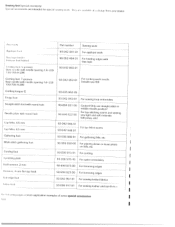
... 948-9 1 For lop-lelled seams Gathering foot Multi-stitch gathenng foot 93-036 998-9 1 98-999 650-00 For gathering frills, etc. I dO/lOb H-ZWI Part number 93-042 941 -91 98-053 484-91 93-042 950-91 Sewing work For appliqué work For binding edges with bias tape...
... 948-9 1 For lop-lelled seams Gathering foot Multi-stitch gathenng foot 93-036 998-9 1 98-999 650-00 For gathering frills, etc. I dO/lOb H-ZWI Part number 93-042 941 -91 98-053 484-91 93-042 950-91 Sewing work For appliqué work For binding edges with bias tape...

Owner's Manual
Page 105
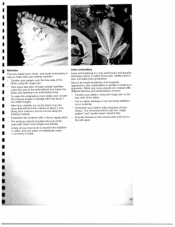
... out and pull the paper off. t' so and o.ir.oriil. P. Place the fabric reverse side to be Now iron matcnal. iron on the appliqué parts on the base wanls over et P the edge. Afterwards pull the fabric apart and fund h protruding hem into the lap-feller li. Pull the two...
... out and pull the paper off. t' so and o.ir.oriil. P. Place the fabric reverse side to be Now iron matcnal. iron on the appliqué parts on the base wanls over et P the edge. Afterwards pull the fabric apart and fund h protruding hem into the lap-feller li. Pull the two...
Owner's Manual
Page 107
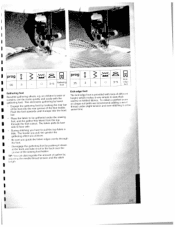
... greater the a gathering effect you have little. (4 - Be sure you guide the fabric edges evenly through the foot cutout fabric from the top The tabric parts lie face side to face side. - EoPfuntsghhaegtehfoetohfteoiongttaouthpthewerianir-gdeasfrougonrtotibol yvitehsonoofakpthisneginfotthooetthhreeoalfdrreobrna.tr Knit-edge foot Tsthohehenraieegmsahkhdtsna,iptouwenenh-ddcikgceunhretitsptfmleoaidgoarthktsfteaiswsbterpeinitcrsovsri.eevorcinyTdoeomasdinommdwbpetioalntehivdnettrooaa-dsesptdseietiwconrhffgeitdhncaiitgGfhwskietwni,iidiiiI un same time, bar. - LU 3-5 I jprog...
... greater the a gathering effect you have little. (4 - Be sure you guide the fabric edges evenly through the foot cutout fabric from the top The tabric parts lie face side to face side. - EoPfuntsghhaegtehfoetohfteoiongttaouthpthewerianir-gdeasfrougonrtotibol yvitehsonoofakpthisneginfotthooetthhreeoalfdrreobrna.tr Knit-edge foot Tsthohehenraieegmsahkhdtsna,iptouwenenh-ddcikgceunhretitsptfmleoaidgoarthktsfteaiswsbterpeinitcrsovsri.eevorcinyTdoeomasdinommdwbpetioalntehivdnettrooaa-dsesptdseietiwconrhffgeitdhncaiitgGfhwskietwni,iidiiiI un same time, bar. - LU 3-5 I jprog...


