
Owner's Manual
Page 3
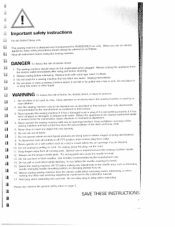
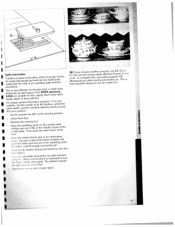
... k1 5 Never drop or mnsett any adjustments in the instruction manual. Do not Switch needle, pull or push fabric while stitching. SAVE THESE INSTRUcTIONS Always unplug this sewing machine is necessary when this appliance from the electric outlet when removing covers, lubricating, adjustments mentioned in bobbin, or changing presser foot, the etc. Hold plug when rewinding into any othei user machine servicing from 2. 3. 4. immediately. Close attention is used by the nianufacturer...
... k1 5 Never drop or mnsett any adjustments in the instruction manual. Do not Switch needle, pull or push fabric while stitching. SAVE THESE INSTRUcTIONS Always unplug this sewing machine is necessary when this appliance from the electric outlet when removing covers, lubricating, adjustments mentioned in bobbin, or changing presser foot, the etc. Hold plug when rewinding into any othei user machine servicing from 2. 3. 4. immediately. Close attention is used by the nianufacturer...
Owner's Manual
Page 5
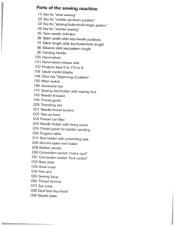
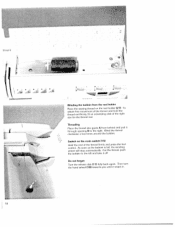
... "beginning of pattern" (15) Main switch (16) Accessory box (17) Sewing foot holder with sewing foot (18) Needle threader (19) Thread guide (20) Threading slot (21) Needle thread tension (22) Takeup lever (23) Presser bar lifter (24) Needle holder with fixing screw (25) Thread guide for bobbin winding (26) Program table (27) Reel holder with unwinding disk (28) Second spare reel holder (29) Bobbin winder (30) Connection socket "mains cord" (31) Connection socket "foot control" (32) Base plate (33) Hook cover (34) Free arm (35) Sewing lamp (36) Thread trimmer (37...
... "beginning of pattern" (15) Main switch (16) Accessory box (17) Sewing foot holder with sewing foot (18) Needle threader (19) Thread guide (20) Threading slot (21) Needle thread tension (22) Takeup lever (23) Presser bar lifter (24) Needle holder with fixing screw (25) Thread guide for bobbin winding (26) Program table (27) Reel holder with unwinding disk (28) Second spare reel holder (29) Bobbin winder (30) Connection socket "mains cord" (31) Connection socket "foot control" (32) Base plate (33) Hook cover (34) Free arm (35) Sewing lamp (36) Thread trimmer (37...
Owner's Manual
Page 6
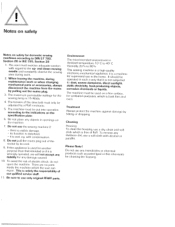
... should be put into operation according to 80% This sewing machine is solely the responsibility of electric shock, do not open the machine. When leaving the machine, during work or when changing mechanical parts or accessories, always disconnect the machine from the mains by hitting or dropping. Ambient temperature 1 0 C to 40 C Humidity 20% to the indications on a free surface, for any objects in...
... should be put into operation according to 80% This sewing machine is solely the responsibility of electric shock, do not open the machine. When leaving the machine, during work or when changing mechanical parts or accessories, always disconnect the machine from the mains by hitting or dropping. Ambient temperature 1 0 C to 40 C Humidity 20% to the indications on a free surface, for any objects in...
Owner's Manual
Page 8
...stitch Darning Darning tears Darning with elastic stitch Darning with straight stitch General notes on sewing Hand wheel relcise disk... . . Contents Accessory compartment Adjusting ,lide keys . . Applique foot Automatic dirning . Bobbin thread tension Bobbin winding Borders Suspenders Ibraces) Buttonhole balance Buttonhole/tacking/single pattern Buttonholes Changing a sewing foot Changing the needle . . Hemstitching Honeycomb stitch Inserting patches Inserting the bobbin Inserting zippers Knit-edge foot Lace work support Dual fabric feed Elastic...
...stitch Darning Darning tears Darning with elastic stitch Darning with straight stitch General notes on sewing Hand wheel relcise disk... . . Contents Accessory compartment Adjusting ,lide keys . . Applique foot Automatic dirning . Bobbin thread tension Bobbin winding Borders Suspenders Ibraces) Buttonhole balance Buttonhole/tacking/single pattern Buttonholes Changing a sewing foot Changing the needle . . Hemstitching Honeycomb stitch Inserting patches Inserting the bobbin Inserting zippers Knit-edge foot Lace work support Dual fabric feed Elastic...
Owner's Manual
Page 9
...Richelieu Right needle position a Roll hemming Saddle stitch . Smocking a Special accessory table Stitch density . . . . ... Stretch triple straight stitch . . Quilting Reverse sewing I Semi automatic (buttonhole) Semiautomatic sewing of second tack . Sewing and emhroidenng a Sewing chart Sewing taults and their remedies I Practical sewing Presser bar lifter Progiam keys . Needie pcsitions Needle thredd tension a Needle threader Needle up/down position a Non elastic stitches Oiling . Open Ovui luck stitch a Overlock stitches Pattern Iuigth Pattern sldfl...
...Richelieu Right needle position a Roll hemming Saddle stitch . Smocking a Special accessory table Stitch density . . . . ... Stretch triple straight stitch . . Quilting Reverse sewing I Semi automatic (buttonhole) Semiautomatic sewing of second tack . Sewing and emhroidenng a Sewing chart Sewing taults and their remedies I Practical sewing Presser bar lifter Progiam keys . Needie pcsitions Needle thredd tension a Needle threader Needle up/down position a Non elastic stitches Oiling . Open Ovui luck stitch a Overlock stitches Pattern Iuigth Pattern sldfl...
Owner's Manual
Page 10
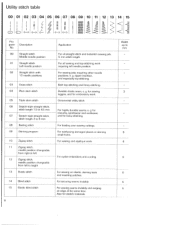
Utility stitch table I II // III / ' I IIIIIIIIH i Blll 11 1213i14 15 ii> >
Utility stitch table I II // III / ' I IIIIIIIIH i Blll 11 1213i14 15 ii> >
Owner's Manual
Page 11
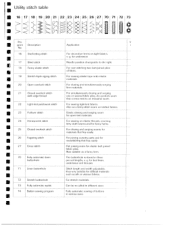
Needle position changeable to an industrial seam. Utility stitch table 16 17 18 19 20 21 22 23 24 25 26 27 70 71 72 73 : Pro- Stretch buttonhole I 73 Fully automatic eyelet Stitch length and width adjustable, thus very suitable for difficult matendls such as silk or viscous fabrics For stretch materials, Can be re-called in different sizes 74 Button sewing program Fully automatic sewing of fabric, 1 9 Stretch triple zigzag stitch For...
Needle position changeable to an industrial seam. Utility stitch table 16 17 18 19 20 21 22 23 24 25 26 27 70 71 72 73 : Pro- Stretch buttonhole I 73 Fully automatic eyelet Stitch length and width adjustable, thus very suitable for difficult matendls such as silk or viscous fabrics For stretch materials, Can be re-called in different sizes 74 Button sewing program Fully automatic sewing of fabric, 1 9 Stretch triple zigzag stitch For...
Owner's Manual
Page 20
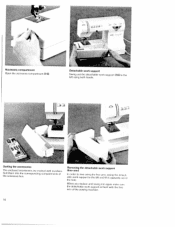
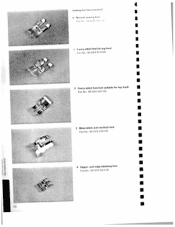
... it in again make u1: the detachable work support (free-arm) In order to sew using both hands. When you replace and swing it upwards out of the hole. Sorting the accessories The enclosed accessones are marked with the tree arm of the accessory box. Removing the detachable work support is flush with numbers. Sort them into the corresponding compartments of the sewing machine A Accessory compartment Open the accessory compartment (16).
... it in again make u1: the detachable work support (free-arm) In order to sew using both hands. When you replace and swing it upwards out of the hole. Sorting the accessories The enclosed accessones are marked with the tree arm of the accessory box. Removing the detachable work support is flush with numbers. Sort them into the corresponding compartments of the sewing machine A Accessory compartment Open the accessory compartment (16).
Owner's Manual
Page 22
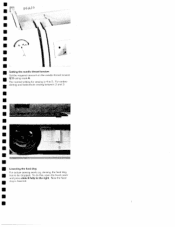
... disk of the thread firmly and press the foot control. Cut the thread, push the bobbin to the right Wind the thread clockwise a few times around the bobbin. Threading Place the thread into guide A from the reel holder Place the sewing thread on the main switch (1 5) Hold the end of the right size for the thread reel. L e I 0 Winding the bobbin from behind and pull it through opening B to the left...
... disk of the thread firmly and press the foot control. Cut the thread, push the bobbin to the right Wind the thread clockwise a few times around the bobbin. Threading Place the thread into guide A from the reel holder Place the sewing thread on the main switch (1 5) Hold the end of the right size for the thread reel. L e I 0 Winding the bobbin from behind and pull it through opening B to the left...
Owner's Manual
Page 33
I U I I U I I U U I U U Lowering the feed dog For ccrtain sewing work, e.g darninq, the teed dog U ii,s to 5. To do this, open the hook cover arid press slide B fully to the right Now the feed I B B The normal setting for sewing is lowered I dog is 4 to be dropped. I I I I I I I U Setting the needle thread tension Set the required amount on the needle thread tension I idering and buttonhole sewing between 2 and 3. For embro I (21) using mark A.
I U I I U I I U U I U U Lowering the feed dog For ccrtain sewing work, e.g darninq, the teed dog U ii,s to 5. To do this, open the hook cover arid press slide B fully to the right Now the feed I B B The normal setting for sewing is lowered I dog is 4 to be dropped. I I I I I I I U Setting the needle thread tension Set the required amount on the needle thread tension I idering and buttonhole sewing between 2 and 3. For embro I (21) using mark A.

Owner's Manual
Page 39
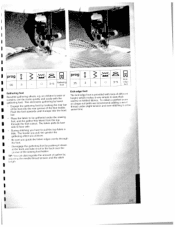
... electronic system will make a basic I ' Setting the needle position 2. Please observe the note concerning slide key (6). ,c LJ .0.5 6 • L.1 • O2'i • Li L2 ' I program setting. _____ 0 I • L 4. .J • r • •0.5_V O2''1 La L2 13 Ii Setting the stitch width The stitch 1 When width slide key (6) you move the slide has key two functions: the upper diode lights up and...
... electronic system will make a basic I ' Setting the needle position 2. Please observe the note concerning slide key (6). ,c LJ .0.5 6 • L.1 • O2'i • Li L2 ' I program setting. _____ 0 I • L 4. .J • r • •0.5_V O2''1 La L2 13 Ii Setting the stitch width The stitch 1 When width slide key (6) you move the slide has key two functions: the upper diode lights up and...
Owner's Manual
Page 48
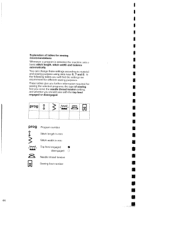
... you further information required for sewing the selected programs: the type of tables for sewing recommendations Whenever a program is selected, the machine sets a I S 44 U I I U I p rog Program number I A Stitch length in mm I Stitch width in mm a Top feed engaged • disengaged 0 I Needle thread tension I E.1 Sewing foot number S a I I basic stitch length, stitch width and balance automatically. I You can change these settings according to material and sewing purpose using slide keys 6, 7 and 8, In I and whether you will find...
... you further information required for sewing the selected programs: the type of tables for sewing recommendations Whenever a program is selected, the machine sets a I S 44 U I I U I p rog Program number I A Stitch length in mm I Stitch width in mm a Top feed engaged • disengaged 0 I Needle thread tension I E.1 Sewing foot number S a I I basic stitch length, stitch width and balance automatically. I You can change these settings according to material and sewing purpose using slide keys 6, 7 and 8, In I and whether you will find...

Owner's Manual
Page 49
... the material plies from shifting, insert dress pins crosswise to finish the work. Then you have to press the foot control each further stitch you do not need to the basting dirction. You can be changed. Program 01 is the basic straight stitch with slide key (6). Place the fabric under the sewing loot Sew one stitch. For each time. LLzi L 1 L Straight stitch Program 00 is a straight stitch with long straight stitches (6 mm).
... the material plies from shifting, insert dress pins crosswise to finish the work. Then you have to press the foot control each further stitch you do not need to the basting dirction. You can be changed. Program 01 is the basic straight stitch with slide key (6). Place the fabric under the sewing loot Sew one stitch. For each time. LLzi L 1 L Straight stitch Program 00 is a straight stitch with long straight stitches (6 mm).
Owner's Manual
Page 53
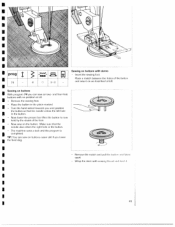
... lower the presser bar lifter, the button is completed. held by the shank of the foot Now sew on buttons easier still if you lower the teed dog. - Place the button in the place marked. - Sewing on buttons with stems Insert the sewing foot Place a match between the holes of the button and sew it hi tIP a , of t,iI a apart V'Vrap the steni with no problem at left hole in the button...
... lower the presser bar lifter, the button is completed. held by the shank of the foot Now sew on buttons easier still if you lower the teed dog. - Place the button in the place marked. - Sewing on buttons with stems Insert the sewing foot Place a match between the holes of the button and sew it hi tIP a , of t,iI a apart V'Vrap the steni with no problem at left hole in the button...
Owner's Manual
Page 95
... around the pin. Set the presser bar lifter at the hunt Mdcc tiuup the marked fabric taut Cut one or two of the the fabric over the pin in an embroidery fabric threads and in the eyeletting plate. h lubnc must fit snugly around the cut-in nuedle plate. Remove the sewing foot Place the eyeletting plate making sure pin A fits in portion. - elastic stitch or fancy stitches. up the bobbin thread and hold...
... around the pin. Set the presser bar lifter at the hunt Mdcc tiuup the marked fabric taut Cut one or two of the the fabric over the pin in an embroidery fabric threads and in the eyeletting plate. h lubnc must fit snugly around the cut-in nuedle plate. Remove the sewing foot Place the eyeletting plate making sure pin A fits in portion. - elastic stitch or fancy stitches. up the bobbin thread and hold...
Owner's Manual
Page 102
and edge-stitching foot Part No: 98-694 884 00 I I I I I I I a I a a I a I a I a a S I I I I I I I I I Fancy-stitch foot for top feed Rr1 No. 98694 814-00 2 Fancy-stitch foot (not suitable for top feed> Part No.: 98 694 89 7-00 3 Blind stitch and overlock foot Part No. 98-694 89000 4 Zipper- wnq (a () .4 t1 4 1 I a'
and edge-stitching foot Part No: 98-694 884 00 I I I I I I I a I a a I a I a I a a S I I I I I I I I I Fancy-stitch foot for top feed Rr1 No. 98694 814-00 2 Fancy-stitch foot (not suitable for top feed> Part No.: 98 694 89 7-00 3 Blind stitch and overlock foot Part No. 98-694 89000 4 Zipper- wnq (a () .4 t1 4 1 I a'

Owner's Manual
Page 105
... over stitch all contours with straight - Sew along the folded edge with narrow i it 3/8" to help you work more easily. Pull the two fabric ph ", 'p 0 ' sewing. Also make sure the I th outer edge so that any letters drawn in the sewing machine. - Transfer your drafted pattern to the face side, smooth side, of the lower ply by the foot and is tire "needle down...
... over stitch all contours with straight - Sew along the folded edge with narrow i it 3/8" to help you work more easily. Pull the two fabric ph ", 'p 0 ' sewing. Also make sure the I th outer edge so that any letters drawn in the sewing machine. - Transfer your drafted pattern to the face side, smooth side, of the lower ply by the foot and is tire "needle down...
Owner's Manual
Page 107
Be sure you guide the fabric edges evenly through the foot cutout fabric from the top The tabric parts lie face side to face side. - LU 3-5 I jprog i 00 3 - Place the fabric to be gathered under the sewing foot, and the gather-free through the toot Disengage at the front, the gathering foot and take it back over down the rove of the sewing foot holder. ltP In...
Be sure you guide the fabric edges evenly through the foot cutout fabric from the top The tabric parts lie face side to face side. - LU 3-5 I jprog i 00 3 - Place the fabric to be gathered under the sewing foot, and the gather-free through the toot Disengage at the front, the gathering foot and take it back over down the rove of the sewing foot holder. ltP In...

Owner's Manual
Page 116
... the right md the ni lb plite will reward you use the machine, the care it needs. Removal: Switch off the main switch I Remove the needle plate and lower the feed dog Clean the feed dog and hook area with i tIme brush I - The more often you with boti i hands ,it TI me tmoi it ...needle plate out. operation) to the hook Yet i en st'e when to 20 hoots of ,i small screwdrivei ntis tIn' I I apply the oil in place Before yni Stilt sewing, it I tisedle plate is otherwise ntaintenamee hoe and nuist not be oiled. Then apply m drop of oil fevemy 15 to I I etwet ,n needle plate...
... the right md the ni lb plite will reward you use the machine, the care it needs. Removal: Switch off the main switch I Remove the needle plate and lower the feed dog Clean the feed dog and hook area with i tIme brush I - The more often you with boti i hands ,it TI me tmoi it ...needle plate out. operation) to the hook Yet i en st'e when to 20 hoots of ,i small screwdrivei ntis tIn' I I apply the oil in place Before yni Stilt sewing, it I tisedle plate is otherwise ntaintenamee hoe and nuist not be oiled. Then apply m drop of oil fevemy 15 to I I etwet ,n needle plate...

Owner's Manual
Page 118
... bottom side of fabric. S Adjust thread tension. Only use perfect threads. Insert new needle. Let the machine feet the fabric. Only guide the fabric I I Use a larger needle. Machine does not feed or feeds irregularly Sewing lii it fully in tier has bt'ctiiie tlpy iI5'i liii) Ittii(J storage. Machine is not properly threail4 S Needle is unevenly wound. The bobbin thread is too small for threait 2. I lightly. I the winding tension. Remove needle plate, remove lint with large eye (System 1 30 N). Needle thread breaks See reasui...
... bottom side of fabric. S Adjust thread tension. Only use perfect threads. Insert new needle. Let the machine feet the fabric. Only guide the fabric I I Use a larger needle. Machine does not feed or feeds irregularly Sewing lii it fully in tier has bt'ctiiie tlpy iI5'i liii) Ittii(J storage. Machine is not properly threail4 S Needle is unevenly wound. The bobbin thread is too small for threait 2. I lightly. I the winding tension. Remove needle plate, remove lint with large eye (System 1 30 N). Needle thread breaks See reasui...


