
Owner's Manual
Page 2
...terminals in the mains lead are coloured according to the following code: Blue: Neutral I The plug must be used without fuse cover. I LL Safety rules :I nor to the terminal which is coloured brown must be connected to the safety-lead terminal I ...wire which is marked with the corresponding colour code. i Please also observe the general safety notes on pages 4 and 5 I froiii electrical suppliers or the PFAFF agencies. I Cut-oft mains plugs are available I - - - Defective mains leads must definitely not be connected to a plug with three pins. I I...
...terminals in the mains lead are coloured according to the following code: Blue: Neutral I The plug must be used without fuse cover. I LL Safety rules :I nor to the terminal which is coloured brown must be connected to the safety-lead terminal I ...wire which is marked with the corresponding colour code. i Please also observe the general safety notes on pages 4 and 5 I froiii electrical suppliers or the PFAFF agencies. I Cut-oft mains plugs are available I - - - Defective mains leads must definitely not be connected to a plug with three pins. I I...

Owner's Manual
Page 3
... 15. 16 Always use out operate of [("O'> changing needle, threading when making unplug sewing any othei user machine servicing from the electric outlet when removing covers, lubricating, adjustments mentioned in the instruction manual. Do not allow to the sewing machine of doors. immediately. where aerosol (spray> products are being administered. To...
... 15. 16 Always use out operate of [("O'> changing needle, threading when making unplug sewing any othei user machine servicing from the electric outlet when removing covers, lubricating, adjustments mentioned in the instruction manual. Do not allow to the sewing machine of doors. immediately. where aerosol (spray> products are being administered. To...

Owner's Manual
Page 5
... unwinding disk (28) Second spare reel holder (29) Bobbin winder (30) Connection socket "mains cord" (31) Connection socket "foot control" (32) Base plate (33) Hook cover (34) Free arm (35) Sewing lamp (36) Thread trimmer (37) Top...
... unwinding disk (28) Second spare reel holder (29) Bobbin winder (30) Connection socket "mains cord" (31) Connection socket "foot control" (32) Base plate (33) Hook cover (34) Free arm (35) Sewing lamp (36) Thread trimmer (37) Top...
Owner's Manual
Page 8
... 103 79 78 . 76, 71 17 . 77 . . . . 92, 93 . . . 53 . . . . . 83 21 . 84, 85 1 03 86 1 01 68 69 Contents Accessory compartment Adjusting ,lide keys . . Covering stitches . . . . Embroidery techniques Eyelet embroidery Eyelets Fagoting stitch Fancy eldstic stitch Fancy stitch table . . . Bobbin thread tension Bobbin winding Borders Suspenders Ibraces) Buttonhole balance Buttonhole...
... 103 79 78 . 76, 71 17 . 77 . . . . 92, 93 . . . 53 . . . . . 83 21 . 84, 85 1 03 86 1 01 68 69 Contents Accessory compartment Adjusting ,lide keys . . Covering stitches . . . . Embroidery techniques Eyelet embroidery Eyelets Fagoting stitch Fancy eldstic stitch Fancy stitch table . . . Bobbin thread tension Bobbin winding Borders Suspenders Ibraces) Buttonhole balance Buttonhole...
Owner's Manual
Page 11
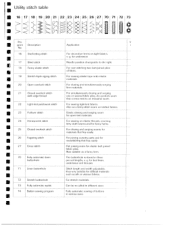
... 23 24 25 26 27 70 71 72 73 : Pro- g. V gram Description Application No. 1 6 Shell-eding stitch 1 7 Blind stitch For decorative hems on elastic threads, covering terry-cloth seams and for difficult matendls such as a fancy hem 70 Fully automatic linen buttonhole The buttonhole is stored in different sizes 74 Button...
... 23 24 25 26 27 70 71 72 73 : Pro- g. V gram Description Application No. 1 6 Shell-eding stitch 1 7 Blind stitch For decorative hems on elastic threads, covering terry-cloth seams and for difficult matendls such as a fancy hem 70 Fully automatic linen buttonhole The buttonhole is stored in different sizes 74 Button...
Owner's Manual
Page 18
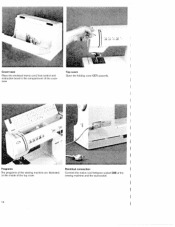
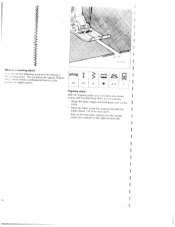
Cover-case Place the enclosed mains cord, foot control and instruction book in the compartment of the sewing machine and the wall socket Electrical connection Connect the mains cord between socket (30) of the covercase. I Programs rhe programs of the sewing machine are illustrated n the inside of the top cover. Top cover Open the folding cover (37) upwards.
Cover-case Place the enclosed mains cord, foot control and instruction book in the compartment of the sewing machine and the wall socket Electrical connection Connect the mains cord between socket (30) of the covercase. I Programs rhe programs of the sewing machine are illustrated n the inside of the top cover. Top cover Open the folding cover (37) upwards.
Owner's Manual
Page 24
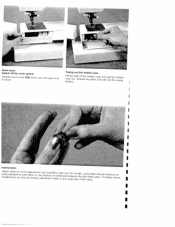
hook cover (33) at the side and open it to Taking out the bobbin case Lift the latch of the bobbin case case out Release the latch and bobbin and take pull out the the bobbin empty I I I I I I I I read tension Iroebbctutaltyitnoanodhpjoutilsmetesudtmhteosteehaarcmehadaoptihpneteera.rrliaaccn.ectensehaontuhdlrreldaubdresabvaiirlsieitbyilnemteoarnklaetcheseduruebnetdthweeresneideneetdIorlfeetthwaenodfafbbarboircbi.cbinplrtvhsr.eaFdortefannscioynsseaairTers I I I I I 1 Hook cover Switch off the main switch -loki the he front.
hook cover (33) at the side and open it to Taking out the bobbin case Lift the latch of the bobbin case case out Release the latch and bobbin and take pull out the the bobbin empty I I I I I I I I read tension Iroebbctutaltyitnoanodhpjoutilsmetesudtmhteosteehaarcmehadaoptihpneteera.rrliaaccn.ectensehaontuhdlrreldaubdresabvaiirlsieitbyilnemteoarnklaetcheseduruebnetdthweeresneideneetdIorlfeetthwaenodfafbbarboircbi.cbinplrtvhsr.eaFdortefannscioynsseaairTers I I I I I 1 Hook cover Switch off the main switch -loki the he front.
Owner's Manual
Page 25
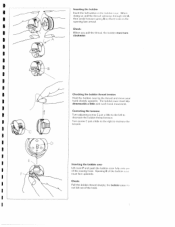
... threud sharply, the bobbin can not fall out of the bobbin Ce must slip downwards a little with eucti baud movement. Inserting the bobbin case Lift cover F and push the bobbin cac fully oiili pu of the sewing hook Opening E of the hook. The uobbn case must face upwards.
... threud sharply, the bobbin can not fall out of the bobbin Ce must slip downwards a little with eucti baud movement. Inserting the bobbin case Lift cover F and push the bobbin cac fully oiili pu of the sewing hook Opening E of the hook. The uobbn case must face upwards.
Owner's Manual
Page 28
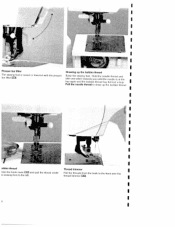
I I I I I I I I I I I Presser bar lifter The sewing foot is at the top again and the bobbin thread has formed a loop. I I II I I I obbin thread lose the hook cover (33) and pull the thread under e sewing foot to the left Thread trimmer Pull the threads from the back to draw up the bobbin thread ...
I I I I I I I I I I I Presser bar lifter The sewing foot is at the top again and the bobbin thread has formed a loop. I I II I I I obbin thread lose the hook cover (33) and pull the thread under e sewing foot to the left Thread trimmer Pull the threads from the back to draw up the bobbin thread ...
Owner's Manual
Page 33
For embro I (21) using mark A. I I I I I I I U Setting the needle thread tension Set the required amount on the needle thread tension I idering and buttonhole sewing between 2 and 3. The normal setting for sewing is lowered I B B To do this, open the hook cover arid press slide B fully to the right Now the feed I U U Lowering the feed dog For ccrtain sewing work, e.g darninq, the teed dog U ii,s to 5. I U I I U I I U U I dog is 4 to be dropped.
For embro I (21) using mark A. I I I I I I I U Setting the needle thread tension Set the required amount on the needle thread tension I idering and buttonhole sewing between 2 and 3. The normal setting for sewing is lowered I B B To do this, open the hook cover arid press slide B fully to the right Now the feed I U U Lowering the feed dog For ccrtain sewing work, e.g darninq, the teed dog U ii,s to 5. I U I I U I I U U I dog is 4 to be dropped.

Owner's Manual
Page 47
Utility and fancy stitches Non-elastic stitches Elastic stitches Overlock stitches Covering stitches Buttonholes Fancy stitches Pages 45 to 50 Pages 51 to 53 Pages 54 to 55 Pages 56 to 58 Pages 59 to 62 Pages 63 to 71 Sewing table Page 44
Utility and fancy stitches Non-elastic stitches Elastic stitches Overlock stitches Covering stitches Buttonholes Fancy stitches Pages 45 to 50 Pages 51 to 53 Pages 54 to 55 Pages 56 to 58 Pages 59 to 62 Pages 63 to 71 Sewing table Page 44
Owner's Manual
Page 60
... sewing a i ii ig viliicl seam. lends This produces the typcial "flatlock a professional look to collai t', oi raglan seams. ii 'prog IA I33 [26 j25 - 6 I What s i covering stitch? on making sum the the nghi and left needle side. Place the fabric under the sewing edges about 1/8 of an inch apart foot with...
... sewing a i ii ig viliicl seam. lends This produces the typcial "flatlock a professional look to collai t', oi raglan seams. ii 'prog IA I33 [26 j25 - 6 I What s i covering stitch? on making sum the the nghi and left needle side. Place the fabric under the sewing edges about 1/8 of an inch apart foot with...
Owner's Manual
Page 73
...it . Apply ironon or tear away stabilizer as an underlay. of stabilizer under it : - thread with program 61. Embroidering leather With the PFAFF electronic 6250 you should not be set too short, because leather tears between stitch holes easily, too. This is the way to - Finally, embroider tire ...62 (extended) over the centre - Since leather stretches easily, you can he made even easier by using a teflon sewing foot The teflon covering allows the foot to slide easily over stitch the gimp - TIP: Leave enough space in the embroidery for the eyelets which ire punched in ...
...it . Apply ironon or tear away stabilizer as an underlay. of stabilizer under it : - thread with program 61. Embroidering leather With the PFAFF electronic 6250 you should not be set too short, because leather tears between stitch holes easily, too. This is the way to - Finally, embroider tire ...62 (extended) over the centre - Since leather stretches easily, you can he made even easier by using a teflon sewing foot The teflon covering allows the foot to slide easily over stitch the gimp - TIP: Leave enough space in the embroidery for the eyelets which ire punched in ...
Owner's Manual
Page 75
... in water). Apply iron-on the fabric. - waste is dissolved in it with an embroidery hoop and program 50. wOa niwthtiednreraryrzrcoilgwoztahzgitghszteaitgcmhs.otintTochhgiesrasmmaankmdeusthssteunfrireostvthbeeerstpeewrreryiiscewlwoittnhh loops are properly covered. fBhaelaleoondncdkgdgcothuagpiedidtimanolgeasrskiasneredoretaqlniunleiietretseldedu.tesoaiAnsblgileeyrplotrouoowgehermaraevmbder,o5tioi.0ed..denoroisThIusmteitch - Now embroider the niarked lines with the magic pen to use the darning position. Monograms fNmaobornimco...
... in water). Apply iron-on the fabric. - waste is dissolved in it with an embroidery hoop and program 50. wOa niwthtiednreraryrzrcoilgwoztahzgitghszteaitgcmhs.otintTochhgiesrasmmaankmdeusthssteunfrireostvthbeeerstpeewrreryiiscewlwoittnhh loops are properly covered. fBhaelaleoondncdkgdgcothuagpiedidtimanolgeasrskiasneredoretaqlniunleiietretseldedu.tesoaiAnsblgileeyrplotrouoowgehermaraevmbder,o5tioi.0ed..denoroisThIusmteitch - Now embroider the niarked lines with the magic pen to use the darning position. Monograms fNmaobornimco...

Owner's Manual
Page 87
... the damaged area. - onto the the darna I Sewing on patches The best way to the I seam on the underside c)ose lo - DFpfaolabarrrcnitecei.naargsTp,htiefiesracaresysterodefnemgdtaghteeersnisaolrthosenmftaahlbelerirucnhadoneldersspidirtoeivsoiedfaetshsieear to cover material. Now cut hack the damaged material up to darn damaged area with elastic stitch. If 13 0,2-1 6 zI 3-5 0/1 I _J TJ*JIJZ 13 0,2-1 6 • 3-5 0/1 L_ I Over...
... the damaged area. - onto the the darna I Sewing on patches The best way to the I seam on the underside c)ose lo - DFpfaolabarrrcnitecei.naargsTp,htiefiesracaresysterodefnemgdtaghteeersnisaolrthosenmftaahlbelerirucnhadoneldersspidirtoeivsoiedfaetshsieear to cover material. Now cut hack the damaged material up to darn damaged area with elastic stitch. If 13 0,2-1 6 zI 3-5 0/1 I _J TJ*JIJZ 13 0,2-1 6 • 3-5 0/1 L_ I Over...
Owner's Manual
Page 94
... of the quilt. Embroidered stitches look very good on plain I cob ii ri d n iateria I I I I I I I I I I I t )i iil it into I ci si i ioi s, wall Ii a g i ups or I icc I covers. Spread out the piirts is often also il the back layer. This is quicker and more practical with the program 03. The double it particular...
... of the quilt. Embroidered stitches look very good on plain I cob ii ri d n iateria I I I I I I I I I I I t )i iil it into I ci si i ioi s, wall Ii a g i ups or I icc I covers. Spread out the piirts is often also il the back layer. This is quicker and more practical with the program 03. The double it particular...


