
User Manual
Page 1
Digital Camera Operating Manual To ensure the best performance from your camera, please read the Operating Manual before using the camera.
Digital Camera Operating Manual To ensure the best performance from your camera, please read the Operating Manual before using the camera.
User Manual
Page 2
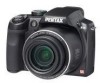
... information. Thank you for your cooperation. ACDSee and the ACDSee logo are trademarks of Seiko Epson Corporation. Please read this PENTAX Digital Camera. Regarding trademarks • PENTAX is a trademark of HOYA CORPORATION. • SDHC logo ( ) is a trademark of Apple Inc., registered in the...• This product supports PRINT Image Matching III. Copyright 2001 Seiko Epson Corporation. Thank you for purchasing this manual before using the PENTAX Digital Camera that you complete the product registration, which can be a valuable tool in helping you to the rights as ...
... information. Thank you for your cooperation. ACDSee and the ACDSee logo are trademarks of Seiko Epson Corporation. Please read this PENTAX Digital Camera. Regarding trademarks • PENTAX is a trademark of HOYA CORPORATION. • SDHC logo ( ) is a trademark of Apple Inc., registered in the...• This product supports PRINT Image Matching III. Copyright 2001 Seiko Epson Corporation. Thank you for purchasing this manual before using the PENTAX Digital Camera that you complete the product registration, which can be a valuable tool in helping you to the rights as ...

User Manual
Page 3
... different from the actual product. • In this manual, both an SD Memory Card and an SDHC Memory Card are referred to as radio transmitters could cause serious personal injuries. To users of this camera • Do not use or store this device in the vicinity of equipment ...radiation or magnetic fields. Strong static charges or the magnetic fields produced by equipment such as SD Memory Cards hereafter. • In this manual, the generic term "computer(s)" refers to the safety of functioning pixels is manufactured using this product, we request your special attention regarding items...
... different from the actual product. • In this manual, both an SD Memory Card and an SDHC Memory Card are referred to as radio transmitters could cause serious personal injuries. To users of this camera • Do not use or store this device in the vicinity of equipment ...radiation or magnetic fields. Strong static charges or the magnetic fields produced by equipment such as SD Memory Cards hereafter. • In this manual, the generic term "computer(s)" refers to the safety of functioning pixels is manufactured using this product, we request your special attention regarding items...

User Manual
Page 9
... Handling 5 Contents 7 Composition of the Operating Manual 13 Camera Features 14 Checking the Contents of the Package 17 Names of Parts 18 Names of Operating Parts 19 Monitor Indications 20 Getting Started 27 Attaching the Lens Cap and Strap 28 Powering the Camera 29 Charging the Battery 29 Installing the Battery... 30 Using the AC Adapter 33 Installing the SD Memory Card 34 Number of Images Recordable on an SD Memory Card 37 Turning the Camera On and Off 38 Starting-up in the Playback Mode 39 Initial Settings 40 Setting the Display Language 40 Setting the Date and Time...
... Handling 5 Contents 7 Composition of the Operating Manual 13 Camera Features 14 Checking the Contents of the Package 17 Names of Parts 18 Names of Operating Parts 19 Monitor Indications 20 Getting Started 27 Attaching the Lens Cap and Strap 28 Powering the Camera 29 Charging the Battery 29 Installing the Battery... 30 Using the AC Adapter 33 Installing the SD Memory Card 34 Number of Images Recordable on an SD Memory Card 37 Turning the Camera On and Off 38 Starting-up in the Playback Mode 39 Initial Settings 40 Setting the Display Language 40 Setting the Date and Time...
User Manual
Page 14
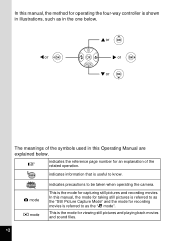
In this Operating Manual are explained below. 1 indicates the reference page number for recording movies is referred to be taken when operating the camera. A mode Q mode indicates precautions to as the "C mode". indicates information that is useful to know. This is the mode for viewing still pictures and playing ...
In this Operating Manual are explained below. 1 indicates the reference page number for recording movies is referred to be taken when operating the camera. A mode Q mode indicates precautions to as the "C mode". indicates information that is useful to know. This is the mode for viewing still pictures and playing ...

User Manual
Page 15
..., refer to the respective 3 chapters below. 3 Taking Pictures This chapter explains the various ways of the Operating Manual This Operating Manual contains the following chapters. 1 Getting Started 1 This chapter explains what you need to do after purchasing the camera before you start taking pictures. Composition of capturing images and how to set the...
..., refer to the respective 3 chapters below. 3 Taking Pictures This chapter explains the various ways of the Operating Manual This Operating Manual contains the following chapters. 1 Getting Started 1 This chapter explains what you need to do after purchasing the camera before you start taking pictures. Composition of capturing images and how to set the...
User Manual
Page 19
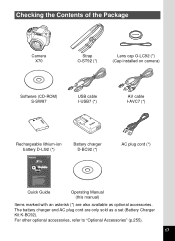
The battery charger and AC plug cord are also available as a set (Battery Charger Kit K-BC92). For other optional accessories, refer to "Optional Accessories" (p.255). 17 Checking the Contents of the Package Camera X70 Strap O-ST92 (*) Lens cap O-LC92 (*) (Cap installed on camera) Software (CD-ROM) S-SW87 USB cable I-USB7 (*) AV cable I-AVC7 (*) Rechargeable lithium-ion battery D-LI92 (*) Battery charger D-BC92 (*) AC plug cord (*) Quick Guide Operating Manual (this manual) Items marked with an asterisk (*) are only sold as optional accessories.
The battery charger and AC plug cord are also available as a set (Battery Charger Kit K-BC92). For other optional accessories, refer to "Optional Accessories" (p.255). 17 Checking the Contents of the Package Camera X70 Strap O-ST92 (*) Lens cap O-LC92 (*) (Cap installed on camera) Software (CD-ROM) S-SW87 USB cable I-USB7 (*) AV cable I-AVC7 (*) Rechargeable lithium-ion battery D-LI92 (*) Battery charger D-BC92 (*) AC plug cord (*) Quick Guide Operating Manual (this manual) Items marked with an asterisk (*) are only sold as optional accessories.
User Manual
Page 35
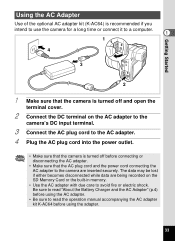
...kit (K-AC64) is recommended if you intend to use the camera for a long time or connect it to a computer. 1 1 4 3 2 1 Make sure that the camera is turned off before using the AC adapter. • Be sure to read the operation manual accompanying the AC adapter kit K-AC64 before connecting or disconnecting... the AC adapter. • Make sure that the camera is turned off and open the terminal cover. 2 Connect the DC terminal on the ...
...kit (K-AC64) is recommended if you intend to use the camera for a long time or connect it to a computer. 1 1 4 3 2 1 Make sure that the camera is turned off before using the AC adapter. • Be sure to read the operation manual accompanying the AC adapter kit K-AC64 before connecting or disconnecting... the AC adapter. • Make sure that the camera is turned off and open the terminal cover. 2 Connect the DC terminal on the ...

User Manual
Page 54
... you can play back still pictures (including enlarged display) (p.150, p.161) or movies (p.151) and switch between A mode and Q mode. The camera switches to A mode. Make sure that are played back. 2 Follow the procedure below to use the "Built-in memory display, you can perform simple... shutter release button halfway. Common Operations Switching Between A Mode and Q Mode In this manual, the capture mode, such as for taking still pictures, is referred to as "Q mode" (the playback mode). The camera switches to Q mode. To Switch from A Mode to display images and movies in...
... you can play back still pictures (including enlarged display) (p.150, p.161) or movies (p.151) and switch between A mode and Q mode. The camera switches to A mode. Make sure that are played back. 2 Follow the procedure below to use the "Built-in memory display, you can perform simple... shutter release button halfway. Common Operations Switching Between A Mode and Q Mode In this manual, the capture mode, such as for taking still pictures, is referred to as "Q mode" (the playback mode). The camera switches to Q mode. To Switch from A Mode to display images and movies in...
User Manual
Page 65
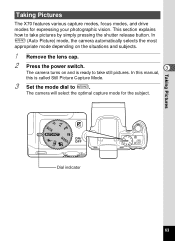
In I . In this manual, this is ready to I (Auto Picture) mode, the camera automatically selects the most appropriate mode depending on the situations and subjects. 1 Remove the lens cap. 2 Press the power switch. 3 The camera turns on and is called Still Picture Capture Mode. 3 Set... pressing the shutter release button. This section explains how to take still pictures. The camera will select the optimal capture mode for expressing your photographic vision. Taking Pictures The X70 features various capture modes, focus modes, and drive modes for the subject. Taking Pictures...
In I . In this manual, this is ready to I (Auto Picture) mode, the camera automatically selects the most appropriate mode depending on the situations and subjects. 1 Remove the lens cap. 2 Press the power switch. 3 The camera turns on and is called Still Picture Capture Mode. 3 Set... pressing the shutter release button. This section explains how to take still pictures. The camera will select the optimal capture mode for expressing your photographic vision. Taking Pictures The X70 features various capture modes, focus modes, and drive modes for the subject. Taking Pictures...
User Manual
Page 70
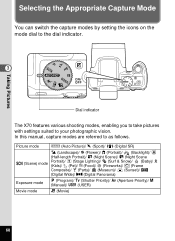
...Fireworks)/ N (Frame Composite)/ B (Party)/ E (Museum)/ K (Sunset)/ X (Digital Wide)/ F (Digital Panorama) Exposure mode e (Program)/ b (Shutter Priority)/ c (Aperture Priority)/ a (Manual)/ A (USER) Movie mode C (Movie) 68 Selecting the Appropriate Capture Mode You ...can switch the capture modes by setting the icons on the mode dial to the dial indicator. 3 Taking Pictures Dial indicator The X70...
...Fireworks)/ N (Frame Composite)/ B (Party)/ E (Museum)/ K (Sunset)/ X (Digital Wide)/ F (Digital Panorama) Exposure mode e (Program)/ b (Shutter Priority)/ c (Aperture Priority)/ a (Manual)/ A (USER) Movie mode C (Movie) 68 Selecting the Appropriate Capture Mode You ...can switch the capture modes by setting the icons on the mode dial to the dial indicator. 3 Taking Pictures Dial indicator The X70...

User Manual
Page 73
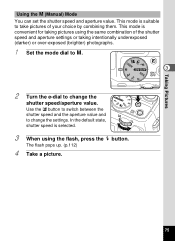
... movement. For details, refer to your own photographic vision. p.76 Using the e (Program) Mode 1 Set the mode dial to capture the picture with creative intent. a Manual Lets you set the desired shutter speed to Program line p.71 when taking pictures. Take pictures of fast moving subjects that look still or subjects...
... movement. For details, refer to your own photographic vision. p.76 Using the e (Program) Mode 1 Set the mode dial to capture the picture with creative intent. a Manual Lets you set the desired shutter speed to Program line p.71 when taking pictures. Take pictures of fast moving subjects that look still or subjects...

User Manual
Page 75
... than normal (height of the focused object is blurred when aperture is set to [AUTO]) are unavailable. • The shutter speed set in combination with manual mode. Taking Pictures 2 Turn the e-dial to appropriate exposure depending on the menu. If the proper exposure cannot be set to change the shutter speed.
... than normal (height of the focused object is blurred when aperture is set to [AUTO]) are unavailable. • The shutter speed set in combination with manual mode. Taking Pictures 2 Turn the e-dial to appropriate exposure depending on the menu. If the proper exposure cannot be set to change the shutter speed.

User Manual
Page 76
.... • , and c are reflected in the other. • Noise Reduction is used with the selected zoom ratio, the closest aperture is set in combination with manual mode. Changes to this case, if you change the 3 aperture value. When using EV compensation, the EV compensation value is displayed using the flash, press...
.... • , and c are reflected in the other. • Noise Reduction is used with the selected zoom ratio, the closest aperture is set in combination with manual mode. Changes to this case, if you change the 3 aperture value. When using EV compensation, the EV compensation value is displayed using the flash, press...
User Manual
Page 77
... is selected. 3 When using the same combination of your choice by combining them. The flash pops up. (p.112) 4 Take a picture. 75 Taking Pictures Using the a (Manual) Mode You can set the shutter speed and aperture value.
... is selected. 3 When using the same combination of your choice by combining them. The flash pops up. (p.112) 4 Take a picture. 75 Taking Pictures Using the a (Manual) Mode You can set the shutter speed and aperture value.

User Manual
Page 78
... is greater than normal (height of 1/3EV. • [AUTO] cannot be selected for later use. This recalls the saved settings. 76 Taking Pictures • In a (Manual) mode, EV compensation is unavailable. • A warning appears if there is displayed.
... is greater than normal (height of 1/3EV. • [AUTO] cannot be selected for later use. This recalls the saved settings. 76 Taking Pictures • In a (Manual) mode, EV compensation is unavailable. • A warning appears if there is displayed.

User Manual
Page 111
• EV compensation stays displayed when set to a value other than ±0.0, but disappears after being displayed for 2 seconds at the bottom of the screen when set to ±0.0. • In 9 (Green)/ I (Auto Picture) modes, EV compensation is fixed at ±0.0. • In a (Manual) mode, EV compensation is unavailable. • The EV compensation value displayed on the screen is enlarged when you press the m button. 38 m 38 3 1/250 04/02/2009 F4.5 +1.0 14:25 Normal Display 1/250 04/02/2009 F4.5 +1.0 14:25 When the compensation button is pressed Taking Pictures 109
• EV compensation stays displayed when set to a value other than ±0.0, but disappears after being displayed for 2 seconds at the bottom of the screen when set to ±0.0. • In 9 (Green)/ I (Auto Picture) modes, EV compensation is fixed at ±0.0. • In a (Manual) mode, EV compensation is unavailable. • The EV compensation value displayed on the screen is enlarged when you press the m button. 38 m 38 3 1/250 04/02/2009 F4.5 +1.0 14:25 Normal Display 1/250 04/02/2009 F4.5 +1.0 14:25 When the compensation button is pressed Taking Pictures 109

User Manual
Page 115
.... Selecting the Focus Mode = Standard Use this mode when the distance to a (Flash Off). \ Manual Focus This mode lets you adjust the focus manually. The setting is used when the distance to the subject is focused on . The camera is approx. 10 cm to capture status. 113 q Macro This mode is used for... selection screen appears. to focus on the subject in A mode. AF Area Selection Select an area of 1 cm. 3 s Infinity This mode is saved and the camera returns to 50 cm (4 in .) or more. You can select a focus mode using the fourway controller (45). The...
.... Selecting the Focus Mode = Standard Use this mode when the distance to a (Flash Off). \ Manual Focus This mode lets you adjust the focus manually. The setting is used when the distance to the subject is focused on . The camera is approx. 10 cm to capture status. 113 q Macro This mode is used for... selection screen appears. to focus on the subject in A mode. AF Area Selection Select an area of 1 cm. 3 s Infinity This mode is saved and the camera returns to 50 cm (4 in .) or more. You can select a focus mode using the fourway controller (45). The...

User Manual
Page 116
.... 2 Use the four-way controller (5) to the 2 subject. Focus Mode Manual Focus Taking Pictures MENU Cancel OK OK 4 Press the four-way controller (23). After the focus is further than 50 cm away, the camera automatically focuses to adjust the focus using the indicator as a MENU OK OK ...guide. 2 for distant focus \ indicator 3 for setting the focus manually (\) is not set. Saving the Focus Mode setting 1p.147 3 To...
.... 2 Use the four-way controller (5) to the 2 subject. Focus Mode Manual Focus Taking Pictures MENU Cancel OK OK 4 Press the four-way controller (23). After the focus is further than 50 cm away, the camera automatically focuses to adjust the focus using the indicator as a MENU OK OK ...guide. 2 for distant focus \ indicator 3 for setting the focus manually (\) is not set. Saving the Focus Mode setting 1p.147 3 To...

User Manual
Page 120
...helps you may feel dazzled. Focusing Area Auto Macro Focus Assist MENU 5 Use the four-way controller (45) to select [O (On)/P (Off)]. The camera does not emit the AF assist light under the following conditions. - When the focus mode is ready for taking pictures. The setting is saved. 6 Press... the 3 button twice. However, do not look into the emitter from a very short distance since you to s (Infinity) or \ (Manual Focus). 118 Looking at the light directly will not create safety hazard. The setting is saved. 6 Press the 3 button twice.
...helps you may feel dazzled. Focusing Area Auto Macro Focus Assist MENU 5 Use the four-way controller (45) to select [O (On)/P (Off)]. The camera does not emit the AF assist light under the following conditions. - When the focus mode is ready for taking pictures. The setting is saved. 6 Press... the 3 button twice. However, do not look into the emitter from a very short distance since you to s (Infinity) or \ (Manual Focus). 118 Looking at the light directly will not create safety hazard. The setting is saved. 6 Press the 3 button twice.


