User Manual
Page 11
...Sharpness 136 Setting the Color Saturation/Tone (Saturation/Tone Adjustment 137 Setting the Image Contrast (Contrast 138 Setting the Date Imprint Function 139 Setting the Green Button 140 Recording Movies 143 Recording a Movie 143 Selecting the Recorded Pixels and Frame Rate for Movies .........145 Setting the Movie SR (Movie Shake Reduction) Function............146 Saving the Settings (Memory 147 Playing Back and Deleting Images 149 Playing Back Images 150 Playing Back Still Pictures 150 Playing Back a Movie 151 Multi-Image Display 152 Using the Playback Function 155 Slideshow...
...Sharpness 136 Setting the Color Saturation/Tone (Saturation/Tone Adjustment 137 Setting the Image Contrast (Contrast 138 Setting the Date Imprint Function 139 Setting the Green Button 140 Recording Movies 143 Recording a Movie 143 Selecting the Recorded Pixels and Frame Rate for Movies .........145 Setting the Movie SR (Movie Shake Reduction) Function............146 Saving the Settings (Memory 147 Playing Back and Deleting Images 149 Playing Back Images 150 Playing Back Still Pictures 150 Playing Back a Movie 151 Multi-Image Display 152 Using the Playback Function 155 Slideshow...
User Manual
Page 12
... to Images 194 Recording a Voice Memo 194 Playing Back a Voice Memo 195 Settings 197 Camera Settings 198 Formatting an SD Memory Card 198 Saving A Mode 199 Changing the Sound Settings 200 Changing the Date and Time 201 Setting the World Time 204 Changing the Display Language 206 Changing the Naming Rule of the Folder 207 Changing the Video Output Format 208 Adjusting the Brightness of the Display 209 Using the Power Saving Function 210 Setting Auto Power Off 211 Setting the Quick Zoom Function 212 Setting the Guide Display 213 Changing the Start-up Screen 213 Resetting...
... to Images 194 Recording a Voice Memo 194 Playing Back a Voice Memo 195 Settings 197 Camera Settings 198 Formatting an SD Memory Card 198 Saving A Mode 199 Changing the Sound Settings 200 Changing the Date and Time 201 Setting the World Time 204 Changing the Display Language 206 Changing the Naming Rule of the Folder 207 Changing the Video Output Format 208 Adjusting the Brightness of the Display 209 Using the Power Saving Function 210 Setting Auto Power Off 211 Setting the Quick Zoom Function 212 Setting the Guide Display 213 Changing the Start-up Screen 213 Resetting...

User Manual
Page 23
... Auto-Macro function is set to [On]. Mode] menu is activated, the q appears on the display (p.113). * Some indications may not appear depending on the shooting mode. 21 Normal Display in Still Picture Capture Mode 78 9 1 2 3 10 11 38 12 13 14 4 5 1/250 6 F3.5 +1.0 04/02/2009 14:25 15 16 17 18 1 Shooting mode (p.68) 2 Face Priority icon (p.78) 3 Bright area adjustment icon (p.130) 4 Shake Reduction icon (p.132) 5 Shutter speed 6 Aperture 7 Flash Mode...
... Auto-Macro function is set to [On]. Mode] menu is activated, the q appears on the display (p.113). * Some indications may not appear depending on the shooting mode. 21 Normal Display in Still Picture Capture Mode 78 9 1 2 3 10 11 38 12 13 14 4 5 1/250 6 F3.5 +1.0 04/02/2009 14:25 15 16 17 18 1 Shooting mode (p.68) 2 Face Priority icon (p.78) 3 Bright area adjustment icon (p.130) 4 Shake Reduction icon (p.132) 5 Shutter speed 6 Aperture 7 Flash Mode...
User Manual
Page 36
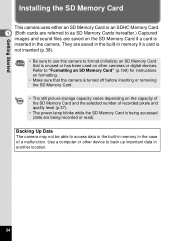
... power lamp blinks while the SD Memory Card is being accessed (data are saved on the SD Memory Card if a card is unused or has been used on formatting. • Make sure that is inserted in the case of a malfunction. Getting Started Installing the SD Memory Card This camera uses either an SD Memory Card or an SDHC Memory Card. 1 (Both cards are referred to as SD Memory Cards hereafter.) Captured images and sound files are being recorded or...
... power lamp blinks while the SD Memory Card is being accessed (data are saved on the SD Memory Card if a card is unused or has been used on formatting. • Make sure that is inserted in the case of a malfunction. Getting Started Installing the SD Memory Card This camera uses either an SD Memory Card or an SDHC Memory Card. 1 (Both cards are referred to as SD Memory Cards hereafter.) Captured images and sound files are being recorded or...
User Manual
Page 38
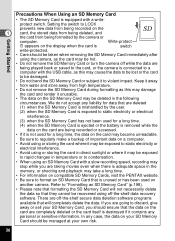
... data recovery software. In any personal or sensitive information. Getting Started Precautions When Using an SD Memory Card • The SD Memory Card is connected to a computer with the USB cable, as this may damage the card and render it to LOCK prevents new data from being recorded on the 1 card, the stored data from being deleted, and the card from high temperature. • Do not remove the SD Memory Card during formatting...
... data recovery software. In any personal or sensitive information. Getting Started Precautions When Using an SD Memory Card • The SD Memory Card is connected to a computer with the USB cable, as this may damage the card and render it to LOCK prevents new data from being recorded on the 1 card, the stored data from being deleted, and the card from high temperature. • Do not remove the SD Memory Card during formatting...

User Manual
Page 53
... date during calendar display (p.155). 9 3 button Displays the [W Setting] menu during single-image display (p.53). Switches from single-image display to the Select & Delete screen (p.166). Changes to single-image display during folder display (p.154). In folder/calendar display, changes to nine-image display with the cursor placed to the most recent image. 0 Green/i button Switches from four-/nine-image display to the Delete screen (p.164). Switches from folder display to A mode (p.52). 6 Four-way controller (2) (3) (45) Plays back and pauses a movie or sound file...
... date during calendar display (p.155). 9 3 button Displays the [W Setting] menu during single-image display (p.53). Switches from single-image display to the Select & Delete screen (p.166). Changes to single-image display during folder display (p.154). In folder/calendar display, changes to nine-image display with the cursor placed to the most recent image. 0 Green/i button Switches from four-/nine-image display to the Delete screen (p.164). Switches from folder display to A mode (p.52). 6 Four-way controller (2) (3) (45) Plays back and pauses a movie or sound file...

User Manual
Page 54
... can play back still pictures (including enlarged display) (p.150, p.161) or movies (p.151) and switch between A mode and Q mode. To Switch from A Mode to use the "Built-in memory display" function. The camera switches to Q mode. Displaying data stored in the built-in memory When an SD Memory Card is inserted in the camera, images and movies on the images that the camera is turned off and remove the SD Memory Card, or follow the procedure below to as "Q mode" (the playback mode). Make...
... can play back still pictures (including enlarged display) (p.150, p.161) or movies (p.151) and switch between A mode and Q mode. To Switch from A Mode to use the "Built-in memory display" function. The camera switches to Q mode. Displaying data stored in the built-in memory When an SD Memory Card is inserted in the camera, images and movies on the images that the camera is turned off and remove the SD Memory Card, or follow the procedure below to as "Q mode" (the playback mode). Make...

User Manual
Page 59
... digital zoom function p.84 Instant Review For choosing whether to display Instant Review p.135 Memory For choosing whether to save the set p.137 Contrast For setting the image contrast level p.138 Date Imprint For choosing whether to imprint the date and/or time when taking still pictures and recording movies. For adjusting the flash output p.129 Movie Recorded Pixels For choosing the number of recorded pixels of the shooting function or return to the defaults when the camera...
... digital zoom function p.84 Instant Review For choosing whether to display Instant Review p.135 Memory For choosing whether to save the set p.137 Contrast For setting the image contrast level p.138 Date Imprint For choosing whether to imprint the date and/or time when taking still pictures and recording movies. For adjusting the flash output p.129 Movie Recorded Pixels For choosing the number of recorded pixels of the shooting function or return to the defaults when the camera...

User Manual
Page 60
... files p.207 Set the method for connecting to a PC (MSC or PTP) p.224 For setting the output format to the desired function (p.140). [W Setting] Menu Item Save as USER Sound Date Adjust World Time Language/ Folder Name USB Connection Video Out Brightness Level Description Page For saving the current camera settings in AUTO ISO50-400 MENU Exit Rec. Mode 3/4 Interval Shoot Blink Detection Digital Zoom Instant Review Memory Green Button MENU Exit [A Rec. Common Operations [A Rec. Mode] Menu 2 Rec. Mode 1/4 Image Tone Bright Recorded Pixels 12M Quality Level White Balance...
... files p.207 Set the method for connecting to a PC (MSC or PTP) p.224 For setting the output format to the desired function (p.140). [W Setting] Menu Item Save as USER Sound Date Adjust World Time Language/ Folder Name USB Connection Video Out Brightness Level Description Page For saving the current camera settings in AUTO ISO50-400 MENU Exit Rec. Mode 3/4 Interval Shoot Blink Detection Digital Zoom Instant Review Memory Green Button MENU Exit [A Rec. Common Operations [A Rec. Mode] Menu 2 Rec. Mode 1/4 Image Tone Bright Recorded Pixels 12M Quality Level White Balance...

User Manual
Page 67
... are used. The [Focusing Area] setting is taken. However, the flash is saved to the SD Memory Card or the built-in memory. • Press the Green button to switch to a (Flash Off). - You cannot turn the Face Recognition function off. - The I mode: - The camera automatically focuses on the subject when the [Auto Macro] is set to L (Continuous Shooting(L)), M (Continuous Shooting(M)) or H (Continuous Shooting(H)), pictures are taken continuously in I (Flower) mode cannot be selected when using Digital Zoom or Intelligent Zoom. - The image appears...
... are used. The [Focusing Area] setting is taken. However, the flash is saved to the SD Memory Card or the built-in memory. • Press the Green button to switch to a (Flash Off). - You cannot turn the Face Recognition function off. - The I mode: - The camera automatically focuses on the subject when the [Auto Macro] is set to L (Continuous Shooting(L)), M (Continuous Shooting(M)) or H (Continuous Shooting(H)), pictures are taken continuously in I (Flower) mode cannot be selected when using Digital Zoom or Intelligent Zoom. - The image appears...

User Manual
Page 75
.... Shutter speed is displayed in red. • , (Auto), c (Auto+Red-eye), b (Flash On), and d (Flash On +Redeye) are unavailable. • The shutter speed set in this value in one mode are automatically set to [AUTO]) are reflected in combination with the shutter speed being used with manual mode. Taking Pictures 2 Turn the e-dial to achieve proper exposure. It will be achieved, the closest value is set and the aperture is automatically set to appropriate exposure depending on the menu. When using...
.... Shutter speed is displayed in red. • , (Auto), c (Auto+Red-eye), b (Flash On), and d (Flash On +Redeye) are unavailable. • The shutter speed set in this value in one mode are automatically set to [AUTO]) are reflected in combination with the shutter speed being used with manual mode. Taking Pictures 2 Turn the e-dial to achieve proper exposure. It will be achieved, the closest value is set and the aperture is automatically set to appropriate exposure depending on the menu. When using...

User Manual
Page 79
... [Save as USER], changes to USER mode settings are saved. • In the default state, the default mode is saved. Turning off the power or changing the capture mode returns the camera to the saved settings. 77 Note that turning off the power will return to the last saved settings in the USER mode when the capture mode is saved. Using [Reset] on the menu returns the settings to their respective defaults. The flash pops up. (p.112) 3 4 Take a picture. • You can save settings in USER mode. • Memory...
... [Save as USER], changes to USER mode settings are saved. • In the default state, the default mode is saved. Turning off the power or changing the capture mode returns the camera to the saved settings. 77 Note that turning off the power will return to the last saved settings in the USER mode when the capture mode is saved. Using [Reset] on the menu returns the settings to their respective defaults. The flash pops up. (p.112) 3 4 Take a picture. • You can save settings in USER mode. • Memory...

User Manual
Page 149
... Memory Card is turned off . Saving the Settings (Memory) Taking Pictures The Memory function is for saving the current camera settings when the camera is inserted when On has been selected, file numbers are assigned sequentially. If you select P (Off), the settings will be reset to O (On) or P (Off) in the Memory function are always saved in immediately before the camera was turned off . Mode] menu P p.125 EV The [EV Compensation] setting on the [A Rec. P p.78 Flash Mode...
... Memory Card is turned off . Saving the Settings (Memory) Taking Pictures The Memory function is for saving the current camera settings when the camera is inserted when On has been selected, file numbers are assigned sequentially. If you select P (Off), the settings will be reset to O (On) or P (Off) in the Memory function are always saved in immediately before the camera was turned off . Mode] menu P p.125 EV The [EV Compensation] setting on the [A Rec. P p.78 Flash Mode...

User Manual
Page 157
... picture 12 13 14 15 16 17 18 with voice memo was the first recorded file. The guide for dates on the calendar. 5 6 7 8 9 10 11 O appears for the selected function appears below. 3 Press the 4 button. The Playback Mode Palette appears. 2 Use the four-way controller (2345) to choose an icon. Playing Back and Deleting Images Calendar display Recorded images and sound files are Frame displayed by date in folder display or calendar display to switch to A mode...
... picture 12 13 14 15 16 17 18 with voice memo was the first recorded file. The guide for dates on the calendar. 5 6 7 8 9 10 11 O appears for the selected function appears below. 3 Press the 4 button. The Playback Mode Palette appears. 2 Use the four-way controller (2345) to choose an icon. Playing Back and Deleting Images Calendar display Recorded images and sound files are Frame displayed by date in folder display or calendar display to switch to A mode...

User Manual
Page 187
... camera to a Computer" (p.217) for instructions on the camera (removable disk). Editing and Printing Images To Copy Frames 1 Remove the SD Memory Card from the computer and camera. For information on working with files on the built-in memory are deleted if the files on your computer, refer to a Computer" (p.217) for instructions on the SD Memory Cards, but using the provided USB cable (I-USB7). Refer to "Connecting to a computer. 3 When the device detection window opens...
... camera to a Computer" (p.217) for instructions on the camera (removable disk). Editing and Printing Images To Copy Frames 1 Remove the SD Memory Card from the computer and camera. For information on working with files on the built-in memory are deleted if the files on your computer, refer to a Computer" (p.217) for instructions on the SD Memory Cards, but using the provided USB cable (I-USB7). Refer to "Connecting to a computer. 3 When the device detection window opens...

User Manual
Page 212
... pull-down menu appears. Power Saving 15sec. Quick Zoom Off MENU Cancel OK OK 5 Press the 4 button. while using the AC adapter - Brightness Level 30sec. The setting is saved. • Power Saving does not function in A mode, press the four-way controller (5) once. in continuous shooting mode - while the camera is connected to select the time until the camera enters power saving mode. Settings 210 while a menu is being displayed - Use the four-way controller (23) to a computer - Setting 2/3 USB Connection 2min. during movie recording/playback...
... pull-down menu appears. Power Saving 15sec. Quick Zoom Off MENU Cancel OK OK 5 Press the 4 button. while using the AC adapter - Brightness Level 30sec. The setting is saved. • Power Saving does not function in A mode, press the four-way controller (5) once. in continuous shooting mode - while the camera is connected to select the time until the camera enters power saving mode. Settings 210 while a menu is being displayed - Use the four-way controller (23) to a computer - Setting 2/3 USB Connection 2min. during movie recording/playback...

User Manual
Page 220
... damaged. Windows • Image viewing/managing/editing software "ACDSee for PENTAX 3.0" (Nine languages: English, French, German, Spanish, Italian, Russian, Chinese [traditional and simplified], Korean, Japanese) Macintosh • Image viewing/managing software "ACDSee 2 for enjoying the captured pictures and movies on your computer and connecting the camera to your computer with the USB cable, you can transfer images and movies captured with your computer. Setting Up Your Computer By installing the software included...
... damaged. Windows • Image viewing/managing/editing software "ACDSee for PENTAX 3.0" (Nine languages: English, French, German, Spanish, Italian, Russian, Chinese [traditional and simplified], Korean, Japanese) Macintosh • Image viewing/managing software "ACDSee 2 for enjoying the captured pictures and movies on your computer and connecting the camera to your computer with the USB cable, you can transfer images and movies captured with your computer. Setting Up Your Computer By installing the software included...
User Manual
Page 227
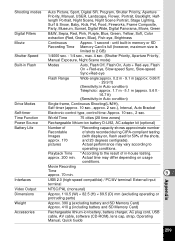
Quick Zoom MENU Cancel OK OK 6 Press the 4 button. Also indicates a standard for controlling USB devices with this driver. Connecting to select [MSC]. You can copy, read, and write files from a computer without installing a device driver. By simply connecting a device that handles devices connected to your computer. A pull-down menu appears. 5 Use the four-way controller (23) Setting 2/3 to a Computer 225 The setting is saved. Auto Power Off 3min. Go to the following pages depending...
Quick Zoom MENU Cancel OK OK 6 Press the 4 button. Also indicates a standard for controlling USB devices with this driver. Connecting to select [MSC]. You can copy, read, and write files from a computer without installing a device driver. By simply connecting a device that handles devices connected to your computer. A pull-down menu appears. 5 Use the four-way controller (23) Setting 2/3 to a Computer 225 The setting is saved. Auto Power Off 3min. Go to the following pages depending...
User Manual
Page 261
... to operating conditions. Shooting modes Digital Filters Movie Shutter Speed Built-in -house testing. until built-in memory or SD Recording Time Memory Card is full (however, maximum size is limited to the result of the shots, and 23 degrees centigrade). Actual performance may differ depending on , flash used for 50% of in Flash Drive Modes Self-timer Time Function Power Source Battery Life Interfaces Video Output Dimensions Weight Accessories Auto Picture, Sport, Digital SR, Program, Shutter Priority, Aperture Priority, Manual, USER...
... to operating conditions. Shooting modes Digital Filters Movie Shutter Speed Built-in -house testing. until built-in memory or SD Recording Time Memory Card is full (however, maximum size is limited to the result of the shots, and 23 degrees centigrade). Actual performance may differ depending on , flash used for 50% of in Flash Drive Modes Self-timer Time Function Power Source Battery Life Interfaces Video Output Dimensions Weight Accessories Auto Picture, Sport, Digital SR, Program, Shutter Priority, Aperture Priority, Manual, USER...

User Manual
Page 268
... 49, 50 Editing Movies 186 Error messages 245 EVF/LCD button 49 Exposure 107 Exposure Mode 71 F Face close-up playback ...162 Face Recognition function 78 File number 147 Filters 178 Fireworks 85 Fish-eye Filter 178 Flash Mode 110 Flash Off a 110 Flash On + Red-eye d ....110 Flash On b 110 Flower 70 Focus Mode 113 Focusing 113 Focusing Area 116 Folder display 154 Folder Name 207 Food 70 Format 198 Four-image display f .....152 Four-way controller ......49, 51 Frame...
... 49, 50 Editing Movies 186 Error messages 245 EVF/LCD button 49 Exposure 107 Exposure Mode 71 F Face close-up playback ...162 Face Recognition function 78 File number 147 Filters 178 Fireworks 85 Fish-eye Filter 178 Flash Mode 110 Flash Off a 110 Flash On + Red-eye d ....110 Flash On b 110 Flower 70 Focus Mode 113 Focusing 113 Focusing Area 116 Folder display 154 Folder Name 207 Food 70 Format 198 Four-image display f .....152 Four-way controller ......49, 51 Frame...


